Proximus Maestro 60 User manual

User manual
Maestro 60
PXM-27384-13110030-Maestro 60 Black-Cover.indd 3 6/10/14 09:38

1
Dear customer,
You have just acquired a new generation telephone and thank you for placing your confidence in us.
This device has been manufactured with the utmost care. If you should have difficulties in operating it, we recommend
that you consult this user manual.
To operate the device safely and easily, please read carefully the paragraph “Recommendations and safety
instructions”, page 4.
The CE label confirms that the product complies with the 1999/5/EC regulations of the European Union
Parliament regarding wireless systems and telecommunications.

2
CONTENTS
Recommendations and safety instructions .... 4
Unpacking........................................................... 5
Phone description ...........................................................5
database .................................................................... 5
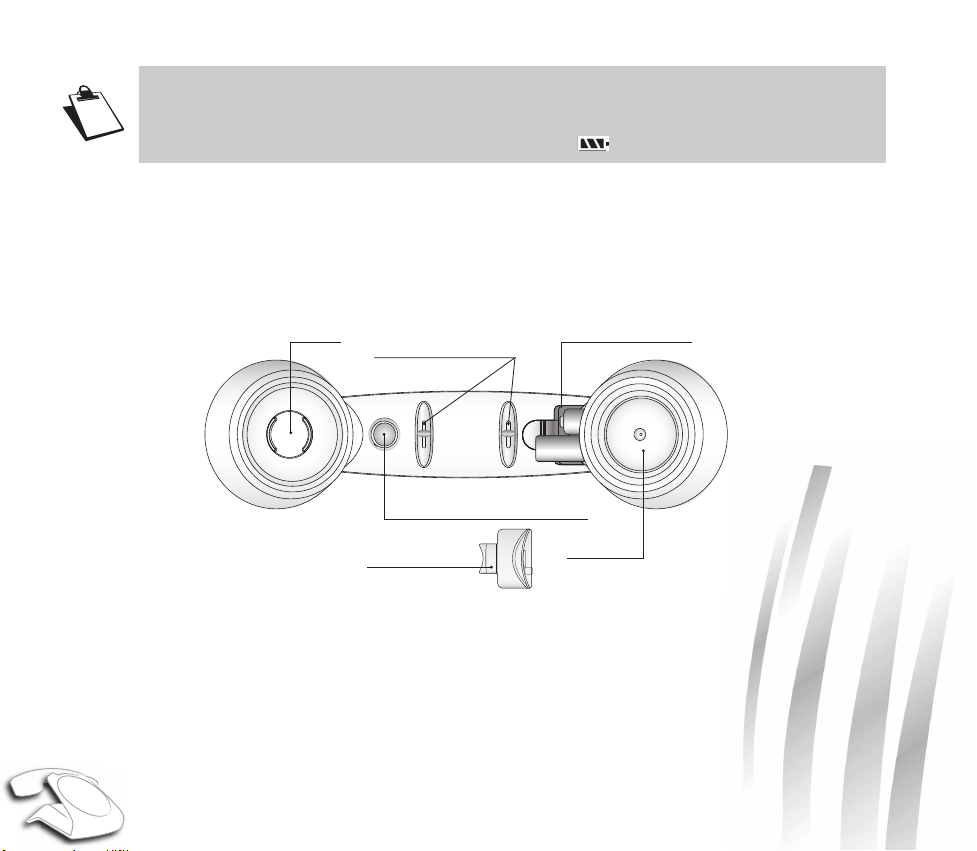
Your handset.............................................................. 6
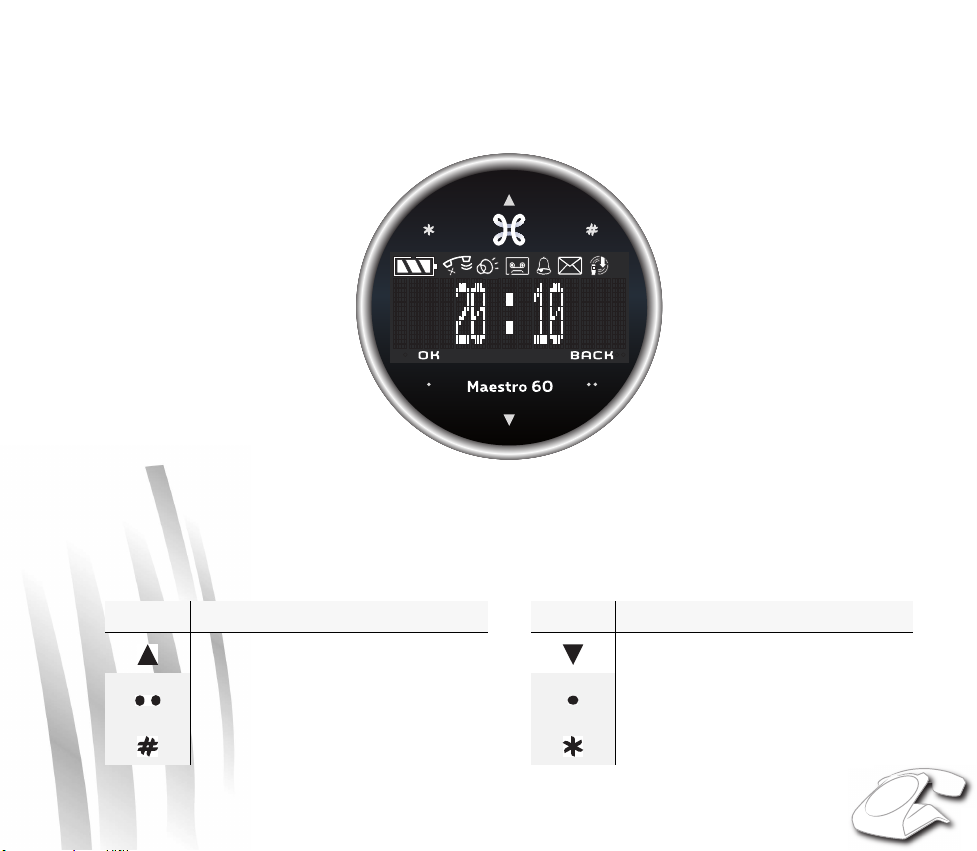
Control panel.............................................................. 7
Using the touch buttons ............................................. 7
Display screen............................................................ 8
Installation.......................................................... 9
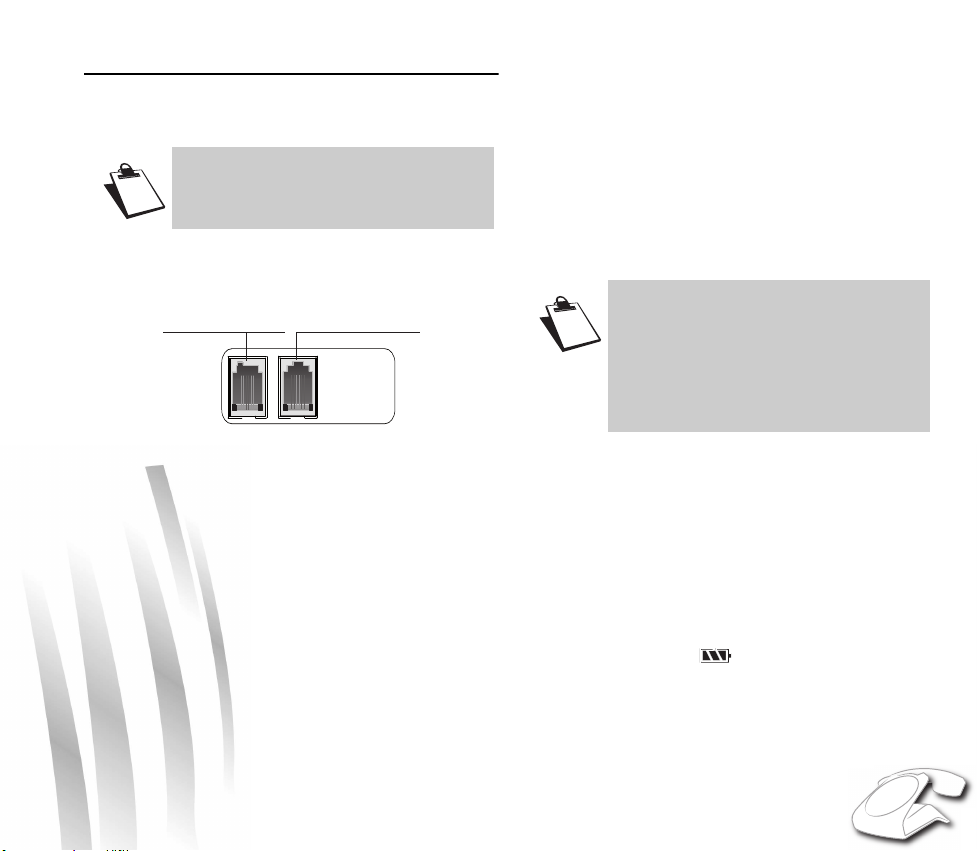
Connecting the base .......................................................9
Setting up the handset ....................................................9
Charging batteries ...........................................................9
Navigating in the menu .................................................10
Browsing through the menus ................................... 10
Menu structure......................................................... 11
Settings required before use .........................................11
Phone use......................................................... 12
Handset location ...........................................................12
Calling ...........................................................................12
Receiving a call........................................................ 12
Making a call............................................................ 13
Ending a call............................................................. 13
During a call............................................................. 13
"Calls" function button.............................................. 14
Secret mode............................................................. 14
Hands-free mode/Speakerphone mode................... 14
Calling the last number dialled................................. 15
Call time display....................................................... 15
Phonebook ....................................................... 15
Creating an entry ...........................................................15
Editing an entry .............................................................16
Associating a ring tone with a phonebook entry ............16
Deleting an entry ...........................................................16
Calling using the phonebook .........................................16
Searching for a contact .................................................16
Call log.............................................................. 17
Viewing the received and dialled call log ......................17
The events log ..............................................................17
Viewing the events log............................................. 17
Activating/deactivating the new event
information screen................................................... 18
Clearing notifications............................................... 18
Information ....................................................................18
Accessories...................................................... 18
Alarm clock ...................................................................18
Activating / deactivating the alarm clock.................. 18
Changing the alarm clock ring tone......................... 18
Modifying the alarm clock time................................ 19
Timer ............................................................................19
Activate the timer..................................................... 19
Changing the programmed time of the timer........... 19
Displaying or hiding the programmed time
of the timer............................................................... 19
Changing the timer ring tone................................... 19
Ring tones ........................................................ 20
Changing the ring tones ...............................................20
Activating or deactivating the beeps .............................20
Activating/deactivating the silent mode ........................20
Settings............................................................. 21
Modifying the date and time .........................................21
Adjusting the contrast ...................................................21
Modifying the language ................................................21
The voicemail number (according to operator) .............21
Demo ............................................................................22
Advanced settings ........................................................22
Modifying the base code.......................................... 22
Base settings........................................................... 23
Line settings ............................................................ 24
Answering machine......................................... 25
Enabling / disabling the answering machine ................25
Modifying the outgoing message ..................................26
Recording a personal outgoing message................ 26
Deleting your personal outgoing message.............. 26

3
Listen to a personal message.................................. 26
Playing messages .........................................................26
Remote access to answering machine .........................27
Deleting all the old messages .......................................27
TAM settings.................................................... 28
Activating and deactivating call screening ....................28
Modifying the remote access code ...............................28
Number of rings ............................................................28
Replacing the batteries................................... 29
Pairing of Maestro 60 handsets
on the Maestro 60 base................................... 29
Appendix.......................................................... 30
Care and Maintenance ..................................................30
Problems .......................................................................30
Technical characteristics................................ 31
Initial condition ..............................................................31
Environmental information............................. 32
Guarantee terms.............................................. 33

4
RECOMMENDATIONS AND SAFETY INSTRUCTIONS
Do not install your DECT telephone in a damp environment, such as a bathroom, washroom, kitchen etc, and
not within 1.50 metres of a source of water or outside. This device is designed for use in temperatures of
between 5 °C and 45 °C.
Do not attempt to remove screws or open the appliance. It does not contain any user-replaceable parts.
Only use the power unit supplied and connect it to the electricity mains in accordance with the installation
instructions in this user manual and the details on the sticker regarding voltage, electrical current and
frequency. As a precaution if there is a risk of danger, the power plug can be pulled out to disconnect the 230
volt power supply. Therefore the sockets should be near the device and easily accessible.
This device is designed to be used for connecting to the public telephone network. If problems should arise,
contact your nearest specialist dealer. Only use the telephone cable supplied.
For safety reasons, never put the handset in the base station without the battery inserted or without the lid on
the battery compartment as this could cause an electric shock.
To avoid damaging your handset/base, only use certified rechargeable batteries NiMH 1.2 V 450 mAh, never
use non rechargeable batteries. Insert the batteries in the handset/base battery compartment respecting
polarity.
The used battery must be disposed of in line with the recycling regulations in this user manual.
Your DECT telephone has a range of approx. 50 metres indoors and up to 300 metres outdoors. The range
can be affected by the proximity of metal objects, such as a television and electrical devices.
Zones without reception may appear owing to elements in the building. This can cause brief interruptions in
the conversation, caused by faulty transmission.
Certain medical equipment and highly-sensitive machines or security systems may be affected by the
transmission power of the telephone. In these cases we recommend adhering to the safety information.
In regions greatly affected by electrical storms we recommend that you protect your telephone circuit with a
special fixture for excess voltage.
Your Maestro 60 has anti-skid pads that should leave no traces on your furniture and ensure stability.
However, given the wide variety of finishes used by furniture manufacturers, traces may appear on surfaces
in contact with the parts of your Maestro 60. Proximus decline all responsibility in any such cases of damage.

5
UNPACKING
Place the box in front of you, open it and make sure it contains the following items: one base Maestro 60, one handset
with its batteries, one telephone line cord, one equipped power adapter and the user guide.
PHONE DESCRIPTION
database
Maestro 60 has the latest technology, such as browser touch buttons, HiFi ringtones, dialling light and sound effects.
Druckknopf der Basisstation/Paging
- Kurzer Druck:
Anruf der Hörer (Paging)
- Langes Drücken :
Anmeldemodus
Anzeige *
Lautsprecher /
Rufannahme
Leuchtanzeige
Zugriff auf Voice-Box PhoneMail (lang Drücken)
oder Zugriff auf Ihre Nachrichten auf dem
Anrufbeantworter **
* Anzeige: gibt die Position des Lautsprechers im Mobilteil an.
** Taste drücken und halten :
- Wenn derAnrufbeantworter ausgeschaltet ist: Zugriff auf Voice-Messaging.
- Wenn derAnrufbeantworter eingeschaltet ist: Zugriff auf Ihre Nachrichten auf demAnrufbeantworter.
n
/Pa
g
in
g
L
R
Zugriff
auf
Voic
oder Zu
g
riff a
u
A
nrufbeantwo
r
osition des Lautsprechers im Mobilteil an.
hlt

6
Your handset
Maestro 60's particularity is that it has a wireless handset.
The single button on the handset allows the user to hang up or answer an incoming call. It should be noted that the
handset is provided with a buzzer that sounds on receiving an incoming call with the handset not on its base.
The handset batteries are charged when the handset is placed on its base. When off the base, the handset's battery
power provides 120 hours of standby time and 10 hours of talk time.
Indicator light operation:
• Fast flashing: the base is in pairing mode (handset registration),
• Slow flashing: new events (voice mail messages, missed calls, answering machine messages...).
• Make sure that when the handset is on the charger, the icon is animated.
Rufannahme / Auflegen/
Abholung der Telefonleitung
+
-
Akkufach
Akkufachdeckel
Ladekontakte des
Mobilteils
Lautsprecher
Mikrofon

7
Control panel
Your Maestro 60 has touch keys for access to configuration and settings functions. This screen tells you about the state
(date and time, unread message, etc..).
Using the touch buttons
The screen includes six touch keys around its periphery. Simply touch the tactile area for the function to be taken into
account:
Key Function(s) Key Function(s)
Scroll up /Go to the menu list. Browse down / Go to the menu list.
Context key 2: Delete an entry / Return
to the previous menu. Context key 1: Access a menu / Vali-
date the selection.
# key. Asterisk key.

8
Display screen
During use or on standby, the screen of your Maestro 60 tells you about the state of your telephone by showing icons,
and in particular:
*The low emission icon (ECO mode): Your telephone is provided with an automatic power management
system. As soon as the handset is near its base, the power required is reduced to the minimum. Radio
transmissions are also cut off when the handset is placed on the base, and the low emission icon is then
displayed.
If a second handset is paired with the base, the "low emission" icon is no longer displayed.
Akkuanzeige
Mikrofon abgestellt
Leitung belegt
Freisprechanlage aktiviert Anrufbeantworter mit
Nachrichtenaufnahme aktiv
Weckfunktion aktiviert
Neue Voicemail
Symbol niedrige Emissionen*

9
INSTALLATION
CONNECTING THE BASE
Never force the plugs: they are in different shapes to
avoid connection mistakes.
1. On the underside of the base, click the phone jack into
its socket and connect the other end of the cord to the
telephone wall outlet.
2. Connect the end of the power supply cord on the
underside of the base and connect the power adapter
to the mains socket. The phone display is turned on.
SETTING UP THE HANDSET
The batteries are already inserted in the handset. To put
the handset into use, simply remove the tab by pulling on
it firmly in the direction of the arrow.
The handset emits a double beep to indicate that it has
started and then a second beep to indicate that the
handset is synchronized with the base. From then on,
your handset becomes operative and you can use it to
make calls.
You can now use your telephone to make and receive
calls.
CHARGING BATTERIES
Place the handset on its base and fully charge the
batteries.
An audio signal is emitted when the handset is placed
correctly on the base.
The battery charge icon is animated to indicate that
the battery is being charged and stops to indicate that the
batteries are fully charged.
Before making any connections, please
refer to the safety instructions presented
at the beginning of this user guide.
Buchse für das Netzgerät Buchse für Telefonleitung
On leaving the factory, the handset is
already registered in the base.
If your handset is not recognized by the
base, then launch a manual registration
(see paragraph "Pairing of Maestro 60
handsets on the Maestro 60 base", page
29.

10
NAVIGATING IN THE MENU
With your Maestro 60 you can create your own telephone
directory, display the list of calls etc. To do this, use the
touch keys.
With the touch keys and you can choose a menu, a
sub-menu or a precise setting.
The key allows you to enter the sub-menus of the
chosen function and select the setting to modify. With the
key you can return to the previous function or cancel
the current choice.
The keys and are used when you use
the answering machine.
Browsing through the menus
Use the browsing keys
or to select the desired
menu. Press Valid. To confirm your selection.
Select the desired function by pressing the browsing keys
or and then press the Valid. key.
- To return to the previous menu, press Return.
- To save the settings, press Valid..
Example:
To modify the menu language, go to the menu SETTINGS
/ LANGUAGE:
1. Use or to access the menu list.
2. Select SETTINGS using or . Press Valid..
3. Select LANGUAGE using or . Press Valid.
4. An information screen presents the current language
used (ENGLISH).
5. Select FRANCAIS using or key.
6. Press Valid..OK is displayed on the screen.
The handset batteries charging time is 10
hours. During charging, the batteries may
heat up. This is quite normal and perfectly
safe.
Ladekontakte des Mobilteils
Ladekontakte
der Basisstation

11
Menu structure
To access one of your phone's menus, use key or .SETTINGS REQUIRED BEFORE USE
Setting the date and time accurately will enable you to
follow your calls and messages chronologically.
According to where your base is situated in the room, you
may have to adjust the contrast.
The default language of your telephone is English; to
modify the language, refer to paragraph "Modifying the
language", page 21.
To set the date and time, refer to paragraph "Modifying
the date and time", page 21.
To set the contrast or the brightness of the screen, refer
to paragraph "Adjusting the contrast", page 21.
TELEFONBUCH
Menü
ZUBEHÖR
ANRUFLISTE
ANRUFEN
ANKOM. ANRUFE
ABGEH. ANRUFE
EREIGNISSE
WECKER
TIMER
EXTERNER RUF
RUHEMODUS
RUFTON
EINSTELLUNGEN
Option ANZEIGEN
RUFTON
LÖSCHEN
NEUER EINTRAG
PIEPS
DATUM/UHRZEIT
KONTRAST
DEMO
ANRUFBEANT NACHRICHTEN
EIN/AUS
ANSAGEN
EINSTELLUNGEN
SPRACHE
Ändern
WEITERE EINST.
SPRACHBOX-NR

12
PHONE USE
HANDSET LOCATION
Lost your handset? Press the button on the back of
the base, behind the keypad. The handset will then ring.
CALLING
Receiving a call
• When a call is received, the phone rings.
• The caller's phone number is displayed on the screen
if you have subscribed to the "Caller ID" service.
The caller's name may also be displayed if it is
included in your phone book or if you have subscribed
to the "Display name" service.
Accepting a call in handset mode
• Pick up the phone handset. You do not need to
press the handset's button.
• Make sure to identify the handset direction by the
dot which identifies the earpiece end. The call time
counter is displayed on the screen.
• To end the call, hang up the handset or press the
handset button.
• If the handset is not on the base, you have to press
the handset button to take the call.
Accepting a call in hands-free mode
• Press to speak in hands-free mode (without
holding the handset). The symbol and the call
time counter are displayed on the screen.
• To end the call, press again.
Toggle between handset mode and hands-
free mode
• If you are in handset mode, press and hold the
key and then hang up the handset to toggle to
hands-free mode. Press the key again to end
the call.
• If you are in hands-free mode:
- If the handset is hung up on the base, lift the
phone handset to toggle to handset mode.
- If the handset is not hung up on the base, press
the dial tone button to toggle to handset
mode.
After you have finished your call, when
you replace the handset on the base, the
message "END OF CALL" is displayed on
the screen and a visual and audio signal is
emitted from the base to confirm that the
handset has been correctly replaced and
that the call has finished.
If you ended the call by pressing the
handset button, only the "END OF CALL"
message is displayed on the screen.

13
• To end the call, hang up the handset on the base or
press .
Making a call
The call can be made in two ways:
Making a call in handset mode
• Pick up the handset.
• The icon is displayed on the screen. Dial your
number on the keypad.
The call time counter is displayed on the screen.
Making a call in hands-freee mode
• Press to obtain a dial tone prompt on the
screen. Dial your number on the keypad.
The call time counter is displayed on the screen.
Ending a call
When you have finished your call, press or hang up
the handset on the base.
During a call
Receiving a second call
(according to operator)
• During the call, a beep is transmitted to your
telephone by your service provider to let you know
that you have a second call waiting.
•PressACCEPT to take this new call if you have
subscribed to the number display service or -R-
then 2otherwise.
• Your other caller is then put on hold and you can
talk with your second caller.
Making a second call
• During a call, you can put your contact on hold and
call a second one by pressing -R- and dial the
number using the keypad.
• The second call is then launched, with the first call
still on hold.
To alternate from one call to the other
• To toggle from one call to the other, press Menu
then SWITCH.
• The call in progress is put on hold, and you can
then take the second call.
Use the and keys to vary the
earphone volume or speakerphone
volume. The handset earphone volume or
speakerphone volume can vary from 1
to 5.
You can also dial a number in pre-dialling
mode, whether in handset or hands-free
mode: dial the number on the keypad and
then lift the handset or press .
If necessary, you can correct the number
entered by pressing BACK.
The caller on hold hears a beep emitted by
the network or music on hold.

14
To end one of the calls and continue the
other one
• To toggle from one call and take the other, press
Menu and then HANGING UP.
• The call in progress is definitely terminated, and
you can then take the second call.
To set up a 3 way-call (the two parties
and yourself)
• During a call, press Menu and then
3-PARTY CONF.
• You can then talk to both parties simultaneously,
and "3-PARTY CONF" is displayed on the screen.
• To end the 3 way-call, hang up the handset.
"Calls" function button
This key is a shortcut to your phone's call log.
• From the idle screen, press the key .
•Presskeysor to select the calls list:
- INCOMING CALLS,
- OUTGOING CALLS,
- EVENTS.
•PressValid. and then select the number using
keys or .
Secret mode
During a call, you can switch to mute mode and your
phone's microphone will be muted. The person you are on
line with can no longer hear you.
To activate secret mode :
• During a call, press Menu / SECRET and then
Activ..
•The"SECRET MODE" message will appear on the
screen.
To deactivate secret mode :
•PressExit, "SECRET MODE" disappears from the
screen. Your correspondent will be able to hear you
again.
Hands-free mode/Speakerphone mode
If you want to phone in hands-free mode, do not lift the
handset, but press the base key; the icon is
displayed on your phone's screen.
The caller can then be heard through the loudspeaker and
you speak into the base microphone.
To end the call, press the key again .
If you want to toggle to speakerphone mode during a call
in handset mode, press the key; the icon is
displayed on your phone's screen.
The caller can then be heard through the base
loudspeaker and the handset earphone and you speak
into the handset microphone.

15
In this mode the base microphone is inactive.
You can return to hands-free mode by holding down
the key and then replacing the handset.
To end the call, replace the handset or press the key .
Calling the last number dialled
Your Maestro 60 stores the last 20 dialled numbers:
•GotoCALLS / OUTGOING CALLS.
• Select the number you want to call.
•GotoOption / CALL.
The number is automatically dialed in speakerphone
mode.
Call time display
Once connected, the call time is displayed on the screen
(minutes and seconds).
PHONEBOOK
You can save up to 150 entries in your phone book, with
each entry able to contain a 24-digit number and a name
up to 12 letters long.
CREATING AN ENTRY
To enter a text, repeatedly press the required key to
display the desired letter.
•GotoPHONEBOOK / New.
• Enter the name of your contact using the
alphanumeric keys. Press Valid..
• Enter the contact`s telephone number using the
alphanumeric keys.
•PressValid..
• Select an icon for this number to specify the type of
number. Press Valid..
The name and number are then stored in your phone
book.
When you call in hand-free/speakerphone
mode, you can increase or decrease the
audio volume from 1 to 5, using
or
.

16
EDITING AN ENTRY
• Go to the menu PHONEBOOK.
• Press keys or to select the contact you want to
change.
• Select Option / Edit. Press Valid..
• You enter the name input screen.
To correct the name, press Return to delete
characters. Enter your changes on the keypad.
After making the changes, press Valid..
• You enter the number input screen.
To correct the number, press Return to delete the
numbers. Enter your changes on the keypad.
After making the changes, press Valid..
• Select an icon for this number.
•PressValid..
ASSOCIATING ARING TONE WITH A
PHONEBOOK ENTRY
You can associate a unique ring tone to each entry and
thus create your own call groups
As you need the active «number presentation» service on
your handset.
• Go to the menu PHONEBOOK.
• Select the entry with which you want to associate a
ring tone.
•GotoOption / RING TONE.
• Select the ring tone of your choice.
•PressValid..
DELETING AN ENTRY
• Go to the menu PHONEBOOK.
•Presskeysor to select the contact you want to
delete.
• Select Option / DELETE.
•PressValid..
• A confirmation screen asks you if you wish to delete
the entry.
- To delete the entry, press Yes, the contact is
deleted from your phone book.
- If you do not wish to delete the entry, press No.
CALLING USING THE PHONEBOOK
• Go to the menu PHONEBOOK.
• From the list of names, select the contact you want to
call using keys or .
•GotoOption / CALL.
The number is automatically dialled in speakerphone
mode.
SEARCHING FOR ACONTACT
• Access your phonebook list, press successively on
the keypad key which corresponds to the first letter of
the name you are searching for so as to make it
appear at the top of the screen.
• Once the first letter of the name is displayed, wait a
moment.
• The phonebook selects the first name in the list that
starts with the selected letter.

17
CALL LOG
Caller identification is a service that requires prior
registration with your operator.
VIEWING THE RECEIVED AND DIALLED
CALL LOG
• Go to the menu CALLS / INCOMING CALLS or
OUTGOING CALLS.
• Select the event to be viewed.
•PressValid..
• The screen presents the following information.
(depending on the operator and the subscription):
- the full name of your contact and the telephone
number,
- the number of consecutive calls,
- time (for calls during the day) or the date (for
previous calls) of the call.
To see the previous calls, use the keys or .
By pressing Option, a list of various executable actions
appears:
-CALL : To call the number.
-VIEW : To view the selected call again.
-STORE NUMBER : To store the name and number
in the phonebook.
-DELETE : To delete the call currently viewed.
-DELETE ALL : To delete all calls.
To return to the call viewing screen, press Return.
THE EVENTS LOG
Viewing the events log
If one or more new events occurred during your absence,
the information screen "NEW EVENTS !" appears and the
light starts flashing.
• If you do not wish to view the event log at this time,
press Back (You can, however, consult the event log
again through the menu CALLS / EVENTS / VIEW).
• To view the event log, press Valid..
- Choose the event using or .
-PressValid..
To check your call log directly, press the
Log key from the idle screen.
The light only stops flashing when all the
events have been viewed.

18
Activating/deactivating the new event
information screen
The new event information screen can be inhibited.
The events which have occurred can then be viewed in
the menu CALLS / EVENTS / VIEW. The default setting
is active.
• Go to the menu CALLS / EVENTS.
• Select ACTIVATE or DEACTIVATE to enable or
disable the displaying of the new events screen.
•PressValid..
Clearing notifications
The notifications received are saved in the event log and
can be deleted once they have been viewed.
• Go to the menu CALLS / EVENTS.
• Select DELETE NOTIF. and press Valid. to remove
the notifications received on your base.
INFORMATION
During an incoming call, PRIVATE is displayed on the
screen, it means that your contact does not want their
number to be displayed.
ACCESSORIES
ALARM CLOCK
This function enable you to use your Maestro 60 as an
alarm clock.
When the alarm is triggered the selected ring tone sounds
for 60 seconds through the handset speaker and an alert
screen is displayed.
Activating / deactivating the alarm clock
•GotoACCESSORIES / ALARM.
• An information screen shows the alarm clock status.
•Useor to select ACTIVATE or DEACTIVATE.
•PressValid..
The alarm settings information screen appears showing
the new status.
Changing the alarm clock ring tone
•GotoACCESSORIES / ALARM.
•Useor to select RING TONE in the list, press
Valid..
• Select the ring tone of your choice, press Volume.
• Select the desired ring tone using or to increase
or decrease the volume, press Valid.. OK is displayed
on the screen.
•PressReturn to go back to the previous menu.

19
Modifying the alarm clock time
•GotoACCESSORIES / ALARM.
•Useor to select SET TIME.
• Enter the time at which you would like the alarm clock
to sound.
•PressValid.. OK is displayed on the screen.
•PressReturn to go back to the previous menu.
TIMER
With this menu you can use your telephone as a timer.
Once the specified time has elapsed, the base rings for 60
seconds and the alarm screen is activated. Turn off the
alarm by pressing Stop, the base stops ringing.
Activate the timer
•GotoACCESSORIES / TIMER.
•PressStart. If a timer duration is already specified,
the timer is directly activated. If not please follow
instructions in the next paragraph.
Changing the programmed time of the
timer
•GotoACCESSORIES / TIMER.
• Select SET DURATION in the list.
•PressValid..
• Enter the desired time.
•PressValid.. OK is displayed on the screen.
•PressReturn to go back to the previous menu.
Displaying or hiding the programmed
time of the timer
•GotoACCESSORIES / TIMER.
• Select VIEW in the list. Press Valid..
• If you want to show the timer, press Yes, else
press No.
•PressReturn.
Changing the timer ring tone
•GotoACCESSORIES / TIMER.
• Select RING TONE in the list of options.
•PressValid..
• The list of ring tones appears, the handset plays the
ring tone.
• Select the ring tone. Press Volume.
•Pressor to increase or decrease the volume.
•PressValid.. OK is displayed on the screen.
•PressReturn to go back to the previous menu.
The timer function must be inactive so that
it can be set.
Table of contents
Other Proximus Telephone manuals