Proze 4.0 User manual

PROZE DASHCAM 4.0
HD Dash Cam with Front and Rear Camera
Product Manual
Bedienungsanleitung
Manual del Producto
Manuale del Prodotto
Manuel du Produit
• WARNING! DO NOT OPERATE CAMERA WHILST DRIVING, ONLY OPERATE WHEN SAFELY
PARKED
• WARNHINWEIS! KAMERA NICHT BEIM FAHREN BETREIBEN, NUR BEI SICHEREM PARKEN
FUNKTIONIEREN
• ADVERTENCIA! NO HAGA FUNCIONAR LA CÁMARA CUANDO CONDUZCA, SÓLO HAGA
FUNCIONAR CUANDO ESTÁ APARCADO CON SEGURIDAD
• AVVERTENZA! NON UTILIZZARE LA VIDEOCAMERA MENTRE LA GUIDA, FUNZIONARE
SOLO IN CASO SICURO
• MISE EN GARDE! NE PAS FAIRE FONCTIONNER L'APPAREIL PHOTO PENDANT LA
CONDUITE, UTILISER UNIQUEMENT EN CAS DE STATIONNEMENT SÉCURITAIRE

2
Precautions
Please read this manual carefully before operation and keep it for future reference. It will
be helpful should you encounter any operational problem.
WARNING: Do not expose this product to rain, moisture or water under any
circumstances, doing so may result in the risk of electric shock or fire
CAUTION: To reduce the risk of electric shock, do not perform any servicing other than
that contained in the instruction manual unless you are qualified to do so. Have the unit
serviced by a qualified service technician if;
The Unit has been exposed to rain or water.
The unit does not seem to operate normally.
The unit exhibits a marked change in performance.
LCD: A Liquid Crystal Display (LCD) screen is a multilayer complex component,
containing 691,200 pixels. Pixels can however fail during normal product life. 1 pixel =
0.0001% failure rate, and one pixel failure per year of operation is considered normal and
not a cause for concern
WEEE: Disposal of Waste Electrical and Electronic Equipment and/or Battery by users in
private households in the European Union.
This symbol on the product or on the packaging indicates that this cannot be disposed of
as household waste. You must dispose of your waste equipment and/or battery by
handing it over to the applicable take-back scheme for the recycling of electronic
equipment and/or batteries. For more information please contact your local household
waste disposal office.
Caution Using This Product
1. Ensure that the windscreen is free of dirt or grease before placing mount upon it.
2. Do not obscure the view of the road ahead or impede the deployment of any airbags in
the event of an accident.
3. Only clean the device with a soft dry cloth, for tough dirt, apply some neutral detergent
diluted in 5 to 6 parts water to a soft cloth. Note that alcohol, thinner, benzene etc could
cause damage to the paint or coatings.
4. Avoid making contact with the lenses as damage may be caused.
5. If required clean the glass lens carefully using spectacle lens cleaning fluid on a soft
cloth only.
6. The video recordings made by this Digital Video Recorder are intended for personal
use only.
7. Publication of the recordings on You Tube, the internet or other methods are subject to
the Data Protection Act and the requirements thereof must be adhered to. If the Digital
Video Recorder is to be used within a commercial environment, i.e. truck use, then the
CCTV regulation apply also, in addition to the Data Protection Act regulations. This
3
includes labelling to identify the use of CCTV is taking place, the omission of Audio
recording and informing the relevant authorities of who controls the data.
8. Video playback upon the device which is visible to the driver is prohibited or restricted
in some countries or States. Please adhere to these laws.
9. Whilst driving, do not adjust the controls of your device as this is a distraction to
driving.
Included In The Box
1 x Proze Dash Cam 4.0
1 x Rear Camera
1 x Suction Mount
1 x 12V Car Power Cable
1 x Wiring Kit (Rear Camera Cable)
1 x Fixings for Rear Camera
1 x Instruction Manual
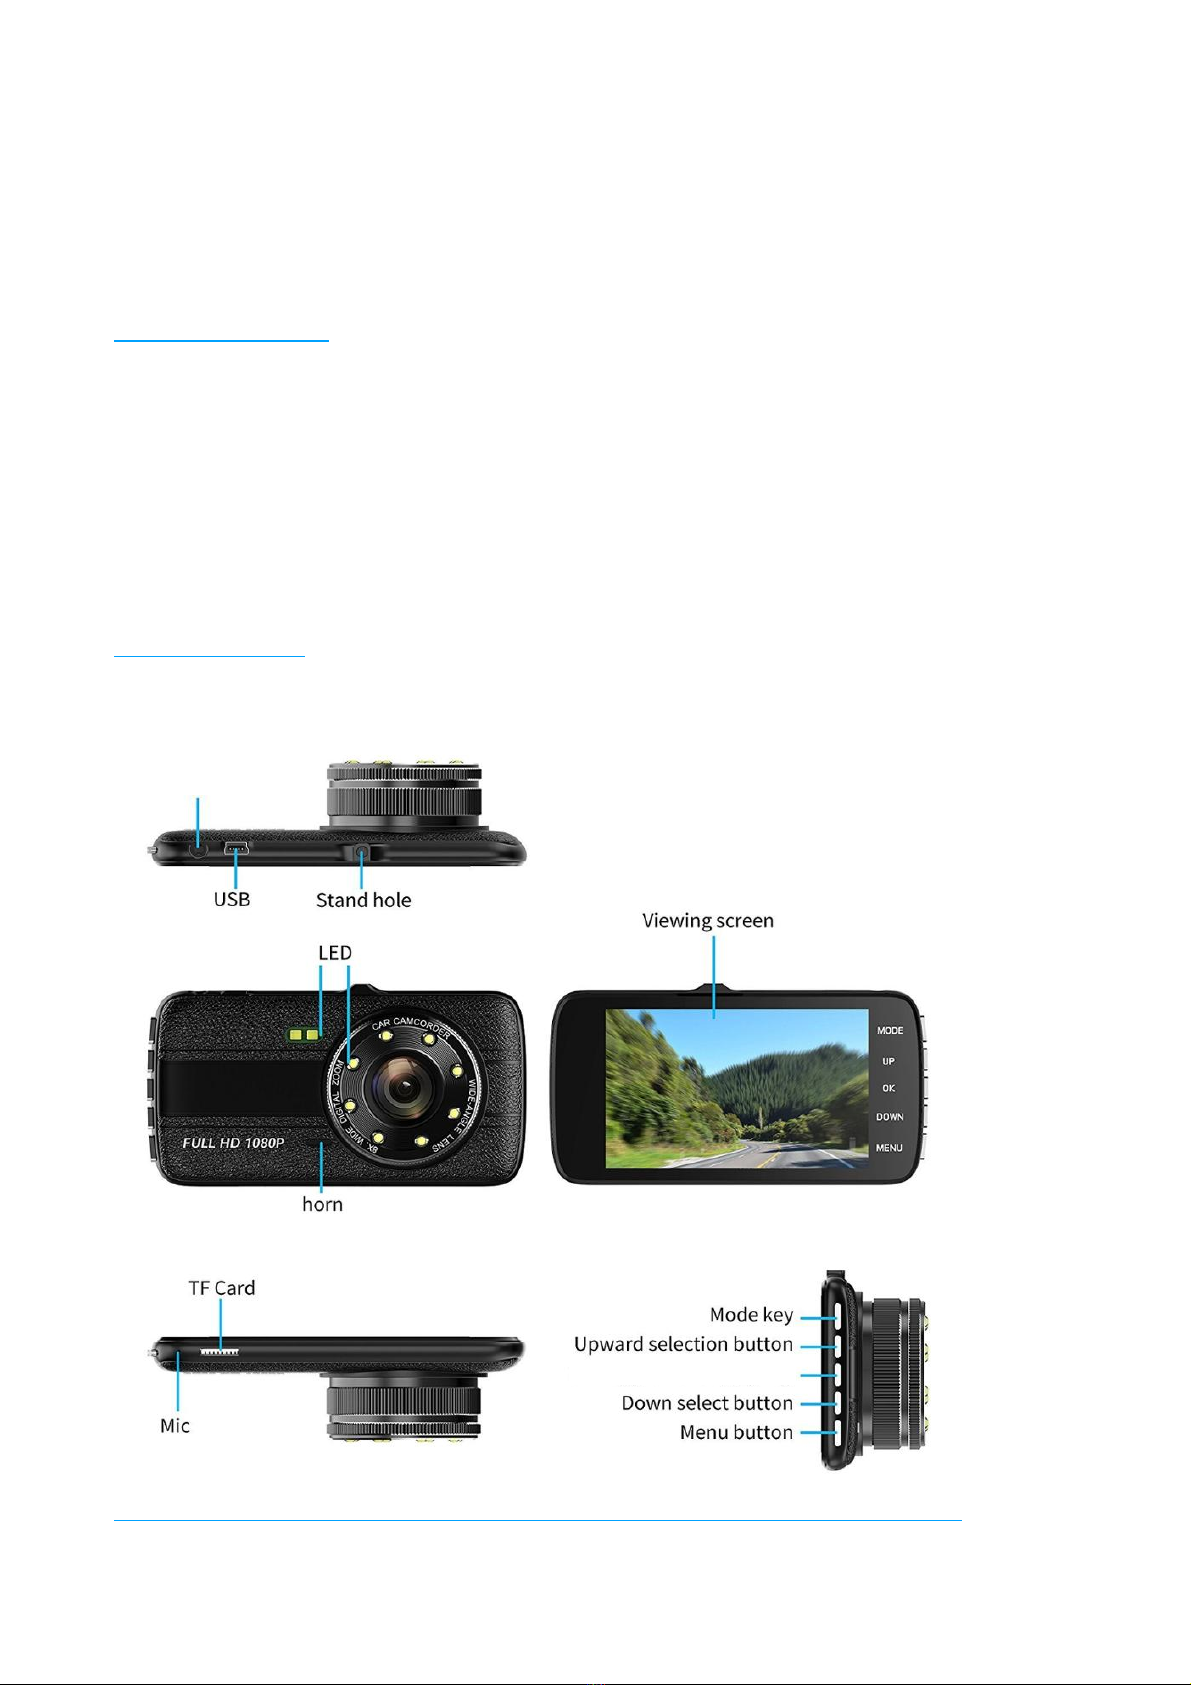
Product Structure
OK key
Rear camera socket

4
Functions
- Micro USB port is used to charge the battery when plugged into car with the 12V power line
included. It is also used for PC intersect with the correct Mini USB Cable (not included).
- Power On / Off – PRESS BOTH MODE AND POWER BUTTON TOGETHER.
- Buttons:
• MODE: Press this key to switch between Camera / Photo / Playback Modes
• UP: Selection upwards within menus and settings
• OK: Confirmation button in video mode (start and stop recording / video), press to take
pictures. Use to select in menu / settings.
• DOWN: Selection downwards within menus and settings
• MENU: Press to call up menu and press for menu mode confirmation
-TF Card Slot (Maximum supports 32Gb Micro SD Card)
- 4” HD LCD Screen - Displays in real time image, you are recording
- Lens for recording (please ensure unobscured for better videos)
- Reset Button for resetting camera (if req.) Only use if any problem occurs and persists.
Restores factory settings.
- PLEASE NOTE THAT THE BATTERY IS FOR BACK UP AND PARKING GUARD FUNCTIONS
ONLY. THE CAMERA WILL NOT OPERATE DURING NORMAL RECORDING USING BATTERY
POWER AND REQUIRES POWER SUPPLY TO FUNCTION.
- BATTERY WILL POWER G-SENSOR AND MOTION SENSOR DURING PARKING GUARD,
ALLOWING FOR SHORT RECORDINGS TO BE TAKEN WHILST THE CAR IS PARKED. IT
ALSO POWERS THE BACK UP FUNCTION IN THE EVENT OF AN INCIDENT.
Operation
Auto ON / OFF:
Support the connection to the vehicle power and when you turn the engine off the camera will
turn off and turn back on once ignition started upon return to vehicle.
Start Up & Shut Down:
Press the MENU & OK button together to power on the device. The red power light will come one
and to switch off you can press the OK and MENU button again and the red light will go out and
the camera turn off.
Note - Device will auto turn off when battery is low.
Camera Mode:
Enter camera mode and press the OK button to take a picture (the screen flashes with the picture
taken, to confirm the picture was taken successfully). The upper left corner will display the camera
icon when in camera mode.
Video Mode:
Enter video mode and the icon will display in the top left corner. Press OK and a flashing red dot
will appear in the screen, showing the recording has started.
Playback Mode:

5
Enter playback mode and the playback icon will appear in the top left corner. From here you will
be able to select a video to playback, using the up and down buttons and OK to play the selected
video.
Set Menu:
Enter the menu and go through all options to set up the camera as required. In the menu you can
enable features and select language.
To change Video Settings when in video mode, press the MENU button from the video record
mode. Set your video settings and press MENU again to exit.
YOU MUST Activate Video Loop recording to allow for videos to continue to write, or once SD
card is full, recording will stop.
USB Connection:
Two modes are available -
1. USB Disk. This is the default mode for recording and will allow you to access the recordings.
2. PC Camera. This is for viewing through your PC, when connected. You can also use the
camera to then record direct to PC (whilst connected).
Battery Charge Description:
The charging time is about 3 hours to fully charge the battery.
Battery indicator in the bottom right corner of screen shows the battery status.
1.Plug in Power Adaptor to charge and use when driving for on board charging. (We recommend
unplugging when leaving the car for long periods to avoid risk of draining car battery).
2. Use PC-USB charging cable and charge the device up before a journey. (Select Charge mode
when connecting to PC).
Set Up
First Install the Camera on your windscreen. Do this by screwing the camera into the mount and
then stick the mount to the desired part of the windscreen and push the plastic clip on the mount
to lock the position.
DO NOT Mount the dash camera in a place where it will obstruct the drivers view when driving.
Use the illustration below as a guide for installing your Proze Camera. Do not place in the red
zone.
6
NOW YOUR CAMERA IS CONNECTED YOU CAN SET UP THE CAMERA ITSELF.
Format SD Card:
Once the camera is on and you have inserted your micro SD card, push the menu button twice to
enter the Dash Cam Settings and scroll down to FORMAT. Enter and press OK to format your SD
card. This must be done before you use your camera for recording and pictures, otherwise it will
not record anything to the SD card until formatted.
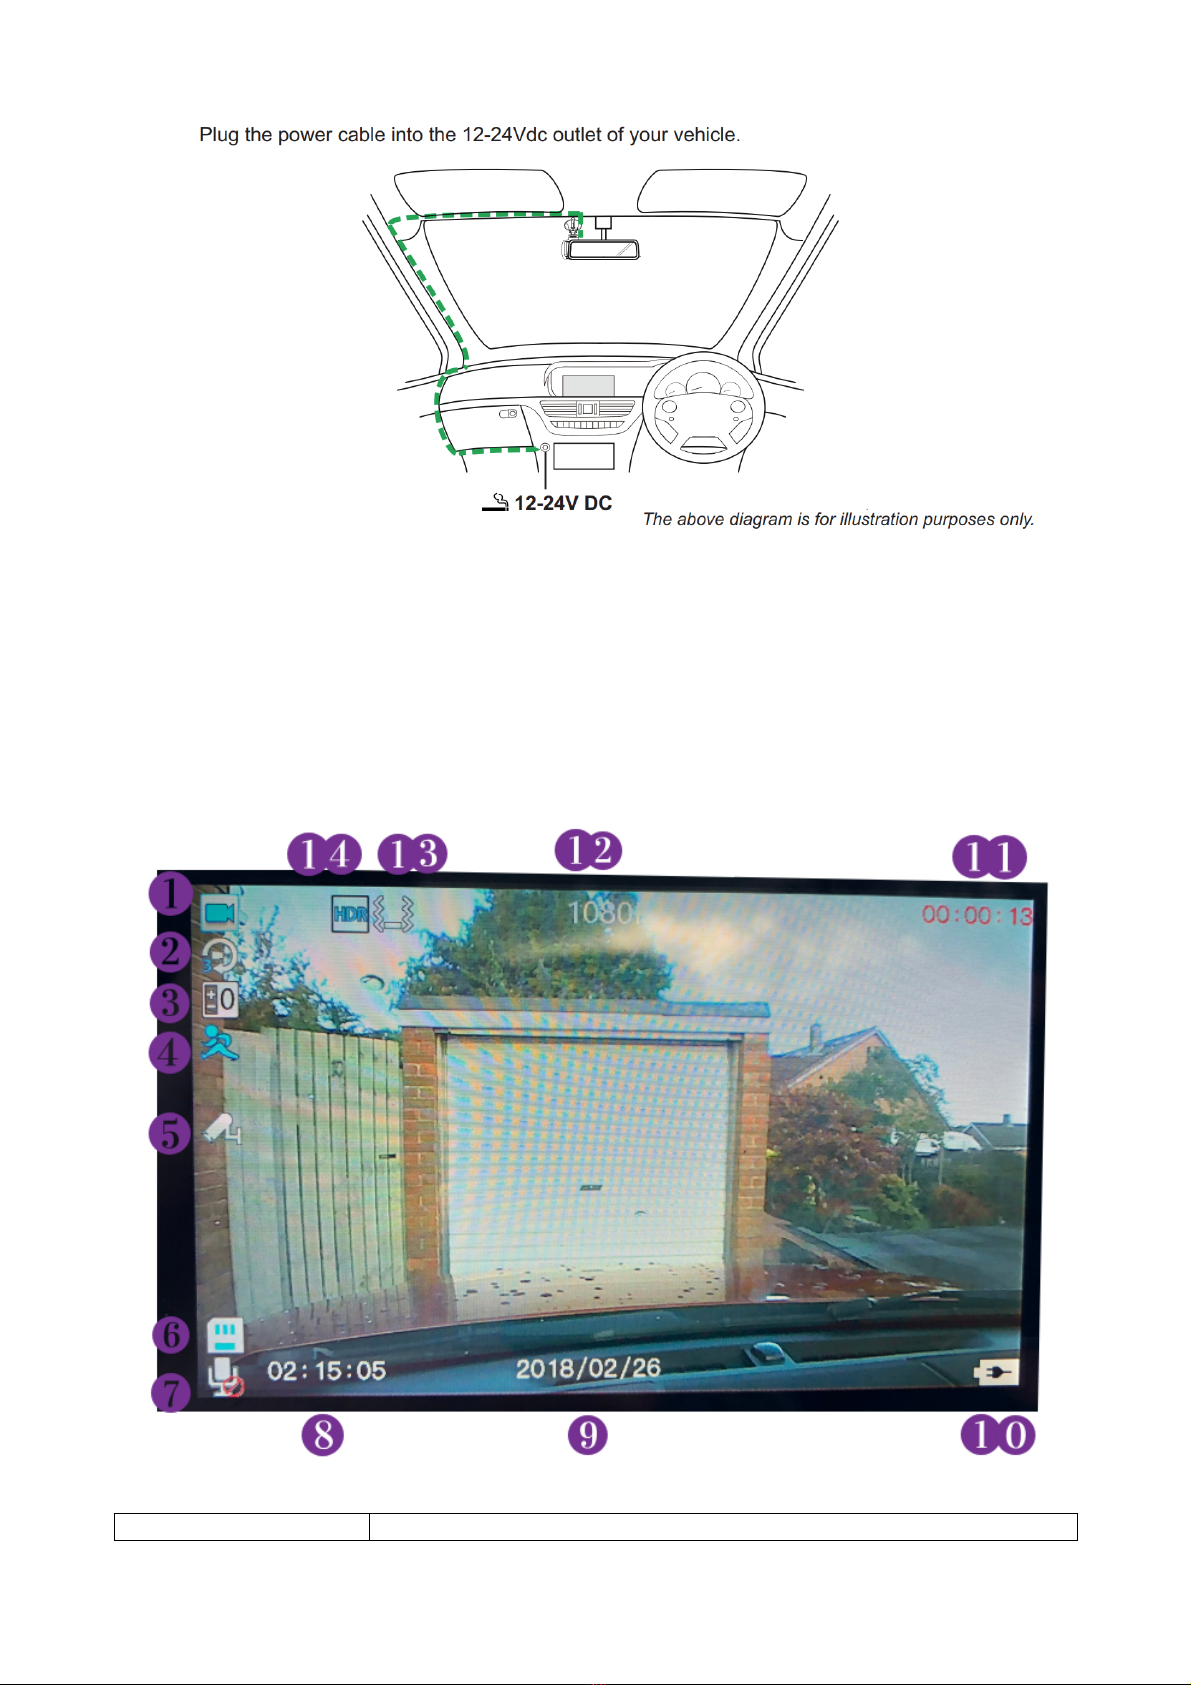
CAMERA:
Proze Dash Cam 4.0:
1
MODE – Recording, Camera, Viewing

7
2
Loop Recording - Time Frame (number will show duration of
recording selected)
3
Exposure Level
4
Motion Detection (On/Off)
5
Parking Guard (On/Off)
6
SD Card - Inserted correctly and reading
7
Recording Audio - (On/Off)
8
Time
9
Date
10
Power Connected / Battery
11
Recording – Red Numbers when recording
12
Recording Quality – 180/720/VGA
13
G-Sensor and Sensitivity – Low, Medium, High
14
HDR – High Dynamic Range
Camera Set Up
Press the Menu Button to enter the menu of the Mode, press Menu again to enter the main
Camera Settings menu. Use the UP, DOWN and OK buttons to navigate through the menu.
RECORDING MENU: Press Menu button whilst in recording mode (stop recording to enter
menu).
To make a change, select the setting by pressing OK button, then select the setting you would
like and press OK again to confirm.
Resolution: This is where you can select the recording quality.
Dual Camera: If you have the Rear Camera installed please select ON to enable all features for
both front and rear cameras.
8
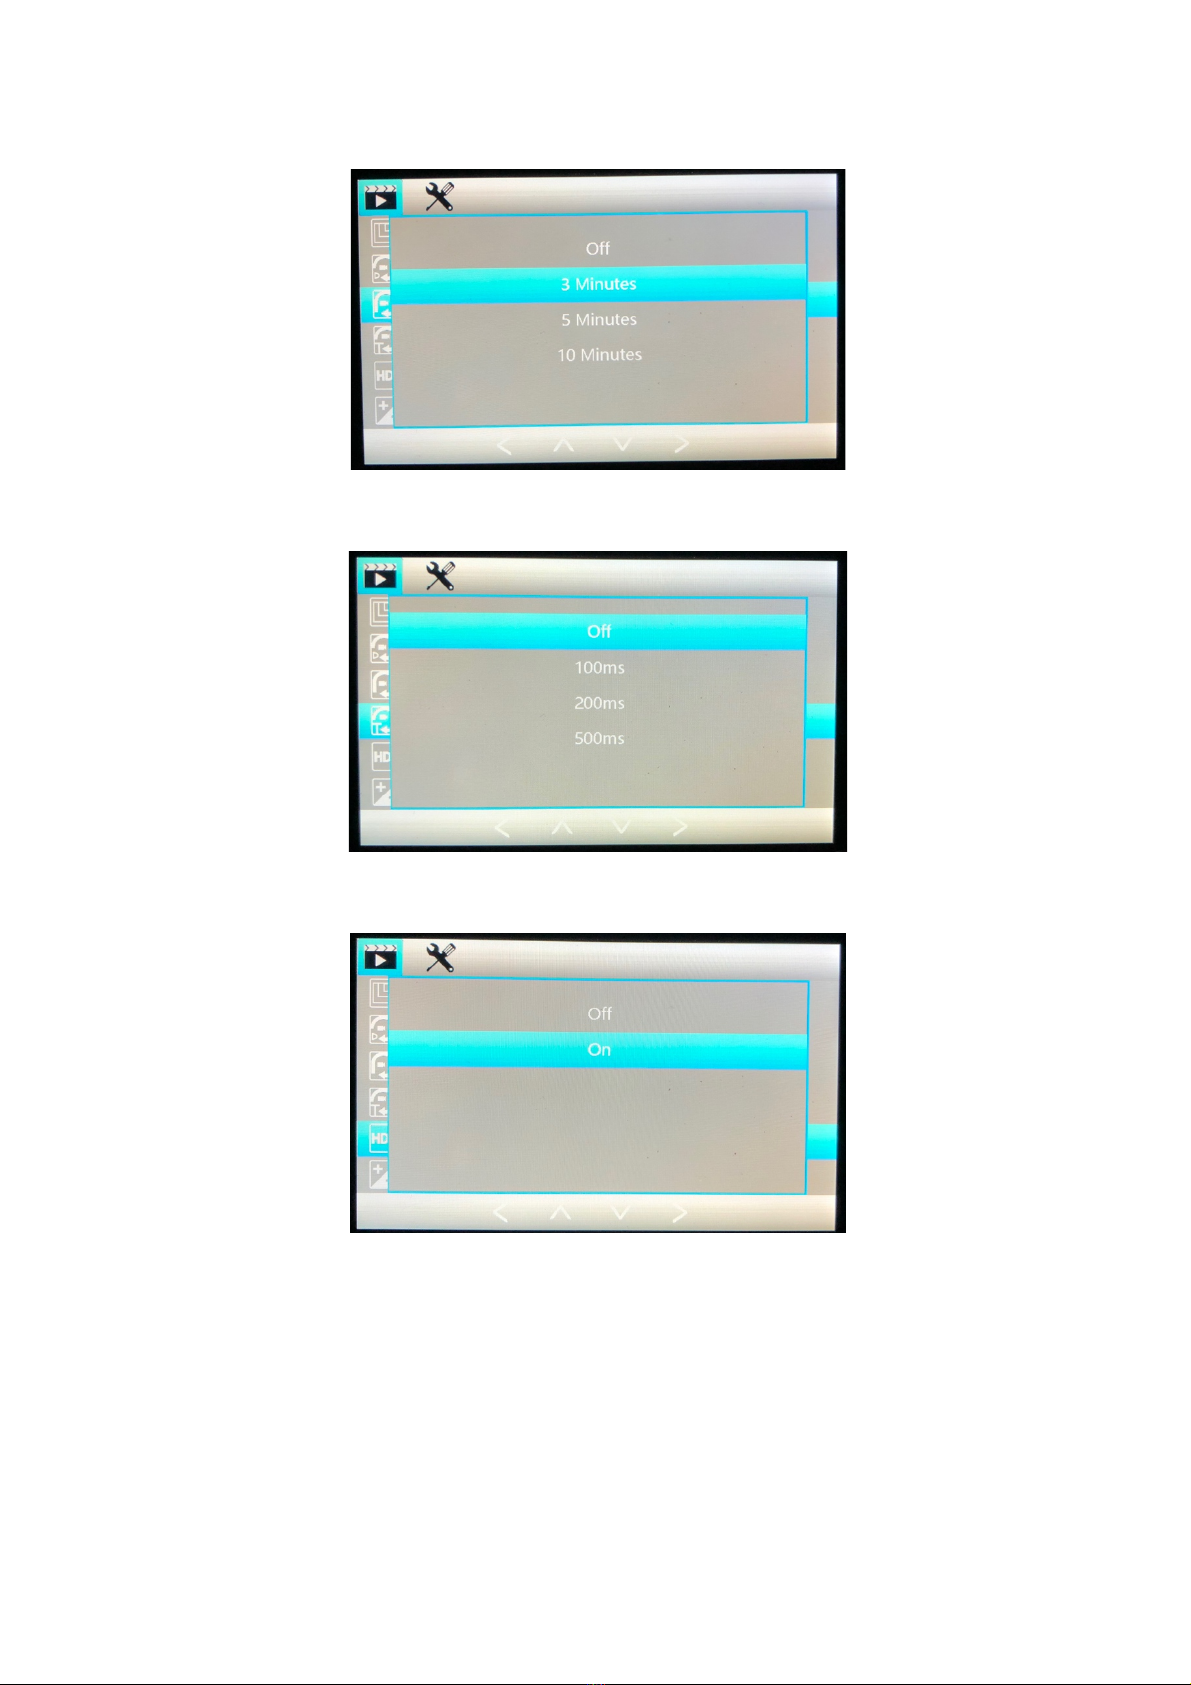
Cyclic Record: Select the length of time you would like your recording clips to be, this will be the
length of the recordings on your memory card.
Interval Record: Time between the recordings, if you want to separate the recordings, otherwise
when off the recordings will overlap by default.
High Dynamic Range: This switches the High Dynamic Range on or off. Recordings have a
greater dynamic light range when this is switched ON for High Quality video.
Exposure: This controls the exposure of level of light the camera allows into. If the picture
appears too white / light or dark, please adjust the exposure to find the right level of exposure.
The + will allow more light in and – will allow less light in.

9
Motion Detection: This will switch the motion detection function on or off for the parking guard.
On allows the camera to come on when it detects motion in front of it.
Recording: This is the audio recording. On will record the audio INSIDE the car.
Date Stamp: This will show a date stamp on the recording when you view it. Off shows no date
stamp.

10
Gravity Sensing: This adjusts the sensitivity of the G-Sensor, so the higher the setting the more
sensitive to movement the parking guard is. Movement will cause the camera to burst record.
Parking Guard: Turn the parking Guard ON to enable the parking guard function, G-Sensor and
Motion Detection functions will work using battery power.
Lane Deviation: This enables the camera to record the lanes and adds a warning when driving on
white lines. This requires setting up to the level of the car, using the up and down buttons to get
the lines in the correct position for this feature to work correctly. Select ON and the Camera will
then ask you to set up the Horizon and Bonnet Lines, using the Up and Down buttons.
Headlight Warning: This turns on the headlight warning, which shows a headlight symbol on the
recording when it senses head lights, or the camera is affected by headlights, as they will adjust
the night vision. Enhanced Night Vision auto turns on at night, using the LED light and 8 IR lights
around the camera.
11
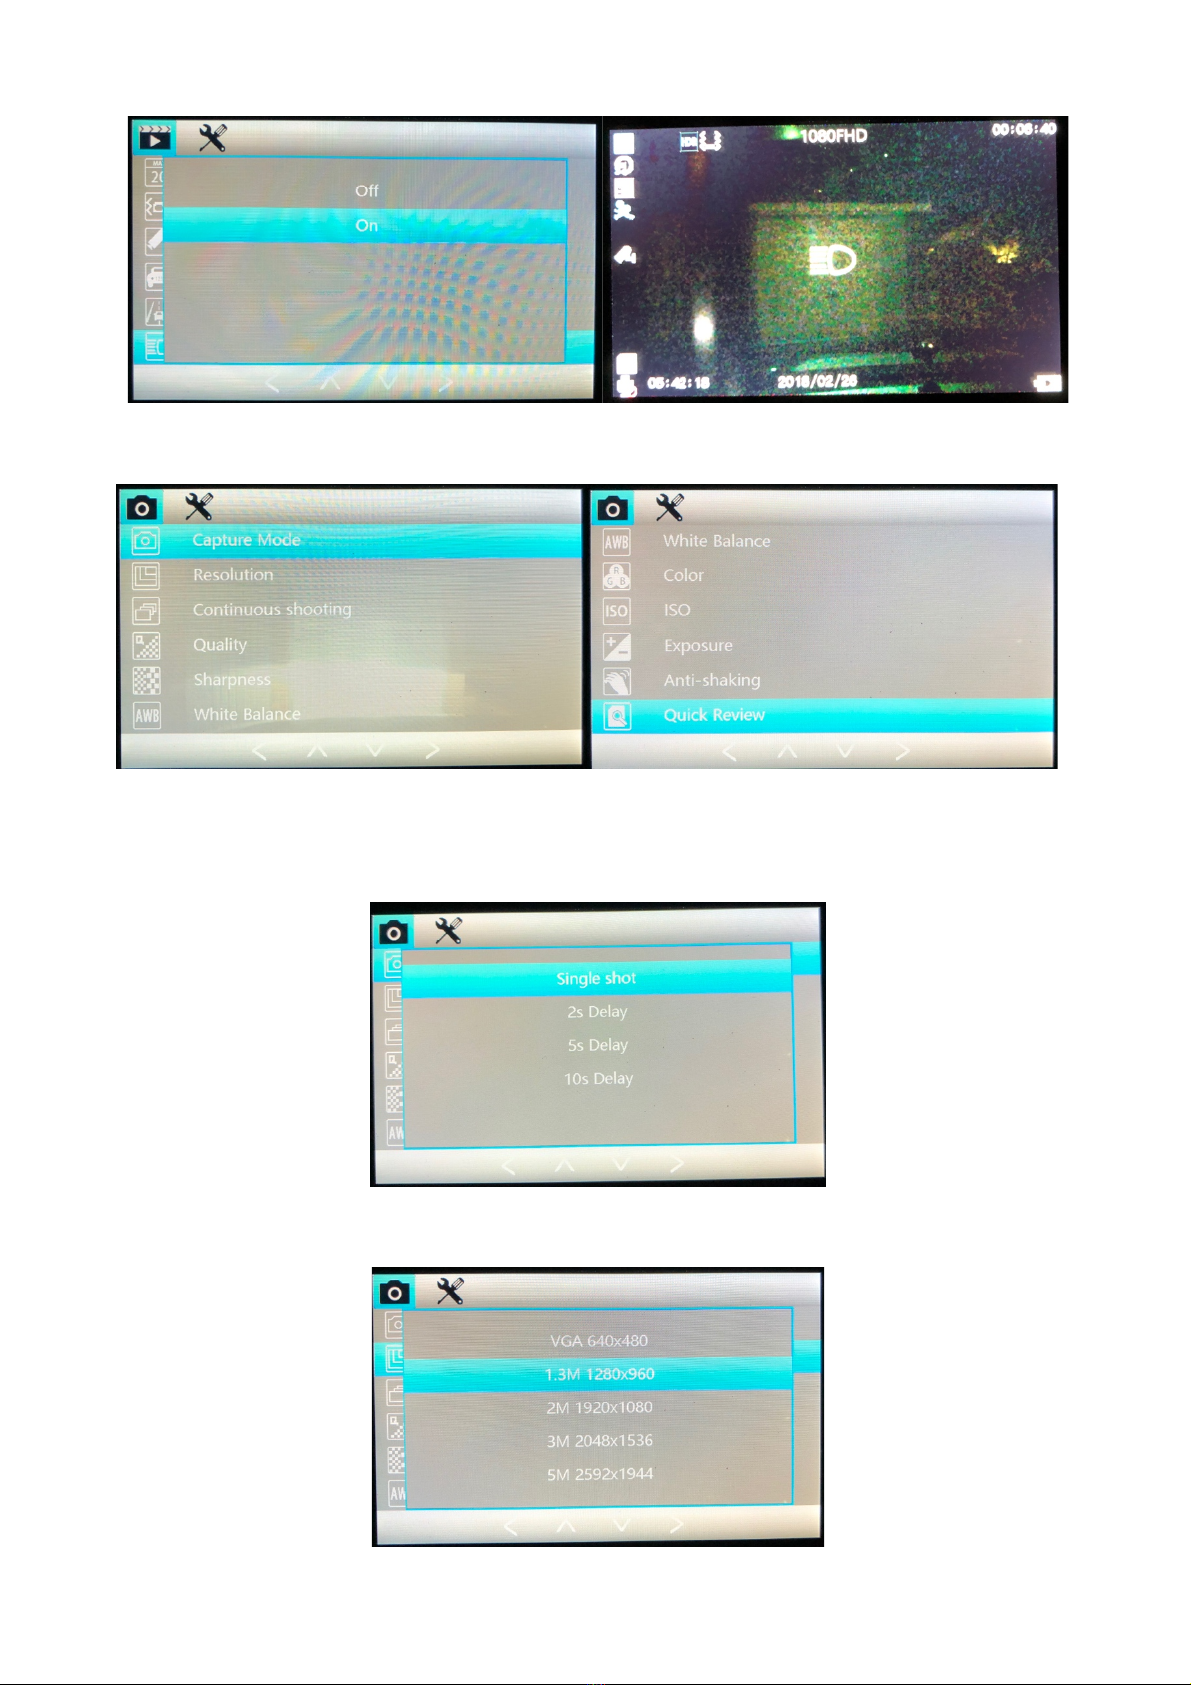
CAMERA MENU: Press Menu button whilst in camera mode to access the camera picture menu.
Capture Mode: Select how the Proze camera will capture a picture when you push the OK
button. Instant, 2 / 5 / 10 second delay. This will cause a delay between pushing ok and the
picture being taken.
Resolution: Select the Resolution of the camera for taking pictures, we recommend 5 megapixels
for highest quality, though lower quality use less space on the memory card.

12
Continuous Shooting: This allows for continuous shooting of pictures, so the camera will take
pictures continuously. Select ON for this function.
Quality: Fine, Normal, Economy. This determines the quality of the picture and economy, will be
lower quality but a smaller file, Normal as default and Fine for higher quality pictures.
Sharpness: This is the sharpness of the image captured, select Strong for a sharper image,
Normal is default and Soft for less Sharpness in your images.
White Balance: White balance will adjust the brightness of colours and shades of the pictures.
Auto is default and the camera will find the best lighting and balance of neutral colours for your
picture, however if you find your pictures are too bright or too dark or the day is cloudy or in need
of adjustment, then select the balance mode that will suit the situation, e.g. Select Cloudy on a
cloudy day and the camera will adapt and brighten the pictures.

13
Colour: This selects the colour group for your pictures, Normal, for colours, black and white for
black and white pictures and Sepia, offers a more toned and neutral colour for your pictures. This
would be useful for night driving, brightening the darker colours. Default is Normal.
ISO: Auto, 100, 200, 400. This selection allows you to select and set the sensitivity of the camera
lens to lightness and darkness, 100 being the darkest and 400 being the lightest setting. This is
set to auto as default and the camera will adjust to find the best setting.
Exposure: This controls the exposure of level of light the camera allows into. If the picture
appears too white / light or dark, please adjust the exposure to find the right level of exposure.
The + will allow more light in and – will allow less light in.
Anti-Shaking: This is stability control and will prevent the camera taking blurred pictures. Switch
to on, to activate the stability control, so pictures of moving objects will be less blurred.

14
Quick Review: This allows for you to see the picture that has just been taken, by selecting one of
the time frames given the picture will then show on the screen for the selected time, allowing you
to quickly review the picture.
Date Stamp: Select this to ON, and a date stamp will show on your pictures.
VIEWING MENU: Press menu button whilst in viewing mode to access the viewing menu.
Delete: Delete the selected picture / video.
Protection:Select protection on this video / picture and the camera will not overwrite this in
future and protect it on the memory card. Do this for important footage, if you would like to ensure
that it does not get overwritten on a long journey. Select Lock to prevent this, Ulock to allow it to
be overwritten, One for the selected and All for all saved footage at that time.

15
Slideshow: Create a slide show of all pictures / footage and select the duration you will see the
selected file for before the next is shown in slideshow.
SETTINGS MENU: From any of the previous Menus, press the menu button a second time to go
to the Main Dash Camera Settings Menu.
LCD Brightness: This enables you to turn off the camera screen whilst driving, so that it is not
distracting you. Select the time frame you would like the screen to stay on for after powering on.
EG. Select 30 seconds and after 30 seconds the screen will turn off, the camera will continue to
record, and all other functions will work. To confirm your selection, press OK, then you will need
to power off the camera and back on to use this function, it will not work until it has been
powered off. Press any key to wake the screen back up during recording.
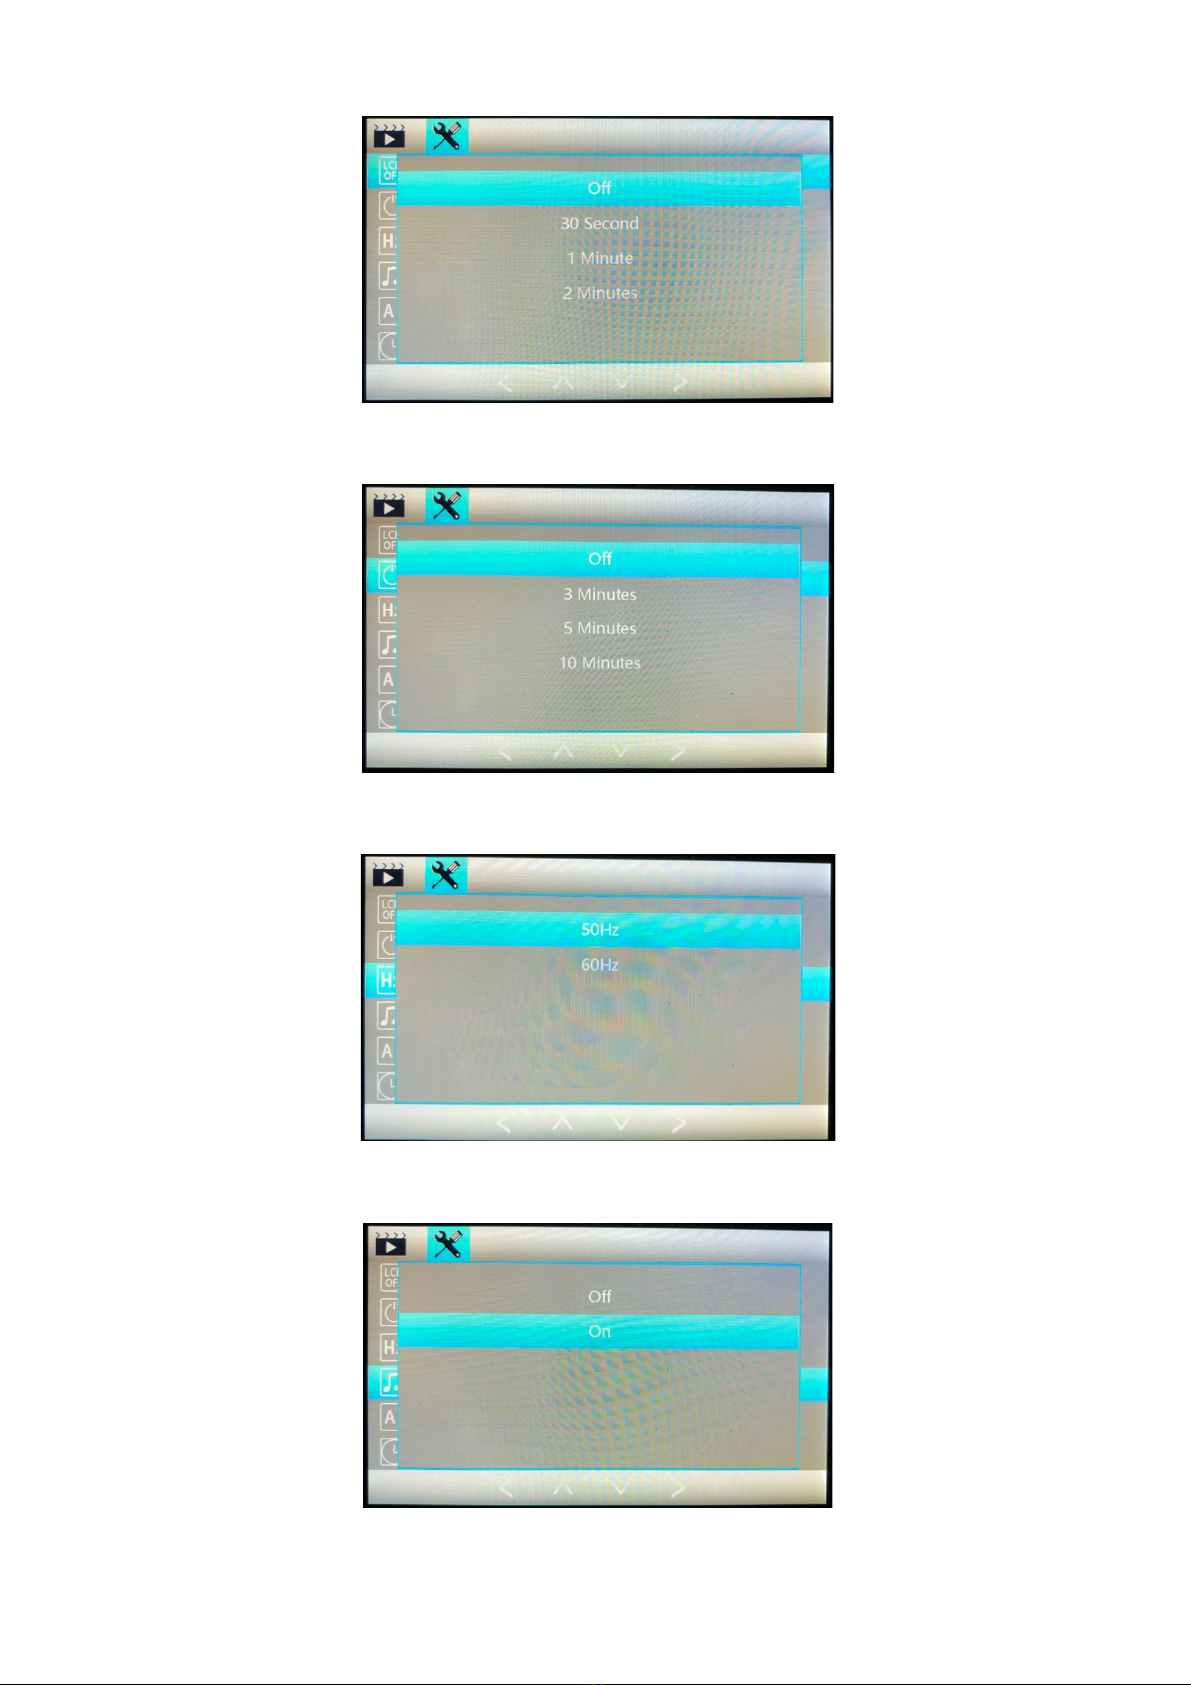
16
Auto Power Off: This is the time you would like the camera to stay on before automatically
switching off. Select the time and the camera will auto off after that amount of time has passed.
Frequency: This is the light source frequency, this will vary depending on location and if you have
any static or problems with recording select another frequency. Default is 50Hz.
Beep Sound: This will turn the beep sound that the camera makes when pushing buttons on or
off.

17
Language: Select Language - English, Italian, German, Spanish, French, Russian, Korean,
Chinese (Simplified), Chinese (Original).
Date / Time: Set the Date and Time.
TV Mode: The recording will be recorded in a TV mode to allow it to be viewed on other devices,
PAL is the EU region standard. PAL set as default.
Format: Insert SD card and go to Format, select OK on format to format the card for the camera.
If you need to format the card, it will delete any other data on the card and reformatting will clear
any previous recordings.

18
Default Settings: If you encounter any issues with the camera or need to reset to factory default
settings. Select OK and Confirm to reset all camera settings to default settings. You will be
required to format card again after reset to default.
Version: This shows the Version of firmware installed in the camera. For updates please check
the Proze website for future updates to the firmware. If experiencing difficulties, you can
download and install the firmware again to reset your camera. Go to the Proze website and follow
the instructions given to download latest firmware. www.proze-electronics.com
Specification
Product
Proze Dashcam 4.0
Display
4” LCD Wide Screen Display
Lens
170 Degree Ultra Wide Angle High Resolution
(1080p) 8x Digital Zoom
Rear Lens
120 Degree VGA Camera with Night Lights
Languages
English, German, Spanish, Italian, French, Russian,
Chinese Simplified, Chinese Traditional, Korean
File Format / Video Format
AVI / M-JPEG
Photo Mode
500 Pixel Still Shots
Photo Format
JPEG
Memory Card
TF Micro SD - Max supported 32GB
Microphone
Internal Supported (records in vehicle)
Video Format
PAL / NTSC
Frequency
50Hz / 60Hz
USB Function
1: USB Disk 2: PC Connection
Battery / Power Supply
Built in Battery / 5V 1A

19
Rear Camera
To set up and activate the Rear camera, using the cable in the box, plug this into the rear
camera and then into the rear camera port on the main front camera.
This will give a number of views, by pressing the UP button you can select between
displays, Front View, Rear View, Split Screen (50:50) and picture in picture.
There are 2 ways to fit the rear camera, this can be fitted inside the rear windscreen or
outside of the car (this may require modification to fit to the outside).
The red wire on the cable is fitted to the positive of the reverse light on your car. (Red to
Red) This enables the reverse camera function on the device.
This will then automatically show the reverse camera when you enter reverse and the
reverse light comes on.
To fit the rear camera please follow the diagram below.
There is 5.5 meters of wiring cable supplied in the box with the dash camera, for you to
connect the rear camera to the front. Any excess cable can be hidden away. DO NOT
CUT THE CABEL TO MAKE IT SHORTER. DOING SO WILL VOID YOUR WARRANTY.

20
PLEASE NOTE WE DO RECOMMEND PROFESSIONAL INSTALLATION FOR THE REAR
CAMERA AND OUR WARRANTY DOES NOT COVER ANY DAMAGE CAUSED AS A
RESULT OF INCORRECT INSTALLATION.
Solutions
If you encounter any issues, refer here or if further support needed contact your local support
team:
Camera doesn’t take photos or record video?
- Check the TF Card is correctly inserted and there is space on it for recordings / pictures.
Video automatically stops?
- Because the video data is high definition and the data therefore larger, ensure that you have a
high-speed TF card, the card will have the C4 or C6 logo identifying this.
The Picture and Video replays show “file error”?
- Error occurred while the data was being transferred to the TF card. Please go to the menu and
select the “Format” function to format the SD card.
The camera is shooting a foggy / distorted image?
- Please check that the lens is unobscured and clean, there is no dirt or fingerprints on it. Please
use a damp cloth or lens cleaner to clean and wipe the lens.
Sky, water, parts the video are appearing dark?
- If a large contrast in the scene the video is recording, then there will darker parts, due to the
automatic exposure function of the camera. This can be adjusted in the Camera Settings.
Adjust the EV value to change this.
Cloudy or indoors colours not perfect?
- his can be adjusted in the camera settings. Check and adjust the white balance as required.
I get Horizontal stripes appearing across the screen?
- This is due to a light source frequency error. Please set the camera to the local frequency (50 or
60Hz).
After a crash the camera isn’t working?
- Please press the reset button for 5 seconds, to restore factory settings and to restart the
camera after an incident.
Low Battery Shows up when using it?
- Plug the camera into power as it will not function in normal recording / driving operation when
unplugged. The battery is only for parking monitor and associated functions, to allow back up
of files and burst recording when parking guard is activated, and no power is connected.
Table of contents


