PryMAX VC198 User manual

Hand-held Vacuum Cleaner
Model No.VC198
User Manual
Please read carefully before using the product

Contents
Safety advices & cautions ………………………………
Components …………………………………………………
Assembling ……………………………………………………
Packing list ……………………………………………………
Using ……………………………………………………………
Cleaning and storage ……………………………………
Troubleshooting guide …………………………………
Tech. data sheet ……………………………………………
1
2
3
5
5
6
7
7

▋
SAFETY ADVICES & CAUTIONS
• This vacuum cleaner can only be dry used, cannot be used to suck water
or cleaning liquid or wet objects.
• Do Not water, spill the liquids to the vacuum cleaner or immerse vacuum
cleaner in water or other liquids, or it will increase the risk of electric shock.
• Do Not vacuum up the tiny powders such as flour, hard or sharp objects
such as glass, nails, screws, or coins that could damage the vacuum cleaner.
DO NOT put any objects into openings.
• When use it for the first time or use after long time storage, please fully
charged the batteries. For long term storage, please make sure charge and
use each three months.
• Do Not use or store the vacuum cleaner under high or low temperature,
it is suggested to use and store in the room where is dry and cool.
• Do Not place the battery unit close to the high temperature objects or fire,
do not insert the battery unit with sharpen objects or break the battery in
case of electric shock.
• When the vacuum cleaner fully charged, please unplug the adapter. Do
not pull the power cord to unplug the adapter.
• Battery unit can only used for this vacuum cleaner and can only be charged
with the adapter included. Please do not use in other purposes, do not
disassemble the battery unit in case of damaging or short circuit.
• Please use dry cloth to clean the vacuum cleaners, do not use any liquid
that can make the surface cracking or color fading such as gasoline.
• If the power cord damaged, vacuum cleaner is not working as it should or
has been dropped, damaged, left outdoors or immersed in water, please
stop using and contact manufacturer or qualified repairing man for repair.
• Child may not play, use the vacuum cleaner and charge the battery unit
in case of any dangers. Keep the device out of the reach of children.
• The plug must be removed from the socket-outlet before cleaning or
maintaining the appliance.
-1-
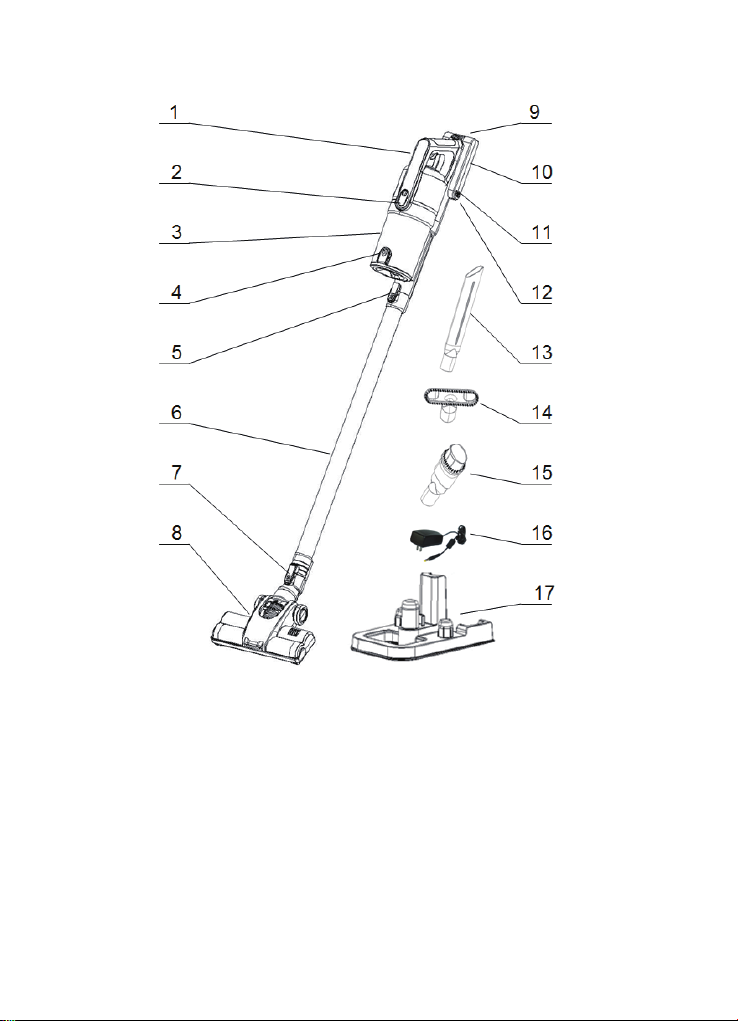
COMPONENTS
1. ON/OFF BUTTON
2. DUST CUP RELEASE BUTTON
3. DUST CUP
4. DUST CUP EMPTY BUTTON
5. TUBE RELEASE BUTTON
6. TUBE
7. BRUSH RELEASE BUTTON
8. MOTORIZED FLOOR BRUSH
9. BATTERY UNIT RELEASE BUTTON
10. BATTERY UNIT
11. CHARGING SOCKET
12. CHARGE INLET
13. CREVICE TOOL
14. MINI SOFT DUSTING BRUSH
15. COMBINATION TOOL
16. POWER ADAPTER
17. BASE
-2-
▋
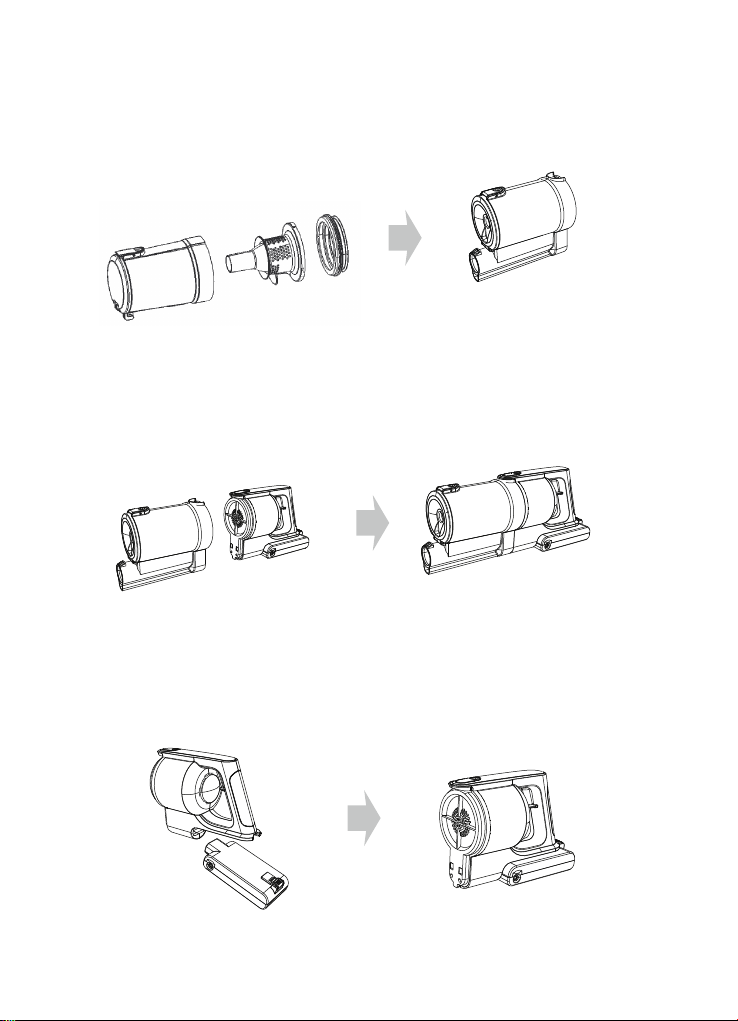
ASSEMBLING
• Dust cup unit assembling
Assemble the dust cup with filters as the photo.
• Dust cup unit and motor unit assembling
Assemble the dust cup unit with the motor unit as the photo below.
• Assemble the battery to the main unit
Assemble them as photo showed.
-3-
▋

• Assembling accessory into the main unit
• Main brush, tube, and main unit assembling
Assembled them as the below photos
• How to place the main units and other accessories onto the base
-4-
• Assembling the accessories to the tube.

USING
• On/Off
Press the ON/OFF button to turn on/off the vacuum cleaner.
Press the button once more for high working speed.
• Crevice Tool
Designed for precise cleaning around edges and narrow gaps.
• Dusting Brush
Great for dusting a multitude of surfaces such as shelves, skirting boards,
window frames, and more.
• Combination Tool
Two tools in one for simple switching between surfaces.
• Motorized Floor Brush
Connect the brush with tube, then use the motorized brush to clean floor,
carpet and more.
• Charging
1. The machine can only be charged with the adapter included.
2. When charging, the indicator light is flashing red. The indicator
light will be blue after fully charged.
3. When the battery is low, please recharge it with the adapter in time.
4. The battery can be detached and charged separately.
-5-
▋
PACKING LIST
▋
Main unit
1
Adapter
1
Battery unit
2
Accessory brush
1+1
Tube
1
Base
1
Brush
1
——
——
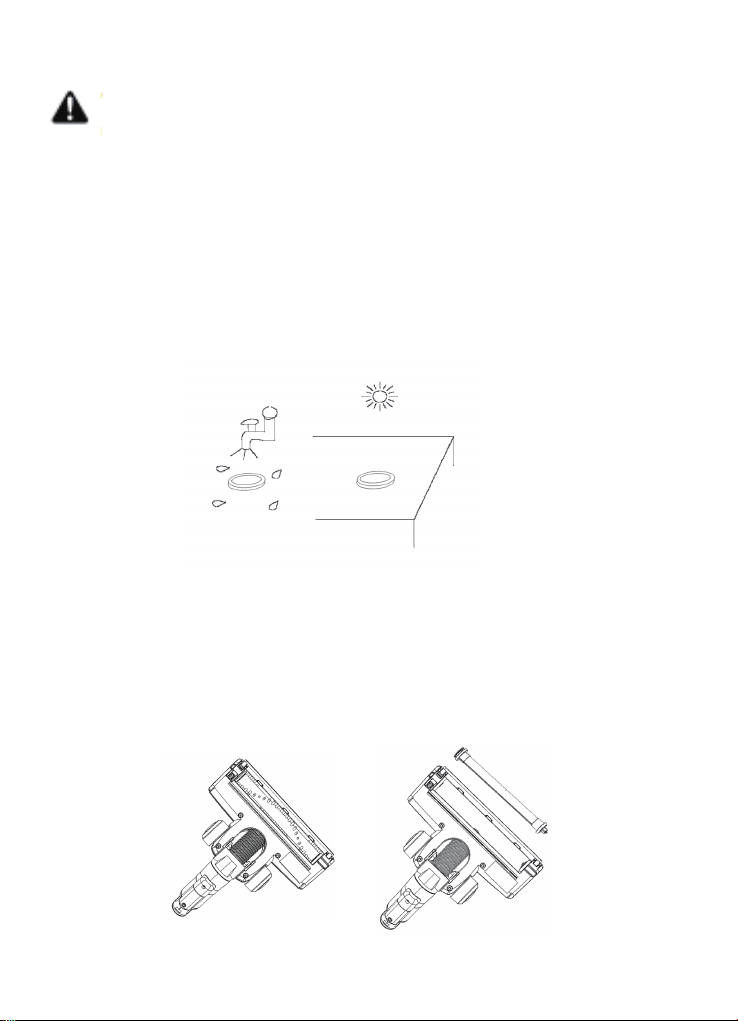
CLEANING AND STORAGE
WARNING! To reduce the risk of shock and unintended
operation, turn off and unplug the unit before servicing.
• Daily use clean
Press the dust cup empty button to clean the dust cup after used daily.
• Cleaning the filter
Release the dust cup from the main machine by press dust cup release
button. Separate the filter from felt filter frame and rinse them with water.
DO NOT use soap. Tap loose dirt off filters as needed. Allow filters to
air-dry completely, then reinsert them and reattach the dust cup to the
vacuum.
• Clean the motorized brush
Open the brushroll by sliding the release buttons away from you, in the
back of the brush, then lifting off the lid. Lift out the Soft Roller and clean
off any string, carpet fibres, or hair that may be wrapped around the Soft
Roller. Remove debris from the roller housing.
Reinsert the Soft Roller in its original place and lock it firmly.
-6-
▋

TROUBLESHOTTING GUIDE
Vacuum cleaner is not working?
• May be the machine run out of battery, please recharge it.
TECH. DATA SHEET
MODEL NO.
VOLTAGE
INPUT POWER
INPUT OF ADAPTER
OUTPUT OF ADAPTER
WORKING TIME
BATTERY CAPACITY
SUCTION POWER
DIRT CUP CAPACITY
VC198
22.2V
150W
100-110V~50/60Hz,0.5A
27V,400mA
About 4-5hours
2200mAh
9 Kpa
0.6L
-7-
▋
▋
Vacuum is not picking up debris. No suction or light suction.
• Check filters to see if they need cleaning. Follow instructions for rinsing
and completely air-drying the filters before reinserting into the vacuum.
• Dust cup may be full; empty dust cup.
• Check floor nozzle for blockages; clear blockages if required.
• Remove any string, carpet fibres, or hair that may be wrapped around
the brushroll and Soft Roller or trapped behind the Soft Roller.
The indicator light doesn’t light up when charging?
• The power adapter is not fully connected charging port.

We are glad that you are happy with our products.
We would like to take this opportunity to kindly ask you
to share new-found happiness so that
We sincerely apologize for inconvenience about the product
if you not 100% satisfied .
We strive to offer the best service possible for our customers.
Here’s how we can connect
12
1
Tell your friends and families about our products
Discount for next PryMax item
Contact us via “contact seller”in your order
Manufacture Add.:
Ping’an Road 388, Linhu Town, Wuzhong District, Suzhou, Jiangsu, P.R.China
Table of contents


