PS Audio PerfectWave SACD Transport Quick start guide

PS Audio® Inc. 800PSAUDIO 4865 Sterling Drive Boulder, Colorado 80301
Owner’s Reference
®
PERFECTWAVE
SACD TRANSPORT

PS Audio® Inc. 800PSAUDIO 4865 Sterling Drive Boulder, Colorado 80301
®Table of Contents
Getting Data Out of the PST 7
I2S is the Preferred Delivery Method 7
Playback from a USB Drive 7
Placement of the PST 7
Digital outputs 7
HDMI for I2S 8
Unpacking the unit 8
Registering Your PerfectWave SACD Transport 8
PST Output Options 8
I2S Sources 9
Coax and XLR Connections 10
Powering the PST 11
Idle Mode 12
Operating the PST 12
Front panel controls 12
Open/Close/Menu Access Button 12
The Display 13
The Front Panel Control Ring 13
For Disc Playback 13
Playing from a USB Drive 14
Menu Features 15
Exiting the Menus 15
System sub-menu 16

PS Audio® Inc. 800PSAUDIO 4865 Sterling Drive Boulder, Colorado 80301
Table of Contents
Network sub-menu 16
Using the Remote Control 17
Idle Mode 17
Display Dim 17
Emergency eject of a stuck disc 17
Upgrading the Firmware 18
Care of the PST 18
Product registration 20
Warranty transfer 21
Warranty service within North America 22
Obtaining An RMA# 22
Packaging and Shipping 22
International warranty service 22

PS Audio® Inc. 800PSAUDIO 4865 Sterling Drive Boulder, Colorado 80301
®
WARNING: TO REDUCE THE RISK OF FIRE OR ELECTRICAL SHOCK, DO NOT EXPOSE THIS
APPARATUS TO RAIN OR MOISTURE. OBJECTS FILLED WITH LIQUIDS, SUCH AS VASES,
SHOULD NOT BE PLACED ON THE APPARATUS. THIS APPARATUS MUST BE CONNECTED
TO A MAINS SOCKET OUTLET WITH A PROTECTIVE EARTH CONNECTION.
Clean only with a dry cloth. Do not place ammable material on top of or beneath the unit.
PS Audio® products are passively cooled components that requires adequate ventilation at all
times during operation.
Do not remove or bypass the ground pin on the end of the AC cord. All PS Audio® products
ship with a grounding-type plug. If the provided plug does not t into your outlet, consult an
electrician for replacement of the obsolete outlet.
Protect the power cord from being walked on or pinched, particularly at plugs, convenience
receptacles, and the point where they exit from the apparatus. Unplug this apparatus during
lightning storms.
When making connections to this or any other component, make sure all components are
powered o. Turn o all systems’ power before connecting the PS Audio® component to any
other component. Make sure all cable terminations are of the highest quality.
THERE ARE NO USER-SERVICEABLE PARTS INSIDE THIS PS AUDIO PRODUCT. REFER ALL
SERVICE NEEDS TO QUALIFIED SERVICE PERSONNEL.
Please contact your authorized dealer, distributor, or PS Audio® directly if you have any
questions or concerns that are not addressed in this reference manual.
PS Audio®, the sine wave logo, and PerfectWave® are registered trademarks of PS Audio, Inc.,
and are restricted for use by PS Audio, Inc., its subsidiaries, and authorized agents. Stellar™,
Power Plant™, MultiWave™, CleanWave™, and Gain Cell™ are trademarks of PS Audio, Inc.
This product was designed and assembled in Boulder, Colorado with globally sourced
components.
© 2020 PS Audio, Inc. All rights reserved. Rev A.
READ AND FOLLOW ALL INSTRUCTIONS
HEED ALL WARNINGS
Safety Information

PS Audio® Inc. 800PSAUDIO 4865 Sterling Drive Boulder, Colorado 80301
Introduction
Thank you for your purchase of the PS Audio PerfectWave SACD Transport.
Universal Disc Player
The PerfectWave SACD Transport (PST) is PS Audio’s most advanced universal disc transport
and is capable of playing stereo audio from most types of optical discs, including SACD,
CD, CD-R, CD-RW and DVD-R*/-RW*/+R*/+RW*(*Audio data le only). It can also play MP3/
WMA/AAC (~48kHz/320bps) WAV/FLAC/AIFF(~192kHz/24-bit) DSD (~5.6mHz) and ALAC
(~96kHz/24-bit) les from discs or from its USB input.

PS Audio® Inc. 800PSAUDIO 4865 Sterling Drive Boulder, Colorado 80301
®
66
Operating Manual
Easy Operation
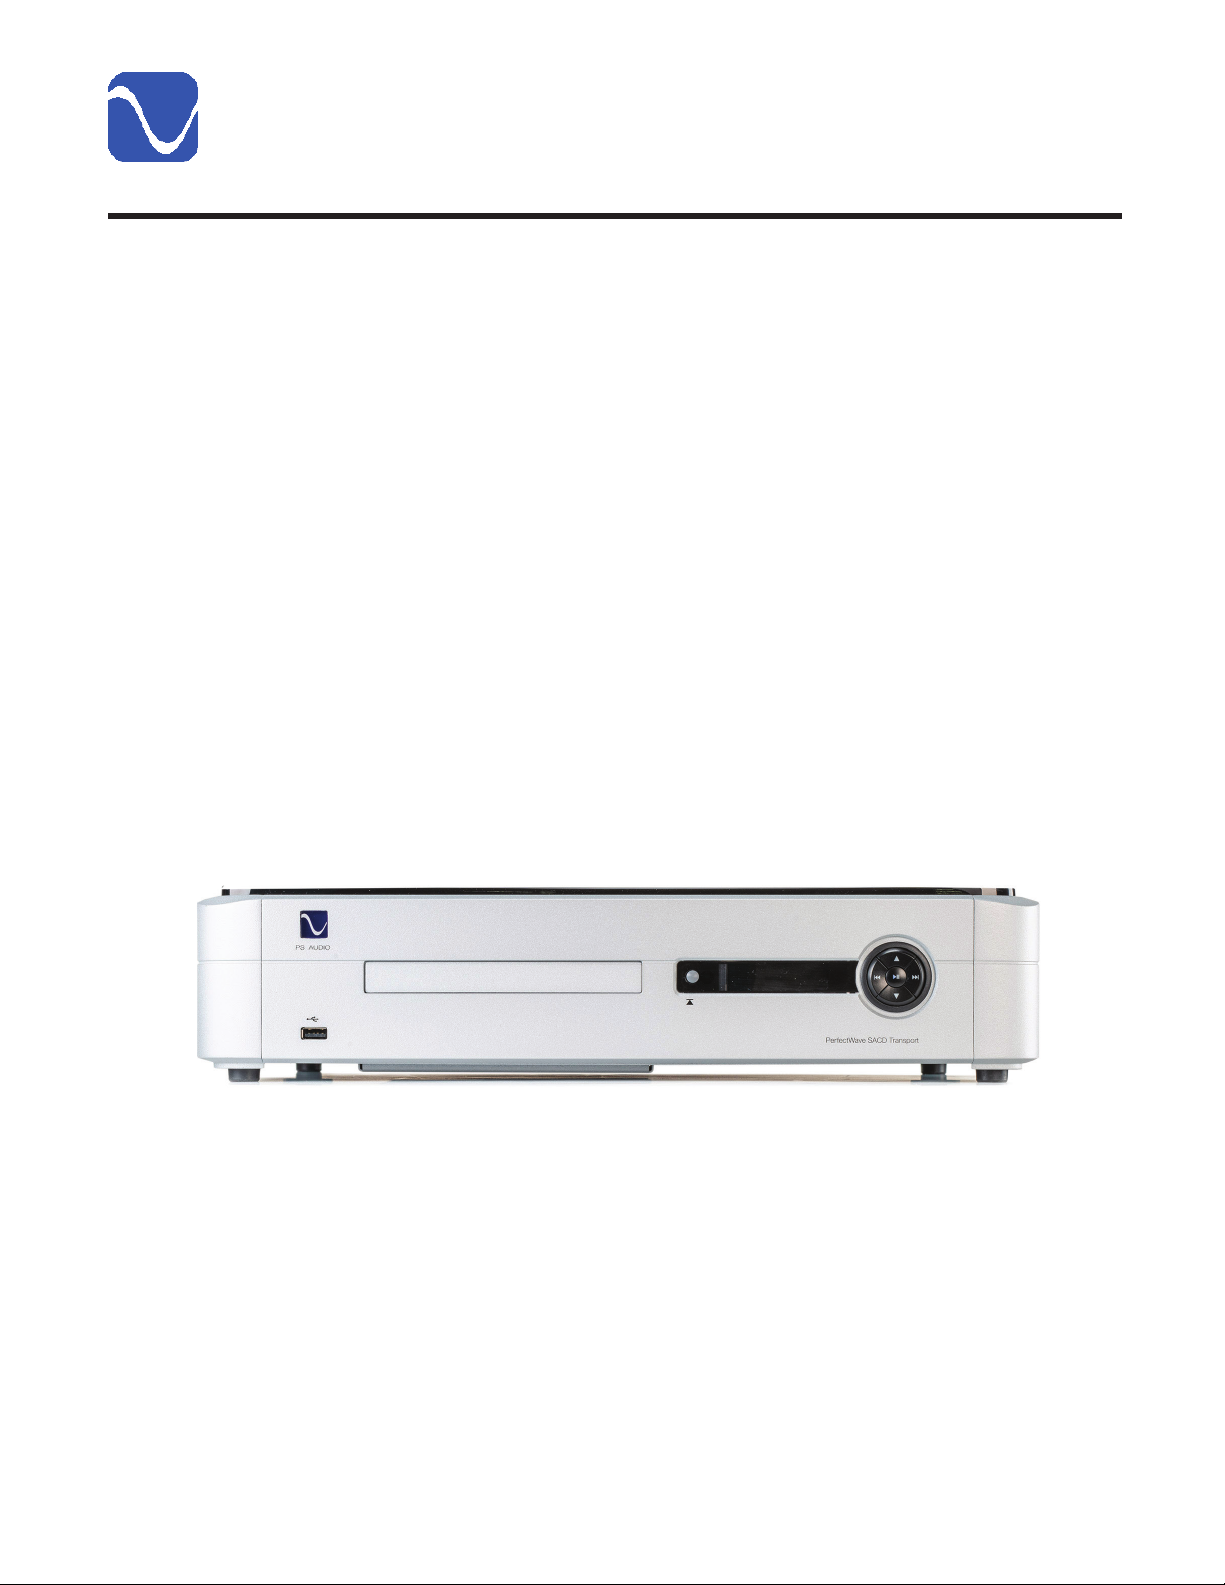
The PST oers simple operation from its front panel or the included remote control. Be aware
that many of the front panel buttons are multi-function in nature and will perform dierent
functions according to whether they are pushed with a short press or a long press. The functions
are explained in detail later in the manual.
Unique Architecture
At the heart of the PSD is PS Audio’s Digital Lens. Invented in 1993 by PS Audio founder Paul
McGowan and chief engineer, Bob Stadtherr. The Digital Lens electrically isolates the mechanical
transport/laser mechanism from the unit’s digital output stage, reducing jitter and timing artifacts,
and focuses the audio data into a single bit-perfect and timing-accurate stream to your DAC.
Galvanically Isolated Output Stage
The Perfect Wave SACD Transport also incorporates a newly-developed galvanically isolated
output stage. This feeds the output of the all-new drive mechanism to the transport’s Digital
Lens with a design that completely eliminates noise or ground contamination. The sonic results
are new levels of image specicity, openness and eortlessness of musical reproduction. Never
before have we experienced noise levels this low, a seemingly velvet blackness that must be
experienced to be understood.
Proprietary Digital Lens Technology
In digital audio, timing is everything. Jitter, noise, and a lack of isolation all have major impacts
on sound quality, especially aecting lower-resolution media such as CD. The PST’s latest-gen-
eration Digital Lens technology solves timing, noise and isolation problems through a unique
combination of buer memory and FPGA (Field-Programmable Gate Array) based digital
processing.
Plays the DSD Layer on SACD
PS Audio’s engineering team has incorporated a host of additional advancements into the
PerfectWave SACD Transport. The PST features a new Memory Player transport with an im-
proved Digital Lens buer. Separate power supplies are employed throughout the circuit. In
addition, the PerfectWave SACD Transport requires no setup – just connect it to a DAC and
press Play.
The PST is able to play the DSD layer of SACD discs when used with a compatible DAC such as
the PS Audio DirectStream series DACs, or a component with a built-in DAC like the PS Audio
Stellar Strata.
With the PS Audio PerfectWave SACD Transport and a compatible DAC or audio component, listeners
can now enjoy the highest level of DSD audio reproduction from SACD discs, and superior CD playback.
Through our advanced interface, pure DSD is streamed to, and processed in, the same reference
quality DAC used by mastering engineers like Gus Skinas, Cookie Marenco and Steve Homan to
name a few. The PST will play back pure DSD only through DACs employing PS Audio’s I2Sprotocols.

PS Audio® Inc. 800PSAUDIO 4865 Sterling Drive Boulder, Colorado 80301 77
Operating Manual
Getting Data Out of the PST
There are a number of ways to get digital audio data out of the PS Audio PerfectWave SACD
Transport: via the S/PDIF, AES/EBU or I2S outputs. I2S is the preferred method if you have a PS
Audio DAC or any manufacturer’s DAC that can receive it.
Note that all of the PST’s outputs are active at all times. There is no need to select which output
is operational. If desired, multiple outputs can be connected to multiple DACs.
I2S is the Preferred Delivery Method
Standard digital outputs require three separate internal clocks along with the raw music data
and combine them into one stream to the DAC. This mashup of music and clocks causes the
audio to sound at and harsh compared to listening via I2S.
I2S oers a much better way of delivering the music. By transferring the clocks and data on
separate wires within the HDMI cable, the audible results are impressive. Simply use any
high-quality HDMI cable between the PST and a compatible DAC and the data will be transferred
perfectly. The quality of the cable can have a signicant eect on the sound quality. Experiment.
A growing number of DACs and devices are adopting the PS Audio I2S over HDMI standard for
digital audio transmission because of its superior audio quality.
Playback from a USB Drive
The PST can also play les from a USB drive that is plugged into its front panel USB port.
Sub-folders are not supported and only les in the root directory are played.
Simple Front Panel Interface
The PST features a simple, straightforward front panel control interface featuring an Open/
Close button and control ring, which operate in conjunction with the front panel display.
Placement of the PST
A good location for the PerfectWave SACD Transport is in a cabinet or on a shelf at an easily
accessible height.
The IR (infrared) receiver for the remote control is located to the left of the front panel display. A
direct line of sight will help to ensure the PST’s IR sensor operates properly.
Digital outputs
The PST oers multiple digital output choices including: XLR, BNC, RCA coax, and I2S (HDMI).
All outputs are capable of delivering high-denition digital audio signals.
The PST’s I2S connector transfers I2S digital audio through the use of an HDMI cable. This data
link can only be used with another compatible component and will not work in other HDMI
equipment as the I2S format does not comply with the HDMI standards. The HDMI connector

PS Audio® Inc. 800PSAUDIO 4865 Sterling Drive Boulder, Colorado 80301
®
88
Operating Manual
and cable were chosen to carry the I2S signal because of their superior high-speed data
transmission capabilities for multiple clocks and data lines. PS Audio publishes its I2S standard
and it has been adopted by multiple other manufacturers as well.
The PerfectWave SACD Transport can deliver the locked DSD layer of an SACD disc to
compatible PS Audio DACs and integrated ampliers, such as the DirectStream DAC, Stellar
GainCell Preamplier and Stellar Strata integrated amplier. Future PS Audio DACs may also
be included.
HDMI for I2S
The DSD layer on an SACD may only be played through the PST’s I2S output. DSD les on the
USB drive or burned to a DVD may be played on any output.
Unpacking the unit
Carefully unpack the PST. Use the included cotton gloves to remove the unit and place it in the
chosen location.
The piano black top cover has a protective plastic lm. Remove this.
Connect the PST to your digital sources using the appropriate connections.
Connect the AC cable into the receptacle in back and plug the unit into your PS Audio Power
Plant, other power conditioner or into the wall.
Registering Your PerfectWave SACD Transport
PS Audio products come from the factory with a three-year warranty. Please register your
new PST. Registration takes just a few minutes, assures that you will be informed about future
upgrades, keeps track ofyour serial number and allows us to maintain the highest standards of
product quality of any company.
To register your new unit, look on the back panel of your PST and note the serial number. Then
go to www.psaudio.com and click on Register Products.
Once you have completed the registration process you can then go to the PS Audio website
and look at the My Registered Products page. The link to this page is located at the top right
hand corner of the website once you are logged in. If you do not have web access you may
register the unit via mail or phone. Notication of software upgrades to this product will be
available only to owners who registered via the web and email.
PST Output Options
The PST has multiple output possibilities, including I2S through an HDMI connector, AES/EBU
through the XLR balanced connector, and S/PDIF through the RCA and BNC coax connectors.

PS Audio® Inc. 800PSAUDIO 4865 Sterling Drive Boulder, Colorado 80301 99
Operating Manual
The stereo digital outputs of the PST can be transferred through three types of connections.
I2S Sources
PS Audio’s recommended connection to DACs is through its I2Sprotocol. I2Sdelivers the best
sonic experience by separately transmitting data and clocks over an HDMI cable. A growing
number of high-end audio DACs have adopted PS Audio’s I2S standard, which we freely oer
and support to the high-end audio manufacturing community. The PST is compatible with all
properly implemented DACs that are compatible with our published protocols.
Although an HDMI cable is used for the I2S connections it’s important to note that I2S data is not
HDMI data, and the PST’s I2S output should not be connected to the HDMI input on a DAC or
receiver. The HDMI connector and cabling are used only to deliver audio via I2S.
Connect a high-quality HDMI cable between the PST’s I2S output to a compatible DAC’s I2S (via
HDMI) input. Note: the quality and length of the HDMI cable have signicant impacts on audio
performance. The shorter the cable, the better the sound. We recommend using a ½-meter

PS Audio® Inc. 800PSAUDIO 4865 Sterling Drive Boulder, Colorado 80301
®
1010
Operating Manual
length if possible. Longer cables will work but make certain you install the highest-quality HDMI
cable possible within your budget.
Users can select what comes out of this output when an SACD is played. The choices are:
SACD (DSD), Stereo downsampled from the SACD layer (PCM), or Red Book audio (PCM).
The pure DSD output on an SACD disc’s master layer is available only through the I2S output. If
that connection is not present, the PST will default to playing the SACD’s CD layer.
Non I2Scompatible DACs will not reproduce the DSD layer of SACD in order to protect copyright
restrictions and guarantee illegal copying of the master layer is not possible.
If desired, it is possible to toggle through an SACD’s DSD layer and its CD layer if the appropriate
and compatible I2S connection has been established.
Coax and XLR Connections
XLR
If an I2S input is not available on your connected DAC, PS Audio recommends XLR as the
next-best connection. The XLR outputs provide a balanced digital output stream containing a
combined version of the musical data and multiple clocks.
Using a high-quality XLR data cable, connect either of the PST’s XLR outputs to the corresponding
input of your DAC.
To obtain double-rate DoP (DSD Over PCM) audio via the XLR outputs, connect both the Left
and Right (L and R) XLR outputs to the corresponding inputs on your DAC (if it is so equipped).
RCA or BNC (Coax)
Many DACs rely upon a coaxial digital connection to receive data. Digital audio transferred over
a single RCA or BNC coaxial cable is in the S/PDIF format (Sony/Philips Digital Interface), which
combines digital audio with multiple clocks on a single cable.
Using a high-quality RCA (or BNC) cable optimized for data transmission, connect the PST’s RCA
or BNC output to your DAC’s RCA or BNC input. To obtain double-rate DoP audio via the BNC
outputs, connect both the Left and Right (L and R) BNC outputs to the corresponding inputs on
a compatible DAC.
Connecting to a network
The PST connects to your home network using Wi or a standard Ethernet jack, to receive
rmware updates. Either enable Wi or connect the Ethernet jack to your home network. We
recommend using a CAT5 or CAT6 cable for upgrades. In addition, in order to make sure your
PST is fully compliant with international regulations, please install the included ferrite noise
suppressor onto the Ethernet cable, around the end of the cable closest to the unit.

PS Audio® Inc. 800PSAUDIO 4865 Sterling Drive Boulder, Colorado 80301 1111
Operating Manual
Note: It is not necessary to enable Wi or connect the Ethernet for normal playback operation
of the PST.
The network connection should be to an internet-connected router or through a wireless
Ethernet bridge connected to a router. The PST’s Internet connection via the network cable will
be automatic through any DHCP-enabled network. Most Internet setups in the home or oce
are DHCP-enabled and connection should take place within a very short period of time.
You can look on the front panel display for verication of connection. When you are connected
to the internet and the PST is powered up Ethernet icon will be displayed on the icon bar at the
top of the screen. If the network is not connected, no icon will appear in the icon bar.
The PST can also receive factory rmware updates via its network connection, should they
become available. In addition, the PST has a built-in Wi-Fi antenna, which can be used to
receive factory supplied network rmware updates.
Powering the PST
Once all the digital audio and network connections are made, use a high quality AC cable to
connect the PST to an AC wall outlet or AC outlet of a power conditioner. The supplied AC
power cord will work but upgrading to a high-end power cord, as well as the use of a PS Audio
Power Plant AC Regenerator if possible, will oer sonic benets.
PS Audio produces an entire line of high-quality power cables that are generally accepted
as being some of the best in the industry. Whatever you choose, make sure it honors the
music.
Turn the AC power switch on the rear of the PST to the ON position. The power switch is
located above the AC inlet as you face the rear panel.

PS Audio® Inc. 800PSAUDIO 4865 Sterling Drive Boulder, Colorado 80301
®
1212
Operating Manual
The PS Audio logo button, located on the upper left hand corner of the unit, is the Idle/Operation
Mode control for the PerfectWave SACD Transport. This control has two modes: Idle Mode and
Operational Mode. Idle Mode is designed to keep power on to critical internal circuitry including
power supply capacitors, thermally sensitive semiconductors and integrated circuits.
Idle Mode
The master power switch on the rear panel should remain on at all times. When your connected
equipment is not in use, the PerfectWave SACD Transport can be placed in Idle mode. Putting
your unit in Idle mode will deactivate all of its output relays.
Idle mode can be activated/deactivated by pressing the PS Audio logo button, located on the
upper left hand corner of the PerfectWave SACD Transport front panel. When the logo button
is not lit, the PST is in Idle mode. Idle mode can also be activated/deactivated by pressing the
On/O button in the top left hand corner of the remote.
CAUTION: Activate Idle mode before powering down your unit using the rear panel master
power switch.
Operating the PST
Front panel controls
All functions of the PS Audio PerfectWave SACD Transport can be accessed via the Open/
Close/Menu Access button, front panel control ring and menu display.
Open/Close/Menu Access Button
The Open/Close/Menu Access button is the round black button to the left of the display. It is
used to open and close the disc loading tray. Press it to open the tray and press it again to close
the disc tray. You can also press gently on the front of the tray itself to close it.

PS Audio® Inc. 800PSAUDIO 4865 Sterling Drive Boulder, Colorado 80301 1313
Operating Manual
Holding down the button will access the Menu display.
The Display
The front panel display will show various information according to the function selected,
including track number and duration, elapsed time, disc type and other information.
By default, the display shows the track number and remaining time of the currently playing track.
To display the elapsed time of the currently playing track, long press the up arrow navigation
button on the control ring. To insure it is set to the correct mode (remaining or elapsed), this
may be done while a track is playing. Once selected, the remaining/ elapsed time mode will not
change unless the unit is powered o in the back.
The Front Panel Control Ring
The ve buttons on the control ring can have dierent functions depending on whether the
button is given a short press or a long press.
For Disc Playback
Center: A short press will begin play of the selected source. If a disc is playing, another short
press will pause the disc. A long press will stop disc playback. The dierence between pause and
stop is that pause will halt at the current track and time and the SACD drive will continue to spin.
Pressing stop will return to the beginning of track 1 and the SACD drive will spin down and stop.
Right: A short press will skip backwards to the previous track. On the rst press, it will skip
back to the beginning of the current track. If pressed within the rst three seconds of a track, it
will skip back to the previous track.

PS Audio® Inc. 800PSAUDIO 4865 Sterling Drive Boulder, Colorado 80301
®
1414
Operating Manual
Left: A short press will skip to the next track.
Up: While a track is playing, a short press will cause the player to enter fast-forward mode,
scanning through the track at approximately ten times the normal playing speed. Pressing the
Up key any key will bring the PST out of fast forward mode and the disc will go back to playing
normally.
A long press (more than two seconds) on the Up button will toggle the time display to show either
remaining time (counting down) or elapsed time (counting up). The default is remaining time.
Down: While a track is playing, a short press will cause the player to enter fast-rewind mode,
scanning backward through the track at approximately ten times the normal playing speed.
Pressing the Down key or the center (Play) key will bring the PST out of fast rewind mode and
the disc will go back to playing normally.
A long press (more than two seconds) on the Down button will toggle the time display to be
either remaining time (counting down) or elapsed time (counting up). The default is remaining
time.
Playing from a USB Drive
The front panel USB input on the PST is available for small music collections stored on USB
drives. Simply plug in a USB stick and its contents can be accessed and played back through
the PST using the same controls on the front panel or the remote control that would be used for
disc playback. The tracks on the USB drive can be navigated via the front-panel controls or the
remote control. The PST supports the same le formats for USB and DVD discs.

PS Audio® Inc. 800PSAUDIO 4865 Sterling Drive Boulder, Colorado 80301 1515
Operating Manual
Note that while this front-panel input is a convenient way to access a limited amount of music – for
example, playing demo tracks from a friend’s collection or at an audio show – it is necessary to
scroll through the tracks one by one, which can be time-consuming. As such, this input should be
viewed more as a courtesy port than a primary means of connecting music.
Menu Features
The PST features a menu display system that is accessible using the small selector button
and control ring. It’s a good idea to familiarize yourself with the dierent functions in the PST’s
menu. To access the menu, simply press and hold the menu button to the left of the display. A
gear icon will appear in the upper right corner showing that you are in the Settings menu.
To scroll through the available menu options, use the left and right arrow buttons on the
control ring.
To scroll through the available options for a menu item, use the control ring up and
down buttons.
Exiting the Menus
Executing a long press of the menu button (holding for more than two seconds) or the center
Play/Pause button will exit the menus and return the unit to the Home screen. The menus
will also timeout after seven seconds. Note that some settings (such as repeat) take eect
immediately, while other settings will not take eect until a nal selection is made and you exit
the menus (such as selecting Source).
Repeat: Toggles between o, repeat song and repeat album.
Source: Toggles between disc or USB source.
Layer: Toggles between DSD and CD layer on SACDs.
Version: This menu display shows the versions of the PST’s rmware. If you need to contact our
customer service team for help with your unit, please have this information ready.
More Settings
There are additional, less often used features in the Settings sub-menus. The features are divided into
two groups: System, and Network. Sub-menus are displayed on the screen with a triangle pointing to the
right. To enter these sub-menus, use the navigation keys until the desired sub-menu is displayed, then
double-press the menu button or single press the center Play/Pause button to go into the sub-menu.

PS Audio® Inc. 800PSAUDIO 4865 Sterling Drive Boulder, Colorado 80301
®
1616
Operating Manual
System sub-menu
Backlight: The brightness of the display can be adjusted to suit your room lighting any your
tastes. The range is from 1 to 10.
Update: This feature will automatically update the rmware in the PST. The rmware will be
downloaded over your network so the unit will need to be connected to the internet via Cat 5
or Wi-Fi
Factory Reset: This feature allows you to reset all of the conguration settings back to what
they were when the PST was shipped from the factory. Any custom settings, Wi-Fi networks, or
any other settings you have made will be erased.
Network sub-menu
Network Status: This menu item will show you information about your network connection,
including Wired/Wi-Fi, IP address, and connection status. This menu is information only, there
are no settings.
Wi Enable: This feature allows you to enable/ disable the wireless (Wi-Fi) functionality. (Not
available in Japan).
WPS: This feature is for using WPS (Wi-Fi Protected Setup) to congure your PST with your
network without the need to enter passwords. Use this menu to activate the WPS feature, then
press the corresponding WPS button on your router. Your PST will then be connected to your
Wi-Fi network automatically.
Wi Setup sub-menu: This menu is used to manually setup a Wi-Fi network connection.
Network Select: Select your Wi router from the drop down menu using the Up or Down arrow
keys to select the correct AP (access point). Press the menu select button or center Play/Pause
button to choose the AP.
SSID Accept: Available network resources are identied by their SSID. Rotate the volume knob
to Accept or Cancel the AP SSID selection.
Password Screen: Press the Up or Down arrow keys to scroll through the characters. If you
press and hold the Up or Down arrow key, the PST will scroll quickly through the characters.
Press the menu select, the center Play/Pause button, or the Right key to select the character
and enter the next character. Double-press the menu select button or use the Left arrow key to
backup one character. Once the last character is entered long press the menu select button or
long press the center Play/Pause button to save the password. The PST will connect to your
access point (router). The characters are arranged by capital letters, lower case letters number
1-9, then 0. The character after the 0 is a space character. The remaining characters are special

PS Audio® Inc. 800PSAUDIO 4865 Sterling Drive Boulder, Colorado 80301 1717
Operating Manual
characters (!, @, #, etc...). It may be faster to nd the number characters by going backwards
from the A.
Using the Remote Control
Your PS Audio PerfectWave SACD Transport is supplied with a full-function remote control. In
addition to operating the PST, the remote can also control compatible PS Audio components such
as the Stellar Strata Integrated Amplier, Stellar GainCell Preamplier, DirectStream DAC, BHK
Signature Preamplier and other PS Audio products.
The operation of the PST’s remote control is intuitive, with standard icons and controls corresponding
to familiar functions such as Play/Pause, Stop, Next Track, Previous Track, direct track number
access and so on.
The remote comes supplied with two AAA batteries. Please remove the back cover and insert the
batteries in the correct orientation.
Idle Mode
Use the “O ” button to put the unit
in Idle mode. Use the “On” button to
return it to the operating mode.
Display Dim
Pressing the “Dim” button will turn
o the display and all the indicators
on your PerfectWave SACD
Transport. Any time you press any
button on your remote control, the
PST will wake up and reactivate
the display and indicators for 7
seconds. After 7 seconds with
no button activity, the display will
go dark again. Pressing the “On”
button will restore the PST display
to normal operation.
Emergency eject of a stuck disc
I
n the unlikely event that a disc gets
stuck in the PST, the rst thing to
try is a reboot of the unit. Turn o
the main rear panel power switch.
Wait 10 seconds, then turn the
switch back on. Once the PST
has initialized, use the front panel

PS Audio® Inc. 800PSAUDIO 4865 Sterling Drive Boulder, Colorado 80301
®
1818
Operating Manual
Open/Close/Menu Access button or the Open/Close button on the remote control to open
the drawer and remove the disc.
If the reboot doesn’t work, an emergency procedure is available. On the bottom panel of the PST
there is a slot just behind the front panel drawer. Using a sharp-bladed object such as a pocketknife,
or a small athead screwdriver, engage the mechanical release mechanism and pull it down to
manually slide the PST’s door open as shown in the photo.
Upgrading the Firmware
At times PS Audio may introduce rmware updates that upgrade the functionality of the PerfectWave
SACD Transport. This is done through the network, or manually with a USB drive.
To check for the current rmware version of your unit go to Menu and scroll down to the Versions
menu. Compare the version number to the latest rmware available on the PS Audio-Resourc-
es-Downloads section of www.psaudio.com. If you need the latest version, you can download the
rmware update at no charge.
After downloading the les, unzip them and transfer them to a blank USB stick. Then place the
stick in the rear panel USB slot of the PST labeled FW. Turn o the rear panel power switch, wait
for 10 seconds and then turn the power switch to the On position, which will reboot the PST. The
front panel logo (Ready) light will begin blinking, indicating that the new rmware is being installed.
DO NOT SHUT OFF THE POWER OR DO ANYTHING ELSE WHILE THE UPDATE PROCESS IS
TAKING PLACE. BE PATIENT AND WAIT UNTIL THE LOGO LIGHT STOPS BLINKING.
Once the light stops blinking, keep the power to the PST on until it has fully initialized and is ready
for operation again. Then, remove the USB stick and then, once again using the rear panel power
switch, power cycle the PST.
Care of the PST
The PS Audio PerfectWave SACD Transport is constructed from durable and attractive materials.
However, should minor scratches occur in the top cover, they can be removed with any high-quality
automotive scratch removal product such as Kit’s Scratch Out or the appropriate Meguiar’s
products. Automotive nishing polish and wax can both be used on the top plate to bring out a
beautiful luster.

PS Audio® Inc. 800PSAUDIO 4865 Sterling Drive Boulder, Colorado 80301 1919
Operating Manual

PS Audio® Inc. 800PSAUDIO 4865 Sterling Drive Boulder, Colorado 80301
®
2020
Warranty Information
Product registration
By registering your product, you are validating the start date of your limited warranty. This
limited warranty is in eect for 3 years from the date the unit was rst purchased from PS Audio
or its dealers and agents. If you do not register your product within 30 days of service, a copy
of your purchase receipt from an authorized PS Audio dealer may be used as proof of purchase
to establish the warranty start date. If no proof of purchase from an authorized PS audio dealer
or registration is provided, the production date of the product will be used to determine the
warranty start date. You can register your product online, by phone, by mail, or by email.
What this warranty covers
This warranty covers defects in material and workmanship for products purchased from PS
Audio or its authorized dealers and agents. In the event your product fails, your sole remedy
under this limited warranty shall be to return the product to PS Audio or an authorized PS Audio
repair center. At the option of PS Audio, the product will be repaired without charge for parts or
labor, replaced, or the purchase price refunded through the original point of purchase.
Shipping
You are responsible to pay for the safe and proper shipment of the warrantied product to PS
Audio or its authorized repair center. Under this limited warranty, PS Audio or its authorized
repair center will pay the cost of returning the repaired or replacement product to you.
What this warranty does not cover
This warranty does not cover damage due to:
• Accidents, carelessness, improper transportation, misuse, neglect, or abuse
• Failure to follow the operating instructions that are provided by PS Audio in the Owner’s
Reference Manual (available for download at www.psaudio.com)
• Use in any manner inconsistent with PS Audio’s operating instructions (available for download
at www.psaudio.com)
• Lack of routine maintenance
• Connection to an improper voltage supply
• Alterations or modications to the unit
• Improper or unauthorized repair, including repairs not authorized by PS Audio or a PS Audio
authorized repair center
• Fire, lightning, ood, “Acts of God,” or other contingencies beyond the control of PS Audio
• Products purchased through an unauthorized source (if you have questions as to whether or
not a dealer is authorized, please contact customer support at www.psaudio.com
• Products with a factory-applied serial number that has in any way been altered, defaced, or
removed
Limitations under this warranty
In no event will PS Audio’s liability to you exceed the original purchase price of your unit. This
warranty does not cover the cost of custom installation, customer instruction, setup adjustments,
or signal reception problems. Consequential and incidental damages are not covered under
This manual suits for next models
1
Table of contents
Other PS Audio CD Player manuals