Psiber Data Systems CableMaster CM400 User manual

CableMaster
CM400
Quick Start Guide
Testing:
A. Plug the wire into the correct Test Port, Ethernet to RJ45
B. Plug the opposite end into the Main Remote
C. Press Network Button
D. The LCD Display reports wire condition, Pass/Fail
E. To turn off, press O/ID Button
Toning:
A. With the unit turned OFF, hold down the TONE button until
LCD illuminates
B. To select a tone cadence, press the TONE button repeatedly to step through
the four cadence options: HI, LO, Hi-Lo1, and Hi-Lo1. Stop when you reach the
option you want. The option you select determines the cadence sent from the
main tester, through the cable, and picked up by the tone tracer probe.
C. Press the appropriate cable type button (voice, video, or data) to select a
cable for the tone signal
* Note: Tone is detected by a tone tracer probe
Features:
Testing: CM400 shows Opens, Shorts, Miswires, Split Pairs, PASS and
FAIL results quickly.
Toning: CM400’s built-in tone generator is a fl exible and function-packed
tone generator. Its confi gurable signal can be generated to fi nd and fi x the
position on any type of cable - either exposed or hidden, in ceilings or
behind walls.
Option: CM400 is supported by (1-19) wiremapping ID locators (Network/Coax).
Button Function
1. LCD Display
2. Voice Mode
3. Video Mode
4. Data Mode
1
4
3
6
7
5
2
5. Tone Mode
6. On/Off and ID Mode
7. Main Unit Remote
(RJ11, RJ45)
CableMaster
CM400
Quick Start Guide
Kurzanleitung
Guide de Démarrage Rapide

CableMaster
CM400
Quick Start Guide
Testing:
A. Plug the wire into the correct Test Port, Ethernet to RJ45
B. Plug the opposite end into the Main Remote
C. Press Network Button
D. The LCD Display reports wire condition, Pass/Fail
E. To turn off, press O/ID Button
Toning:
A. With the unit turned OFF, hold down the TONE button until
LCD illuminates
B. To select a tone cadence, press the TONE button repeatedly to step through
the four cadence options: HI, LO, Hi-Lo1, and Hi-Lo1. Stop when you reach the
option you want. The option you select determines the cadence sent from the
main tester, through the cable, and picked up by the tone tracer probe.
C. Press the appropriate cable type button (voice, video, or data) to select a
cable for the tone signal
* Note: Tone is detected by a tone tracer probe
Features:
Testing: CM400 shows Opens, Shorts, Miswires, Split Pairs, PASS and
FAIL results quickly.
Toning: CM400’s built-in tone generator is a fl exible and function-packed
tone generator. Its confi gurable signal can be generated to fi nd and fi x the
position on any type of cable - either exposed or hidden, in ceilings or
behind walls.
Option: CM400 is supported by (1-19) wiremapping ID locators (Network/Coax).
Button Function
1. LCD Display
2. Voice Mode
3. Video Mode
4. Data Mode
1
4
3
6
7
5
2
5. Tone Mode
6. On/Off and ID Mode
7. Main Unit Remote
(RJ11, RJ45)
CableMaster
CM400
Quick Start Guide
Button Function
1LCD Display 5 Tone Mode
2Voice Mode 6On/Off and ID Mode
3Video Mode 7Main Unit Remote
4Data Mode (RJ11/RJ12, RJ45)
English

A. Plug the wire into the correct Test Port, e.g. Ethernet to RJ45
B. Plug the opposite end into the Main Remote
C. Press Network Button
D. The LCD Display reports wire condition, Pass/Fail
E. To turn off, press O/ID Button
Toning:
A. With the unit turned OFF, hold down the LENGTH/TONE button until LCD
illuminates
B. To select a tone cadence, press the LENGTH/TONE button repeatedly to
step through the four cadence options: HI, LO, Hi-Lo1, and Hi-Lo 2. Stop
when you reach the option you want. The option you select determines
the cadence sent from the main tester, through the cable, and picked up
by the tone tracer probe*.
C. Press the appropriate cable type button (voice, video or data) to select a
cable for the tone signal
* Note: Tone is detected by a tone tracer probe (optional)
Features:
Testing: CM400 shows Opens, Shorts, Miswires, Split Pairs, PASS and
FAIL results quickly.
Toning: CM400`s built- in tone generator is a flexible and function- packed
Tone generator. Its configurable signal can be generated to find and fix the
position on any type of cable – either exposed or hidden, in ceilings or
behind walls.
Length: CM400 determines the length (in feet or meters) of an entire cable
and/ or individual wire pairs within the cable.
Option: CM400 is supported by (1-19) wiremapping ID locators (Network/
Coax) and (1-8) testing/ID remotes (Network/Telephone).
English

CableMaster
CM400
Quick Start Guide
Testing:
A. Plug the wire into the correct Test Port, Ethernet to RJ45
B. Plug the opposite end into the Main Remote
C. Press Network Button
D. The LCD Display reports wire condition, Pass/Fail
E. To turn off, press O/ID Button
Toning:
A. With the unit turned OFF, hold down the TONE button until
LCD illuminates
B. To select a tone cadence, press the TONE button repeatedly to step through
the four cadence options: HI, LO, Hi-Lo1, and Hi-Lo1. Stop when you reach the
option you want. The option you select determines the cadence sent from the
main tester, through the cable, and picked up by the tone tracer probe.
C. Press the appropriate cable type button (voice, video, or data) to select a
cable for the tone signal
* Note: Tone is detected by a tone tracer probe
Features:
Testing: CM400 shows Opens, Shorts, Miswires, Split Pairs, PASS and
FAIL results quickly.
Toning: CM400’s built-in tone generator is a fl exible and function-packed
tone generator. Its confi gurable signal can be generated to fi nd and fi x the
position on any type of cable - either exposed or hidden, in ceilings or
behind walls.
Option: CM400 is supported by (1-19) wiremapping ID locators (Network/Coax).
Button Function
1. LCD Display
2. Voice Mode
3. Video Mode
4. Data Mode
1
4
3
6
7
5
2
5. Tone Mode
6. On/Off and ID Mode
7. Main Unit Remote
(RJ11, RJ45)
CableMaster
CM400
Kurzanleitung
Funktionstasten
1. LCD Display
2. Sprachmodus
3. Videomodus
4. Datenmodus
Deutsch
5. Tonmodus
6. Ein/Aus und ID-Modus
7. Remoteeinheit
(RJ11/RJ12, RJ45)

5. Tonmodus
6. Ein/Aus und ID-Modus
7. Remoteeinheit
(RJ11/RJ12, RJ45)
A. Schließen Sie ein Kabelende an die RJ45 Buchse am Hauptgerät an.
B. Schließen Sie das andere Ende an die RJ45 Buchse der Remoteeinheit an.
C. Drücken Sie die Taste Netzwerk.
D. Auf dem Bildschirm wird das Ergebnis mit Pass/Fail und der Verdrahtungs-
plan angezeigt
E. Zum Ausschalten des Gerätes drücken Sie die Taste O/ID
Tonverfolgung:
A. Bei ABGESCHALTETEM Gerät halten Sie die Taste TON solange gedrückt,
bis der Bildschirm aufleuchtet
B. Zum Auswählen eines von vier möglichen Tonmustern drücken Sie die
Taste TON wiederholt, bis das gewünschte Tonmuster angezeigt wird (HI,
LO, Hi-Lo1 und Hi-Lo2). Vom Hauptgerät wird das gewählte Tonsignal auf
das Kabel gesendet und kann nun mit dem Tonverfolger geortet werden
C. Drücken Sie die entsprechende Taste für den Kabeltyp (Voice - Sprache,
Video oder Data - Daten), der mit diesem Tonsignal beaufschlagt werden
soll.
* Hinweis: Der Ton wird mit einem Tonverfolger geortet (optionales Zubehör).
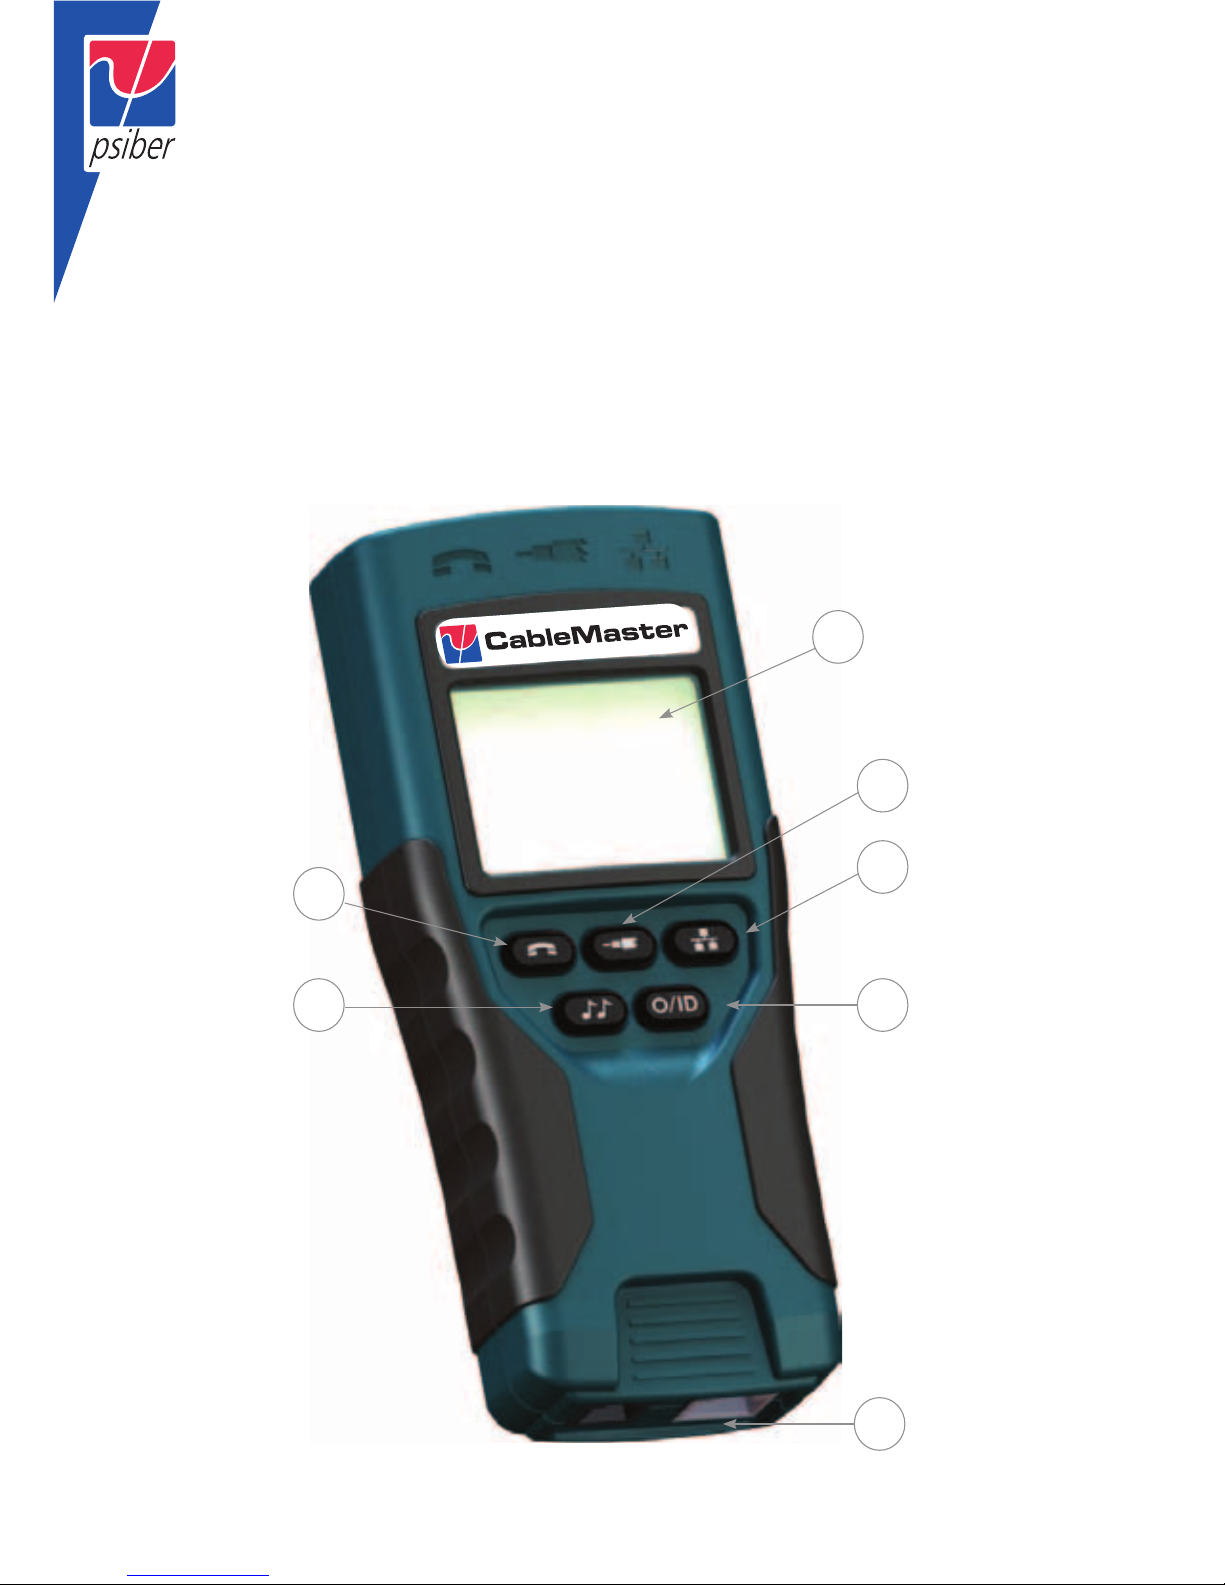
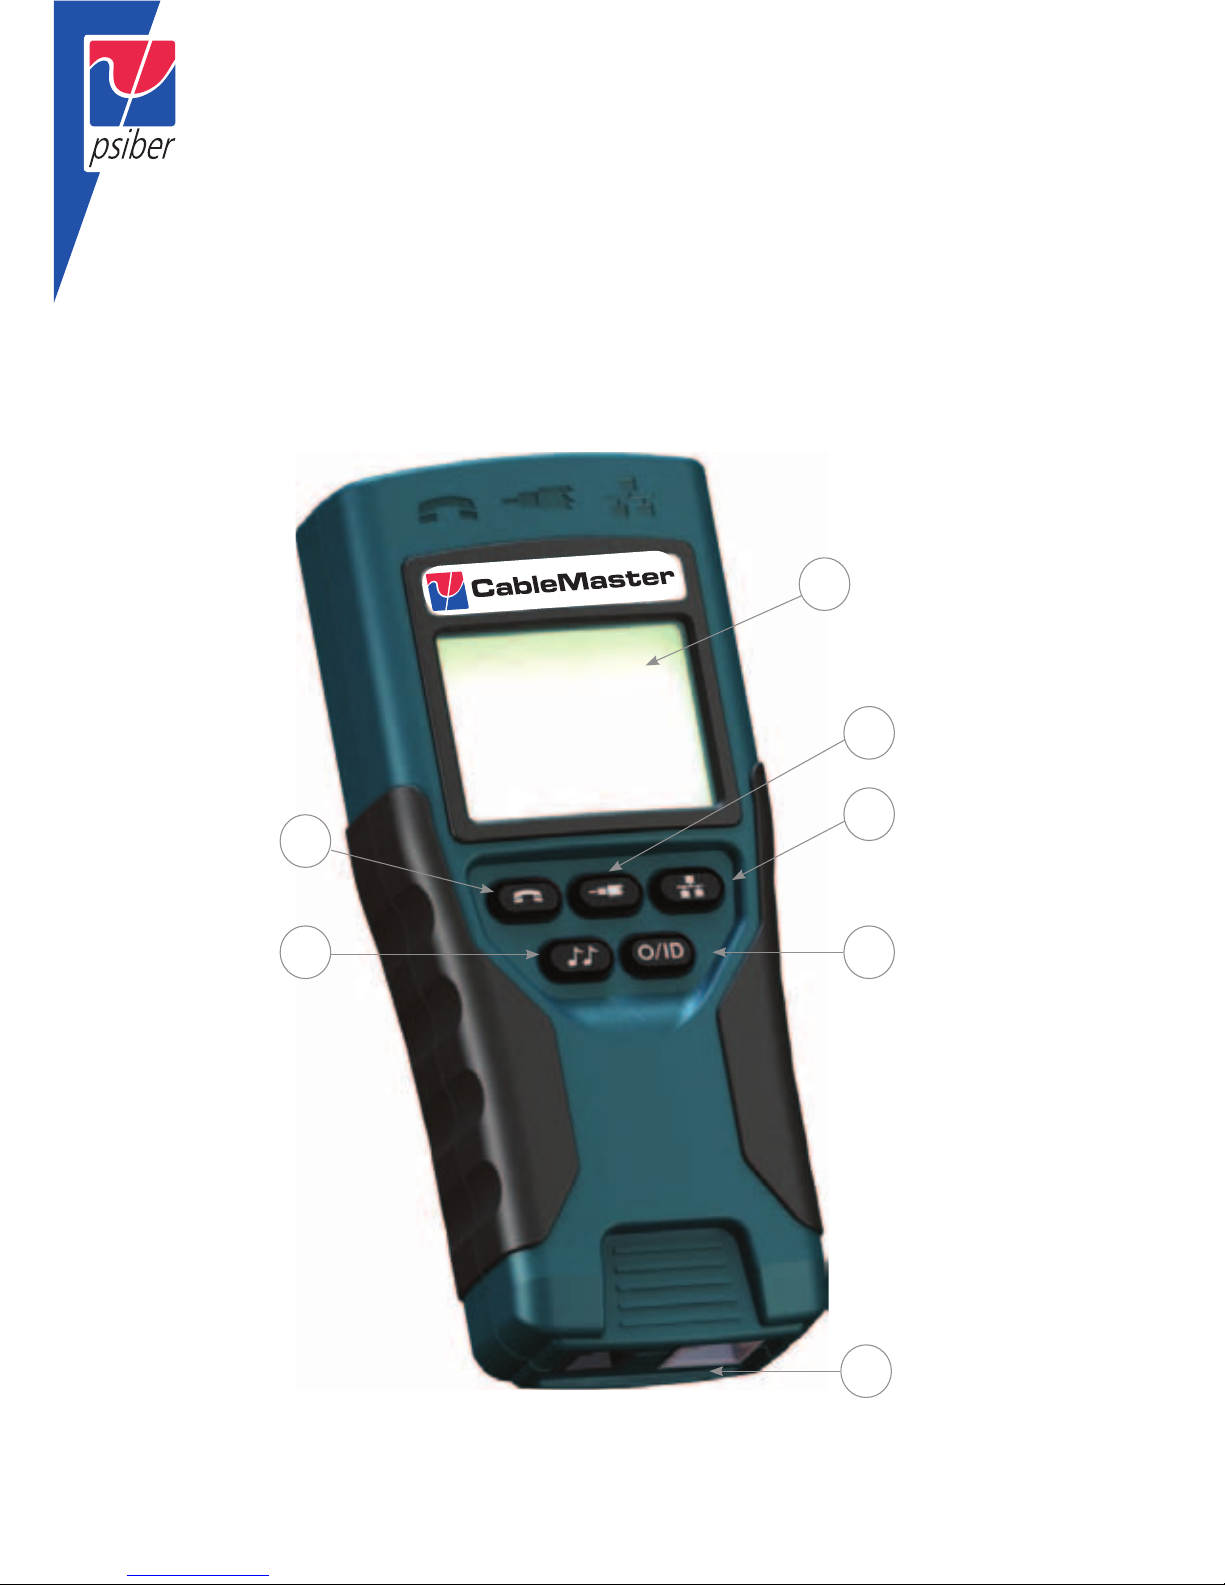
Funktionsmerkmale:
Test: Im Handumdrehen zeigt der CM400 Unterbrechungen, Kurzschlüsse,
Verdrahtungsfehler, Split Pair-Fehler, PASS und FAIL Ergebnisse auf dem
Bildschirm an.
Tonverfolgung: Der integrierte Tongenerator des CM400 kann flexibel auf die
Erzeugung von vier verschiedenen Tonmustern konfiguriert werden. Über das
Tonsignal ist es möglich, jedes Kabel zu orten und dessen Verlauf zu verfol-
gen – ob freiliegend oder unter Putz, in der Decke oder hinter der Wand.
Option: Zur Verwendung mit dem CM400 können (1 – 19) Fernerkennungen
(Netzwerk/Koaxial) zur Kabelerkennung und (1 – 8) Fernerkennungen (Netz-
werk/Telefon) zum Test/ID separat bestellt werden.
Deutsch

CableMaster
CM400
Quick Start Guide
Testing:
A. Plug the wire into the correct Test Port, Ethernet to RJ45
B. Plug the opposite end into the Main Remote
C. Press Network Button
D. The LCD Display reports wire condition, Pass/Fail
E. To turn off, press O/ID Button
Toning:
A. With the unit turned OFF, hold down the TONE button until
LCD illuminates
B. To select a tone cadence, press the TONE button repeatedly to step through
the four cadence options: HI, LO, Hi-Lo1, and Hi-Lo1. Stop when you reach the
option you want. The option you select determines the cadence sent from the
main tester, through the cable, and picked up by the tone tracer probe.
C. Press the appropriate cable type button (voice, video, or data) to select a
cable for the tone signal
* Note: Tone is detected by a tone tracer probe
Features:
Testing: CM400 shows Opens, Shorts, Miswires, Split Pairs, PASS and
FAIL results quickly.
Toning: CM400’s built-in tone generator is a fl exible and function-packed
tone generator. Its confi gurable signal can be generated to fi nd and fi x the
position on any type of cable - either exposed or hidden, in ceilings or
behind walls.
Option: CM400 is supported by (1-19) wiremapping ID locators (Network/Coax).
Button Function
1. LCD Display
2. Voice Mode
3. Video Mode
4. Data Mode
1
4
3
6
7
5
2
5. Tone Mode
6. On/Off and ID Mode
7. Main Unit Remote
(RJ11, RJ45)
CableMaster
CM400
Guide de Démarrage Rapide
Touches
1. Ecran LCD
2. Mode Voix
3. Mode Vidéo
4. Mode Données
France
5. Mode Tonalité
6. Marche/Arrêt et Mode ID
7. Unité Distante
(RJ11/ RJ12, RJ45)

5. Mode Tonalité
6. Marche/Arrêt et Mode ID
7. Unité Distante
(RJ11/ RJ12, RJ45)
A. Branchez une extrémité du câble sur le port RJ45 du testeur principal.
B. Branchez l’autre extrémité du câble sur l’unité distante.
C. Pressez la touche Network (Réseau).
D. L’écran affichera le résultat : Pass/Fail (Succès/Echec), schéma de câblage
E. Pour éteindre le testeur, pressez la touche O/ID.
Tonalité :
A. Le testeur éteint, tenez la touche TONE (Tonalité) enfoncée, jusqu’à l’écran
s’allume.
B. Pour sélectionner la tonalité, pressez la touche TONE plusieur fois et faites
votre choix entre quatre
tonalités : HI, LO, Hi-Lo1 et Hi-Lo2. Arrêtez, quand l’option désirée s’affiche.
Le testeur émettra la tonalité choisie sur le câble pour le dépister avec le
dépisteur de tonalité.
C. Pressez la touche appropriée au type de câble (voice - voix, video - vidéo,
ou data - données) pour transmettre la tonalité.
* Note : La tonalité sera détectée par un dépisteur de tonalité.((Accessoires
optionnels)
Caractéristiques :
Test : CM400 affiche rapidement les résultats de test: courts-circuits, circuits
ouverts, mauvais câblage, paires séparées (Split Pairs), Pass/Fail (Succès/
Echec).
Tonalité : Le générateur de tonalité incorporé dans le CM400 peut fl exible-
ment être confi gurré à la tonalité désirée pour trouver la position d’un prob-
lème sur chaque type de câble - si exposé ou encastré dans des plafonds ou
des murs.
Option : Le CM400 est soutenu par des (1-19) sondes à distance pour localiser
les câbles par l’identification (lID) de câbles (Réseau/Coaxial) et par des (1-8)
sondes à distance pour test/ID (Réseau/Téléphone).
France

www.psiberdata.com
For technical information and support please
contact the Psiber Ofce in your country.
Psiber US:
Psiber Data Sytems Inc.
7075-K Mission Gorge Road
San Diego, CA 92120
Phone: +1 (619) 287 99970
e-mail: info@psiber.com
www.psiber.com
Psiber Europe:
Psiber Data GmbH
Felix-Wankel-Str. 4
82152 Krailling
Germany
Phone: +49 (89) 8913 6060
e-mail: info@psiber-data.com
www.psiberdata.com
Psiber Data Pte. Ltd.:
3 Science Park Drive
#03-09 The Franklin
Singapore Science Park 1,
Singapore 118223
Phone: +65-6569-6019
e-mail: asiasales@psiber-data.com
www.psiberdata.com
Table of contents
Other Psiber Data Systems Cable Tester manuals
Popular Cable Tester manuals by other brands

Radiodetection
Radiodetection RD8100 Operation manual

VOLTCRAFT
VOLTCRAFT VC731 operating instructions

Tempo Fitness
Tempo Fitness 45055 instruction manual

Triplett
Triplett WireMaster HDMI2 instruction manual

Besantek
Besantek BST-IT30 instruction manual

Gardner Bender
Gardner Bender GST-55M quick start guide