PTM Engines 120F User manual

Gasoline Engine
Owner’s Manual
120F ●160F ●200F
240F ●270F ●340F ●390F●420F
Keep this owner's manual handy, so you can refer to it at any time.
This owner's manual is considered a permanent part of the engine and should remain with
the engine if resold.
The information and specifications included in this publication were in effect at the time of
approval for printing.
Only the D Type is equipped for both electric and manual starting.
RE D THIS OWNER’S M NU L C REFULLY. Pay special attention to these symbols
and any instructions that follow:
Indicates serious injury or deat will result if instructions are not followed.
Indicates
a
strong
possibility
t at
serious
injury
or
deat
could
result
if
instructions
are
not
followed.
Indicates
a
possibility
t at
minor
injury
or
an
result
if
instructions
are
not
followed.
Indicates t at equipment or property damage can result if
instructions
are
not
followed.
NOTE: Gives helpful information.
If a problem should arise, or if you have any questions about your engine, consult your
engine dealer.
CONTENTS

CONTENTS
2
1. ENGINE S FETY.............................. ........................... .............. ....... .......... 2
2. COMPONENTS & CONTROL LOC TIONS……………................................................3
3. CONTROLS................................. .................................... .......................... 4
4. CHECK BEFORE OPER TION .............................................................................. 6
5. OPER TION............................................................................................ 7
6. M INTEN NCE ……………………….......................................................................11
7. STOR GE/TR NSPORTING ...................................................................................23
8. TROUBLESHOOTING………………………………………………................................26
9. TECHNIC L & CONSUMER INFORM TION ……..……………………………………27
10. SPECIFIC TIONS .......................... ....... .................... ........................ ...... 33
11. WIRING DI GR MS ..................... ............................ ............... .......... .....36
12. OPTION L P RTS.................................................................................... 38
B TTERY................................................................................................. 38

ENGINE S FETY
3
1. ENGINE SAFETY
IMPORTANT SAFETY INFORMATION
Most accidents with engines can be prevented if you follow all instructions in this manual
and on the engine. Some of the most common hazards are discussed below, along with
the best way to protect yourself and others.
Owner Responsibilities
The
engines
are
designed
to
give
safe
and
dependable
service
if
operated
according
to instructions. Read and understand this owner’s manual before operating the engine.
Failure to do so could result in personal injury or equipment damage.
Know
how
to
stop
the
engine
quickly,
and
understand
the
operation
of
all
controls.
Never permit anyone to operate the engine without proper instructions.
Do not allow children to operate the engine. Keep children and pets away from the
area of operation.
Refuel Wit Care
Gasoline is extremely flammable, and gasoline vapor can explode. Refuel outdoors, in a
well-ventilated area, with the engine stopped. Never smoke near gasoline, and keep other
flames and sparks away. lways store gasoline in an approved container. If any fuel is
spilled, make sure the area is dry before starting the engine.
Hot Ex aust
The muffler becomes very hot during operation and remains hot for a while after
stopping the engine. Be careful not to touch the muffler while it is hot. Let the engine
cool before storing it indoors.
To
prevent
fire
hazards
and
to
provide
adequate
ventilation
for
stationary
equipment
applications, keep the engine at least 3 feet (1 meter) away from building walls and
other equipment during operation. Do not place flammable objects close to the engine.
Carbon Monoxide Hazard
Exhaust gas contains poisonous carbon monoxide. void inhalation of exhaust gas. Never
run the engine in a closed garage or confined area.
Ot er Equipment
Review the instructions provided with the equipment powered by this engine for any
additional safety precautions that should be observed in conjunction with engine startup,
shutdown, operation, or protective apparel that may be needed to operate the equipment.
COMPONENTS & CONTROL LOC TIONS
4
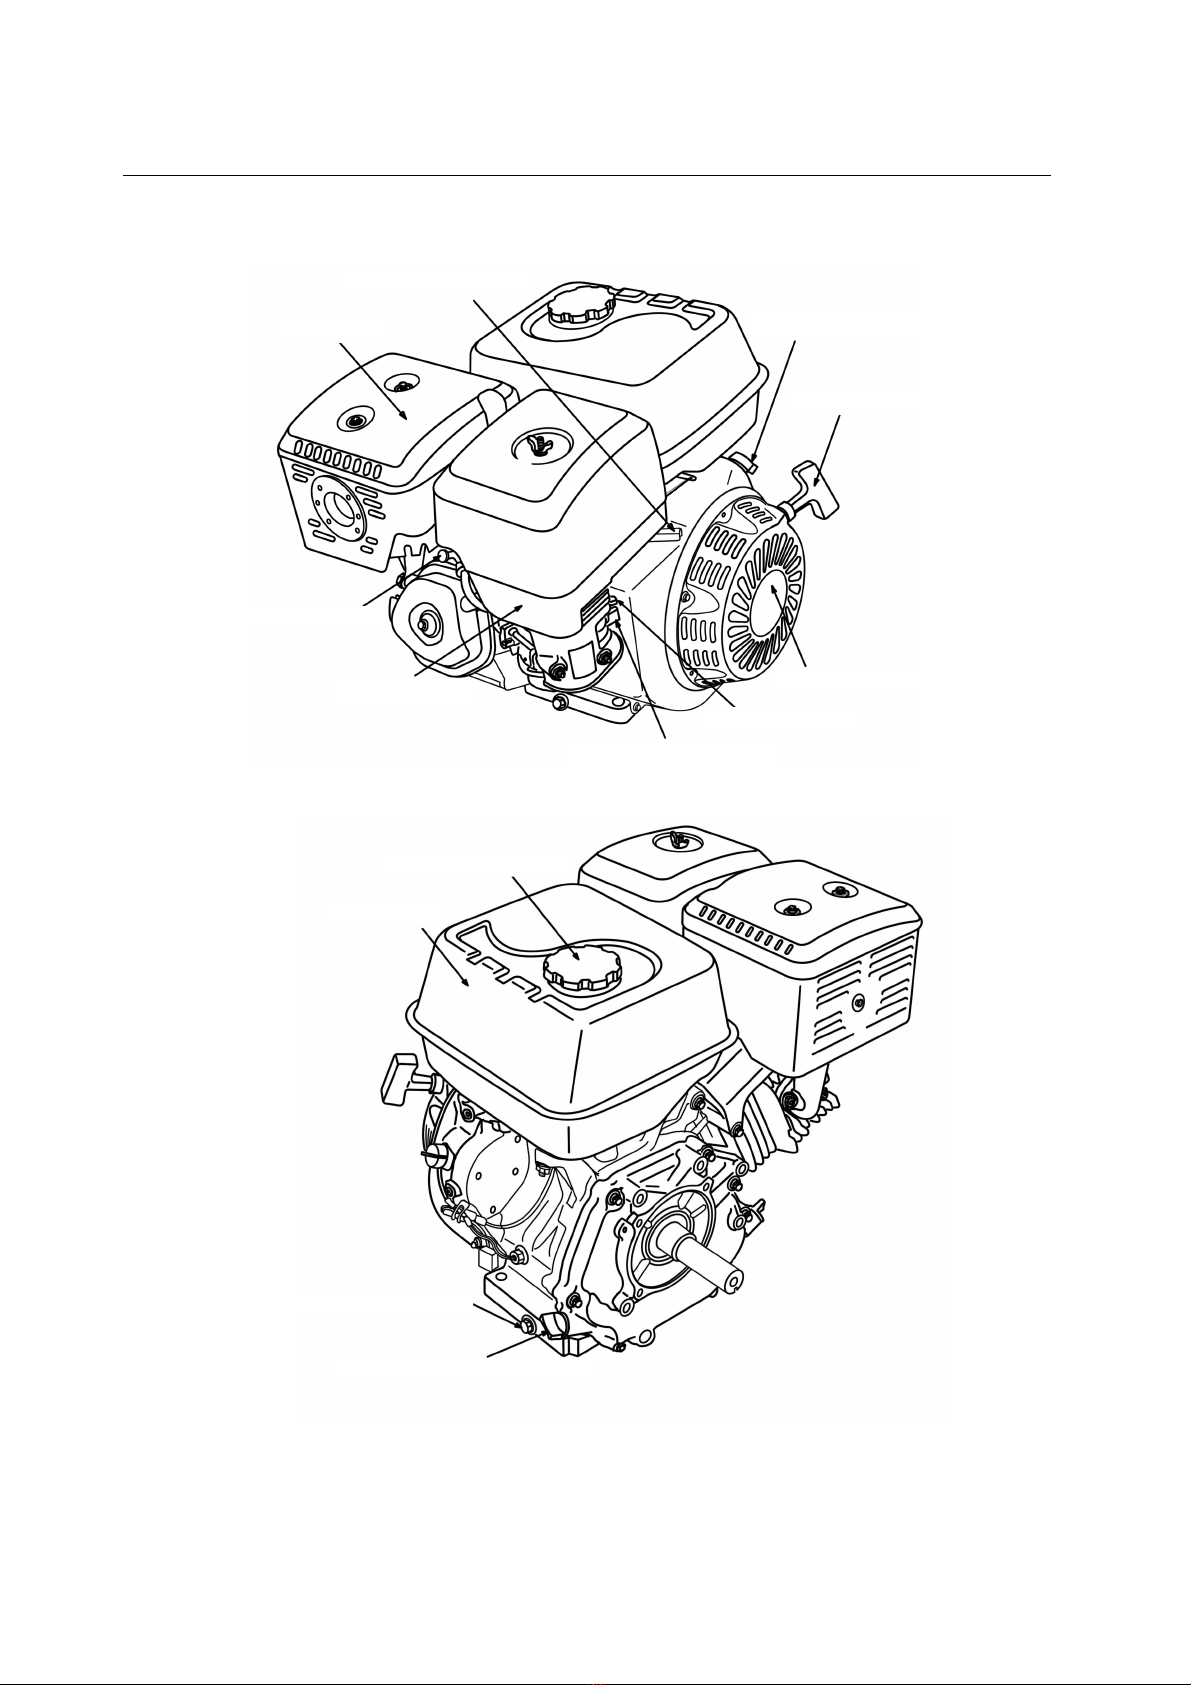
2. COMPONENTS & CONTROL LOCATIONS
THROTTLE LEVER
MUFFLER
SP RK PLUG
IR CLE NER
FUEL V LVE LEVER
CHOKE LEVER
RECOIL ST RTER
ST RTER GRIP
IGNITION SWITCH
FUEL FILLER C P
FUEL T NK
OIL DR IN PLUG
OIL FILLER C P/DIPSTICK

CONTROLS
5
3. CONTROLS
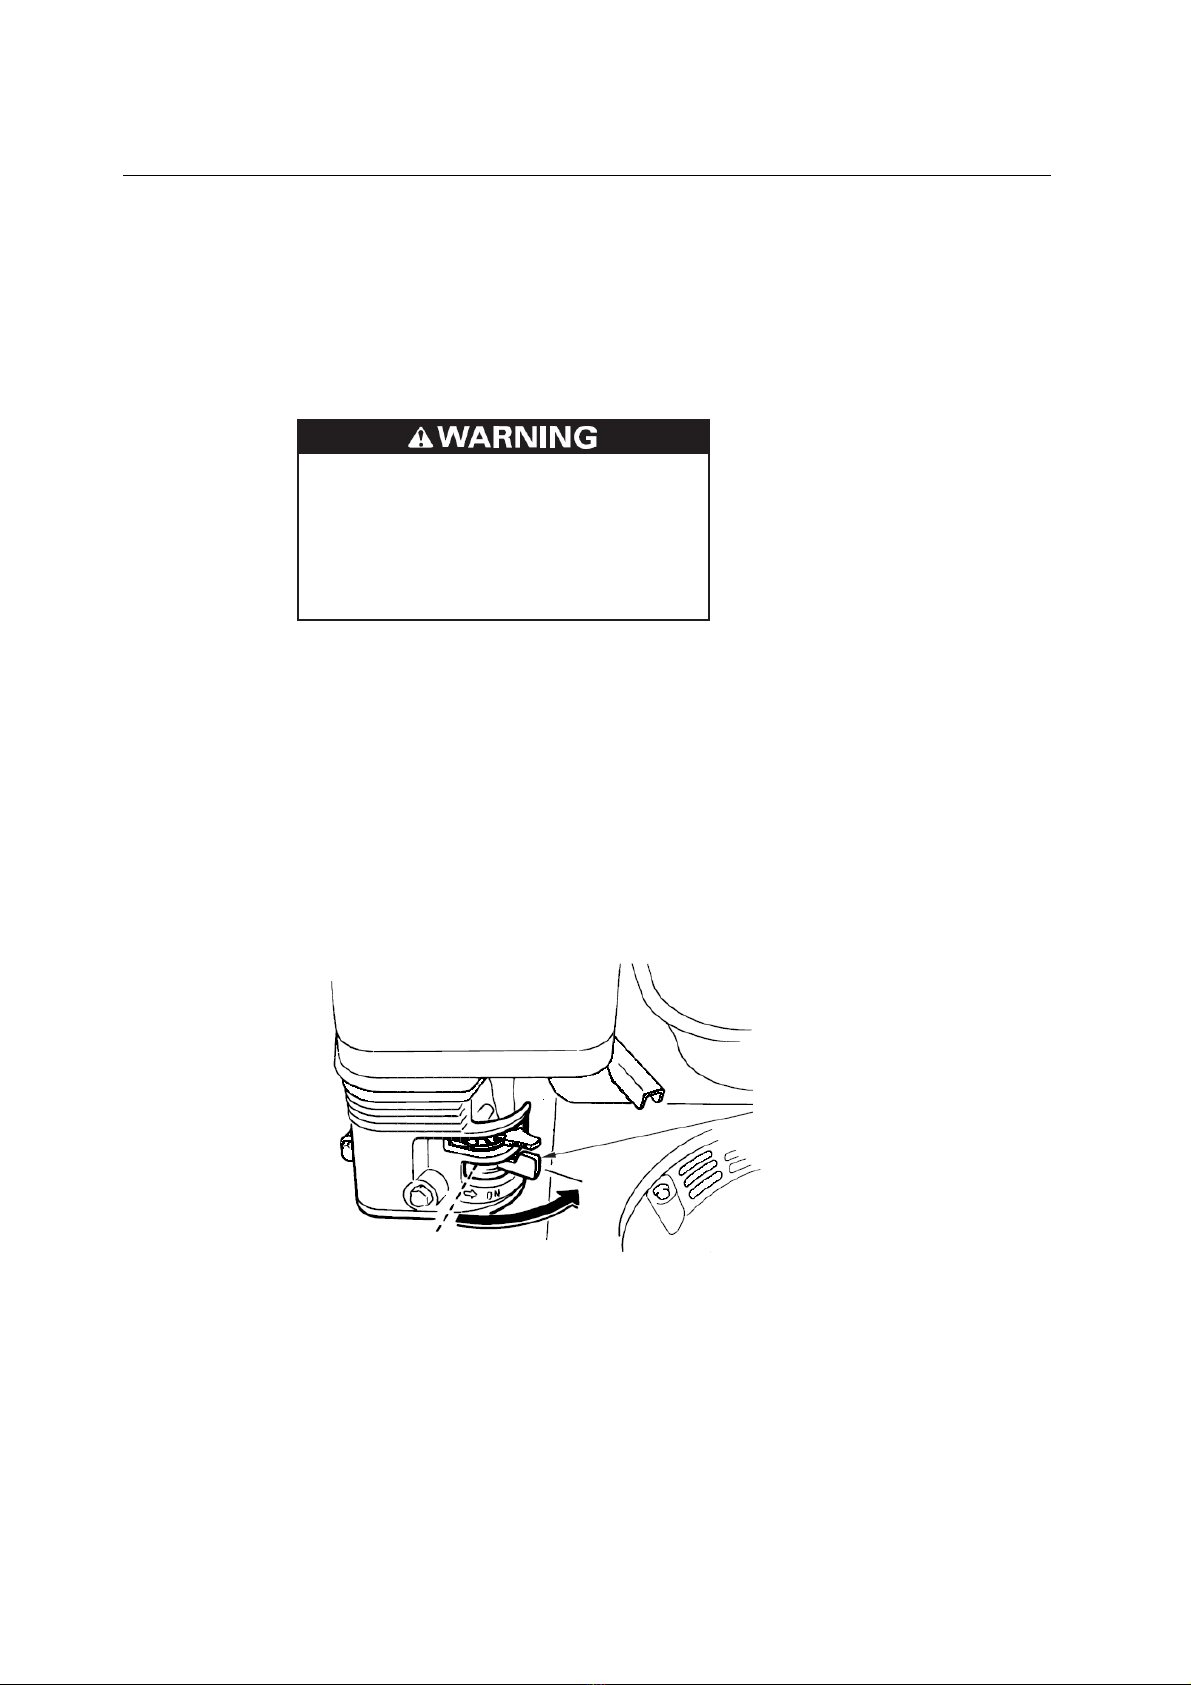
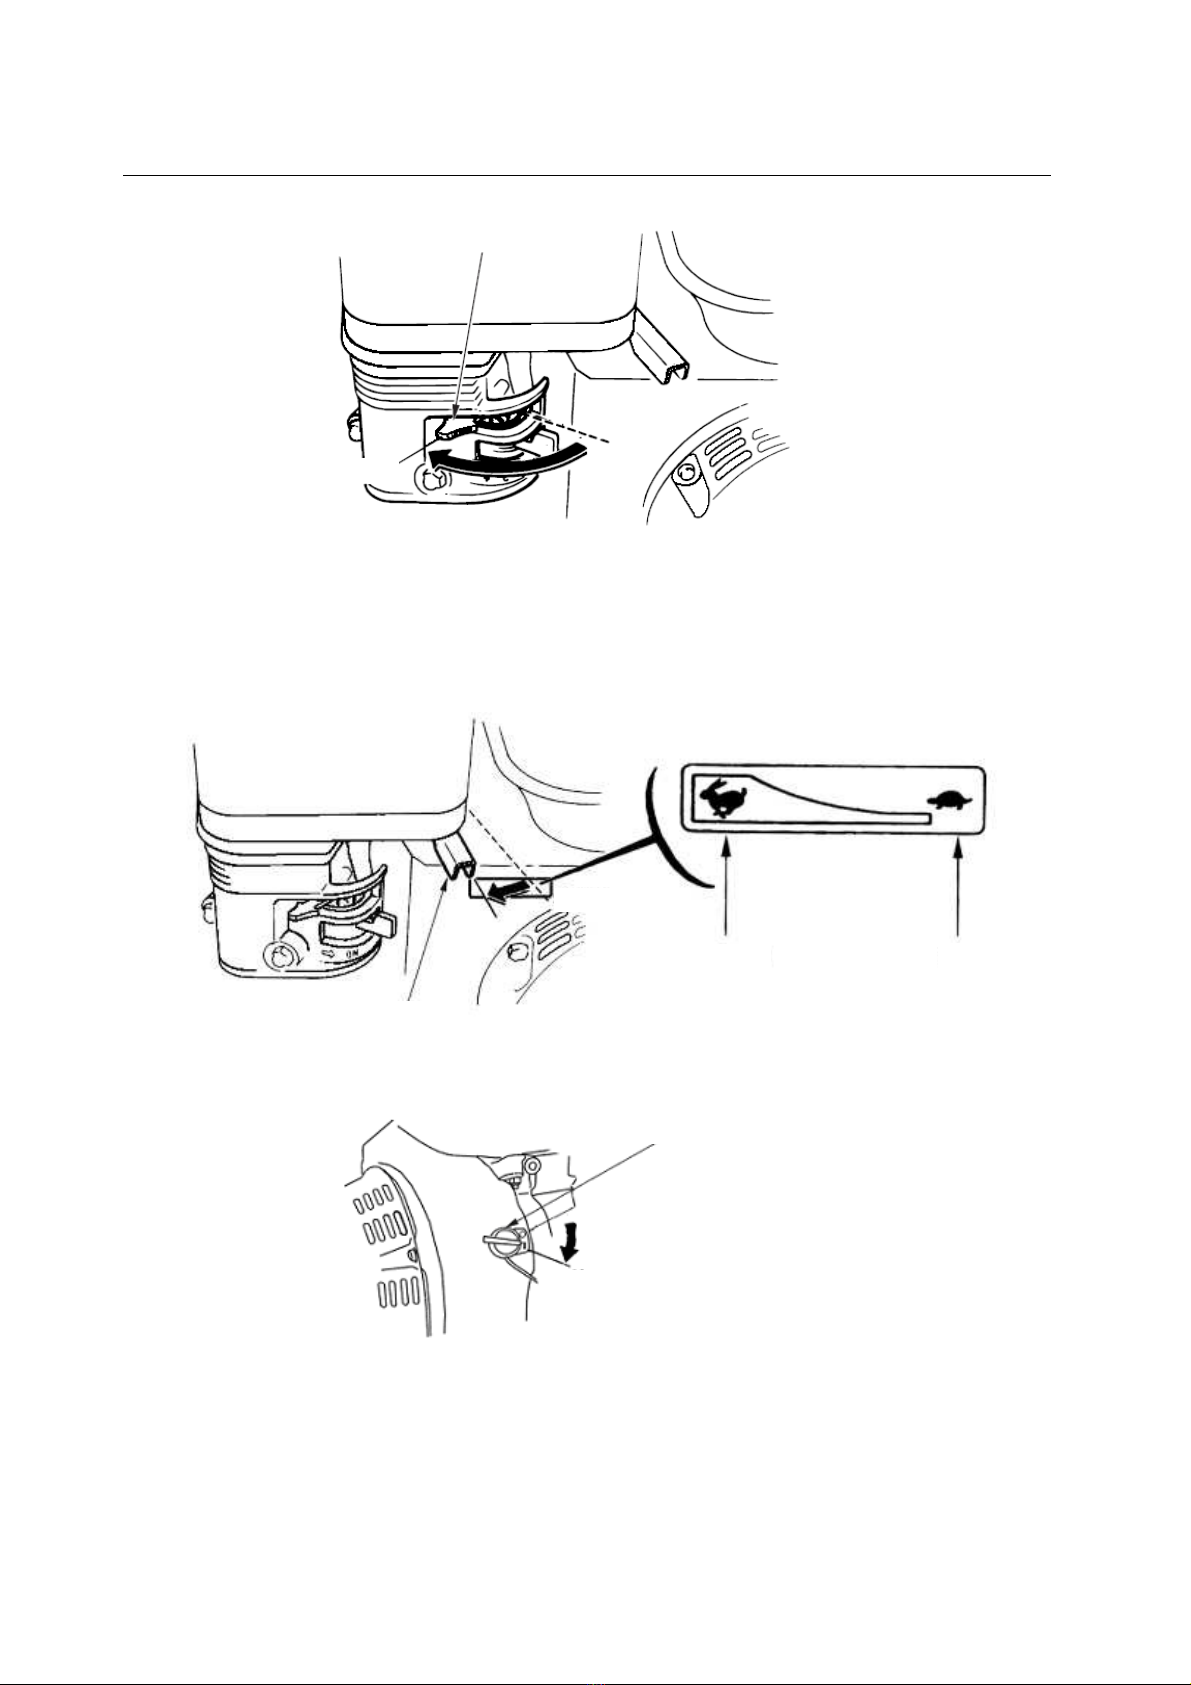
Fuel Valve Lever
The fuel valve opens and closes the passage between the fuel tank and the carburetor.
The fuel valve lever must be in the ON position for the engine to run.
When the engine is not in use, leave the fuel valve lever in the OFF position to prevent
carburetor flooding and to reduce the possibility of fuel leakage.
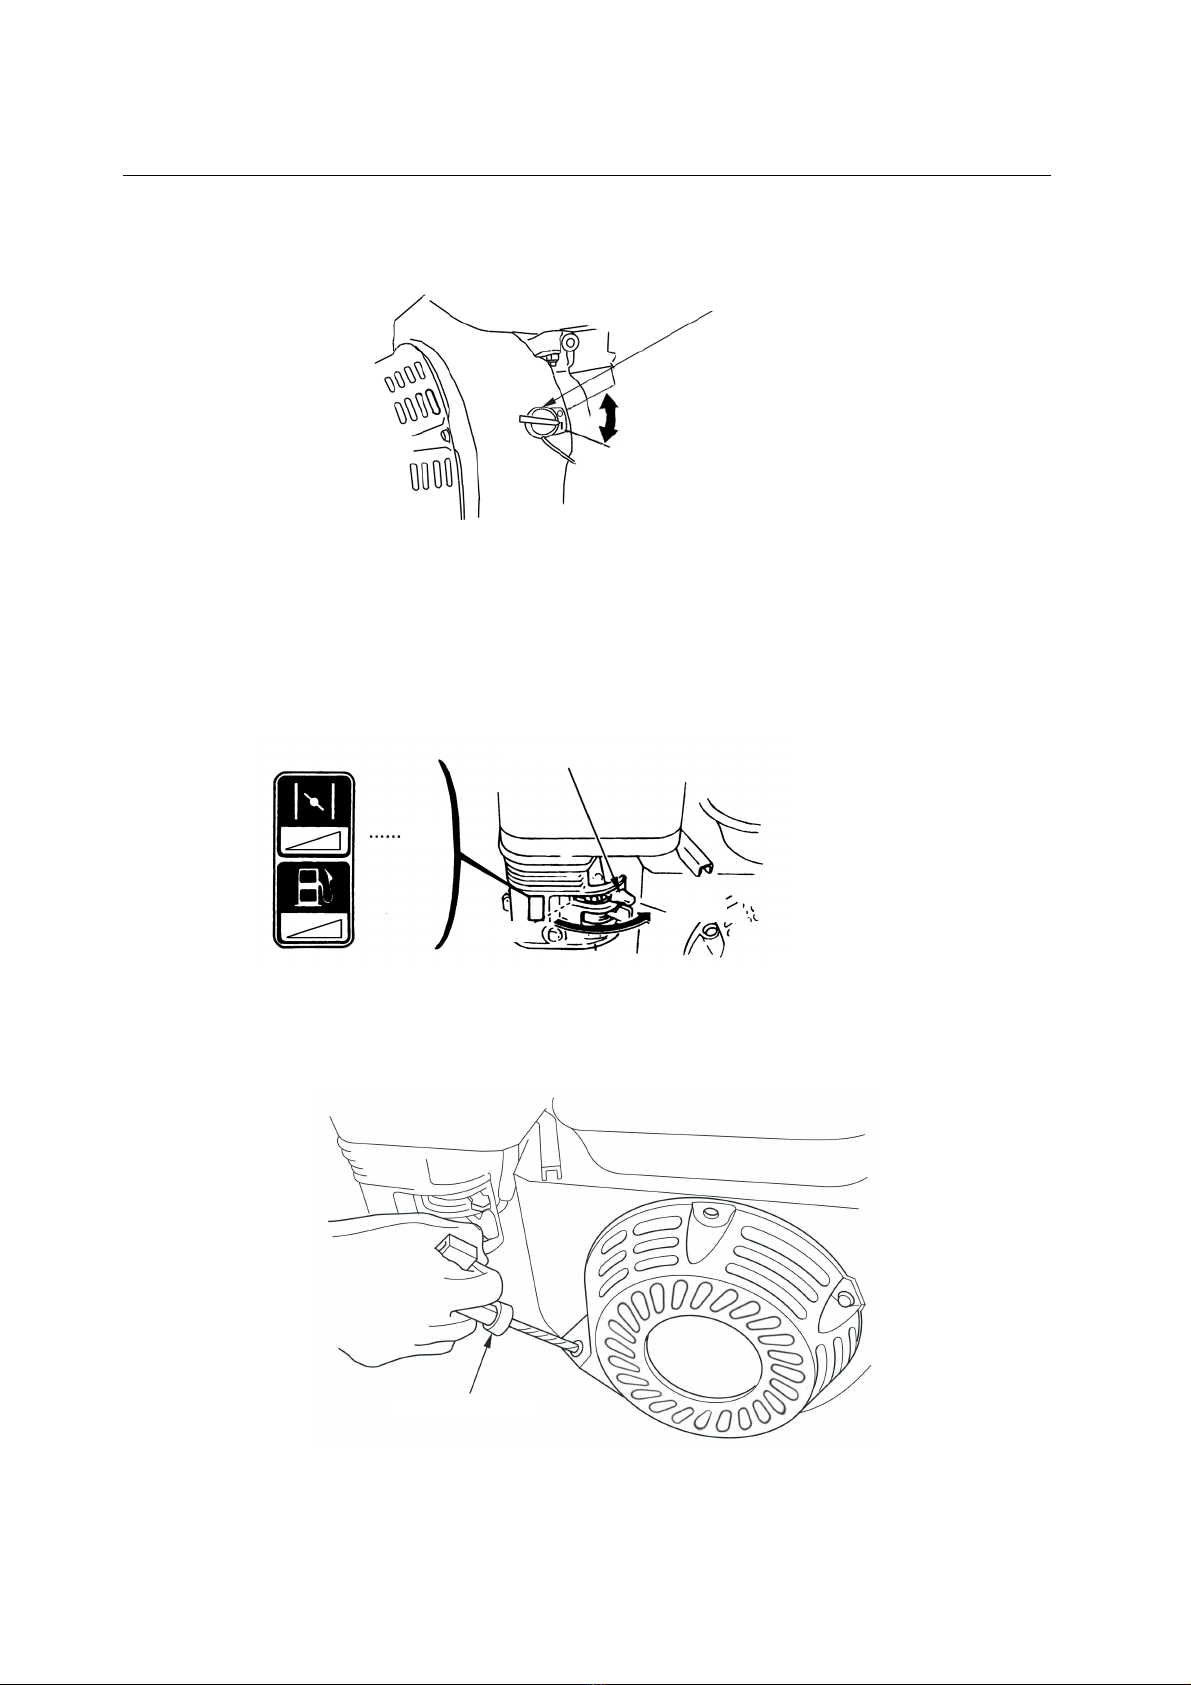
T rottle Lever
The throttle lever controls engine THROTTLE LEVER speed.
Moving the throttle lever in the directions shown makes the engine run faster or slower.
Engine Switc
The engine switch enables and disables the ignition system.
The engine switch must be in the ON position for the engine to run.
Turning the engine switch to the OFF position stops the engine.
OFF
FUEL
V LVE
LEVER
OFF
ON
THROTTLE
LEVER
F ST
SLOW
CONTROLS
6
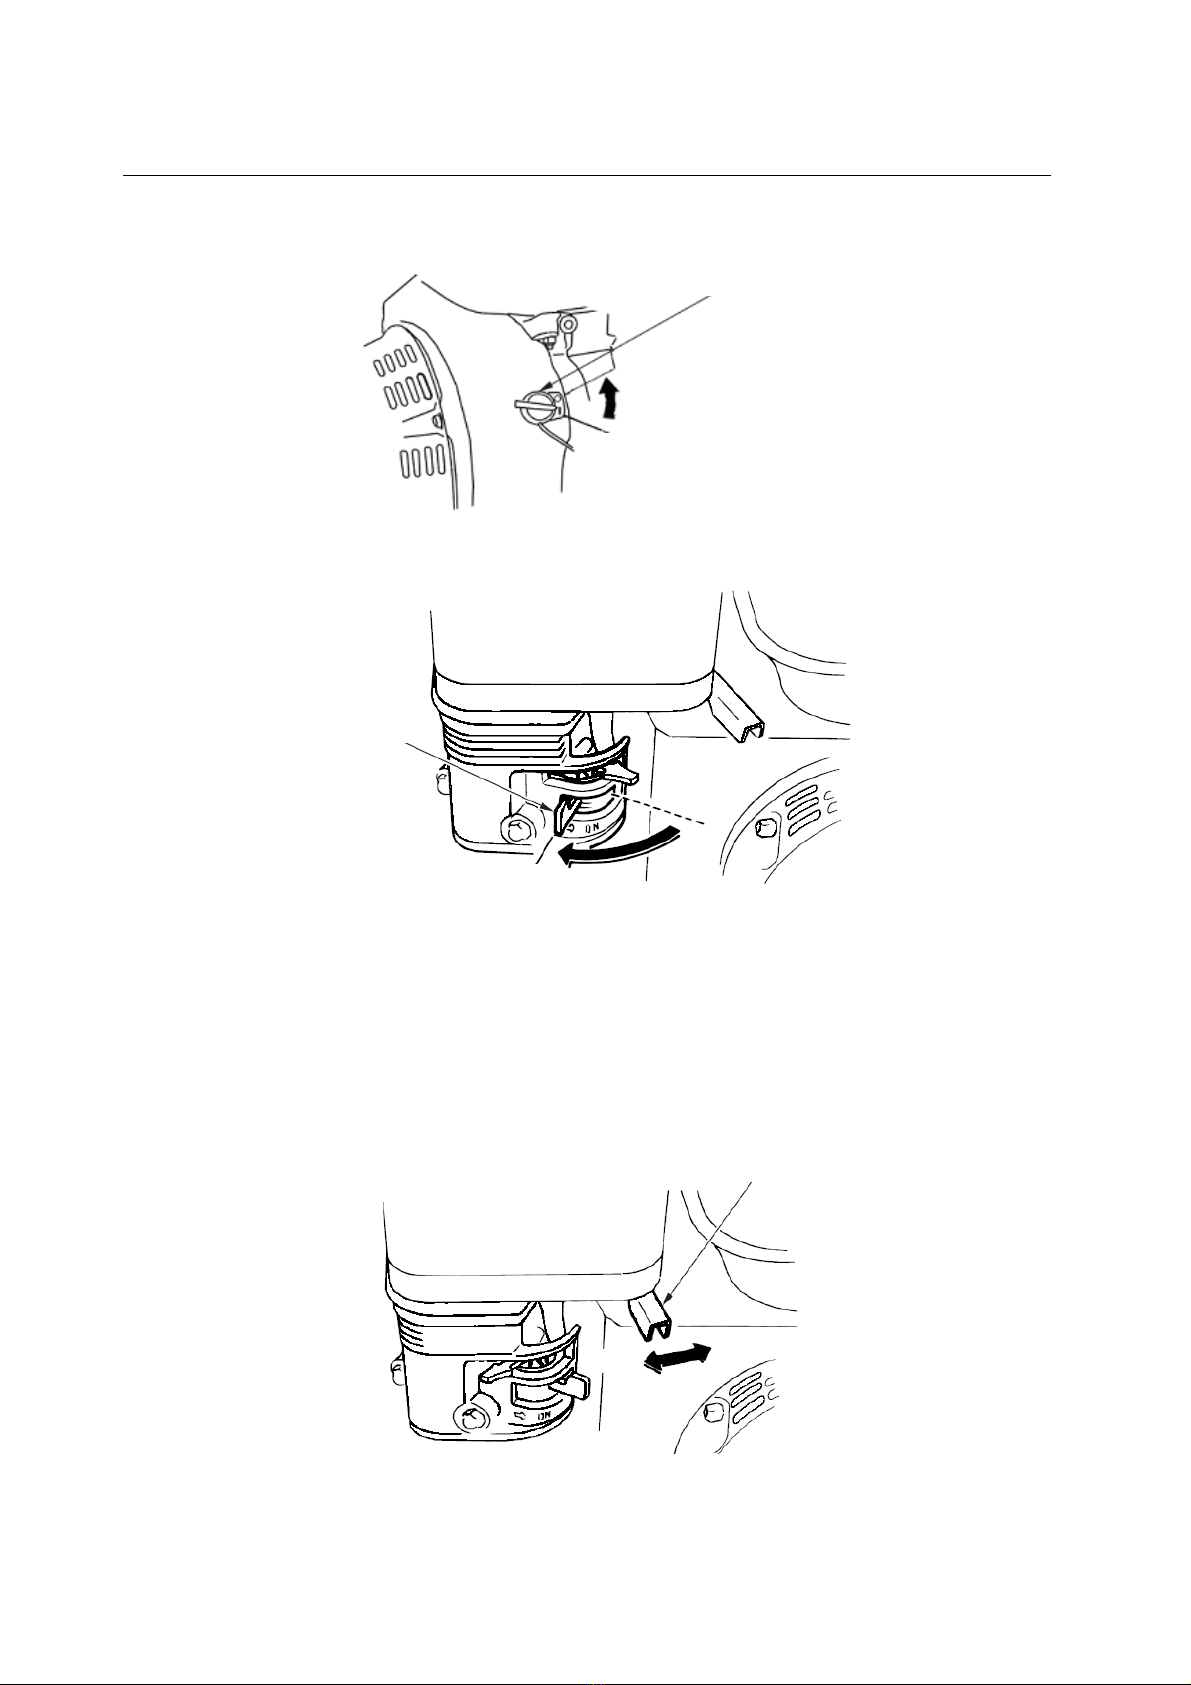
C oke
Lever
The choke lever opens and closes the choke valve in the carburetor.
The CLOSE position enriches the fuel mixture for starting a cold engine.
The OPEN position provides the correct fuel mixture for operation after starting, and for
restarting a warm engine.
Some engine applications use a remotely-mounted choke control rather than the
engine-mounted choke lever shown here.
Recoil Starter Grip
Pulling the starter grip operates the recoil starter to crank the engine.
LL ENGINE EXCEPT D TYPE
ENGINE SWITCH
OFF
ON
CHOKE
LEVER
OPEN
O
PEN
CLOSE
ST RTER GRIP

CHECK BEFORE OPER TION
7
4. CHECK BEFORE OPERATION
IS YOUR ENGINE READY TO GO?
For your safety, and to maximize the service life of your equipment, it is very important to
take a few moments before you operate the engine to check its condition. Be sure to take
care of any problem you find, or have your servicing dealer correct it, before you operate
the engine.
Improperly maintaining t is engine,
or failing to correct a problem
before operation, could cause a
malfunction in w ic you could be
seriously injured.
Always perform a preoperation
inspection before eac operation,
and correct any problem.
Before beginning your preoperation checks, be sure the engine is level and the engine
switch is in the OFF position.
C eck t e General Condition of t e Engine
Look around and underneath the engine for signs of oil or gasoline leaks.
Remove any excessive dirt or debris, especially around the muffler and recoil starter.
Look for signs of damage.
Check that all shields and covers are in place, and all nuts, bolts, and screws are
tightened.
C eck t e Engine
Check the engine oil level. Running the engine with a low oil level can cause engine
damage.
The Oil lert system (applicable engine types) will automatically stop the engine before the
oil level falls below safe limits. However, to avoid the inconvenience of an unexpected
shutdown, always check the engine oil level before startup.
Check the air filter. dirty air filter will restrict air flow to the carburetor, reducing engine
performance.
Check the fuel level. Starting with a full tank will help to eliminate or reduce operating
interruptions for refueling.
C eck t e Equipment Powered by T is Engine
Review the instructions provided with the equipment powered by this engine for any
precautions and procedures that should be followed before engine startup.
OPER TION
8
5. OPERATION
SAFE OPERATING PRECAUTIONS
Before operating the engine for the first time, please review the IMPORTANT SAFETY
INFORMATION and the chapter titled BEFORE OPERATION.
Carbon monoxide gas is toxic.
Breathing it can cause
unconsciousness and even kill you.
void any areas or actions that
expose you to carbon monoxide.
Review the instructions provided with the equipment powered by this engine for any safety
precautions that should be observed in conjunction with engine startup, shutdown, or
operation.
STARTING THE ENGINE
1. Move the fuel valve lever to the ON position.
2. To start a cold engine, move the choke lever to the CLOSE position.
To restart a warm engine, leave the choke lever in the OPEN position.
Some engine applications use a remotely-mounted choke control rather than the
engine-mounted choke lever shown here.
FUEL V LVE
LEVER
ON
OPER TION
9
3. Move the throttle lever away from the SLOW position, about 1/3 of the way toward the
F ST position.
Some engine applications use a remotely-mounted throttle control rather than the
engine-mounted throttle lever shown here.
4. Turn the engine switch to the ON position.
5. Operate the starter.
RECOIL ST RTER (all engine types):
Pull the starter grip lightly until you feel resistance, then pull briskly.
CHOKE
LEVER
CLOSE
O
PEN
HIGH
SLOW
LOW
THROTTLE LEVER
ENGINE SWITCH
OFF
ON

OPER TION
10
Return
the
starter
grip
gently.
6. If the choke lever has been moved to the CLOSE position to start the engine, gradually
move it to the OPEN position as the engine warms up.
STOPPING THE ENGINE
To stop the engine in an emergency, simply turn the engine switch to the OFF position.
Under normal conditions, use the following procedure.
1. Move the throttle lever to the SLOW position.
Some engine applications use a remotely-mounted throttle control rather than the
engine-mounted throttle lever shown here.
CHOKE
LEVER
OPEN
THROTTLE
LEVER
SLOW
ST RTER GRIP
OPER TION
11
2. Turn the engine switch to the OFF position.
3. Turn the fuel valve lever to the OFF position.
SETTING ENGINE SPEED
Position the throttle lever for the desired engine speed.
Some engine applications use a remotely-mounted throttle control rather than the
engine-mounted throttle lever shown here.
For engine speed recommendations, refer to the instructions provided with the equipment
powered by this engine.
ENGINE SWITCH
OFF
ON
FUEL V LVE
LEVER
OFF
THROTTLE
LEVER
SLOW
F ST

M INTEN NCE
12
6. MAINTENANCE
THE IMPORTANCE OF MAINTENANCE
Good maintenance is essential for safe, economical, and trouble-free operation. It will also
help reduce air pollution.
Improperly maintaining this engine,
or failure to correct a problem
before operation, can cause a
malfunction in which you can be
seriously hurt or killed.
lways follow the inspection and
maintenance recommendations and
schedules in this owner’s manual.
To help you properly care for your engine, the following pages include a maintenance
schedule, routine inspection procedures, and simple maintenance procedures using basic
hand tools. Other service tasks that are more difficult, or require special tools, are best
handled by professionals and are normally performed by a technician or other qualified
mechanic.
The maintenance schedule applies to normal operating conditions. If you operate your
engine under unusual conditions, such as sustained high-load or high-temperature
operation, or use in unusually wet or dusty conditions, consult your servicing dealer for
recommendations applicable to your individual needs and use.
MAINTENANCE SAFETY
Some of the most important safety precautions are as follows: However, we cannot warn
you of every conceivable hazard that can arise in performing maintenance. Only you can
decide whether or not you should perform a given task.
Failure to properly follow
maintenance instructions and
precautions can cause you to be
seriously hurt or killed.
lways follow the procedures and
precautions in the owner’s manual.
Safety Precautions
Make sure the engine is off before you begin any maintenance or repairs. This will

M INTEN NCE
13
eliminate several potential hazards:
Carbon
monoxide
poisoning
from
engine
ex aust.
Be sure there is adequate ventilation whenever you operate the engine.
Burns
from
ot
parts.
Let the engine and exhaust system cool before touching.
Injury
from
moving
parts.
Do not run the engine unless instructed to do so.
Read the instructions before you begin, and make sure you have the tools and skills
required.
To
reduce
the
possibility
of
fire
or
explosion,
be
careful
when
working
around
gasoline.
Use only a nonflammable solvent, not gasoline, to clean parts. Keep cigarettes, sparks
and flames away from all fuel-related parts.
Remember that your servicing dealer knows your engine best and is fully equipped to
maintain and repair it.
To ensure the best quality and reliability, use only new, genuine parts or their equivalents
for repair and replacement.
MAINTENANCE SCHEDULE
Emission-related
items.
☆Replace the paper element type only.
(1)Service more frequently when used in dusty areas.
REGUL R SERVICE PERIOD
Performed at every indicated month or
operating hour interval, whichever comes
first.
Each
use
First
month or
20 Hrs.
Every 3
months or
50 Hrs.
Every 6
months or
100 Hrs.
Every
year or
300 Hrs.
ITEM
●
●●
●Engine oil Check level ○
Change ○ ○
●
●●
●ir cleaner
Check ○
Clean ○(1)
Replace ○☆
●
●●
●Sediment Cup Clean ○
●
●●
●Spark plug Check-Clean ○
Replace ○
Spark arrester
(optional parts) Clean ○
●
●●
●Idle speed Check- djust ○(2)
●
●●
●Valve clearance Check- djust ○(2)
●
●●
●Fuel tank and strainer Clean ○(2)
●
●●
●Combustion chamber Clean fter every 300 Hrs. (2)
●
●●
●Fuel line Check Every 2 years (Replace if necessary) (2)

M INTEN NCE
14
(2)These items should be serviced by your servicing dealer unless you have the proper
tools and are mechanically proficient. Refer to manual for service procedures.
REFUELING
Fuel tank capacities
120F: 2.5 L
160F(D), 160F(D)-B, 160F(D)-C: 3.6 L
200F(D), 200F(D)-B, 200F(D)-C: 3.6 L
240F(D), 240F(D)-B, 240F(D)-C: 6.0 L
270F(D), 270F(D)-B, 270F(D)-C: 6.0 L
340F(D), 340F(D)-D, 390F(D), 390F(D)-D: 6.5 L
With the engine stopped, remove the fuel tank cap and check the fuel level. Refill the tank
if the fuel level is low.
Gasoline is highly flammable and
explosive. You can be burned or
seriously injured when handling fuel.
Stop
the
engine
and
keep
heat,
sparks, and flame away.
Handle
fuel
only
outdoors.
Wipe
up
spills
immediately.
Refuel in a well-ventilated area before starting the engine. If the engine has been running,
allow it to cool. Refuel carefully to avoid spilling fuel. Do not fill above the fuel strainer
shoulder. fter refueling, tighten the fuel tank cap securely.
Never refuel the engine inside a building where gasoline fumes may reach flames or
sparks. Keep gasoline away from appliance pilot lights, barbecues, electric appliances,
power tools, etc.
Spilled fuel is not only a fire hazard, it causes environmental damage. Wipe up spills
immediately.
M XIMUM FUEL LEVEL

M INTEN NCE
15
Fuel
can
damage
paint
and
plastic.
Be
careful
not
to
spill
fuel
w en
filling
your
fuel
tank.
Damage
caused
by
spilled
fuel
is
not
covered
under warranty.
FUEL RECOMMENDATIONS
Use unleaded gasoline wit a pump octane rating of 86 or ig er.
These engines are certified to operate on unleaded gasoline. Unleaded gasoline produces
fewer engine and spark plug deposits and extends exhaust system life.
Never use stale or contaminated gasoline or an oil/gasoline mixture. void getting dirt or
water in the fuel tank.
Occasionally you may hear a light ‘‘spark knock’’ or ‘‘pinging’’ (metallic rapping noise) while
operating under heavy loads. This is no cause for concern.
If spark knock or pinging occurs at a steady engine speed, under normal load, change
brands of gasoline. If spark knock or pinging persists, see an authorized servicing dealer.
Running t e engine wit persistent spark knock or pinging can cause engine
damage.
Running t e engine wit persistent spark knock or pinging is considered misuse,
and t e Distributor’s Limited Warranty does not cover parts damaged by misuse.
ENGINE OIL LEVEL CHECK
Check the engine oil level with the engine stopped and in a level position.
1. Remove the filler cap/dipstick and wipe it clean.
FILLER C P/DIPSTICK UPPER LIMIT
LOWER LIMIT

M INTEN NCE
16
2. Insert and remove the dipstick without screwing it into the filler neck. Check the oil level
shown on the dipstick.
3. If the oil level is low, fill to the edge of the oil filler hole with the recommended oil.
4. Screw in the filler cap/dipstick securely.
Running
the
engine
with
a
low
oil
level
can
cause
engine
damage.
The Oil lert system (applicable engine types) will automatically stop the engine before the
oil level falls below safe limit. However, to avoid the inconvenience of an unexpected
shutdown, always check the engine oil level before startup.
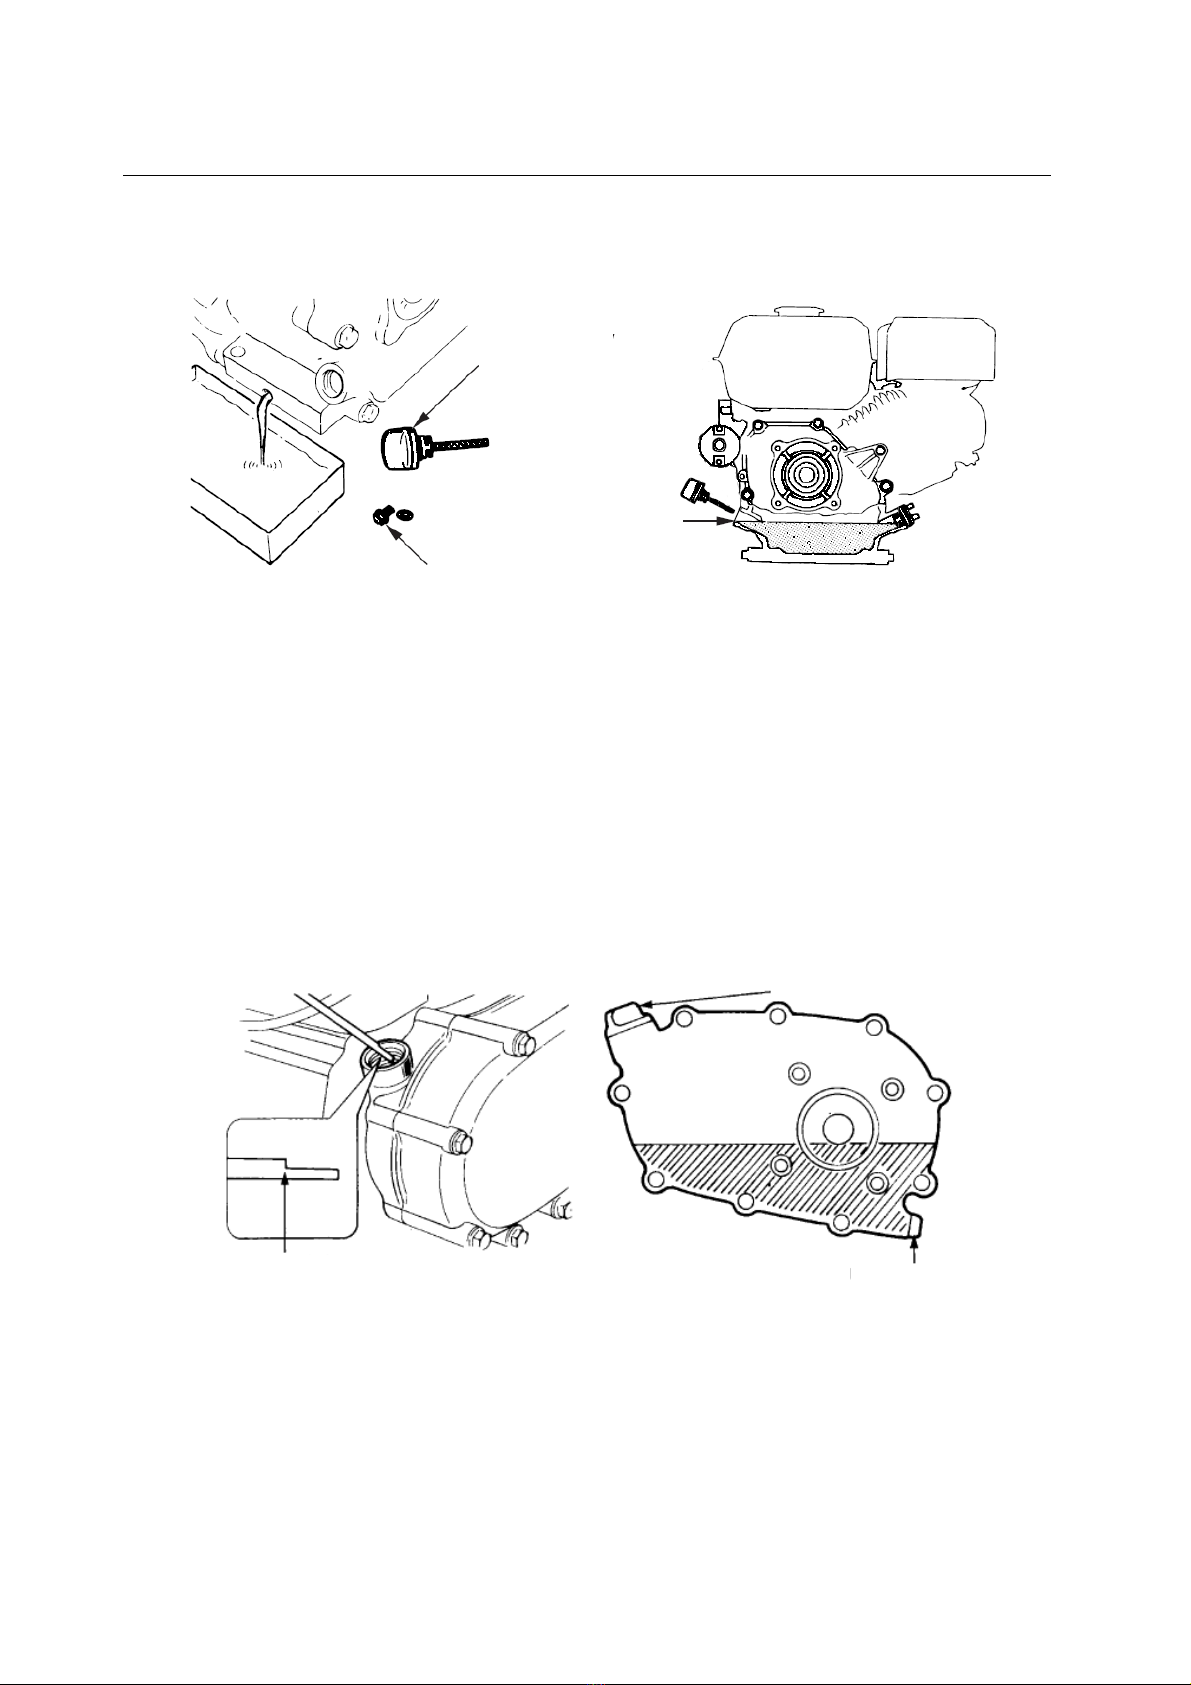
ENGINE OIL CHANGE
Drain the used oil while the engine is warm. Warm oil drains quickly and completely.
1. Place a suitable container below the engine to catch the used oil, and then remove the
filler cap/dipstick and the drain plug.
2. llow the used oil to drain completely, and then reinstall the drain plug, and tighten it
securely.
Please dispose of used motor oil in a manner that is compatible with the environment.
We suggest you take used oil in a sealed container to your local recycling center or
service station for reclamation. Do not throw it in the trash; pour it on the ground; or
down a drain.
3. With the engine in a level position, fill to the outer edge of the oil filler hole with the
recommended oil.
Engine oil capacities:
120F: 0.63 US qt ( 0. 6 L)
160/200F(D), 160/200F(D)-B, 160/200F(D)-C: 0.63 US qt ( 0.60 L)
240/270/340/390F(D), 240/270F(D)-B: 1.2 US qt ( 1.1 L)
240/270 F(D)-C, 340/390F(D)-D: 1.2 US qt ( 1.1 L)
Running the engine with a low oil level can cause engine damage.
The Oil lert system (applicable engine types) will automatically stop the engine before
the oil level falls below the safe limit.
However, to avoid the inconvenience of an unexpected shutdown, fill to the upper limit,
and check the oil level regularly.
M INTEN NCE
17
4. Screw in the filler cap/dipstick securely.
REDUCTION GEAR OIL (Only on equipped model)
<1/2 reduction with automatic centrifugal clutch>
1.
Remove
the
oil
filler
cap
and
wipe
the
dipstick
clean.
2.
Insert
the
dipstick
into
the
filler
neck
but
do
not
screw
it
in.
3.
If
the
level
is
low,
fill
to
the
upper
level
mark
with
the
same
oil
recommended
for
the
engine.
Oil capacity of 160/200/240/270F(D)-B: 500 cc
SERVICING YOUR ENGINE
ENGINE OIL RECOMMENDATIONS
Oil is a major factor affecting performance and service life. Use 4-stroke automotive
detergent oil.
FILLER C P/
DIPSTICK
DR IN BOLT
OIL LEVEL
DIPSTICK/FILLER
C P
UPPER LEVEL DR IN BOLT

M INTEN NCE
18
S E 10W-30 is recommended for general use. Other viscosities shown in the chart may
be used when the average temperature in your area is within the recommended range.
S E Viscosity Grades
MBIENT TEMPER TURE
The S E oil viscosity and service classification are in the PI label on the oil container. We
recommend that you use PI SERVICE Category SE or SF oil.
AIR FILTER INSPECTION
Remove the air cleaner cover and inspect the filter. Clean or replace dirty filter elements.
lways replace damaged filter elements. If equipped with an oil-bath air cleaner, also
check the oil level.
AIR
CLEANER
SERVICE
dirty air filter will restrict air flow to the carburetor, reducing engine performance.
P PER
FILTER
ELEMENT
FO M
FILTER
ELEMENT
FILTER

M INTEN NCE
19
If you operate the engine in very dusty areas, clean the air filter more often than specified
in the M INTEN NCE SCHEDULE.
Operating the engine without an air filter, or with a damaged air filter, will allow dirt to enter
the engine, causing rapid engine wear. This type of damage is not covered by the
Distributor’s Limited Warranty.
Dual-Filter-Element Types
1. Remove the wing nut from the air cleaner
cover,
and remove the air cleaner cover.
2.
Remove
the
wing
nut
from
the
air
filter,
and
remove
the
filter.
3.
Remove
the
foam
filter
from
the
paper
filter.
4.
Inspect
both
air
filter
elements,
and
replace
them
if
they
are
damaged.
lways
replace
the
paper
air
filter
element
at
the
scheduled
interval.
5.
Clean
the
air
filter
elements
if
they
are
to
be
reused.
Paper air filter element: Tap the filter element several times on a hard surface to
remove dirt, or blow compressed air [not exceeding 30 psi (207 kPa)] through the filter
element from the inside. Never try to brush off dirt; brushing will force dirt into the
fibers.
Foam air filter element: Clean in warm soapy water, rinse, and allow drying thoroughly.
Or clean in nonflammable solvent and allow drying. Dip the filter element in clean
engine oil, and then squeeze out all excess oil. The engine will smoke when started if
too much oil is left in the foam.
6.
Wipe
dirt
from
the
inside
of
the
air
cleaner
base
and
cover,
using
a
moist
rag.
Be
careful to prevent dirt from entering the air duct that leads to the carburetor.
7. Place the foam air filter element over the paper element, and reinstall the assembled
air filter. Be sure the gasket is in place beneath the air filter. Tighten the air filter wing
nut securely.
8.
Install
the
air
cleaner
cover,
and
tighten
the
cover
wing
nut
securely.
P PER
FILTER
ELEMENT
IR
CLE NER
COVER
FO M
FILTER
ELEMENT
G SKET
This manual suits for next models
7
Table of contents
Other PTM Engines Engine manuals


Popular Engine manuals by other brands


SMI Assembly and operating instructions")
BECKER-Antriebe
BECKER-Antriebe P3/30C PS(+)SMI Assembly and operating instructions

Kohler
Kohler Courage XT-6 Service manual

Master
Master Apro instructions

Lutz
Lutz UNIVERSALMOTOR MA II Translation of the original instructions

Tecumseh
Tecumseh AH520 - Handbook

Kohler
Kohler Command PRO CH270 owner's manual