Puhui T-870A User manual

0
BGA IRDA-WELDER User Manual
Model:T-870A
Puhui technology (taian). CO., LTD.
www.Tech168.cn

IRDA-WELDER T870 User Manual
Http://www.tech168.cn 1
CATALOGUE
1. F e a t ur e s … …… … …… … …… … … …… … …… … … … … …… … .2
2. Te c hn i c P ar a me t e r … … … … … … … … … … … … … … … …… … . . 2
3. I n s t r u m e n t I n v e n t o r y … … … … … … … … … … … … … … … … … 3
4. The main part functi on explaining … … ……………………….3
⑴Main body……………………………………………………3
⑵Front panel………………………………………………………4
⑶Back panel………………………………………………………4
⑷Focusing support and lamp body …………………………………5
⑸Line board (PCB) support……………………………………………5
5. Inst al l ati on step … ………… ……… ………… … ……… ……… …6
⑴Lamp body and main body assembly………………………………6
⑵Connection infra-red lamp body ties………………………6
⑶Connection infra-red lamp sensor plug………………………6
6. O p er a t i o n m e t h o d … … … … … … … … … … … …… … … …… … …7
⑴Starting and starting front inspects……………………………………8
⑵Sealing off/repair operation…………………………………………8
⑶Maintenance and overhaul:………………………………………10
7. Matters needing attention ………………………………………………10
8、The maintenance pledged that …………………………………………10

IRDA-WELDER T870 User Manual
Http://www.tech168.cn 2
Features
1. Adopt infrared weld technology which independent exploration.
2. Use infrared heat, easy to cut through, which overcomes disadvantage(bum out
elements) of traditional welding machines.
3. Easily operate. Just need one day training. Can operate it shillfully.
4. Don't need weld tools. This machine can weld all the component betwween
35-50mm.
5. This machine has 800W heating system. It’s preating area is 240x180mm.
6. Infrared heating without heated sirocco flowing. No impact on perimeter small
component. Can suitable for all component , especially Micro BGA component.
7. This machine is suitable for a variety of computers,notebooks and the rework or
repair of their BGA components, especially suits to the computer north and south
bridge.
Technic parameter
Work floor size
360X240mm
Rated voltage and frequency
AC220-230v 60/50Hz
Complete machine power
1000W
Infra-red lamp body power
150W
Preheating chassis power
800W
Infra-red lamp body heating size
Φ70mm(50x50mm)
Preheating chassis preheating size
240x180mm
Infra-red lamp body temperature range
200℃-450℃
Preheating chassis temperature range
60℃-200℃
IRDA-WELDER T870 User Manual
Http://www.tech168.cn 3
Instrument inventory
Welding table main body
1
Infra-red lamp body
1
Temperature sensor
1
Board support of the circuit
1
Power line
1
user's manual(Compact disc)
1
The main part function explaining
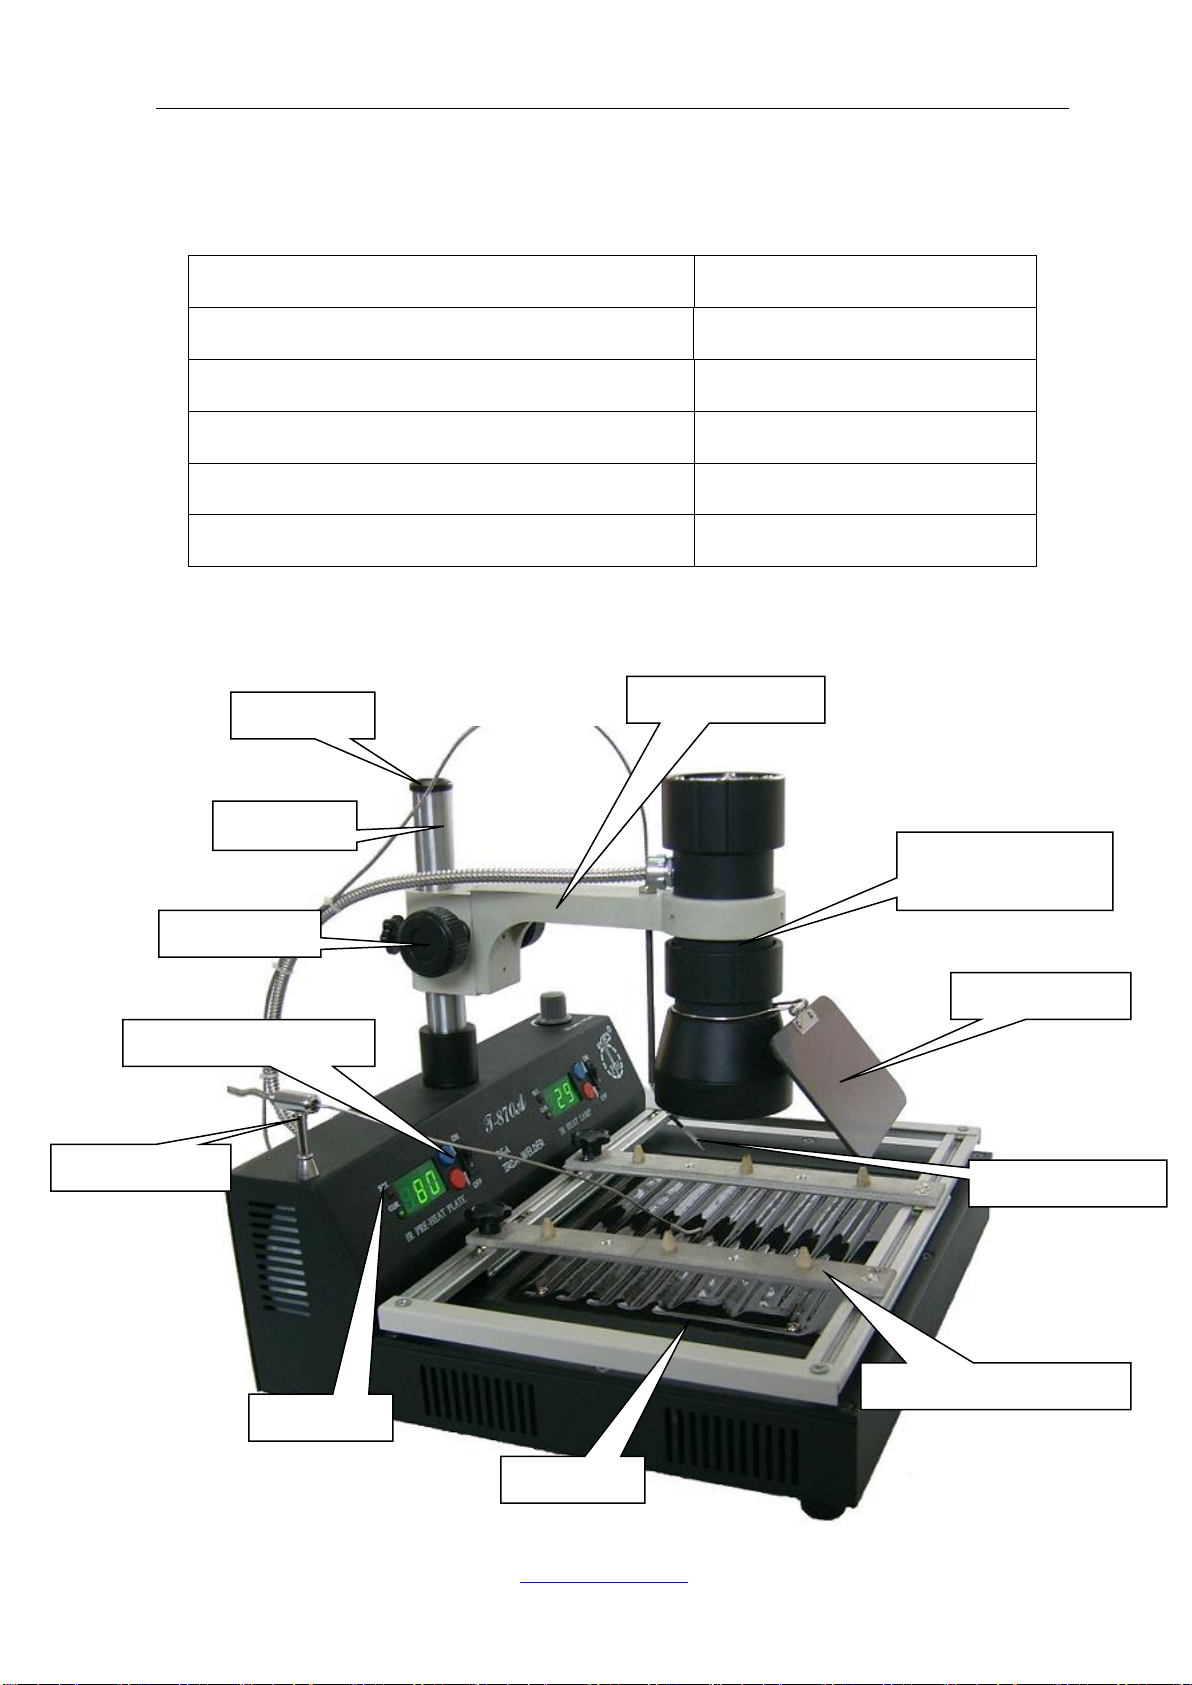
1、Welding table main body:
Guide rod
Focus the knob
钮
Chassis (working bench )
Preheat dish
The infrared lamp
body
Front panel
Filter and cover
Focus the holder
Board support of the circuit
PCB temp-sensor
烙铁 rack
End cover
Lamp temp-sensor
烙铁 rack
IRDA-WELDER T870 User Manual
Http://www.tech168.cn 4
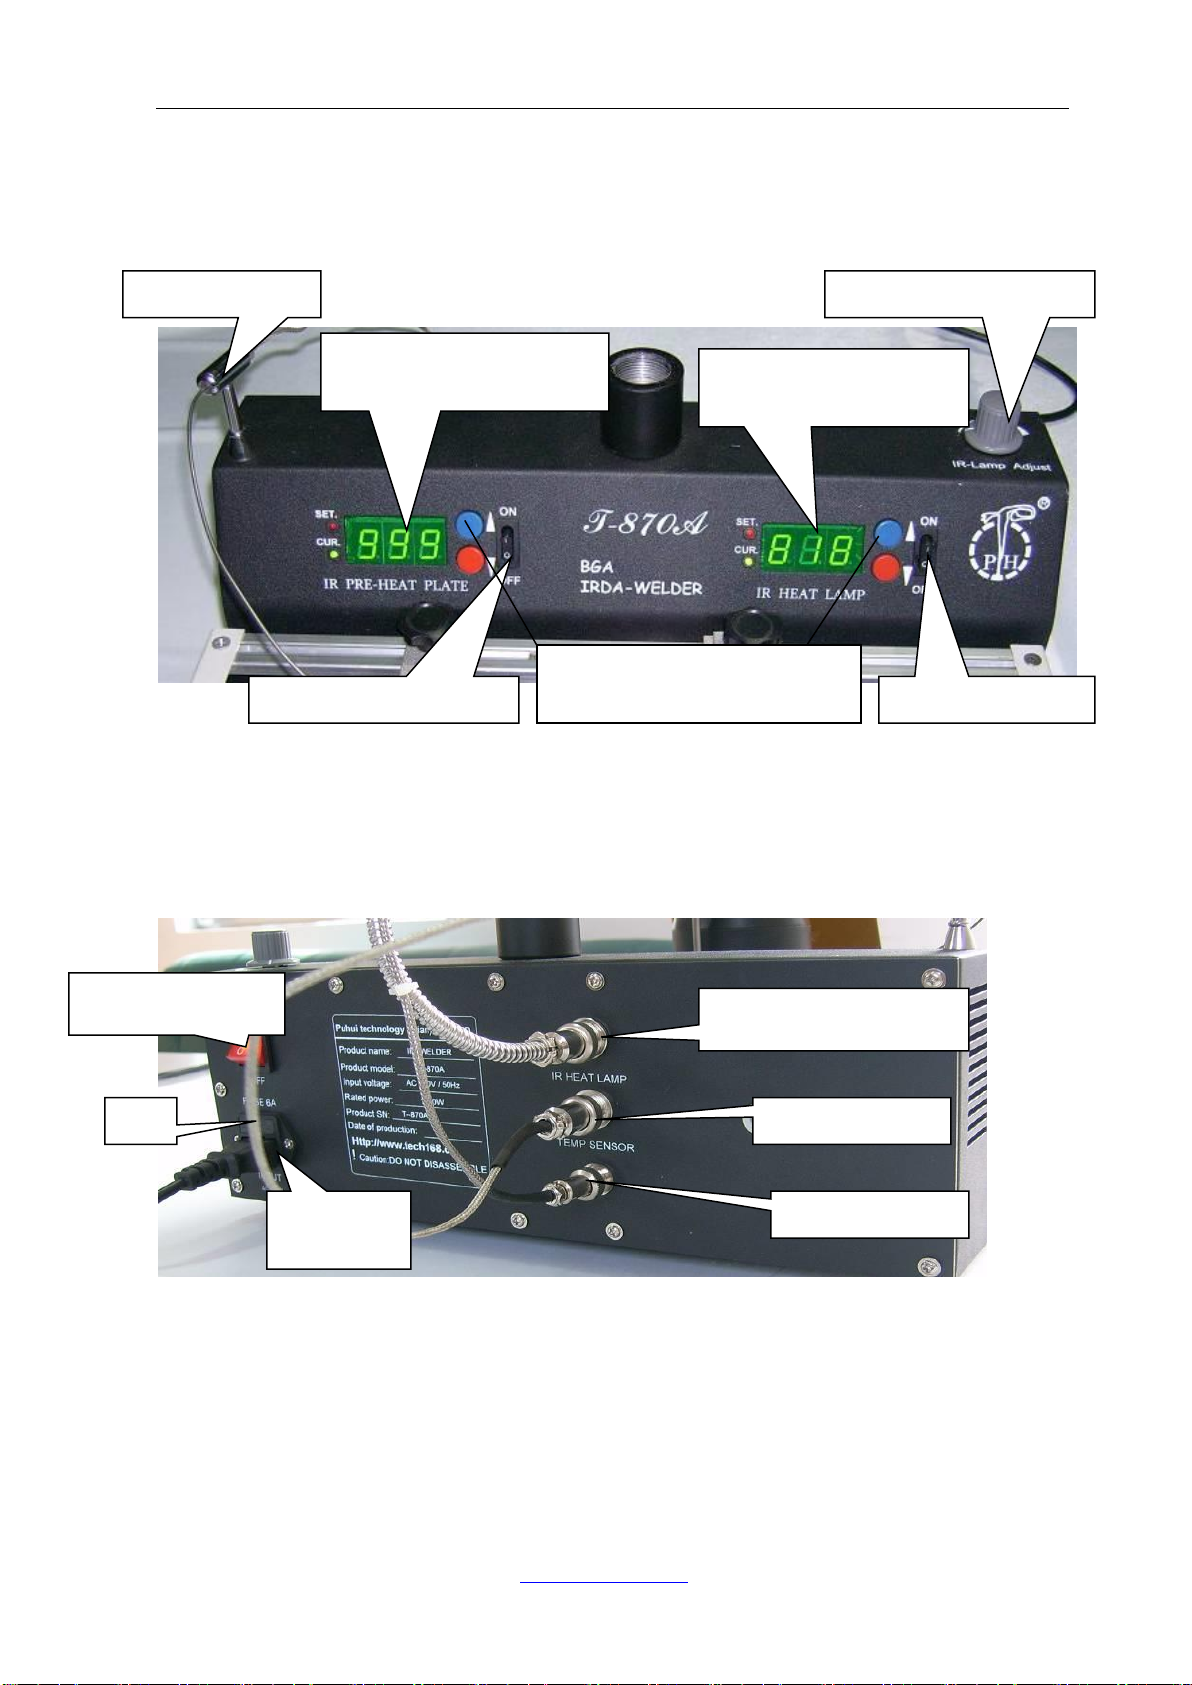
2、Front panel
3、Back panel
Preheating chassis
temperature display monitor
Infra-red lamp temperature
display monitor
Preheating chassis switch
Infra-red lamp switch
Temperature level regulation
buttons
Power input
Infrared lamp connection
Power switch
Fuse
Infra-red lamp adjustment
PCB temp-sensor
PCB temp-sensor
Lamp temp-sensor
烙铁 rack

IRDA-WELDER T870 User Manual
Http://www.tech168.cn 5
4、Focusing support and lamp body:
5、Board support of the circuit:
Focusing knob
Focusing holder
Board support of the circuit
Fastening nut
Preheat dish
Lamp body segment
Chassis (workingbench )
Guide rod
Lamp temp-sensor
烙铁 rack
Socket of the sensor

IRDA-WELDER T870 User Manual
Http://www.tech168.cn 6
Installation step
1、Lamp body and main body assembly:
①Loosen the pinch nut of focusing support. ②Pick up focusing support, make the guide
rod aim at the corresponding nut on the base, then rotate the guid rod. ③Fasten the focusing
support by rotating pinch nut of it.
.
2、Connection of infra-red lamp body cable and temperature sensor :
①Get the adapter of connecting wire plug in the socket of infrared lamp connecting wire
②Rotate setscrew clockwise.
Lead the post and pack
the direction into
Rotate the direction
Power input
socket for lamp temp-sensor sensor
Socket for the infrared
lamp
PCB temp-sensor


IRDA-WELDER T870 User Manual
Http://www.tech168.cn 10
1、Examination and starting:
①、Inspect the infrared lamp body, the temperature sensor and the power line and see if
they are in good connection.
②、Turn on the power switch.Self-checking uses (the previous setting value semons
trated on the keyboard display monitor after you turn on the machine) .
③、The front panel has two switches: one controls the preheating dish, the other the
infrared lamp separately.Press the “▲”or“▼”buttons on the“IR PRE-HEAT PIATE”on
the front panel to choose a temperature between 60 and 200℃for the preheating dish. Press
the “ON” button and the preheating dish will start to warm up. Press “OFF”, and the heater
will shut down; Press the “▲”or“▼”buttons on the“IR HEAT LAMP”on the front panel
to choose a temperature between 200 and 450℃for the lamp.Press the“ON” or“OFF”
buttons accordingly to switch the lamp on or off.
2、Sealing off/repair operation:
①、 Inserting of the PCB board:
Put PCB on the corresponding notch in PCB support, and adjust the pinch nuts of locating
ring and fasten with the hand wheel. Make sure the PCB board is in a secured position.
②、 Before starting with sealing off/repair:
Adjusts the PCB board position, so that it’s centre is vertically aligned with the infra red lamp.
Adjust the height of infrared lamp body, the ideal height between lamp and the component is
20-30mm.
Place the temperature sensor of the infrared lamp near the chip in a suitable position. If the
circuit board is adhered by solid sealing colloid, you can switch on the pre heater plate to melt
the colloid. If not, please take other proper measures. The temperature to melt colloid can’t be
too high; generally the
ideal temperature should be between 120 to 140 . The preheat interval is approximately 3 - 5
minutes.
③、 Sealing off/repair process:
According to product technological requirement or PCB board size, adjust the temperature
of the preheating chassis to about 60-200; switching it on about
3-5 minutes in advance will stabilize the
temperature.
Select the suitable heating temperature of infrared lamp between 200-450℃, according to
the chip size that need to be unsoldered. For general guidance: According to the chip size,
adjusts the infra-red lamp temperature to about 22mm and the preheating chassis
temperature to about60-200 .
When you unsolder chips which are smaller than 20 x 20 mm, you adjust the infrared
lamp’s temperature to 220-240 .
When working on bigger chips like 30x30mm, according to your experience, you may
adjust the infra-red lamp to 240-260 ; preheat the dish to about 140-200 first for 3 -
5 minutes. Once the temperature has stabilized, you may complete the sealing off/repair
process very conveniently. Please pay attention to the timing to prevent the chip from
burning out.

IRDA-WELDER T870 User Manual
Http://www.tech168.cn 11
④Soldering process
Clean up the welding plate with the brush. Put the tin ball and spread soldering flux (not
too thick, only a thin layer of it) on the soldering plate. Put the chip in the accurate place
after the solvent volatilizes out of soldering flux, heat the tin ball until it melts, once the tin
ball melts, the chip will be soldered in the right place automatically. Pick out the PCB to
check if the chip works after it cools down. If not, solder it again.
3、Maintenance and overhaul:
①、 Complete machine maintenance:
After the machine has been used for a period of time, clean the focusing frame, the guide
rod, the PCB board support and the sliders and treat them with a lubricant to protect them
from rust.
②、 Preheating chassis and infra-red lamp body maintenance:
Clean the pre heating chassis and in particular the infrared lamp body with dehydrated
alcohol. Otherwise residue from evaporated soldering paste could otherwise decrease
the effectiveness of the infrared lamp.
③、 Infra-red lamp replacement:
Use a special inside caliper gauge or a pair of long mouth pliers to first take out
the inside spring. Then push the lamp gently out of the body through the air vent.
Cautions:
1. Do not cut the power off right after the work finished. You need to wait until the fan
cools down the lamp body.
2. Keep the lamp body clean and the ventilation opening free of any obstructions.
3. The guide rod and the focusing support should be spread with lubrication regularly.
4. Pull out the power plug if you don’t use it for a long term.
5. Be careful of operating under high temperature conditions.
Warranty:
The complete machine has a warranty period of 1 year from the time of purchase and
lifelong service support as well as a long-term factory price supply.
The life of the infrared lamp should be around 1000 working hours, guaranteed
usable for 3 months. We provide online Q/A and troubleshooting support and
technical advice service.

IRDA-WELDER T870 User Manual
Http://www.tech168.cn 12
Reminder: These machines are very heavy, between 8 to 15 kilograms and are not
designed to be shipped on airplanes, but in containers that do not move. We are not
the shipping company, the airplane crew, the customs agent or the carrier in your
country and therefore take no responsibility for damage caused in transit.
Corollary: When our machines leave QC, they are tested, 100% new and in perfect
condition.
These machines consist of modules. Should you receive a faulty or damaged module,
we will be happy to replace it. However, we will not replace the complete machine;
this is not covered by our warranty.
PUHUI is responsible to give proper guidance of the use and installation of the
machine; if you don’t follow these, it will void the warranty.
Statement:
The images and screenshots in this product manual may vary
slightly from the actual purchased product.
Table of contents
Other Puhui Welding System manuals


Popular Welding System manuals by other brands


Lincoln Electric
Lincoln Electric PRO-CUT 25 SVM149-A Service manual

Weldclass
Weldclass CutForce 43P operating instructions

Lincoln Global
Lincoln Global Century FC-90 Operator's manual

ESAB
ESAB ARC300i instruction manual

Lincoln Electric
Lincoln Electric SP-135 PLUS IM725 Operator's manual

Lincoln Electric
Lincoln Electric POWER FEED 10M SINGLE/DUAL SVM172-A Service manual

STARWELD
STARWELD QUATRO 450 Operator's manual

Silverline
Silverline 633505 manual

Lincoln Electric
Lincoln Electric LN-25 IM10092 Operator's manual

Lincoln Electric
Lincoln Electric Idealarc DC-1500 Technical specifications

Parweld
Parweld XTP-63 Operator's manual

Tregaskiss
Tregaskiss TOUGH GUN CA3 Series owner's manual