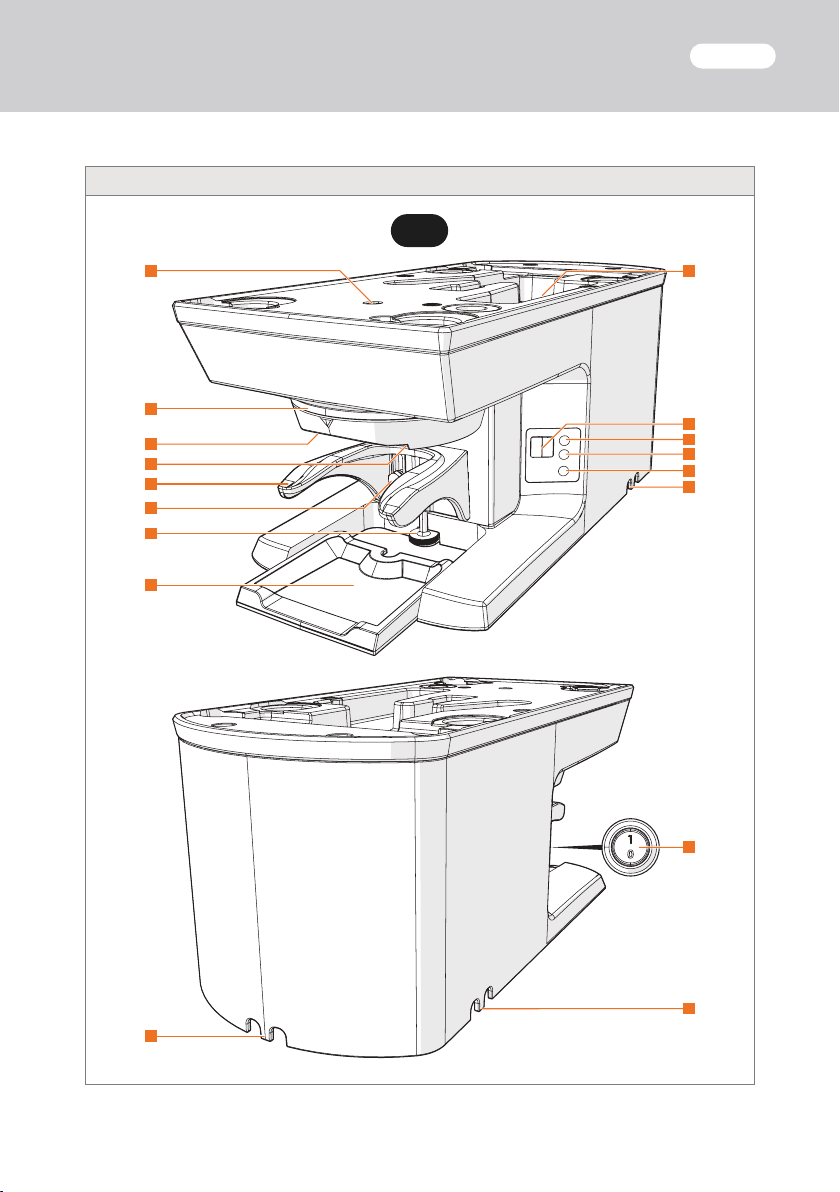
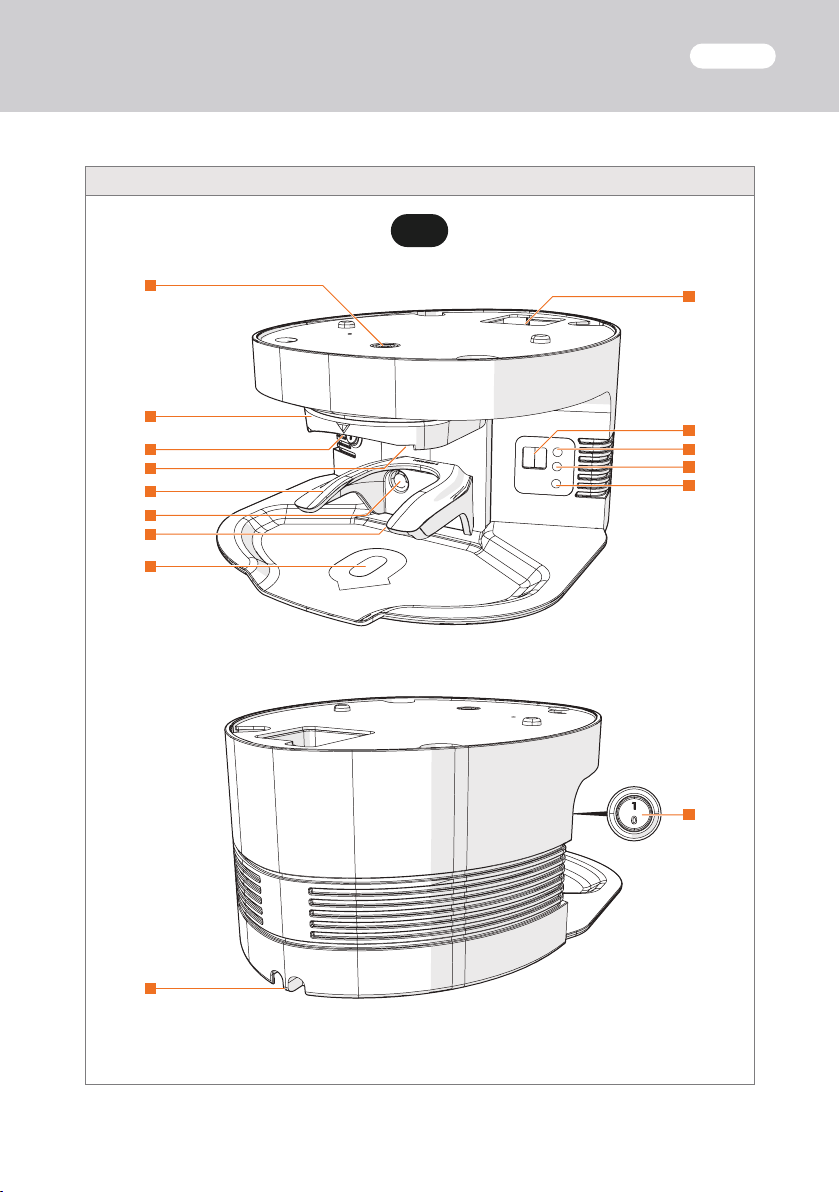
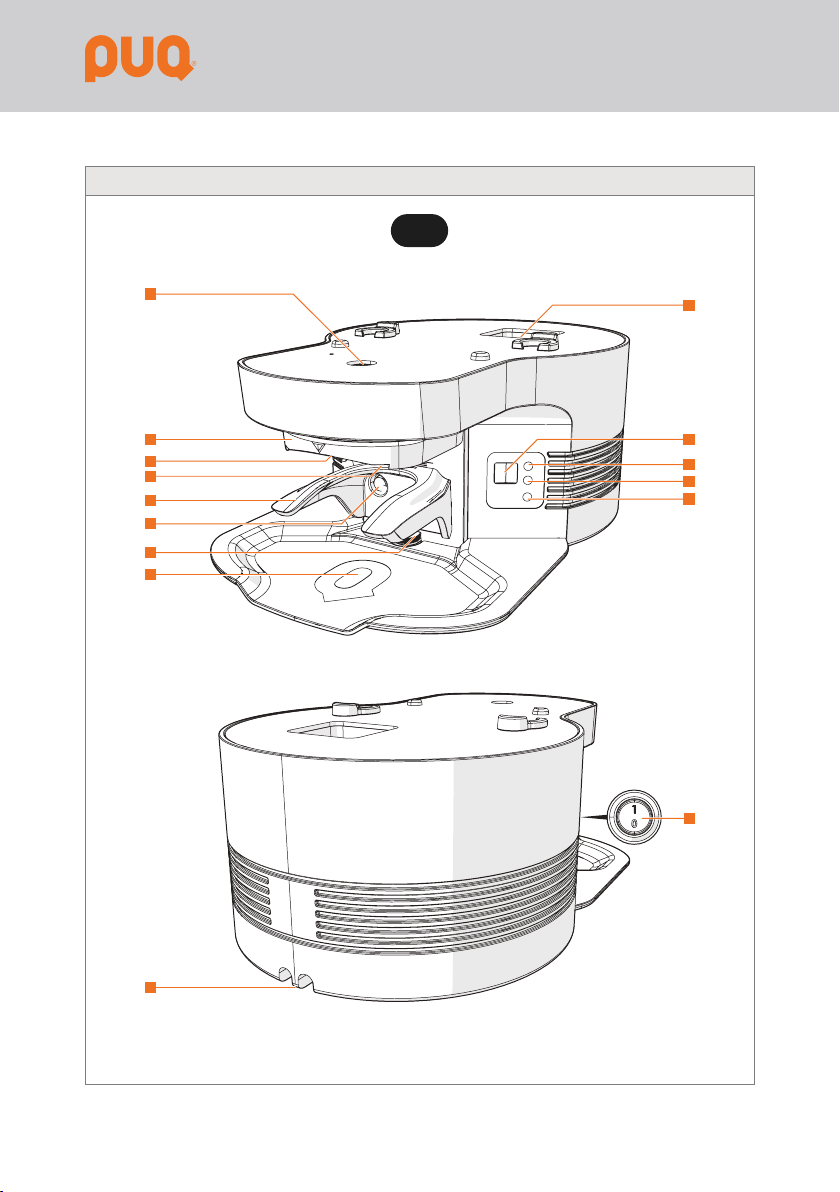
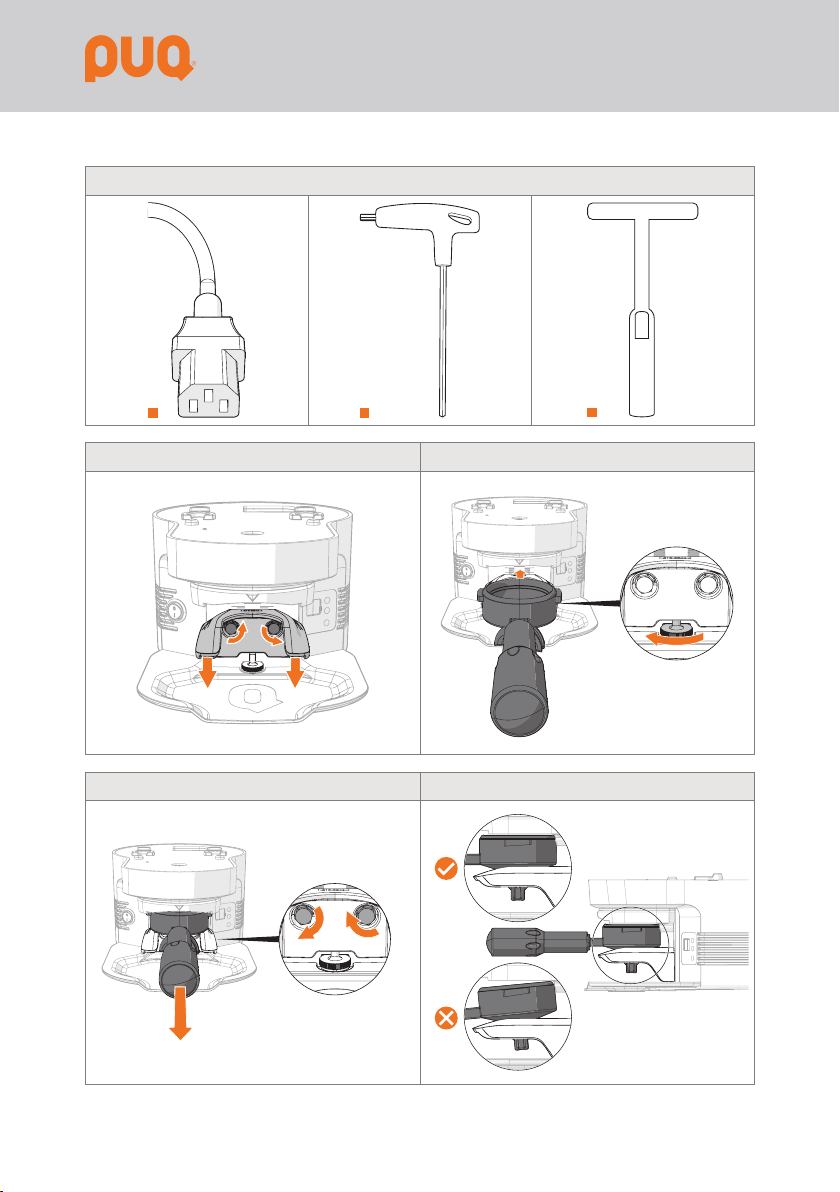
Puqpress M2 User manual

USER
MANUAL
M5 M6M3 M4M2
MODEL

2
www.puqpress.com/manuals
6WARNING
For more information see the extended
manual online about safe installation
and operation.
EN
NL
KO 사용자 설명서
DE
FR
ES
PT
IT
PL
EL Εγχειρίδιο χρήστη
RU Руководство пользователя
JA ユーザーマニュアル
ZH 用户手册
AR
EN Original manual

3
IMAGES
14
14
15
1 9
10
11
12
13
14
2
3
5
4
6
7
8
M2

4
10
9
11
12
13
1
2
3
4
5
6
7
8
14
15
M3

5
IMAGES
14
15
10
9
11
12
13
1
2
3
4
5
6
7
8
M4

6
14
15
10
9
11
12
13
1
2
3
4
5
6
7
8
M5

7
IMAGES
M6
14
15
14
10
9
11
12
13
14
1
2
3
4
5
6
7
8

8
16
17
18

9
IMAGES

10

11
EN
TABLE OF CONTENT
1 Safety 12
Explanation of the symbols on the
2 Introduction 14
3 Productdescription 15
4 Installation 18
5 Operation 19
6 Maintenance 21
7 Troubleshooting 23
8 Disposal 24
DEAR COFFEE ENTHUSIAST,
First off, we would like to congratulate you
with your very own PUQpress and thank you
The PUQpress is a fully automatic tamper,
developed by people with a passion for
perfect coffee and elegant technology.
Our specialists have spent all their
knowledge and devotion in developing the
ultimate tool to standardise the tamping
pressure, a crucial parameter for a perfect
cup of coffee.
Please read this manual closely so you and
your customers will enjoy the PUQpress to
the fullest and store the manual away safely
after reading. If anything remains unclear,
please feel free to contact your authorized
dealer or contact us directly.
We wish you all the fun and perfection with
your new PUQpress!
Greetings from Amsterdam,
Barista Technology B.V.

12
1SAFETY
1.1 Safety instructions
6WARNING
•Ensure you have fully read and
understood the instructions in this
document before you install or use the
PUQpress. Keep this document for future
reference.
•Only use the PUQpress as described in
this document.
•This appliance can be used by children
aged from 8 years and above and
persons with reduced physical, sensory
or mental capabilities or lack of
experience and knowledge if they have
been given supervision or instruction
concerning use of the appliance in a safe
way and understand the hazards
involved.
•Never let children play with the
PUQpress. Not doing so may result in the
PUQpress getting damaged.
•Cleaning and user maintenance shall not
be made by children without supervision.
•Never immerge cables, plugs or the
PUQpress itself into water or other
liquids to avoid electric shock, or injury.
•Always switch off the PUQpress before
performing maintenance or cleaning on
the PUQpress to avoid electric shock, or
injury.
•Always remove the plug from the outlet
before performing maintenance or
cleaning on the PUQpress to avoid
electric shock, or injury.
•Always unplug the PUQpress from the
power source and other equipment if
problems occur to avoid electric shock,
or injury.
•Never use the PUQpress if the PUQpress,
cable or plug is damaged. Any required
repairs may only be conducted by
authorized service personnel. For this
reason, please contact a customer
service repair facility or your dealer.
Using the PUQpress if the PUQpress,
cable or plug is damaged may result in
electric shock, or injury.
6CAUTION
•Always handle the coffee grinder with
two people with care. Not doing so may
result in the coffee grinder getting
damaged.
•Always adjust the lower clamp before
use. Not doing so results in exposure of
dangerous moving parts.
•Never insert your hand (or other limbs) in
between the PUQpress base and lower
clamp. Risk to pinch.
•
alterations to the PUQpress. The
manufacturer holds no liability for
damages resulting from failure to
observe these instructions.
•Never drop the PUQpress and avoid
bumping. Not doing so results in the
PUQpress getting damaged.

13
EN
•Never unplug the PUQpress by pulling the
cable. Always grasp the plug and pull.
•Always place the PUQpress on a level,
•Never operate the PUQpress in moist or
wet conditions.
•
handle) does not wiggle after adjusting.
•Make sure to guide the cables through
the cable guide(s) and clip(s) on the
bottom. Not doing so may result in the
cables getting damaged.
•Make sure not to use a damp/wet cloth
to clean the tamper base. Grounded
coffee will stick to the tamper base.
•Never install the PUQpress in an area
where a water jet can be used.
•Never clean the PUQpress with a jet of
water or a steam cleaner.
1.2 Personnel requirements
The user of this PUQpress does not need
special requirements. Ensure you have fully
read and understood the instructions in this
document before you install or use the
PUQpress. Keep this document for future
reference.
1.3 Explanation of the symbols on the
product and packaging
Electronic equipment needs to
bear the CE mark in order to be
marketed in the EU. CE marking
shows that a product is assessed
before being placed on the
market and that it meets EU
safety, health and environmental
protection requirements. CE
marking is also sometimes
accepted as a means of
requirements; for example,
electronic components that
marking for electromagnetic
equipment.
Indication that the PUQpress is an
Electrical class | product, with
provided means for the
connection of conductive parts
(which are not live parts) to the
protective (earthing) conductor in
these parts cannot become live in
the event of a failure of the basic
insulation.
Indication that the PUQpress is
fragile.

14
Indication that the PUQpress
must be kept dry.
Indication that the PUQpress
must be handled with care.
Indication that the packaging of
the PUQpress must be handled
this way up.
Read the manual before use.
Indication to explain that the
PUQpress is cETLus Intertek
Indication to explain that the
PUQpress is ETL Intertek
S
A
N
I
T
A
T
I
O
N
N
I
T
E
E
K
T
ForM3/M4/M5only:
Indication to explain that the
PUQpress is Intertek sanitation
Indication to explain that the
PUQpress needs to be collected
separately when disposed. Do not
throw in the trash bin.
Indication to explain that the
packaging can be recycled.
2INTRODUCTION
2.1 Used symbols in this manual
6WARNING
WARNING indicates a hazardous situation
which, if not avoided, could result in death or
serious injury.
6CAUTION
CAUTION indicates a hazardous situation
which, if not avoided, could result in minor or
moderate injury. CAUTION is also used to
address practices not related to physical
injury.
NOTICE
NOTICE indicates useful information.
2.2 Warranty
•The warranty period is 2 years from the
date of purchase. Refer to the chapter
tamping cycles covered by the warranty.

15
EN
•The warranty covers all damages that
can be attributed to inferior materials or
defective workmanship. The
corresponding PUQpress will be repaired
exception of transport or freight
charges. Proper transport is the
responsibility of the customer, so please
try to avoid damages during a product
return by correctly packing the
PUQpress. Use the original packaging to
return the PUQpress.
•This warranty does not cover damages
which have occurred through:
−improper usage,
−improper maintenance,
−lack of servicing,
−usage for purposes other than those
intended,
−incorrect installation,
−breakage,
−natural wear or for reasons beyond
•In order to maintain the warranty, only
original spare parts and accessory parts
may be used.
•The manufacturer is in no way liable for
consecutive or secondary damages.
•The warranty does not cover costs
resulting from repairs conducted by
2.3 Disclaimer
rights reserved. No part of this publication
may be reproduced or transmitted in any
form or by any means without the prior
written permission of Barista Technology
B.V. The information in this publication is
proprietary to Barista Technology B.V.
3PRODUCT DESCRIPTION
3.1 Intended use
The PUQpress is intended as a fully
automatic coffee tamper.
Grounded coffee can be tampered with an
adjustable force.
These appliances are intended to be used for
commercial applications, for example in
kitchens of restaurants, canteens, hospitals
and in commercial enterprises such as
bakeries, butcheries, etc., but not for
continuous mass production of food.
The PUQpress is intended for indoor use
only.
consequences for safety, warranty and
proper functioning.
15

16
3.2 Specications
Model M2 M3 M4 M5 M6
Voltage
Frequency
Power
Current
Dimensions
mm
inch
mm
inch
mm
inch
mm
inch
mm
inch
Weight
Tamping
pressure
Operating
temperature
Storing
temperature
Ingress
protection
N/A
Maximum
inclination
Tamping cycle
Tamper shape Flat bottom
Warranty
Tamping cycles
within the
warranty
Unlimited
cycles
Unlimited
cycles
Unlimited
cycles
Unlimited
cycles
Serial number See tag plate on the bottom of the PUQpress
Year built See tag plate on the bottom of the PUQpress
Tamper diameter See tag plate on the bottom of the PUQpress
16

17
EN
Suitable coffee
grinders
Pro, Victoria
Arduino Mythos
Victoria
Arduino Mythos
Mahlkönig
Mahlkönig
Fiorenzato
Fiorenzato
Fiorenzato
Supreme
Victoria
Victoria
Victoria
Victoria
Optional coffee
grinders*
Victoria
Arduino Mythos
Fiorenzato
Fiorenzato
Suitable coffee
grinders in
combination with
optional bracket
Mazzer Super
Jolly, Mazzer
Major, Mazzer
Kony
Mazzer Robur,
Mazzer Kold
Suitable coffee
grinders in
combination with
universal top
plate
not optimal.
3.3 Main parts
See for an overview of the main parts of
the M2.
See for an overview of the main parts of
the M3.
See for an overview of the main parts of
the M4.
See for an overview of the main parts of
the M5.
See for an overview of the main parts of
the M6.
See for an overview of the main parts of
the M2/M3/M4/M5/M6.
1. Tamper base bolt
2. Upper clamp
3. Tamper base
4. Contactless sensor
5. Lower clamp
6. Lower clamp bolts
7. Adjustment wheel
8. Ground coffee basket
9. Power cable port
10. Display
11. Up button
12. Down button
13. Set button
14. Power cable entries

18
15. On/off switch
16. Power cable
18. Allen key (4 mm)
4INSTALLATION
You have received your PUQpress in
operating condition. Now you only need to
with your coffee grinder and switch on the
PUQpress. Refer to the chapter ‘Safety
instructions’ for more information.
4.1 Preparation
4.1.1 Checking the contents
Check that all parts are present and that no
damage is visible on the parts. If parts are
missing or damaged, contact your dealer or
your authorised customer service centre.
4.1.2 Tools and materials
Required tools and materials
•
Provided tools and materials
•
4.2 Adjustingtheport-a-lterclamp
The PUQpress is designed so that all
even and level tamping.
6CAUTION
Always adjust the lower clamp before use.
Not doing so results in exposure of
dangerous moving parts.
NOTICE
Make sure to adjust the lower clamp before
use. Not doing so can result in uneven and
unlevelled tamping.
1. Slightly loosen the bolts of the lower
2. Pull down the lower clamp.
upper and lower clamp.
4. Rotate the adjustment wheel clockwise
to move the lower clamp up against the
5. Slightly fasten the bolts of the lower
NOTICE
Make sure not to fasten the bolts entirely.
7. Fasten the bolts of the lower clamp with
upper and lower clamp and check if the
start again at step 1..

19
EN
6CAUTION
does not wiggle after adjusting.
4.3 Setting up the coffee grinder
6CAUTION
Always place the PUQpress on a level,
1. Slide the back of the PUQpress over the
edge of the table or bar where you want
2. Plug the power cable into the PUQpress.
3. Lift the coffee grinder with two people
and guide the power cable of the coffee
grinder from the top to the bottom of the
PUQpress.
4. Place the coffee grinder on the
PUQpress.
5. Guide the power cables of the PUQpress
and the coffee grinder through a power
cable entry.
6CAUTION
Make sure to guide the cables through the
cable guide(s) and clip(s) on the bottom. Not
doing so may result in the cables getting
damaged.
bar or table.
4.4 Switching on the PUQpress
6WARNING
Never use the PUQpress if the PUQpress,
cable or plug is damaged. Any required
repairs may only be conducted by authorized
service personnel. For this reason, please
contact a customer service repair facility or
your dealer. Using the PUQpress if the
PUQpress, cable or plug is damaged may
result in electric shock, or injury.
1. Plug the other side of the power cable
into a socket and/or (wall) outlet.
2. Switch on the PUQpress by setting the
on/off switch to I.
5OPERATION
Your PUQpress is now in operating condition.
Now you only need to use PUQpress and
adjust the settings to create perfect coffee!
Refer to the chapter ‘Safety instructions’ for
more information.
5.1 Preparation
5.1.1 Tools and materials
Required tools and materials
•
grounded coffee

20
5.2 Using the PUQpress
upper and lower clamp.
3. The PUQpress automatically starts
tamping the coffee. The contactless
4. Wait until the PUQpress has tampered
the coffee.
of approximately 1.3 seconds.
5.3 Adjusting the tamping force
Adjust the tamping force by using the display
and the buttons.
1. Press the up button to increase the
force.
2. Press the down button to decrease the
force.
NOTICE
The force is displayed in kilograms (kg) or
pounds (lbs).
5.4 Selecting the tamping mode
1. Press and hold the set button for 5
seconds.
2. Use the up and down button to adjust
the setting.
3. Choose between the following settings:
M2/M3/M5/M6
Code Setting Explanation
SPEEDY Normal tamping speed
PRECISE Slow retraction of the
tamper base
SOFT Slow retraction of the
tamper base, lower
kg)
Triple tamp
SINGLE Single tamp
M4
Code Setting Explanation
SPEEDY Normal tamping speed
PRECISE Slow retraction of the
tamper base
SINGLE Single tamp
4. Press the set button
setting.
5.5 Checking the tamping cycle count
1. When the PUQpress is not in use, press
and hold the up and down button for 3
seconds.
seconds. Multiply this number by 5,000
to get the tamping cycle count.
5.6 Checking the cleaning cycle count
1. Press the set button.
2. Press and hold the up and down button
for 3 seconds when the PUQpress is in
clean modus.
Other manuals for M2
2
This manual suits for next models
4
Table of contents
Languages:
Other Puqpress Coffee Maker manuals
Popular Coffee Maker manuals by other brands

Bunn
Bunn Single SH BrewWISE DBC Installation and operating manual

Jura
Jura GIGA X8c Technical documentation

Electrolux
Electrolux Lavazza A Modo Mio quick start guide

DeLonghi
DeLonghi NESCAFE Dolce Gusto JOVIA EDG 250 user manual

Gevi
Gevi GECME403-U instruction manual

eunasa
eunasa Lucca CEM-BLK instruction manual