Puretone P Series User manual

Established 1976
V1.0
December 2014
Mini Microphone
User Guide

Welcome
Statement
2
Congratulations on your purchase of a Mini Microphone, a high quality
streamer of speech and sound. Mini Microphone streams speech directly
to your hearing instrument. The line-in functionality of the Mini Microphone
will provide you with a streamed audio signal (mono) from your Hi-Fi
stereo, personal computer, TV or similar device directly to your hearing
instruments. Please read this manual carefully to fully benet from the
Mini Microphone. Ask your hearing care professional if you have any
questions.
For your safety, carefully read the chapter Important Information,
Starting on page 16.
FCC ID: X26SM-1
This device complies with Part 15 of the FCC Rules and IC Rules.
Operation is subject to the following two conditions: (1) this device may not
cause harmful interference, and (2) this device must accept any interference
received, including interference that may cause undesired operation.
Note: This equipment has been tested and found to comply with the limits
for a Class B digital device, pursuant to part 15 of the FCC Rules and
ICES-003 of the IC rules. These limits are designed to provide reasonable
protection against harmful interference in a residential installation. This
equipment generates, uses and can radiate radio frequency energy and,
if not installed and used in accordance with the instructions, may cause
harmful interference to radio communications.

3
Mini Microphone is intended to enable hearing instrument users to better
follow speech or listen to other audio signals. The essential performance
of the Mini Microphone is to transfer signals from the micro-phone or other
audio devices to a wireless hearing instrument.
In the EU: Products are intended for sale in countries within European
Economic Area as well as Switzerland.
Intended Use
List of Countries
Reorient or relocate the receiving antenna.
Increase the separation between the equipment and receiver.
Connect the equipment into an outlet on a circuit different from the receiver
is connected.
Consult the dealer or an experienced radio/TV technician for help.
Changes or modications can void the user’s authority to operate the
equipment.
However, there is no guarantee that interference will not occur in a particular
installation. If this equipment does cause harmful interference to radio or
television reception, which can be determined by turning the equipment off
and on, the user is encouraged to try to correct the interference by one or
more of the following measures:

4
National Restrictions
This product is in compliance with the following regulatory standards:
In EU: The device conforms to the Essential Requirements according to
- Annex I of Council Directive 93/42/EEC for medical devices (MDD) and
essential requirements and other relevant provisions of Directive 1999/5/
EC (R&TTE).
In US: FCC CFR 47 Part 15, subpart C.
In Canada: IC 6941C-SM1
This Class B digital apparatus complies with Canadian ICES-003.
Cet appareil numérique de la classe B est conforme à la norme
NMB-003 du Canada.
Operation is subject to the following two conditions:
1. This device may not cause interference, and
2. This device must accept any interference, including interference that
may cause undesired operation of the device.
Other identied applicable international regulatory requirements in
countries outside EU and US. Please refer to local country requirements
for these areas.
Products are categorized as receiver class 2 according to EN 300 328.

5
Contents
Description
Getting Started
Turning your Mini Microphone ON and OFF
Pairing to your hearing instruments
Start streaming
Stop streaming
Light Indicator (LED)
Using the Line-in
Volume Control
Important Information
General warnings
General precautions
Technical specications
Warranty
Troubleshooting Guide
6
7
8
8
10
12
13
14
16
16
17
17
21
21
22

6
Description
1. Mini-USB connector for charging
2. Microphone inlet
3. Line-in input
4. ON/OFF switch
5. Volume control
6. Light indicator (LED)
7. Clip
8. Pairing button
7
3
8
1
2
4
5
6

7
Getting Started
Charging the Battery
Before using your Mini
Microphone, you need to fully
charge the rechargeable battery.
To charge it, plug the charging
cable as shown in the picture to
the right. Then plug the other end
of the charging cable into a power
outlet.
During the charging process, the
LED indicator will show a solid
red light. When fully charged and
still connected to the charger,
the LED will turn solid green
interrupted by a red blink every 2
seconds.
Charging an empty battery
typically takes about 3 hours.
It is safe to leave the charger
connected overnight – the battery
cannot be overcharged.
• When charging your Mini Microphone for the rst time, leave it to
charge for at least 3 hours, even if the battery indicator indicates that the
battery is fully charged.
• For safety reasons, recharge the battery only with chargers supplied.
Do not charge the
Mini Microphone while
it is on your body.

8
To turn ON your Mini Microphone slide the ON/OFF switch (4 on page 6)
down to the ON position. A white “I” icon will be visible on the switch and
the LED indicator will now blink green every 2.5 second.
To turn it OFF, slide the ON/OFF switch up to the OFF position. The LED
will now stop blinking.
If the battery level is low the LED will blink yellow every 2 seconds.
Note! The following information is intended primarily for your hearing
care professional, who in most cases will complete the tasks that are
necessary before the Mini Microphone can be used with your hearing
instruments. However, the process is designed to be simple and most
people can do it themselves.
It is possible to pair up to three streaming devices - e.g. one Mini
Microphone and two TV streamers (optional accessory) - with a given
pair of hearing instruments. Therefore, channel 1, 2 or 3 must be selected
when starting the pairing process.
Pairing the Mini Microphone in channel 1
1. Make sure Mini Microphone is turned ON. Your hearing instruments
must be OFF – open the battery door.
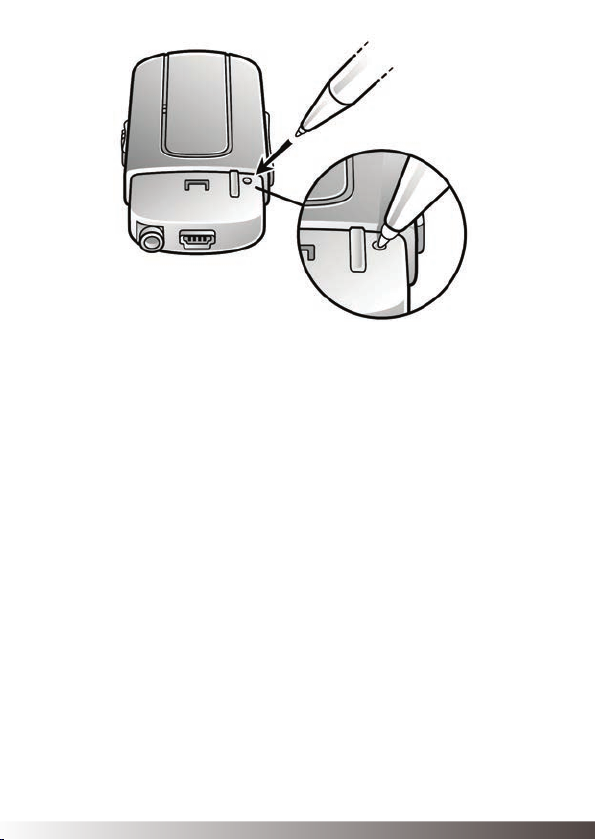
2. Remove the silver cap from the Mini Microphone. With the tip of a pen
or similar object, press the small pairing button one time on the front of
your Mini Microphone (see page 9). The LED will now blink yellow once
every 2 seconds to indicate that is ready to be paired in channel 1. Your
Mini Microphone will remain in pairing mode for 20 seconds.
Turning Your Mini Microphone ON and OFF
Pairing To Your Hearing Instrument

9
3. While pairing mode is activated, close the battery doors of both
hearing instruments and make sure they are ON. A successful pairing will
be indicated by an audible melody played in both hearing instruments.
You are now ready to use the Mini Microphone!
Pairing the Mini Microphone in channel 2 or 3
To pair the Mini Microphone in channel 2, press the pairing button twice.
The LED will now blink yellow twice every 2 seconds to indicate that it is
ready to be paired in channel 2. Close the battery doors on the hearing
instruments.
To pair the Mini Microphone in channel 3, press the pairing button three
times. The LED will now blink yellow three times every 2 seconds to
indicate that it is ready to be paired in channel 3. Close the battery doors
on the hearing instruments.

10
Pairing
button
pushes
1
2
3
1
2
3
ChannelLight indicator pattern
Pairing blinking pattern:
Turn on the Mini Microphone and make sure your hearing instruments
are turned on as well. Streaming may be started in one of two ways.
1. Press and hold the push button on both hearing instruments for about
three seconds in order to listen to the streamed audio signal. Once the
Mini Microphone has been connected an audible melody will play in your
hearing instruments and will be followed by the streamed sound.
2. If you have a Remote Control (optional accessory), simply press the
streaming button (not supported by 680 Series). Doing so will briey
show a search icon in the remote control display. Once the hearing
instruments connect to Mini Microphone, a short melody will be played
in both ears to conrm the presence of streamed audio and a streaming
icon will appear in the display. The streamed sound can now be heard in
your hearing instruments.
Start Streaming

11
Start streaming on a 2nd or 3rd Mini Microphone unit
If your hearing instrument is paired to more than one streaming device,
you can start streaming in two ways.
1. Press and hold the hearing instrument push button for about 3
seconds a 2nd or 3rd time to access the 2nd or 3rd streaming device.
2. If you use a Remote Control, press the streaming button (not
supported on 680 Series) on the Remote Control a 2nd or 3rd time to
access the 2nd or 3rd streaming device.
The 1 to 3 streaming devices are initially labelled by letter designator A, B
or C, and the device in use is shown on the Remote Control display.
Searching for
Mini Microphone
Connected to
Mini Microphone
Streaming Button

12
• With the Remote Control (optional accessory) you just have to press
the “P” button, located in the center of the key pad. This will return the
hearing instruments to the last program used. You may also press the
home button to return to your default settings.
• If you are using the telephone with the Phone Clip, streaming of the
Mini Microphone will be temporarily disrupted. When you have ended
your phone call, streaming will resume.
Note! You may get out of range (>7m) from your Mini Microphone.
If you get back in range within 5 minutes, your hearing instruments
will automatically reconnect and continue streaming.
Wearing Your Mini Microphone
Clip your Mini Microphone on the speaker’s jacket or other clothing.
Place the device within a range of 10-20cm from the speaker’s mouth.
Start Streaming

13
The Light indicator (6 on page 6) on your Mini Microphone serves as a
multi-purpose user interface, providing information on the status of your
device.
Normal operation
Battery low
Charging
Fully charged - still
connected to charger
Pairing in channel 1
Pairing in channel 2
Pairing in channel 3
Light Indicator (LED)

14
The Line-in (3 on page 6) can be used to stream audio signals from most
auxiliary audio devices through the Mini Microphone’s line input directly to
your hearing instrument.
1. Insert the included jack cable into the Line-in plug on the Mini
Microphone.
2. Plug the other end of the jack cable into the AUDIO OUT on the audio
device you want to stream from.
Note: When using the Mini Microphone with a TV the HEADPHONE
output terminal is usually located on the side or front of the TV. When
using the HEADPHONE output terminal on the TV, usually only the person
wearing the hearing instruments will hear the sound, and the TV speakers
are muted. Your TV may support speakers and HEADPHONE being on
simultaneously, check your TV manual for instructions.
Using The Line-In

15
The Mini Microphone has been designed to provide a comfortable
listening level from the moment it is activated. However, for some devices
or listening environments it may be desirable to adjust the listening
volume. This can be accomplished in a variety of ways. Keep in mind that
volume adjustments apply to the streamed signal only, not the volume of
normal environmental sounds.
• Use the “+” and “-“ keys (5 on page 6) to adjust volume to a
comfortable level. Make sure that your hearing instruments are
comfortably adjusted before you change the settings with the volume
control.
Note: When using the Mini Microphone as a microphone the last
volume setting will be stored. When using the Line-in, the volume
setting will revert to the default level when the Mini Microphone is turned
OFF and ON again to avoid an uncomfortable loud initial sound level
when used with different audio sources.
• Use the Remote Control (optional accessory) to adjust the streaming
volume in the hearing instrument. Ask your hearing care professional for
more information about this accessory.
• The volume can in some cases be further adjusted at the signal source,
for example by turning the TV itself down. In many cases this will adjust
the volume of both streamed audio (transmitted wirelessly to your
hearing instruments) and non-streamed audio (sounds reaching the
hearing instrument microphones in the normal fashion). Of course, this
will also affect listening volume for others in the room.
Volume Control

16
Maintenance and Care
• Clean the Mini Microphone using a damp cloth. Never use household
cleaning products (washing powder, soap etc…) or alcohol to clean the
device.
• When the Mini Microphone is not in use, turn it OFF and store safety.
• Protect the Mini Microphone from excessive moisture (bathing,
swimming) and heat (radiator, car dashboard). Protect it from excessive
shock and vibration.
• Protect the microphone and charger inlets from debris and dirt.
If necessary, use the cleaning brush provided with your hearing
instruments to clean these areas.
General Warnings
• Young children can wrap cords and lanyards / key chains around their
neck causing the risk of strangulation. Therefore, always keep cords
and lanyards / key chains out of reach of children.
• The Mini Microphone uses low-powered digitally coded transmissions
in order to communicate with other wireless devices. Although unlikely,
nearby electronic devices may be affected. In that case, move the Mini
Microphone away from the affected electronic device.
• When using the Mini Microphone and the device is affected by
electromagnetic interference, move away from the source.
Important Information
!

17
• Avoid exposing your product to rain, moisture or other liquids to protect
against damage to the product or injury to you.
• Keep the product and any cords and cables away from operating
machinery.
• If the product overheats, if the product has been dropped or damaged,
if the product has a damaged cord or plug, or if the product has been
dropped in a liquid, discontinue use and contact your hearing care
professional.
• Dispose of the product according to local standards and regulations.
• Do not use in areas where there are explosive hazards.
Ignition of ammable atmospheres
• Do not use the product in environments where there is a danger of
ignition of ammable gasses.
• Do not use this device in locations where it is forbidden to use
electronic devices.
• X-ray radiation (e.g. CT scans, MRI scans) may adversely affect the
correct functioning of this device. We recommend that you switch the
device OFF before undergoing X-ray procedures and keep it outside
the room.
• High-powered electronic equipment, larger electronic installations and
metallic structures may impair and signicantly reduce the operating
range.
General Precautions

18
• If the hearing instruments do not respond to the device because of an
unusual eld disturbance, move away from the disturbing eld.
• Your hearing instruments and this device were given a unique
communication code during the tting. This ensures that the device will
not affect hearing instruments worn by others.
• Do not make any changes or modications to this device.
• Opening the Mini Microphone might damage it. If problems occur
which cannot be resolved, consult your hearing care professional.
• Mini Microphone may only be repaired by an authorised service centre.
• Do not use the Mini Microphone in areas where RF transmission is
prohibited, e.g. air planes etc.
• Do only connect the Mini Microphone to connections which it is
explicitly intended for.
BUILT-IN BATTERY CARE: Please observe the following if the
product contains a battery.
• Your product is powered by a rechargeable battery.
• The full performance of a new battery is achieved only after two or three
complete charge and discharge cycles.
• The battery can be charged and discharged hundreds of times, but will
eventually wear out.
• Unplug the charger from the electrical plug and the product when not
in use.

19
• Leaving the product in hot places, such as in a closed car in the
summer conditions, will reduce the capacity and lifetime of the battery.
• A product with a cold battery may not work temporarily, even when
the battery is fully charged. Battery performance is particularly limited in
temperatures well below freezing.
Battery warning!
• ”Caution” – The battery used in this product may present a risk of re or
chemical burn if mistreated.
• Do not attempt to open the product or replace the battery. It is built-in
and not changeable. Use of other batteries may present a risk of re or
explosion and the warranty will be terminated.
• The battery in your product can not be removed or replaced by the
user. Any attempt to do so is risky and may result in damage of the
product.
• Only recharge the Mini Microphone only with a power supply unit that
has been supplied together with the product.
• Dispose of batteries according to local regulations. Please recycle when
possible.
• Do not dispose the battery as household waste or in a re as it may
explode.
• Batteries may explode if damaged.
!

20
CHARGER CARE: Please observe the following if the product
is supplied with a charger.
• Do not attempt to charge your product with anything other than the AC
adapter provided. The use of any other types may damage or destroy
the product and could be dangerous. Use of other chargers may
invalidate any approval or warranty.
• For availability of approved enhancements, please check with your
hearing care professional.
• Charge the product according to the instructions supplied with the
product.
Charger warning!
• When you disconnect the power cord or any enhancement, grasp and
pull the plug, not the cord.
• Never use a charger that is damaged.
• Do not attempt to disassemble the charger as it may expose you to
dangerous electric shock.
• Incorrect reassembly can cause electric shock or re when the product
is subsequently used.
• Avoid charging your product in extremely high or low temperatures and
do not use the charger outdoors or in damp areas.
• Do not charge the Mini Microphone while it is on your body.
!
This manual suits for next models
2
Table of contents