PVDJ DAI User manual


2
INDEX
CUE
……………………………
GRAB
LOAD
SEARCH
………………………………
UTILITIES
………………………………
………………………………
………………………………
7
7
8
8
9
INSTALLATION ……………………………… 4
SPECS ……………………………… 10
?

3
Welcome to the PVDJ DAI.
The DAI™ (Digital Audio Interface) is the essential gear for forward-thinking DJs,
a hardware and software package that lets you remix all of your .mp3, .wav and
.cda audio files in real time. Just plug in and free your mind.
You'll find all the tools you need for real-time remixing and editing in the DAI,
including two jog wheels (one for each player) that can be used to create vinyl-
style scratching effects, and exclusive Grab™ technology, which allows on-the-
fly, one-button-push looping and BPM matching.
Mobile/event jocks will appreciate our exclusive Auto Pilot™, a fully automated
mixing and tempo-matching feature that eliminates dead air between songs. Auto
Pilot detects the end of the currently playing track and mixes in the next song
automatically, aligning the beats and matching the tempos. It can be left on as a
safeguard without interfering with the other controls, so you can get lost in the
beats as the DAI mixes seamlessly from song to song.
The DAI controller works in tandem with the companion PVDJ software package,
which is built around a 56-bit audio engine. The software requires no additional
drivers—it runs using your Windows or Mac OSX drivers—and is a true "plug &
play" interface; if either the USB or power cord is unplugged, the DAI will pick up
exactly where it left off once the cord is replaced, without rebooting.
The DAI is so intuitive, you don't even have to load your songs into a program—
as long as they're in your computer, the DAI will find them.
You have the tools. Now go create.

4
Minimum System Requirements
•CPU 733Mhz
•Windows XP SP1
•3 MB of unused hard drive space
•1026 x 768 screen resolution, 16-bit colors
•PVDJ DAI
Installation
Plug the PVDJ DAI into your PC (you will see detected new hardware at the
bottom right of the computer screen). After inserting the program CD, select
“install” from the installation menu. If no menu shows up after inserting CD,
locate and run Setup.exe on the CD. Updates and information can be found at
www.pvdj.com.
After installation, Windows XP will automatically detect the necessary drivers.
Since this PVDJ software is written to use standard USB drivers, you will not
need to install any additional drivers.
Double-click on the PVDJ icon and you will see this screen:
PVDJ Software Screen

5
The DAI has two work modes, internal mixer and external mixer. When using the
internal mixer, the controls (PVDJ software screen: 8, 9, and 10) can be used to
adjust volume and tone. The two stereo audio outputs on the DAI go to the main
and monitor; you use monitor to listen to a track before mixing it. This is
controlled by the internal mixer cue button (PVDJ software screen 9).
To use an external mixer, select Menu/Edit/Preferences and then click on the
Output tab and check “Use External Mixer.” This will disconnect the software
mixer and make the two stereo outputs on the DAI connect directly to the left and
right players.
PVDJ will look for the soundcard built into the DAI and connect to it. If you want
to use a different soundcard, select Menu/Edit/Preferences to change. All of your
changes will be saved when exiting the PVDJ software program.
Preferences Screen
Playlist
PVDJ software has a built-in playlist (PVDJ software screen: 12) to contain all
tracks, and it’s from this list that you load tracks into the players. The DAI can
play .wav and .mp3 files as well as audio CDs. To compile tracks into the playlist,
simply drag and drop the file into the playlist. This will create a link to the files
within the PVDJ software but will not actually move the files. Using this method, it
is possible to create playlists for different types of gigs easily. Simply place the
tunes you want on a particular list into a folder and then drop that folder into the
player. To delete a playlist, click on the first track of the list and move the mouse
to the last track and click on it as you hold down shift or ctrl + A. This will highlight
all the tracks in blue. Next, go to Edit/Delete to remove the selected tracks from
the playlist. You can now reload an alternate list using the same method as
before.

6
After inserting an audio CD, the tracks from the CD will automatically appear in
their own playlist. Once you remove the CD, those tracks will disappear. The
scanned BPM information is saved automatically so next time you insert the CD
the scanned BPM info will appear.
You can resize columns and also rearrange them by clicking on the column you
want to change while holding down the mouse button and then moving the
column to a new position. On the computer screen sorting is done by clicking on
the column headers (PVDJ software screen: 12). To find a track, go to the Find
box (PVDJ software screen: 11). You can toggle between a playlist and the Find
function by pressing the TAB key; when entering text in Find, you will see the
result immediately. Pressing the ESC key will clear the Find field.
DAI
BPM Scan
When adding tracks to the PVDJ software, a BPM scan starts to extract the BPM
(beats per minute) in the background so that automatic mixing and Grabbing can
be performed (this can be turned on/off under Menu/Edit). BPM scan will only
scan a track in the playlist if its BPM field is empty Normally, when adding tracks
this BPM field will display what is stored in the track’s ID tag, if anything, or it will
set to 000.00. To enable scanning, select tracks (click on it or do multiple
selections with shift + click or ctrl + click) and execute “Clear BPM” on selected
tracks in the Edit menu. PVDJ does not alter your .mp3, or .wav files; all data is

7
stored/changed in a database, so selecting “Clear BPM” will not delete any tag
info stored in your tracks. The text “Scanning” will appear in the BPM field of the
track being scanned on the LCD display. This may take a minute or so, but it will
run in the background while you perform. It will only use leftover CPU power and
will not slow down the primary functions such as response time and sound
latency (delays). You can also scan your audio CDs; PVDJ identifies the CD by
its CDDB ID and uses this identification to retrieve the saved BPM data.
Load
You can select a track by using the jog wheel or the (+/ _) pitch bend buttons on
the DAI when the players are not playing. To Load the track push the load button
Holding down the Load button on the DAI (DAI: 1) will enable you to do this while
a player is playing. It will not load a track if you press Load when it is playing.
Search
type the name of the song you want. The list will be limited by the letters that you
type. After you release the Search button, the LCD screen will go back to its
normal mode. At the bottom of the LCD screen, you will see your search text. In
Find mode you can select your track by using the inner jog wheel. Press Load to
load the track that is at the top of the list.
You can sort your songs from the LCD screen by BPM, Title, Artist or Version.
Simply touching the columns on the LCD screen does this. The sort order will be
displayed at the bottom of the screen (DAI LCD screen: 5). To clear the sort
method and return to the order the songs appear in your original playlist, touch
the “Sort order :text” graphic at the bottom of LCD screen. It will then display
“Sort order :Pos normal.”
hold down the search button, (DAI: 2) (
)
then use the LCD touch ke
y
board to
To find a track using the DAI only, use the on-screen touch-sensitive keyboard. First
)
(DAI: 1) (

8
DAI LCD Screen
PVDJ players
You have two identical audio players at the top of the DAI LCD screen. After
loading a track, the track information, type, sample rate, etc will be displayed
immediately. (PVDJ software screen: 1). If your track has been BPM scanned,
you will see a “Q” (LCD screen: 1) to indicate “Quantized.” This means that when
setting a cue point, PVDJ will automatically adjust to the nearest ½ BPM so you
will find the beat quickly. The Quantize function can be turned on/off in the Edit
menu or with the Utilities button on the DAI.(
Under Elapsed and Remaining Times (LCD screen: 3), Artist, BPM, Title and
Version are shown. A progress bar shows the current location within the song.
Click on the progress bar to jump to different positions in the track. You can also
click the Frev and Ffwd arrows on the computer screen or use the outer or inner
jog wheel on the DAI (DAI: 7). You can switch the display to show Elapsed or
Remaining Time, and BPM or Pitch information on the DAI by simply touching on
those areas on the LCD.
The Play button toggles play/pause, and the Cue button toggles stop to
beginning, stop to cue position. There are several ways to set a cue position (a
cue position is a starting point in the track to be used in place of the actual start
of track).
Creating/editing a cue position
•Load a track and start playing. Press Play to pause, then use inner and
outer jog wheels to fine-tune the exact cue point. To store press Cue.
•I Load
)
) (DAI: 5)
To edit an existing cue point, hold the Cue CFG button on DAI (
and rotate the inner/outer jog wheel to fine-tune the exact cue point.

9
•Load a track. Start playing. Hold down the Cue CFG button on the DAI
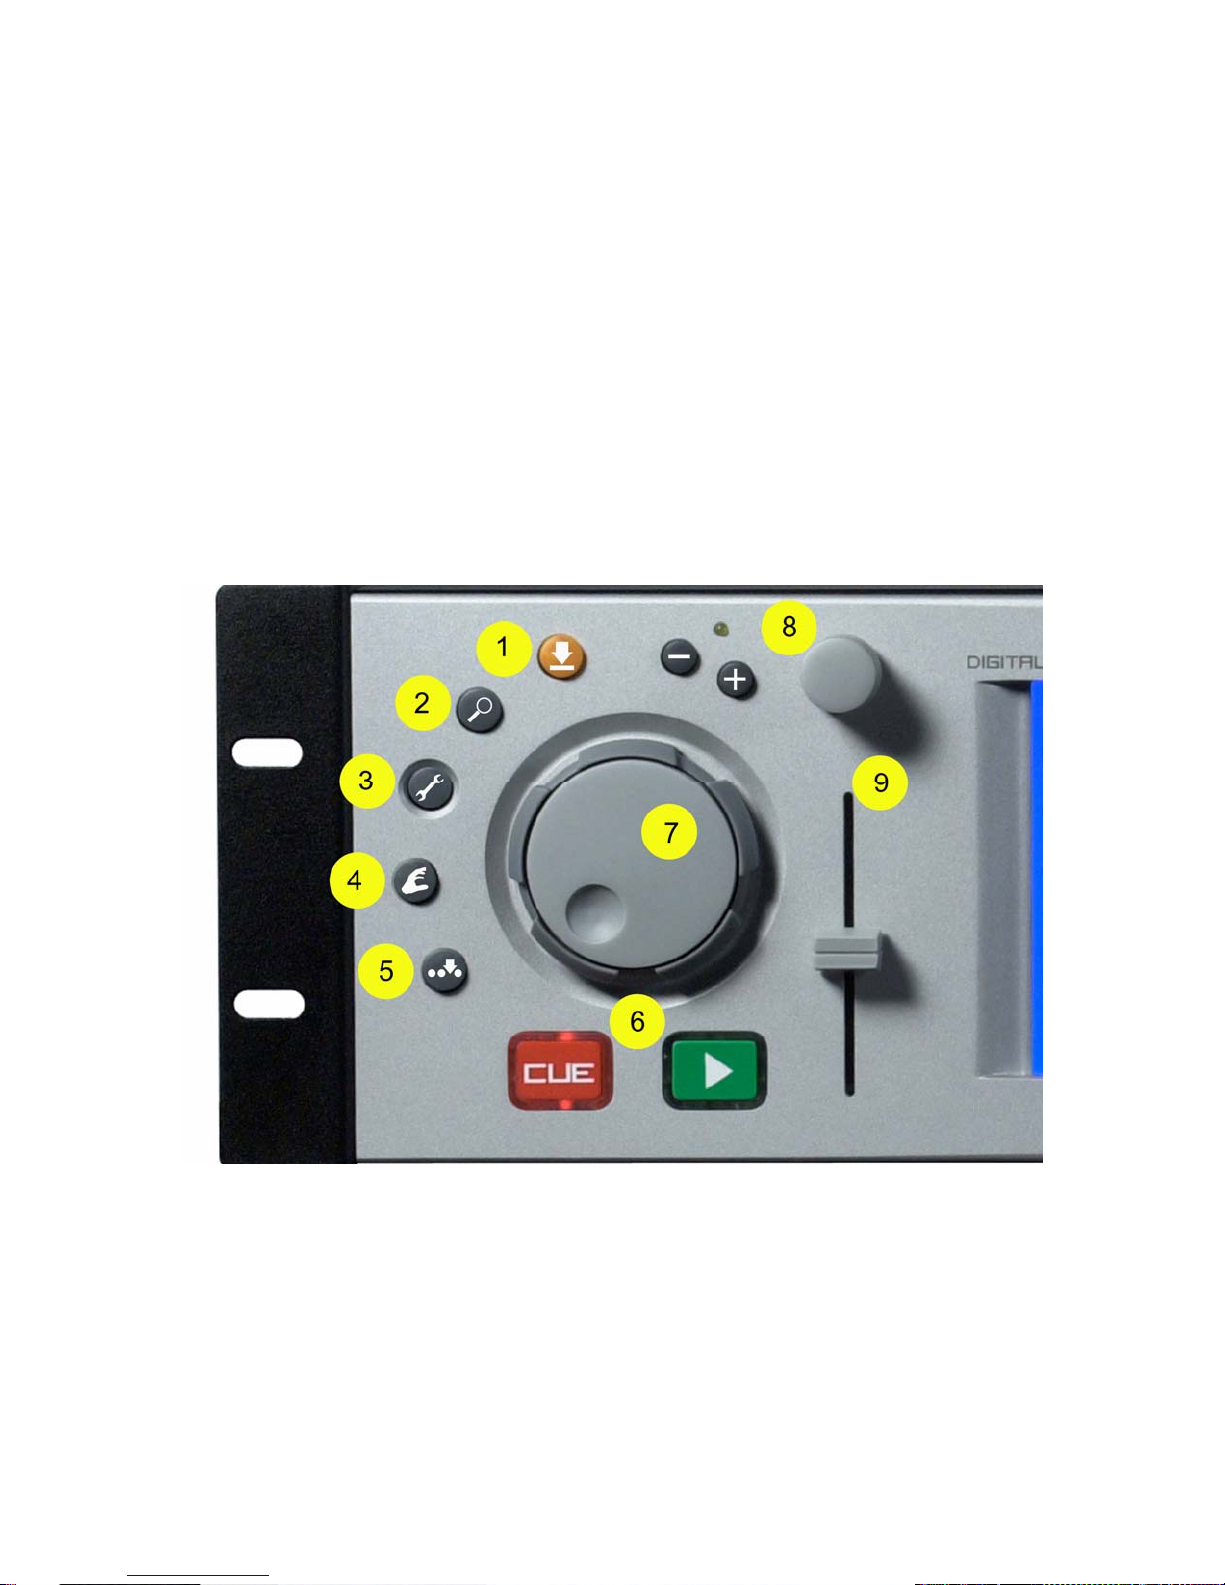
(DAI: 5) and when you hear the position coming up, “punch in” the cue
with the Cue button (DAI: 6) on the fly.
Deleting a cue position
Hold down Cue CFG button on the DAI (DAI: 5) and touch Clear on the LCD
screen. You can also perform additional functions as displayed on the LCD
screen while holding down the Cue CFG button.
Digital and analog search modes: scratching effects
Also within the Cue CFG screen is the option of switching between digital and
analog search modes. In analog mode, the stutter is replaced by a more “vinyl-
sounding” analog setting that can be used to find a cue position. When used with
the inner jog wheel, analog mode can also be used to simulate scratching
effects.
Stutter and Cue on the Fly
To create a cue point on the fly that will automatically correct to the beat. Hold
down the Cue CFG button and press Cue as the music is playing. Cue will
instantly store that point as a cue point. Then by pushing Play, the DAI will
instantly jump to that position.
Change the pitch by moving the pitch slider (DAI: 9). If both players have a BPM
set, the BPM of the player you are adjusting will snap to match the other player
as the tempos get close. This makes tempo matching simple.
Grab™.
The Grab feature automatically makes a loop that starts and ends on a beat.
These loops can be adjusted in length. The default initial length is four beats,
however four, eight, twelve and sixteen beats can be selected. You can adjust
this
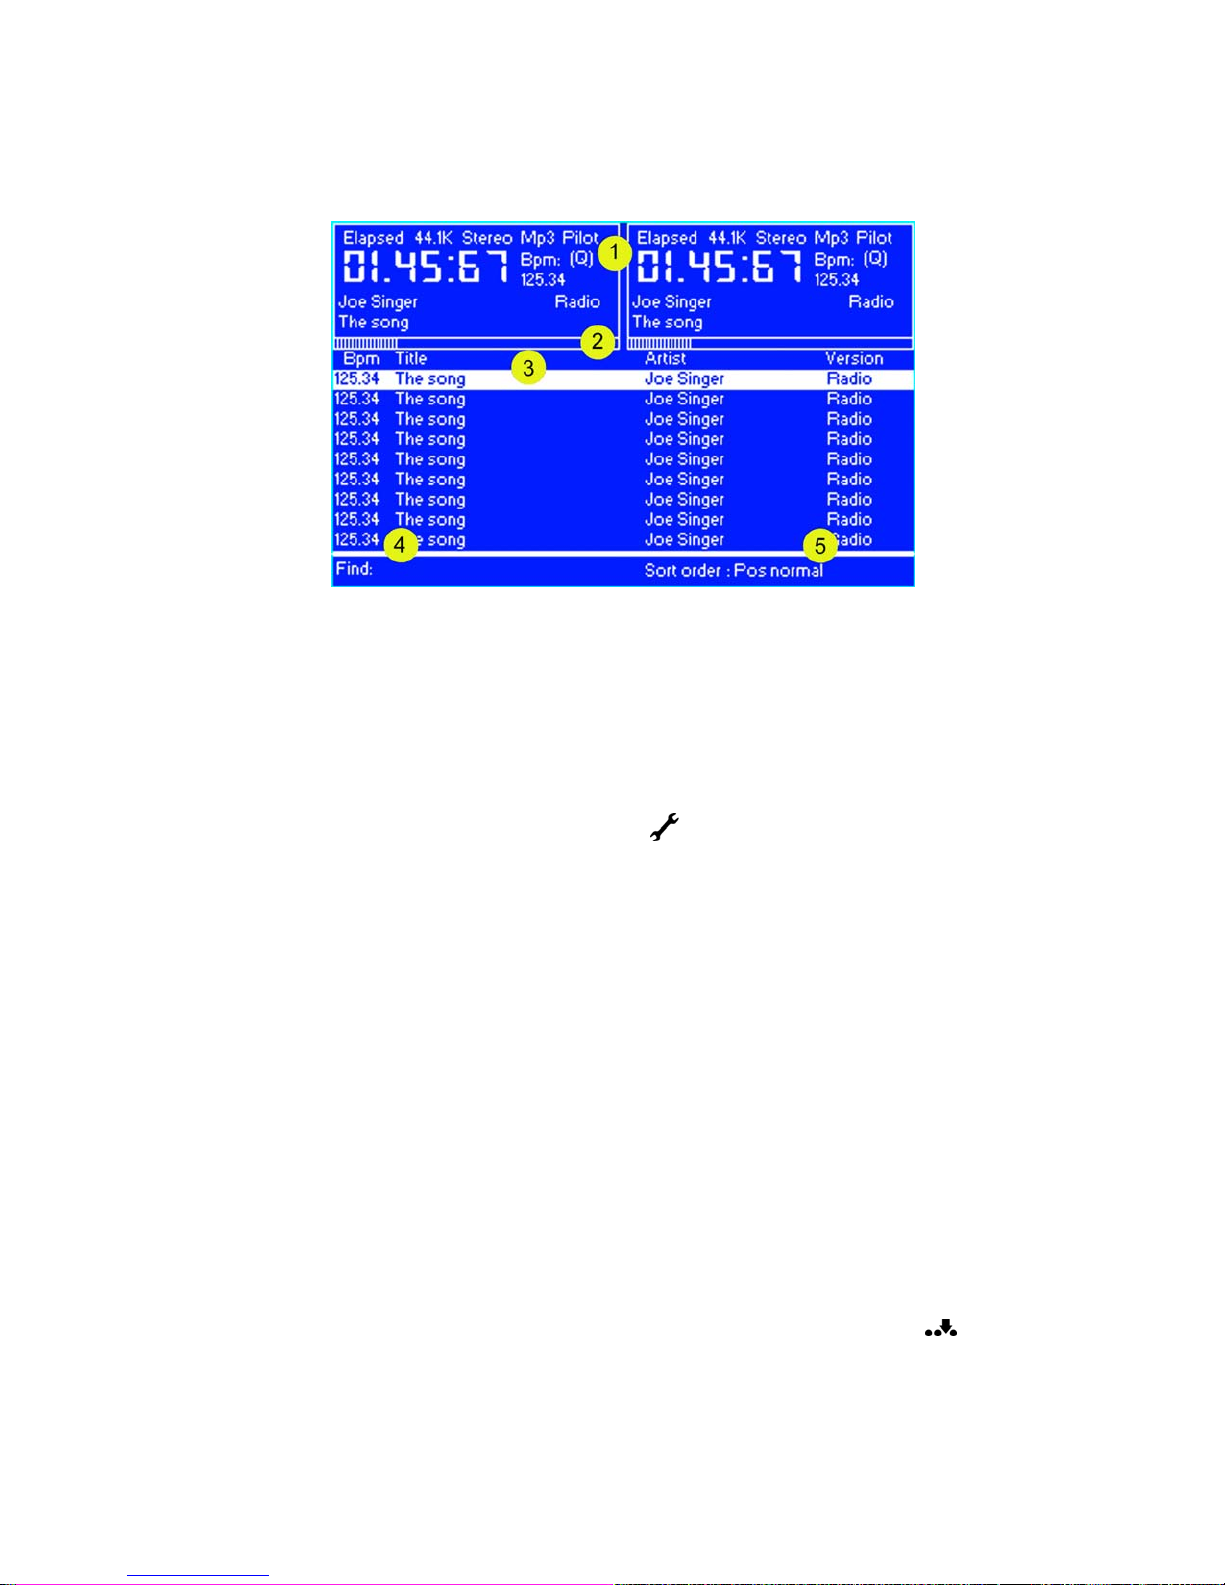
To change the loop length while looping, turn the rotary knob to extend or cut the
loop. The length of the loop is indicated on the LCD screen (DAI: 2).
To use the Grab feature, simply press the rotary knob (DAI: 9) and a loop is
created. When you press again you will exit the loop. This can only be done at
the end of a bar (four beats), so you can mix and play very short loops and keep
the exit in sync with the musical measure.
If Quantize mode is turned off, then Grab will create a loop based solely on when
the button is pushed. It will not adjust to the beat. Quantization is turned on/off by
holding down the Utility button ( ) (DAI: 3) and selecting quantization on/off.
By holding down the Grab CFG button ( ) (DAI: 4), the loop can be moved
by holding down the Grab CFG button ( ) (DAI: 4), then select Decrease/Increase
Make a stutter effect by holding down the Cue CFG ( ) button on the DAI and
pressing Play.

10
forward and backward one beat at a time with the rotary knob (DAI: 9).
Beat Offset
Offsetting a beat in the Grab CFG screen allows you to temporarily change the
detected beat position. If you get a track with a beat that is slightly off, this will
allow you to adjust it ¼ beat plus or minus. This setting resets to zero when
loading a new track. Grabbing will only work on tracks with a set BPM. If no BPM
is set, nothing will happen.
Utility settings and Auto Pilot play
The DAI can also help you with your mixing. In the utility screen on the DAI (DAI:
3) you can turn Auto Pilot on/off, plus other settings such as Auto Cue,
Quantization and BPM scanning.
Auto Pilot is designed to help in live situations. When turned on Auto Pilot will mix
in a new track when it approaches the last 15 seconds of the current track. It will
then load and mix in the next marked track. If you stop either player, or if you mix
before the very end, it will not engage.
Auto Sync Play
If the BPMs of the tracks are within 10 beats of each other mixing will be done on
the beat automatically. If the difference is greater than 10 BPM or Quantization is
turned off, Auto Pilot will begin mixing when the song starts to fade out. If there is
no fading, it mixes when the track stops. This way, there is no setting to
compromise mixing. Instead, all mixing is individually handled from track to track.
Specifications
- 0.01 sec Audio Latency
- 56 bit Audio rendering engine
Audio specifications
- Audio sampling in 16-bit/44.1KHz
mode
- 24-bit 105dB ADC, 24-bit 102dB DAC
Compatibility USB
- USB 1.1 (USB Full-Speed) required
-Compatible with USB 2.0 (USB High-
Speed)
User upgradable firmware
LCD screen resolution 320 x 240
Tempo fine-tune 0.01 BPM
Inputs/Outputs
4 balanced outputs
4 unbalanced outputs
2 unbalanced inputs
1 balanced microphone input
16VAC ~ 1100 mA power supply

PVDJ LIMITED WARRANTY
Effective Date: July 1, 2003
WWhhaatt TThhiiss WWaarrrraannttyy CCoovveerrss
Your PVDJ Warranty covers defects in aterial and work anship in PVDJ products purchased and serviced in the U.S.A. and Canada.
WWhhaatt TThhiiss WWaarrrraannttyy DDooeess NNoott CCoovveerr
The Warranty does not cover: (1) da age caused by accident, isuse, abuse, i proper installation or operation, rental, product odification or neglect; (2)
da age occurring during ship ent; (3) da age caused by repair or service perfor ed by persons not authorized by Pvdj; (4) products on which the serial
nu ber has been altered, defaced or re oved; (5) products not purchased fro an Authorized PVDJ Dealer.
WWhhoo TThhiiss WWaarrrraannttyy PPrrootteeccttss
This Warranty protects only the original retail purchaser of the product.
HHooww LLoonngg TThhiiss WWaarrrraannttyy LLaassttss
The Warranty begins on the date of purchase by the original retail purchaser. The duration of the Warranty is as follows:
Product Category Duration
Power A plifiers 2 years *(+ 3 years)
Pre-A plifiers, Mixers, Electronic Crossovers and Equalizers 2 years *(+ 1 year)
Enclosures 3 years *(+ 2 years)
Digital Effect Devices and Keyboard and MIDI Controllers 1 year *(+ 1 year)
Microphones 2 years
Speaker Co ponents (incl. speakers, baskets, drivers,
diaphrag replace ent kits and passive crossovers)
and all Accessories 1 year
Tubes and Meters 90 days
[*Denotes additional warranty period applicable if optional Warranty Registration Card is co pleted and returned to PVDJ by original retail purchaser within 90 days of purchase.]
WWhhaatt PPVVDDJJ WWiillll DDoo
We will repair or replace (at PVDJ's discretion) products covered by warranty at no charge for labor or aterials. If the product or co ponent ust be shipped
to PVDJ for warranty service, the consu er ust pay initial shipping charges. If the repairs are covered by warranty, PVDJ will pay the return shipping charges.
HHooww TToo GGeett WWaarrrraannttyy SSeerrvviiccee
((11))Take the defective ite and your sales receipt or other proof of date of purchase to your Authorized PVDJ Dealer or Authorized PVDJ Service Center.
OR
((22))Ship the defective ite , prepaid, to PVDJ, International Service Center, 412 Highway 11 & 80 East, Meridian, MS 39301 or PVDJ Canada Ltd., 95 Shields
Court, Markha , Ontario, Canada L3R 9T5. Include a detailed description of the proble , together with a copy of your sales receipt or other proof of date of
purchase as evidence of warranty coverage. Also provide a co plete return address.
LLiiiittaattiioonn ooff IIpplliieedd WWaarrrraannttiieess
ANY IMPLIED WARRANTIES, INCLUDING WARRANTIES OF MERCHANTABILITY AND FITNESS FOR A PARTICULAR PURPOSE, ARE LIMITED IN DURATION TO THE
LENGTH OF THIS WARRANTY.
So e states do not allow li itations on how long an i plied warranty lasts, so the above li itation ay not apply to you.
EExxcclluussiioonnss ooff DDaaaaggeess
PVDJ'S LIABILITY FOR ANY DEFECTIVE PRODUCT IS LIMITED TO THE REPAIR OR REPLACEMENT OF THE PRODUCT, AT PVDJ'S OPTION. IF WE ELECT TO REPLACE
THE PRODUCT, THE REPLACEMENT MAY BE A RECONDITIONED UNIT. PVDJ SHALL NOT BE LIABLE FOR DAMAGES BASED ON INCONVENIENCE, LOSS OF USE,
LOST PROFITS, LOST SAVINGS, DAMAGE TO ANY OTHER EQUIPMENT OR OTHER ITEMS AT THE SITE OF USE, OR ANY OTHER DAMAGES WHETHER INCIDENTAL,
CONSEQUENTIAL OR OTHERWISE, EVEN IF PVDJ HAS BEEN ADVISED OF THE POSSIBILITY OF SUCH DAMAGES
So e states do not allow the exclusion or li itation of incidental or consequential da ages, so the above li itation or exclusion ay not apply to you.
This Warranty gives you specific legal rights, and you ay also have other rights which vary fro state to state.
If you have any questions about this warranty or service received or if you need assistance in locating an Authorized Service Center, please contact the PVDJ
International Service Center at (601) 483-5365 / PVDJ Canada Ltd. at (905) 475-2578.
Features and specifications subject to change ithout notice.

Features and specifications subject to change without notice.
PVDJ a Division of Peavey Electronics ▪711 A Street ▪Meridian, MS 39301 ▪U.S.A.
(601) 583-5367 ▪Fax (601) 486-1678 ▪www.pvdj.com
©2004
Table of contents
Popular Accessories manuals by other brands

RDI
RDI Prestige K10 Instructions for use

iOptron
iOptron ZEQ25 Instruction

PCB Piezotronics
PCB Piezotronics 352C33 Installation and operating manual

Lightolier
Lightolier IS-CWL280612 instruction sheet

FRANCO
FRANCO UCP Fly Mobile Instruction manual for use and maintenance

Burkert
Burkert 1060 operating instructions