Pyranha SPRAYMASTER SM55 User manual

1
SprayMaster® System User Manual | www.PyranhaInc.com | Houston, Texas
System_Manual_2020.indd 1System_Manual_2020.indd 1 12/23/20 10:18 AM12/23/20 10:18 AM

2
SprayMaster® System User Manual | www.PyranhaInc.com | Houston, Texas
System_Manual_2020.indd 2System_Manual_2020.indd 2 12/23/20 10:18 AM12/23/20 10:18 AM

3
SprayMaster® System User Manual | www.PyranhaInc.com | Houston, Texas
YOUR TRUSTED LEADER IN
INSECT CONTROL®
SINCE 1972
SprayMaster®
Warranty Registration
Dear Pyranha SprayMaster™ System New Owner,
We here at Pyranha®, Inc. “Thank You” for purchasing the SprayMaster™
System, and we look forward to many years of providing you with the
comfort and protection to which all of our customers are accustomed.
In order to serve you best, please complete and mail-in the attached
registration within 30 days of purchase, or go to www.pyranhainc.com and
register online to ensure that your system will be covered under our One (1)
Year System Top Warranty (pump, timer and motor).
Warmest Regards,
The Pyranha® Family
Pyranha®, Inc.
Attention: Customer Service
6602 Cunningham Road
Houston, Texas 77041
Company/Individual Name
Address City State Zip
Phone Number Email
Serial # Date SprayMaster™ Purchased
Where was your SprayMaster® System Purchased?
www.pyranhainc.com Store Name
City, State
System_Manual_2020.indd 3System_Manual_2020.indd 3 12/23/20 10:18 AM12/23/20 10:18 AM

4
SprayMaster® System User Manual | www.PyranhaInc.com | Houston, Texas
System_Manual_2020.indd 4System_Manual_2020.indd 4 12/23/20 10:18 AM12/23/20 10:18 AM

5
SprayMaster® System User Manual | www.PyranhaInc.com | Houston, Texas
YOUR TRUSTED LEADER IN
INSECT CONTROL®
SINCE 1972
SprayMaster®
System Top Installation
1. Cut out or peel o tape covering large holes on lid.
2. Unlatch metal ring and slide it down
so it remains around the drum.
3. Remove drum lid
The following steps can be completed
with the drum top resting on the lip
of the drum, or on any support that
allows access to the bottom of the
drum lid.
4. Carefully drop float through top of
matching large hole. Make sure float
line isn’t pinched between the drum
lid and system disk.
5. Insert supplied bolts through the
bolt holes near the edges of the
plastic disk and secure to the drum
top. Tighten by hand to hold system
disk in place and then use wrenches
to finish tightening. *Don’t over
tighten as the plastic system disk
can crack.
6. Check float line again to make sure
it is not pinched and hangs free.
The latch on the metal ring can be locked in place for security
to keep the drum from being opened.
System_Manual_2020.indd 5System_Manual_2020.indd 5 12/23/20 10:18 AM12/23/20 10:18 AM

6
SprayMaster® System User Manual | www.PyranhaInc.com | Houston, Texas
150
100 200
250
300
psi
50
0
Pyranha
Pyranha SprayMaster
Basic Misting System Parts & Layout
Accessories:
Nozzle Assemblies
Tubing Connectors
Tubing “T” Connectors
Tubing Elbow Connectors
Bleed Valve
Electric Motor 1/2 hp
Pt.# 007EMH
Pump 140 gph
Pt.# 007PPH
Solid State Timer
Pt. # 008MCRTIME
Float
Pt.# 006FLO
Pressure Gauge
Pt.# 006PG
45 Degree Fitting
Pt.# 00745DFMPF
Reducer Bushing
Pt.# 007RB
Check Valve 3 psi
Pt.# 007CV3
Brass Cross Female
Thread Pt.# 007BC
Male Discharge Elbow 1/4”
Pt.# 007E1
Pressure Regulating Valve
Pt.# 007BPV
Check Valve 25 PSI
Pt.# 007CV25
Intake Filter
Pt.# 006IF
Intake Elbow 3/8”
Pt.# 007E3
Pyranha
Pyranha
12
6
3
9
10
CIRCUIT
BREAKER
TANK
EMPTY
AUTO
OFF
TEST
15
45 60
120
MIST “ON” SECONDS
30
90
180
EXTRA
RUN
System_Manual_2020.indd 6System_Manual_2020.indd 6 12/23/20 10:18 AM12/23/20 10:18 AM

7
SprayMaster® System User Manual | www.PyranhaInc.com | Houston, Texas
YOUR TRUSTED LEADER IN
INSECT CONTROL®
SINCE 1972
SprayMaster®
Installation Instructions
1. At the installation site, remove all equipment from the corrugated box and the polyethylene drum
and replace the drum lid. Check the image in Figure 1 below to identify each piece of equipment.
NOTE: HIGH PRESSURE TUBING MUST BE USED OR WARRANTY WILL BE VOID.
2. Run the end of the tubing from the intake
filter through the lid and PVC circle and
connect it to the pump suction inlet
elbow. (Figure 2)
3. Insert the check valve assembly through
the lid and PVC circle and connect it to
the pressure regulating valve. (Figure 2)
4. Place the lid on the drum making sure the
black float with nylon line passes through
the cut-out with all lines hanging freely.
5. Remove the pressure gauge from its box
and screw it into the top of the brass
cross assembly. (Figure 3)
6. Make sure that the male discharge elbow
points away from the timer. (Figure 3)
FIGURE 1
FIGURE 2
FIGURE 3
System_Manual_2020.indd 7System_Manual_2020.indd 7 12/23/20 10:18 AM12/23/20 10:18 AM

8
SprayMaster® System User Manual | www.PyranhaInc.com | Houston, Texas
1. Remove the spray nozzles from package. Using the barn diagrams as a guide
(Figure 4), run the ¼ inch nylon tubing on the ground around the stall area to be
treated, beginning at the tank.
2. Using supplied tubing cutter, cut the tubing squarely to ensure airtight connections at
each spray nozzle.
System_Manual_2020.indd 8System_Manual_2020.indd 8 12/23/20 10:18 AM12/23/20 10:18 AM

9
SprayMaster® System User Manual | www.PyranhaInc.com | Houston, Texas
3. Push the tubing firmly into the side of the spray nozzle tee (Figure 5). Pull gently to
confirm you have secure connections then push back in. If leakage occurs, remove
tubing by pushing on the green circle, pushing the tubing in, pulling the tubing out and
then releasing the green circle. Trim ¼ inch o the tubing before reinserting.
4. Using the plastic fasteners (Figure 5), or zip ties, install the tubing and spray nozzles
above the center of each stall and six (6) feet inside each exterior door. Do not install
above fifteen (15) feet from the floor. Use cable wire if necessary. Make sweeping turns
with the tubing around corners to avoid kinking.
5. After all the spray nozzles have been installed, run the beginning of the tubing from the
discharge elbow on the brass cross assembly (Figure 3). Tighten with a wrench. Leave
four (4) feet of slack in the line to allow for easy shifting of the lid to add insecticide or
to remove the lid for drum cleaning.
6. At the end of the tubing attach
a bleed valve to shut o the line
and hold pressure (Figure 6). It is
recommended to end the tubing at
the drum for bleeding liquid and air
from the line into the drum.
FIGURE 5
FIGURE 6
System_Manual_2020.indd 9System_Manual_2020.indd 9 12/23/20 10:18 AM12/23/20 10:18 AM

10
SprayMaster® System User Manual | www.PyranhaInc.com | Houston, Texas
7. Remove the lid from the top of the drum and fill the drum about halfway with clean
water. Do NOT put insecticide in the drum until testing is completed. Replace the lid
on top of the drum. Do not restrict the float line and tubing.
8. Connect the electrical cord from the timer to an 110V outlet. Open the bleed valve
and hold inside the drum. Open the timer cover and start the system by flipping the
toggle switch to “TEST.” Allow the system to operate for several minutes to be certain
the pump is priming and there are no leaks at the various tubing connections. Once a
steady stream is flowing into the drum, close the bleed valve.
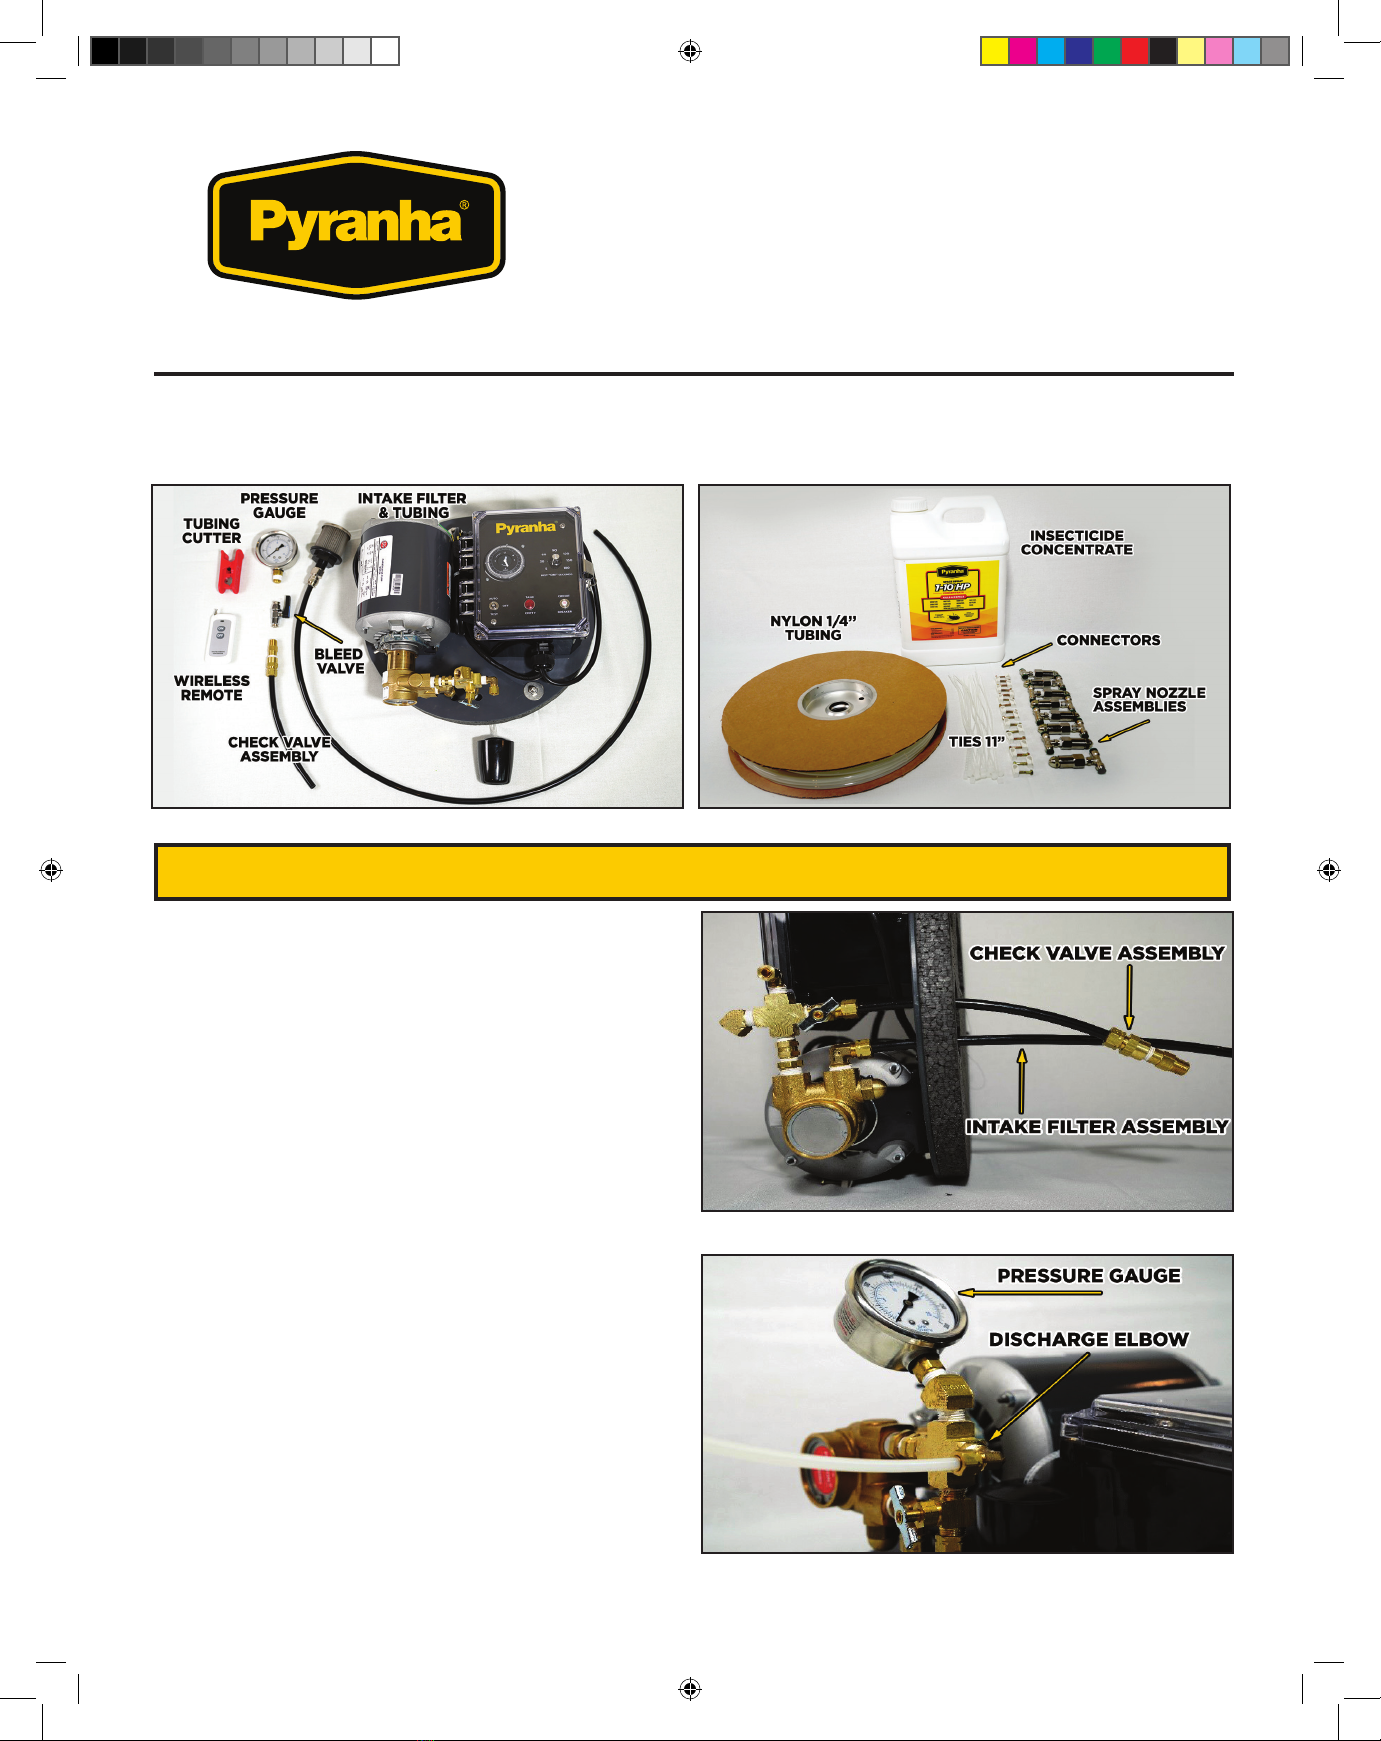
9. Turn the pressure regulating valve clockwise until the pressure gauge reads between
190psi and 210psi (Figure 7), and all nozzles are spraying a consistently fine mist.
Check again for leaks at the tubing connections.
10. After confirming the spray nozzles are operating correctly with no leads at the tubing
connections, flip the toggle switch to “OFF” and disconnect the electrical cord from
the outlet. Close the timer lid.
11. Carefully lift the drum lid and shift it to the side of the drum top. Add the entire
contents of the insecticide concentrate to the drum and finish filling with clean water
to four (4) inches from the top of the drum. Replace the lid on the drum (being
careful not to pinch the float line or kink the tubing) and reconnect the electrical
cord. Secure the lid in place with the metal ring. The latch on the metal ring can be
locked in place for security to keep the drum from being opened.
12. Open the timer cover. Open the bleed valve and hold in the drum. Flip the toggle
switch to “TEST” to fill the nozzle line with insecticide. Close the bleed valve once
insecticide is flowing through it. Adjust the pressure between 190psi and 210psi, if
necessary.
NOTE: The system works best between
190psi-210psi and must not be set
below 185psi, or over 215psi.
DO NOT OPERATE SYSTEM WITH THE
PRESSURE REGULATING VALVE
CLOSED.
FIGURE 7
System_Manual_2020.indd 10System_Manual_2020.indd 10 12/23/20 10:18 AM12/23/20 10:18 AM

11
SprayMaster® System User Manual | www.PyranhaInc.com | Houston, Texas
13. Rotate outer ring of clock dial clockwise to set the time of day (Figure 8).
14. Select the pin for the time of day you want the system to operate by using a ballpoint
pen or similar object to move the switch outward into the set position (Figure 8).
Repeat the above for each time you want the system to spray. Spray times should be
set from early morning to
dusk. Your unit is shipped
with the timer set for
six firing times: 6:00am,
8:00am, noon, 4:00pm,
6:00pm and 8:00pm.
15. Set the run duration selector
switch to the length of spray
time desired. When you
are first starting the system,
we recommend setting the
timer to operate six (6)
times a day for 45 seconds
each time. When the area is
under satisfactory control (10 to 14 days), cut back on the number of spray cycles and
duration time to maintain control.
NOTE: System will run continuously when the toggle switch is in the “TEST” position.
System will not operate when the switch is in the “OFF” position the “EXTRA RUN”
button can be used at any time to test the system, or for extra spraying.
CLOSE THE TIMER LID WHEN FINISHED.
PLACE CLOTH COVER OVER THE SYSTEM TOP.
FIGURE 8
System_Manual_2020.indd 11System_Manual_2020.indd 11 12/23/20 10:18 AM12/23/20 10:18 AM

12
SprayMaster® System User Manual | www.PyranhaInc.com | Houston, Texas
YOUR TRUSTED LEADER IN
INSECT CONTROL®
SINCE 1972
SprayMaster®
Servicing Your System
When the liquid is low and the drum needs to be refilled, the Float Switch
will automatically shut the system o and the red light will turn on.
To service and refill the system, use the following procedure:
1. Unplug the system from the power supply.
2. Lift the lid and set it to one side of the drum top. Normal refilling does not require
that you completely remove the lid from the drum; but if you do remove it, take care
to not crimp or damage the discharge tubing, intake tubing float line, or check valve
assembly.
3. Inspect the intake filter and clean, if necessary. We recommend changing the intake
filter annually and replacing every two (2) years.
4. Check the interior of the drum for residue or dirt. Flush and clean the drum before
adding water and concentrate. If the drum appears clean, just add concentrate and
water.
NOTE: If flushing out the drum; consider collecting the insecticide at the bottom of the
drum prior to cleaning and spreading it on your manure pile.
5. Fill the drum about halfway with water. Put the lid back on the drum (being careful to
not pinch the float line or tubing) Plug the system to the power source.
6. Open the bleed valve and hold in the drum. Flip the toggle switch to “TEST.” Once
the liquid is flowing through the bleed valve, close it. Check the pressure gauge is be-
tween 190psi and 210psi. Use the pressure regulating valve to adjust, if needed.
7. Inspect all spray nozzles and confirm spray is a fine, even mist. If nozzles pail to spray
properly, se the Troubleshooting Guide.
8. With the nozzles spraying as desired; flip the toggle switch to “OFF.” Slide the lid to
the side of the drum top. Add insecticide concentrate and continue filling the drum
with clean water to four (4) inches from the top. Put the lid back on the drum, making
sure not to pinch the float line, and latch in place.
9. Reset the timer clock, if needed. Flip the toggle switch to the “AUTO” position.
System_Manual_2020.indd 12System_Manual_2020.indd 12 12/23/20 10:18 AM12/23/20 10:18 AM

13
SprayMaster® System User Manual | www.PyranhaInc.com | Houston, Texas
Winterizing Your SprayMaster® System
1. Disconnect the nozzle tubing at the discharge elbow (liquid will pour from the tubing)
and open the bleed valve at the other end. We recommend having both ends of the
tubing empty into the drum. Be sure the brass nut and ferrule on the nozzle tubing
stay in place.
2. Lift or move the lid to raise the intake filter out of the liquid. Flip the toggle switch to
“TEST” and let run for fifteen (15) seconds to purge any liquid in the equipment (liquid
will spray from the discharge elbow). Flip the toggle switch to “OFF.” Unplug the sys-
tem from the power source.
3. Allow the nozzle tubing to drain for sever
minutes to empty as much liquid as possi-
ble. Be sure the intake filter stays out of any
liquid remaining in the drum.
4. If the drum freezes during the winter,
you will need to stir any contents before
reusing.
Re-connecting the SprayMaster®
System after Winterizing
1. After stirring the contents of the barrel,
reattach the nozzle tubing to the system
by pushing the tubing into the discharge
elbow and tightening with the nut and
ferrule.
2. Follow steps 5 through 9 under “Servicing
Your SprayMaster® System” on page 12.
YOUR TRUSTED LEADER IN
INSECT CONTROL®
SINCE 1972
SprayMaster®
Winterizing Your System
System_Manual_2020.indd 13System_Manual_2020.indd 13 12/23/20 10:18 AM12/23/20 10:18 AM

14
SprayMaster® System User Manual | www.PyranhaInc.com | Houston, Texas
YOUR TRUSTED LEADER IN
INSECT CONTROL®
SINCE 1972
SprayMaster®
System Consumption Rates
CONSUMPTION RATE FOR AUTOMATIC INSECT CONTROL SYSTEMS
The following is the formula for determining how many gallons of
diluted Pyranha® Insecticide your Automatic System will consume in one
week.
• Number of times system fires in a day multiplied by
Number of days in a week (7) multiplied by
• Number of spray nozzles on your system.
• Divided by 128 oz. gives you the number of gallons of liquid used each week.
• (A 45 second cycle dispenses 1 ounce of insecticide per spray nozzle.)
The following is for firing for 45 seconds, 6 times a day, at 190 P.S.I.:
Number of
Nozzles in Facility
Consumption
Rate
30 Gallon
System
50 Gallon
System
6 Nozzles 1.97 gal/wk 15 weeks 25 weeks
8 Nozzles 2.62 gal/wk 11 weeks 19 weeks
10 Nozzles 3.28 gal/wk 9 weeks 15 weeks
12 Nozzles 3.94 gal/wk 7 weeks 12 weeks
14 Nozzles 4.59 gal/wk 6 weeks 10 weeks
16 Nozzles 5.25 gal/wk 5 weeks 9 weeks
18 Nozzles 5.91 gal/wk 5 weeks 8 weeks
20 Nozzles 6.56 gal/wk 4 weeks 7 weeks
System_Manual_2020.indd 14System_Manual_2020.indd 14 12/23/20 10:18 AM12/23/20 10:18 AM

15
SprayMaster® System User Manual | www.PyranhaInc.com | Houston, Texas
YOUR TRUSTED LEADER IN
INSECT CONTROL®
SINCE 1972
SprayMaster®
Troubleshooting Solutions
Issues Possible Causes Solution
System does not operate at
the correct times.
Time of day incorrect. Check the timer to be sure the time of day is correct.
System does not run
automatically or when you
press the extra run button.
1. Tripped breaker or no power.
2. Tank is empty and float is cutting
power to the motor.
3. Float line being pulled or is tangled.
1. Check breaker panel. Plug in another appliance to same receptacle to make sure there is power.
2. Fill your system with water and your preferred Pyranha®Concentrate.
3. Check float line to make sure it is not being pulled or is stuck on something.
System runs but not
pumping fluid.
1. The tank is empty.
2. The intake filter is clogged.
3. Pump needs to be primed.
1. Fill your system with water and your preferred Pyranha® Concentrate.
2. Remove filter and rinse it clean or replace with a new one.
3.
A) Remove nozzle tubing from discharge elbow and hit the “Extra Run” button. If fluid shoots out of
the discharge elbow, reattach the nozzle tubing and open the bleed valve until liquid comes out and
then close the valve.
B) Remove nozzle tubing from discharge elbow, remove the system from the drum and twist o the
intake filter form the brass fitting. Take a water hose and with low pressure, hold it up to the brass
fitting. With your other hand press the “Extra Run” button. Water should spray out of the discharge
elbow. Reassemble the system and run.
If options A or B do not work, call or visit pyranhainc.com for a new pump. (007PPH)
Not all nozzles are spraying
or very little spray coming
out of tips.
1. System not building enough
pressure.
2. Spray tip filters are clogged.
3. Intake filter is clogged and not
allowing enough fluid through.
1. Turn Pressure Regulating Valve clockwise until the pressure gauge is between 190psi - 210psi.
2. Purchase new tips from your local authorized dealer.
3. Clean or replace the intake filter. (006IF)
Motor seems to be bogged
down and system shuts o
causing motor to overheat.
1. The Pressure Regulating Valve is
completely closed o.
2. Check valve is bad.
3. Bad motor and/or pump.
1. Turn Pressure Regulating Valve counterclockwise until the pressure gauge is between 190psi - 210psi.
2. Purchase new check valve. (007CV25)
3. Replace motor and/or pump.
System only runs with the
extra run button and clock is
not keeping time.
The timer is no longer good. Replace timer from your local authorized dealer.
System runs continuously
and won’t shut o, even in
the “OFF” position.
The timer is no longer good. Replace timer from your local authorized dealer.
Spray tips are dripping. 1. Excessive pressure in nozzle tubing.
2. Loose spray tip.
3. Air in nozzle tubing.
4. Check valve not working.
1. Turn Pressure Regulating Valve counterclockwise until the pressure gauge is between 190psi - 210psi.
2. Tighten spray tip in nozzle barrel.
3. Check for air bubbles in tubing. Run system with bleed valve open until there is a constant flow of
liquid and then close bleed valve.
4. Purchase new check valve. (007CV25)
Spray is not killing insects. 1. Insucient pressure.
2. Incorrect spray times.
3. Clogged tips.
4. Inoperative check valve in return
line to tank.
5. 30 gallon concentrate refill in 55
gallon drum.
1. Pressure should be between 190psi and 210psi. Increase the pressure by turning the pressure
regulating valve clockwise until pressure is in proper range. DO NOT TURN VALVE COMPLETELY
CLOSED.
2. Confirm clock has the correct time. Spray times may need to be adjusted to increase the number
of spraying times and duration of sprays. We recommend six (6) times a day for 45 seconds to obtain
control (about 10 – 14 days), then the duration time can be reduced to maintain control.
3. Clean outside of spray tip with a damp cloth or steel wool. If this does not work, see below.
4. If pressure drops to zero, replace the check valve (007CV25). If the check valve isn’t holding
pressure this can cause air in the lines and delay spraying of the tips.
5. Check 2.5 gallon bottle to see if it’s for a 30 gallon system or 55 gallon system.
System_Manual_2020.indd 15System_Manual_2020.indd 15 12/23/20 10:18 AM12/23/20 10:18 AM

16
SprayMaster® System User Manual | www.PyranhaInc.com | Houston, Texas
SprayMaster® Options & Replacement Products
Part Number Description
002SMTOPONLY SPRAYMASTER® SYSTEM TOP (MOTOR, TIMER, PUMP & BRASS CONNECTIONS)
002SM55GAL SPRAYMASTER® - 55 GAL UNIT WITH BATTERY BACK UP
002SM55GALKIT SPRAYMASTER® KIT - 55 GAL UNIT, (1) 1-10HP FILL, 160’ TUBING, 8 NOZZLES
004SNA1NPNS
SPRAY NOZZLE ASSEMBLY - 1/4” NICKLE PLATED BARREL, NICKLE SILVER TIP
004SNANPNSKIT SPRAY NOZZLE ASSEMBLY KIT - (5) 1/4” NOZZLE ASSEMBLIES, 100’ TUBING
004NTUNUPKIT TUNE-UP KIT - (2) 1/4” NOZZLES, 5 SPRAY TIPS, 1 INTAKE FILTER WITH TUBING
001HP55 PYRANHA® 1-10HP CONCENTRATE™ FOR 55 GALLON SYSTEM - 2.5 GAL
001HPS30 PYRANHA® 1-10HPS CONCENTRATE™ FOR 30 GALLON SYSTEM - 2.5 GAL
001ODAWAYC PYRANHA ODAWAY™ ODOR ABSORBER - 1 GALLON
Rev. 121520
System_Manual_2020.indd 16System_Manual_2020.indd 16 12/23/20 10:18 AM12/23/20 10:18 AM
Table of contents
Popular Paint Sprayer manuals by other brands

Makita
Makita EVH2000 Original instruction manual

stayer
stayer EPG300 operating instructions

Campbell Hausfeld
Campbell Hausfeld HV2100 Operating instructions and parts manual

SATA
SATA SATAjet 3000 A spray mix operating instructions

Gilson
Gilson Performer III SS-3 operating manual

DeVilbiss
DeVilbiss CMAX-B85MN Operation manual