Qcam QSD-722 User manual

1
Qcam QSD-722 User Manual
Version 1.1.2
Revised December 23th, 2015

2
Welcome........................................................................................................................................................................4
Important Safeguards and Warnings.............................................................................................................................4
1 Features and Specifications ........................................................................................................................................5
1.1 Overview..............................................................................................................................................................5
1.2 Features ...............................................................................................................................................................5
1.3 Minimum System Requirements .........................................................................................................................6
1.4 Package Contents ................................................................................................................................................6
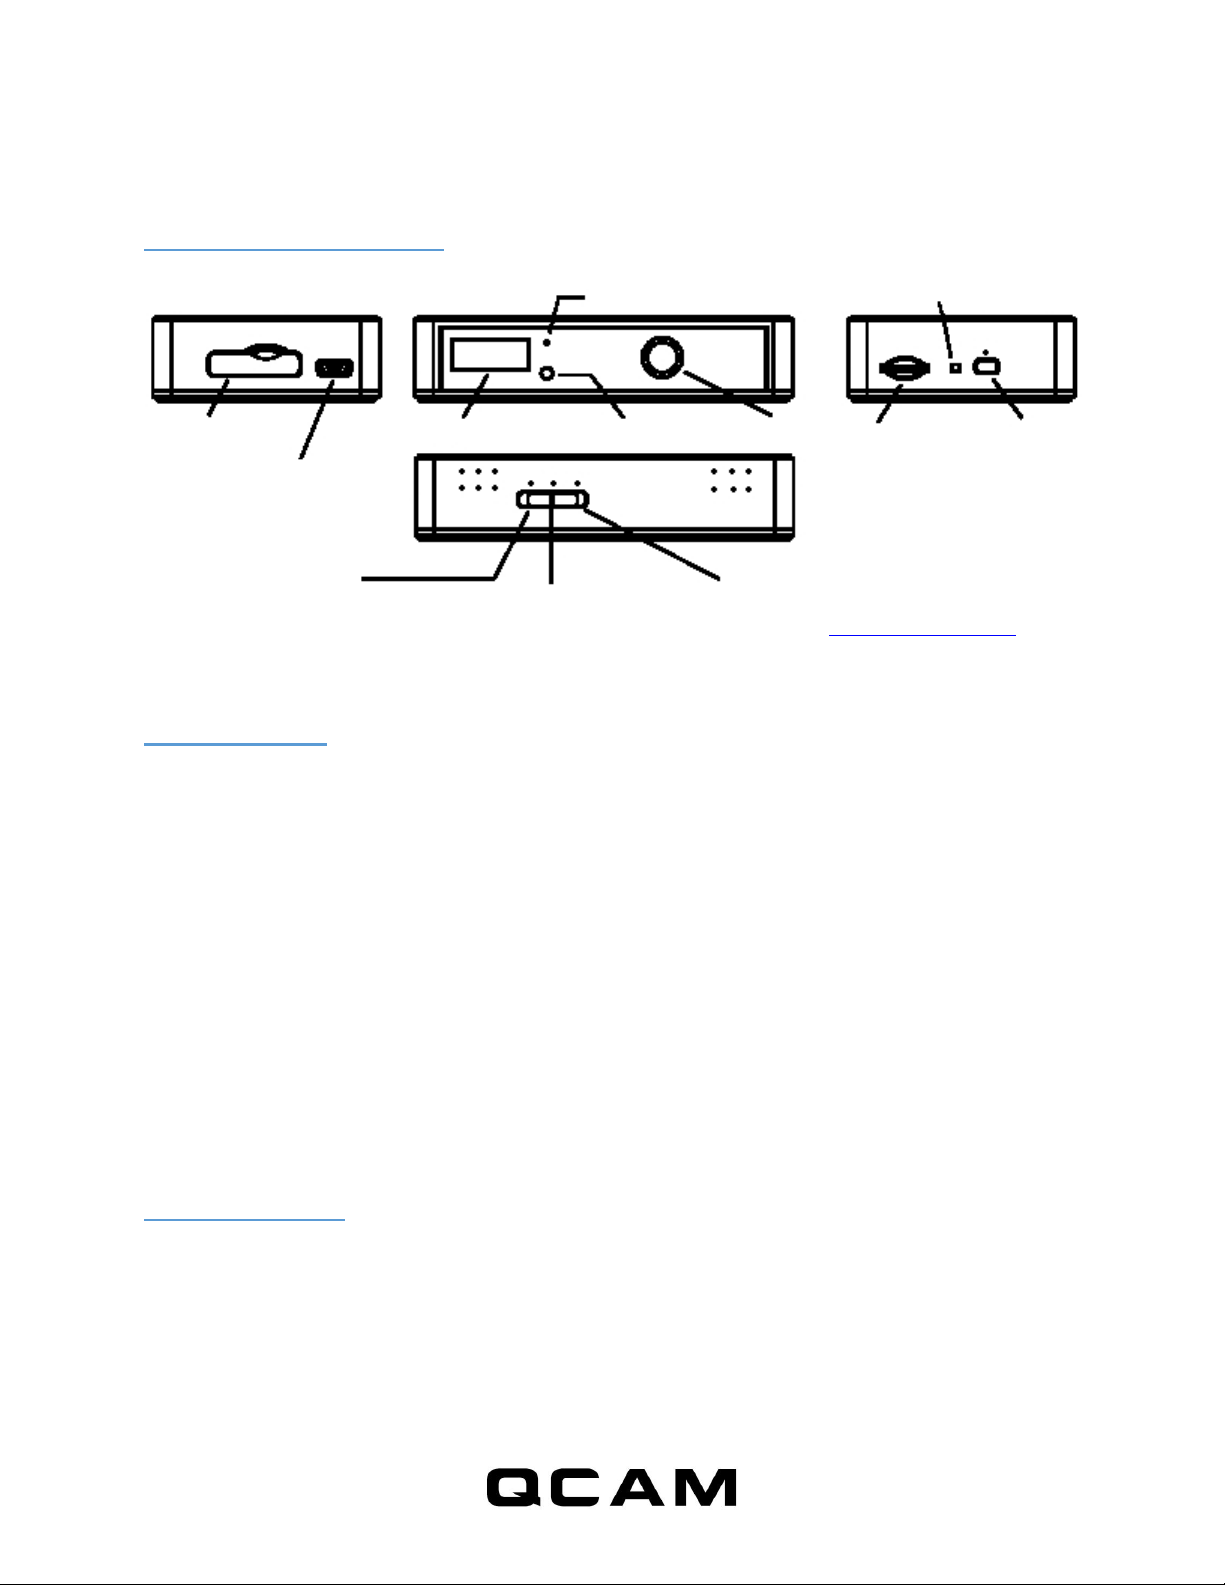
2 Device Overview .........................................................................................................................................................7
2.1 Device Overview ..................................................................................................................................................7
2.2 Charging...............................................................................................................................................................7
2.3 Recording.............................................................................................................................................................7
2.4 Status LED Indicator.............................................................................................................................................8
2.5 Mode switch ........................................................................................................................................................8
2.5.1 Frame rate .................................................................................................................................................10
2.5.2 Day/Night Mode .........................................................................................................................................10
2.5.3 PIR Trigger...................................................................................................................................................10
2.5.4 Voice-Trigger Sensitivity .............................................................................................................................11
2.5.5 Vibration-Trigger Sensitivity .......................................................................................................................11
2.5.6 Vibration Trigger Standby Mode ................................................................................................................11
2.5.7 Motion-Trigger Sensitivity ..........................................................................................................................11
3 Trigger Input /Output Configurations.......................................................................................................................12
3.1 Input/Output Location & schematic ..................................................................................................................12
3.2 Power output to external device: ......................................................................................................................12
3.3 External Trigger In Contact Type - Normal Open...............................................................................................13
3.4 External Trigger In Contact Type - Normal Close...............................................................................................14
3.5 Aux-Trigger Out Contact Type - Normal Open...................................................................................................15
3.6 Aux-Trigger Out Contact Type - Normal Close...................................................................................................17

3
4 PC Software Widget..................................................................................................................................................18
5 Firmware upgrades...................................................................................................................................................18
6 Environmental Requirements...................................................................................................................................18
7 FCC Regulation..........................................................................................................................................................18

4
Welcome
Thank you for purchasing our Qcam QSD-722 Camera!
This user manual is designed to be a reference tool for the installation and operation of your Qcam Camera.
Here you can find information about the camera’s features and functions, as well as information to aid in
troubleshooting.
Important Safeguards and Warnings
1.Electrical Safety
All installation and operation should conform to your local electrical safety codes.
The product must be grounded to reduce the risk of electric shock.
We assume no liability or responsibility for any fires or electrical shock caused by improper handling or installation.
2.Transportation Security
Heavy stress, violent vibrations, and excess moisture should not occur during transportation, storage, and
installation of the device.
3.Installation
Handle the device with care.
4.Repair Professionals
All the examination and repair work should be done by qualified service engineers.
We are not liable for any problems caused by unauthorized modifications or user-attempted repair.
5.Environment
The camera should be kept in a cool, dry place away from direct sunlight, flammable materials, explosive
substances, etc.
This product should be transported, stored, and used only in the specified environments as stated above.
Do not aim the camera at a strong light source, as it may cause overexposure of the picture, and may affect the
longevity of the camera’s sensors.
Ensure that the camera is in a well ventilated area to prevent overheating.
6. Operation and Maintenance
Do not touch the camera sensor or lens directly.
To clean dust or dirt off of the lens, use an air blower or a microfiber cloth.
7. Accessories
Be sure to use only the accessories recommended by manufacturer.
Before installation, please open the package and check to ensure that all of the components are present.
Contact the retailer that you purchased from, or Amcrest directly if anything is broken or missing in the package.

5
1 Features and Specifications
1.1 Overview
Congratulations on your purchase of the QSD-722 Infrared HD Hidden Camera!
The QSD-722 is an Infrared HD Hidden Camera with PIR* and other triggering functions. infrared night vision,
and multiple auto on/off trigger modes have been integrated to ensure that you have the flexibility you need
to capture what’s important to you. The camera comes with a built-in rechargeable battery which can record
up to 24 hours continuous video during typical use and standby for more than 6 months when vibration
triggering, external triggering or PIR triggering is enabled. By plugging in the 5V DC adapter, it can achieve up
to 64 hours** of looped recording for surveillance use.
* A passive infrared sensor (PIR) is an electronic sensor that measures infrared (IR) light radiating from
objects in its field of view.
** Actual life and performance may vary depending upon usage and settings; battery is not replaceable.
1.2 Features
The Amcrest QSD -722 Camera has the following features:
Circular recording - Also known as "loop recording" overwrites oldest recordings first once the memory card
is full.
Time stamp - Records a time stamp onto the video.
Scheduled recording - Set the time to automatically turn start/stop recording; uses a 7-day cycle.
Vibration-trigger recording - Select this to record only when vibration is detected.
Motion-trigger recording - Select this to record only when motion is detected.
Voice-trigger recording - Select this to record only when voice/noise is detected.
PIR trigger recording - Select this to record only when body heat is detected. The distance is 3 - 5 meters.
Infrared night vision - Select infrared night vision to see even in a completely dark environment. The distance is
3 - 5 meters. A passive infrared sensor (PIR sensor) is an electronic sensor that measures infrared (IR) light
radiating from objects in its field of view.
External trigger-in –The Amcrest QSD-722 can be triggered by an external device such as a smoke detector,
vibration detector, door/window sensor, etc. Optionally, the Amcrest QSD-722 can supply power to an external
device.
Auxiliary trigger-out –The Amcrest QSD-722 can trigger an external device such as a GSM alarm, buzzer, etc.
Optionally, the Amcrest QSD-722 can supply power to an external device.

6
Auto on/off mode - Select different auto on/off scenarios.
Selectable day/night mode - Select day mode or night mode to suit your recording environment.
Auto gapless split file - Splits files without gaps in the recording at every 10 / 15 / 20 minutes.
Orientation - Use when the camera is turned upside-down to correct the inverted picture.
Selectable resolution - Select a resolution of 1280x720(720p) or 640x360(360p).
Frame rate adjustment - Adjust or lower the frame rate to save memory space. Lower frame rate decreases
space used at the cost of video quality versus a higher framerate. A higher frame rate will increase space
used while providing a smoother picture.
Configurable video quality - high / medium / low
Supports max 64GB microSD card - For better performance, use a card with class 4 or above and format the
card before usage. For details on how to format a microSD card please see the Quick Start Guide or visit:
qcam.com/qsdsupport
1.3 Minimum System Requirements
Included with this camera is Amcrest software used for custom recording configurations. The
requirements for this software is as fallows.
Windows 2000, XP, Vista, 7, 8, Mac OS X (mass storage class)
Windows Media Player 9
Intel Pentium class computer
USB 2.0 port for hi-speed transfers and charging
1.4 Package Contents
Please unpack your Amcrest QSD-722 Infrared HD Security Camera and check that the following are
included:
QSD-722 Infrared HD Security Camera
5V DC Adapter
USB 2.0 Cable
Quick Start Guide

7
2 Device Overview
2.1 Device Overview
NOTE: For video tutorials on your Spy Cam DVR and its widget please visit: qcam.com/qsdsupport
2.2 Charging
The camera comes with an internal rechargeable battery. When using the camera for the first time, or if
you are using it after a long period of non-usage, remember to fully charge the battery for at least 8 hours
and to sync the time in the QSD-722 again by using the widget (see section "PC Software Widget") if
needed. You can charge your camera by using the USB port of your computer, the DC adapter, or a car
adapter.
To charge the battery through a USB port, connect the USB cable to the USB port of the computer and the
camera. For details, please see the status below. The camera will function as a mass storage device. You
will not be able to record video during this time.
To charge the battery through a DC adapter or car adapter, connect the DC adapter or car adapter to the
camera. For details, please see the Status section below. Moreover, you will also be able to record video
while charging depending on the mode you set.
2.3 Recording
Recording
The power button is located at the right hand side of the camera. It functions to turn the camera on and off
for use and storage.
Start Recording
Press and hold the Power button until the green LED is on, and then release the button. When you see the
green LED flashing, the camera is recording. If you see otherwise, please read the Status section below.
Trigger in/out
Micro USB Port
PIR Sensor
Light Sensor
Microphone
Lens
Card Slot
Status LED Indicator
On/Off
Continuous
Triggering
Custom Mode

8
Stop Recording
Press and hold the Power button until the orange LED is off.
WARNING: Turn off the camera before removing the card!
2.4 Status LED Indicator
Without 5V DC adapter
Solid Green LED on: camera is booted up
Red LED on: no card, card failed, battery low, or card is full. Note: The Status light will not turn red to
indicate that the card is full while in not in circular recording. If the light turns red while in circular Recording,
it is because of another listed reason.
Green LED flashing: The Camera is recording.
Green / Red LED intermittent flashing: battery low while the camera is recording.
5V DC adapter plugged in
ORANGE LED on: The camera is charging but not recording.
Solid Green LED on: The camera is charging but not recording.
Green LED flashing: charging completed and the camera is recording
Green / Orange LED intermittent flashing: The camera is charging while recording.
Solid Red LED on: no card, card failed or card full. Note: The Status light will not turn red to indicate that the
card is full while in not in circular recording. If the light turns red while in circular Recording it is because of
another listed reason.
Connected to computer
Solid Orange LED on: The camera is charging
Solid Green LED on: charging has completed and the battery is full.
2.5 Mode switch
Switch between continuous, triggering, and custom modes. The following table shows the default settings.
(Note: When configuring a custom mode, please use the PC software Widget to change the settings and
options. The widget can be downloaded from qcam.com/qsdsupport or found on the included CD-ROM
Disk.
To use the custom mode settings, while powered off please set the mode switch to the "custom mode"
position, Launch the QSD-722 Widget installed on your computer and connect the camera via the included
USB cable. (The LED indicator should turn orange to indicate that the camera is on and the widget will
indicate that the camera is connected.

9
Then in the Qcam QSD-722 widget go to the "Option" page. On the option page change the settings mode to
"Custom Mode" and Save.
To configure the custom recording settings please select the settings tab. Remember to sync the settings once
you have selected the options you prefer.
The default mode settings are as follows
Continuous
Triggering
Custom (default)
Video Quality*
High
High
(High) / Medium/ Low
Resolution*
1280x720
1280x720
(1280x720) / 640x360
Frame Rate*(1)
High
High
(High) / Low
Indoor Lighting Condition(2)
50Hz
50Hz
(50Hz) / 60Hz
Day/Night Mode(3)
Day Mode
Day Mode
(Day Mode) / Night Mode / Auto Switching
Orientation
Normal
Normal
(Normal) / Upside Down
Time Stamp
Enable
Enable
(Enable) / Disable
Circular Recording
Enable
Enable
(Enable) / Disable
Split File Time (min)
10
15
(10) / 15 / 20
Mic
Enable
Enable
(Enable) / Disable
LED On/Off
On
On
(On) / Off
PIR Trigger****(4)
Off
On
Off
Voice-Trigger
Sensitivity***(5)
Disable
Disable
High / Medium / Low / (Disable)
Vibration Standby Mode(7)
Power Saving
Power Saving
Fast Wake Up / (Power Saving)
Motion-Trigger
Sensitivity***(8)
Disable
Disable
High / (Medium) / Low / Disable
Ext-Trigger In Contact
Type***(9)
Disable
Disable
Normal Open / Normal Close / (Disable)
Aux-Trigger Out
Disable
Disable
Normal Open / Normal Close / (Disable)
Auto On/Off
Disable
Disable
Scheduled Recording / Car-activated
Recording / Car-stop Recording / Car-
activate or Car stop Recording / (Disable)
Note: If a recording has started, you cannot switch between modes.
When the QSD-722 is connected to a car through the 5V car adapter and the auto on /off mode is selected:
Car-activated Recording: Auto-starts recording once the car is started, auto-stops recording when car is
stopped.
Car-stop Recording: Auto-starts recording when car is stopped, auto-stops recording once car is started.
Car-activated and Car-stop Recording: Auto-starts recording once car is started and continues to record even
when the car is stopped. The camera needs to be turned off manually to fully turn off the camera.
* For the longest recording time, set Video Quality to Low, Resolution to 640x360 and Frame Rate to Low.
This way the QSD-722 can act as a digital voice recorder.
*** If this triggering is enabled, the QSD-722 will record for 10 seconds after the device is turned on. Then it
will go into standby. If there is a trigger, it will keep recording until there are no further triggers. After that,
it will record for 2 more minutes and then standby again.

10
**** If PIR triggering is enabled, the QSD-722 will record for approximate 40 seconds after powering-up.
Then it will go into standby. If there is a trigger, it will keep recording until there are no further triggers.
After that, it will record for 2 more minutes and then standby again.
2.5.1 Frame rate
High: The recording is smooth.
Low: The video less fluid similar to CCTV. It can reduce the file size and save storage space.
(2) Indoor Lighting Condition
50Hz: Suitable for Asia*, Europe, Africa, Australia and South America**
60Hz: Suitable for North America and South America**
*In Asia , some countries are using both 50Hz and 60Hz frequency.
For example, in Japan, Tokyo is 50Hz and Hokkaido is 60Hz.
** In South America, Argentina and Chile are 50Hz. Brazil and Colombia are 60Hz.
For more information about the frequency of other countries, please visit the website:
http://www.controlledpwr.com/help-international-voltages.php
2.5.2 Day/Night Mode
Night mode: For recording in dark environments. Infrared night vision will be automatically turned on.
Auto switching: QSD-722 will switch to "Day mode" or "Night mode" depending on the brightness level of the
environment.
Note:
This device is not considered harmful, but the following precautions are recommended:
1. Avoid direct eye exposure to the infrared LED beam
2. Be aware that the beam is invisible light and cannot be seen
3. Do not attempt to view the infrared LED beam with any types of optical device
2.5.3 PIR Trigger
When selected the camera will start to record when body heat is detected

11
2.5.4 Voice-Trigger Sensitivity
High: Even soft sounds can trigger recording
Low: Only substantial sounds can trigger recording
2.5.5 Vibration-Trigger Sensitivity
High: Even subtle vibrations can trigger recording
Low: Only substantial vibrations can trigger recording
2.5.6 Vibration Trigger Standby Mode
Fast Wakeup: Start to record immediately once vibration is detected
Power Saving: QSD-722 is completely off until it detects vibration. The standby time can last up to six
months.
2.5.7 Motion-Trigger Sensitivity
High: Even subtle movement can trigger recording
Low: Only substantial movement can trigger recording

12
3 Trigger Input /Output Configurations
3.1 Input/Output Location & schematic
Application for use of this feature: The QSD-722 can connect to external devices such as smoke detectors,
pressure detectors, vibration detectors, and door/window sensors to trigger recording, or GSM alarm and
buzzer function of the alarm.
Location and pole position
Pin 1: 2.8V, 100mA (max) Power Out
Pin 2: Ground
Pin 3: Trigger in + (positive)
Pin 4: Trigger in –(Negative)
Pin 5: Trigger out + (Positive)
Pin 6: Trigger out –(negative/Ground)
3.2 Power output to external device:
Function of having power out: It can supply power to an external device.
Note:
1. No need to use this power out if the external device has already had its own power supply.
2. Power out (Pin 1): Voltage is 2.8V. The maximum output current is 100mA.

13
3.3 External Trigger In Contact Type - Normal Open
Instructions for configuring a normal open trigger:
1. Run Qcam Widget->Choose Option-> (Settings Mode) Custom Mode->Save Option, then choose Settings->
Ext-Trigger In Contact Type-> Normal Open and press Sync Settings to DVR
2. Disconnect the USB cable from the QSD-722.
3. Put the QSD-722 mode switch in the custom mode position
3. Connect the QSD-722 to the external device (We suggest using AWG26 wire). The connection screws are
on the top of the QSD-722.
4. Turn on the QSD-722 after connecting the wire correctly.
Note: Pole positions are:
QSD-722 Trigger in + (Pin3) should connect to external device Trigger out +.
QSD-722 Trigger in - (Pin4) should connect to external device Trigger out -.
Function of this configuration:
Standby
If no trigger is detected by the external device, the trigger out of external device will be kept open. QSD-
722 operates in standby mode.
When Triggered
The external device trigger output will close and the QSD-722 will start recording at the same time.

14
3.4 External Trigger In Contact Type - Normal Close
Instructions:
1. Run QSD-722 Widget->Choose Option-> (Settings Mode) Custom Mode->Save Option, then choose
Settings-> Ext-Trigger In Contact Type-> Normal Close and press Sync Settings to DVR
2. Disconnect the USB cable from the QSD-722.
3. Put the QSD-722 mode switch in the custom mode position
3. Connect the QSD-722 to the external device (We suggest using AWG26 wire). The connection screws are
on the top of the QSD-722.
4. Turn on the QSD-722 after connecting the wire correctly.
Note: Pole positions are:
QSD-722 Trigger in + (Pin3) should connect to external device Trigger out +.
QSD-722 Trigger in - (Pin4) should connect to external device Trigger out -.
Function of this configuration:
Standby
If no trigger is detected by the external device, the trigger out of external device will be kept
closed/connected. The QSD-722 will be in standby mode.
When Triggered
The external device trigger output will open and the QSD-722 will start recording at the same time.

15
3.5 Aux-Trigger Out Contact Type - Normal Open
Instructions:
1. Run Qcam Widget->Choose Option-> (Settings Mode) Custom Mode->Save Option, then choose Settings->
Aux-Trigger Out Contact Type-> Normal Open and press Sync Settings to DVR.
2. Disconnect the USB cable from the QSD-722.
3. Put the QSD-722 mode switch in the custom mode position
3. Connect the QSD-722 to the external device (We suggest using AWG26 wire). The connection screws are
on the top of the QSD-722.
4. Turn on the QSD-722 after connecting the wire correctly.
Note: Pole positions are:
QSD-722 Trigger out + (Pin5) should connect to external device Trigger in +.
QSD-722 Trigger out - (Pin6) should connect to external device Trigger in -.
Note:
1. Please make sure the voltage input connected to the QSD-722 trigger out + (Pin5) is under 24V and
the current is less than 1 amp.
2. Please make sure the current direction is correct. Otherwise, the QSD-722 may be damaged
Function of this configuration:

16
Example of GSM alarm or buzzer application/configuration:
Standby
The recorder stays in the standby state if there are no triggers*. As depicted above, the trigger output is
open.
Triggered
Whenever the QSD-722 is recording or detects any triggers*, the trigger outputs will be closed thus
triggering the action of recording.
* Triggers include voice trigger, motion trigger, vibration trigger, PIR trigger and external trigger-in.

17
3.6 Aux-Trigger Out Contact Type - Normal Close
Instructions:
1. Run Qcam Widget->Choose Option-> (Settings Mode) Custom Mode->Save Option, then choose Settings->
Aux-Trigger Out Contact Type-> Normal Open and press Sync Settings to DVR.
2. Disconnect the USB cable from the QSD-722.
3. Put the QSD-722 mode switch in the custom mode position
3. Connect the QSD-722 to the external device (We suggest using AWG26 wire). The connection screws are
on the top of the QSD-722.
4. Turn on the QSD-722 after connecting the wire correctly.
QSD-722 Trigger out + (Pin5) should connect to external device Trigger in +.
QSD-722 Trigger out - (Pin6) should connect to external device Trigger in -.
Note:
1. Please make sure the voltage input to the QSD-722 trigger out + (Pin5) is under 24V and the current is less
than 1A.
2. Please make sure the current direction is correct. Otherwise, the QSD-722 may be damaged.
Function of this configuration:
Example of GSM alarm or buzzer application/configuration:

18
4 PC Software Widget
To synchronize the time and customize settings, download and install the PC software "Widget" from
either the included CD or from qcam.com/qsdsupport and follow the instructions in the software guide.
Note:
1. If the time shown is year 2026 or beyond due to a loss of Real Time Clock, recording time will not be shown
on the video, even if timestamp is enabled. Please use the widget to sync the time to DVR again and remove
files created in 2026 or beyond!
2. When using the QSD-722 Widget for the first time, express mode is set as the default. It has several typical
scenarios to choose from.
Connecting to computer
To connect the camera to your computer, follow these instructions:
1. Connect the larger end of USB cable into an available USB port on the computer.
2. Connect the smaller end of the cable into the USB port of the camera.
3. The camera will appear in My Computer as a removable drive.
Note: If you are wanting to connect it to the widget software, please launch the widget software before
connecting.
5 Firmware upgrades
Qcam will from time to time release new firmware for enhancements or to add new features. Visit
qcam.com/qsdsupport to check on the latest firmware for your QSD-722.
6 Environmental Requirements
Storage temperature: 32˚ to 113˚F (0˚ to 45˚C)
Operating temperature: 32˚ to 113˚F (0˚ to 45˚C)
7 FCC Regulation
This device complies with part 15 of the FCC Rules. Operation is subject to the following two conditions:
1. This device may not cause harmful interference, and
2. This device must accept any interference received, including interference that may cause undesired operation.
This equipment has been tested and found to comply with the limits for a Class B digital device, pursuant to Part 15 of the FCC Rules. These limits
are designed to provide reasonable protection against harmful interference in a residential installation. This equipment generates, uses, and can
radiate radio frequency energy and, if not installed and used in accordance with the instructions, may cause harmful interference to radio
communications. However, there is no guarantee that interference will not occur in a particular installation. If this equipment does cause
interference to radio or television reception, which can be determined by turning the equipment off and then on, the user is encouraged to try to
correct the interference by one or more of the following measures:
1. Increase the separation between the equipment and camera.
2. Connect the equipment to a different outlet so that the equipment and camera are on different branch circuits.
3. Consult the dealer or an experienced radio / TV technician for help.

19
To contact Amcrest support, please do one of the following:
Visit http://amcrest.com/contacts and use the email form
Call Amcrest Support using one of the following numbers
Toll Free US: (888) 212-7538
International Callers (Outside of US): +1-713-893-8956
USA: 713-893-8956
Canada: 437-888-0177
UK: 203-769-2757
Email Amcrest Customer Support supp[email protected]
Other manuals for QSD-722
1
Table of contents