QFX CV-100 User manual

®
CV-100

To assure continued compliance,
WARNING:
To reduce the risk of fire or electric
shock. Do not expose this product to
accessories only.
follow the attached installation
instructions and use only shielded
cables when connecting to other
FCC NOTICE:
device.
devices. Modifications not
authorized by the manufacturer
otytirohtuas`resudiovyamoperate this
rain or moisture.
To reduce the riskof fire or electric
shock, and annoyinginterference. Use
the recommended
~
~

outside antenna system, extreme care should be
taken to keep from touching such power lines or
circuits as contact with them might be fatal.

following: the power-supply cord or

ANTENNA IN
CH3/4:
TV OUT/LOOP:
:
USB:
VIDEO:
STANDBY Power ON/Standby(Green light-On,Red light-Standby).
Remote control sensor.
6
7
HDTV: High definition (max 1080p) video output.
L/R: Left/Rightl channel for audio output.
CVBS(composite video broadcast signal) video outout.
This connector is not only compliant with NTSC Analog TV (RF CH3/4)
USB port for connection to extenal USB device.
Switch analog TV output between CH3 and CH4.
signal output, but also compliant to split digital TV signal to other external device. Please
refere →Modulation→CH .egdelwonkrehtrufrofhguorhtpooL/NO
DC
7

Set the specfied time for video playback.
-
: Dash for typing.
C: Close caption.
PAGE+:To navigate inside the menus+.
PAGE-:To navigate inside the menus-.

EFFECTIVE DISTANCE OF THE REMOTE CONTROL TRANSMITTER
NOTE:
~when there is an obstacle between the unit and the transmitter, the transmitter may not
operate.
~when direct sunlight, an incandescent lamp, fluorescent lamp or any other strong light
shines on the remote control of the unit, the remote operation may be unstable.
1.Press the tab on the battery door then lift it off.

1. Connect your existing antenna cable to the ANTENNA I N of the converter box.
2. Connect the RF coaxial cable from TV OUT of the converter box to the antenna
jack of the TV set.
3. Insert the small plug from supplied AC/DC Adapter into DC IN jack on the rear of the
unit.
4. Insert the supplied AC/DC Adapter to any wall outlet having 120-240V~ , 60Hz.
NOTE:This AC/ DC Adapter is intended to be correctly orientated in a vertical or floor mount
position.
CONNECTI NG THE CONVERTER BOX TO YOUR TV WI TH RF JACK
From Antenna
AC Wall Outlet
ANTENNA
C

1.Connect your existing antenna cable to the ANTENNA IN of the converter box.
2.Connect the supplied Video/Audio cables from VIDEO/AUDIO jacks ( yellow, white, red )
of the converter box to the Video/Audio jacks of the TV set.
3.Insert the small plug from supplied AC/DC Adapter into DC IN jack on the rear of the unit.
4.Insert the supplied AC/DC Adapter to any wall outlet having 120-240V~ , 60Hz.
NOTE:
This
AC/DC
Adapter
is
intended
to
be
correctly
orientated
in
a
vertical
or
floor
mount
position.
CONNECTI NG THE CONVERTER BOX TO YOUR TV WI TH AV SOCKET
From Antenna
AC Wall Outlet
C
When AV and RF TV jacks are connected to TV set together, the brightness of RF TV output
might be a little lower

C
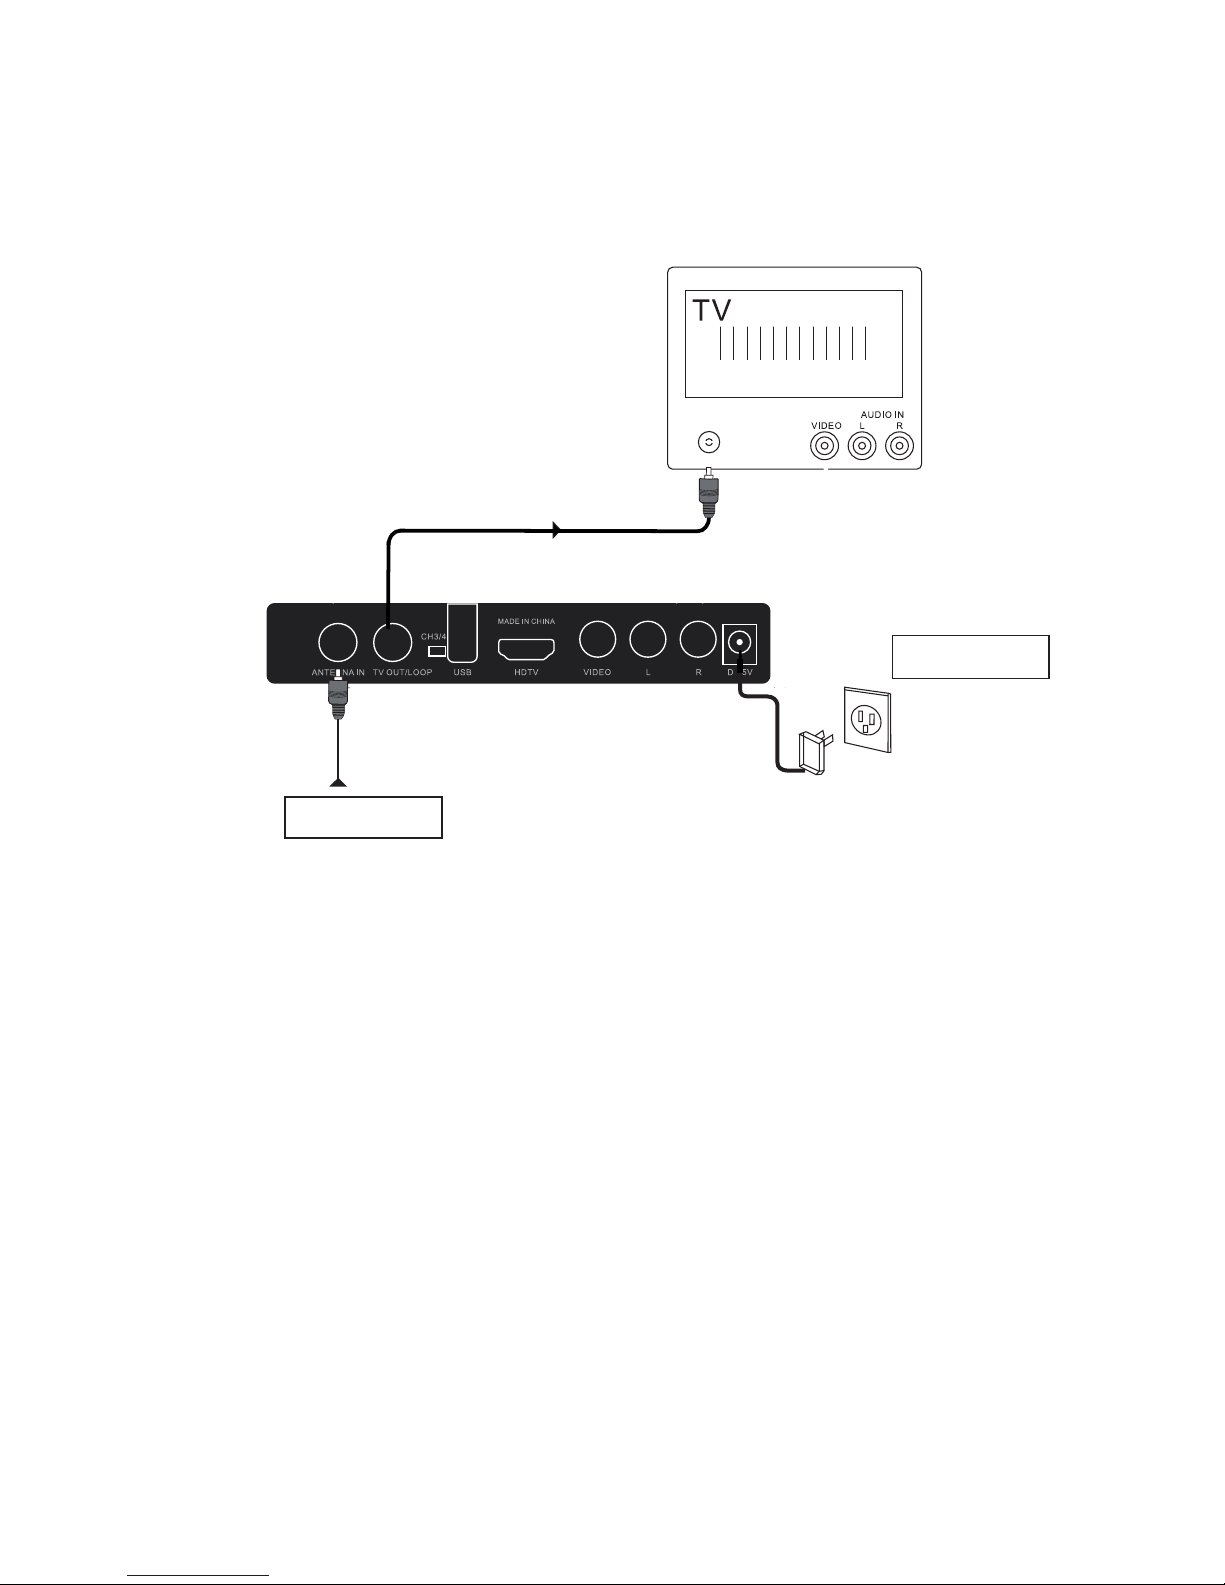
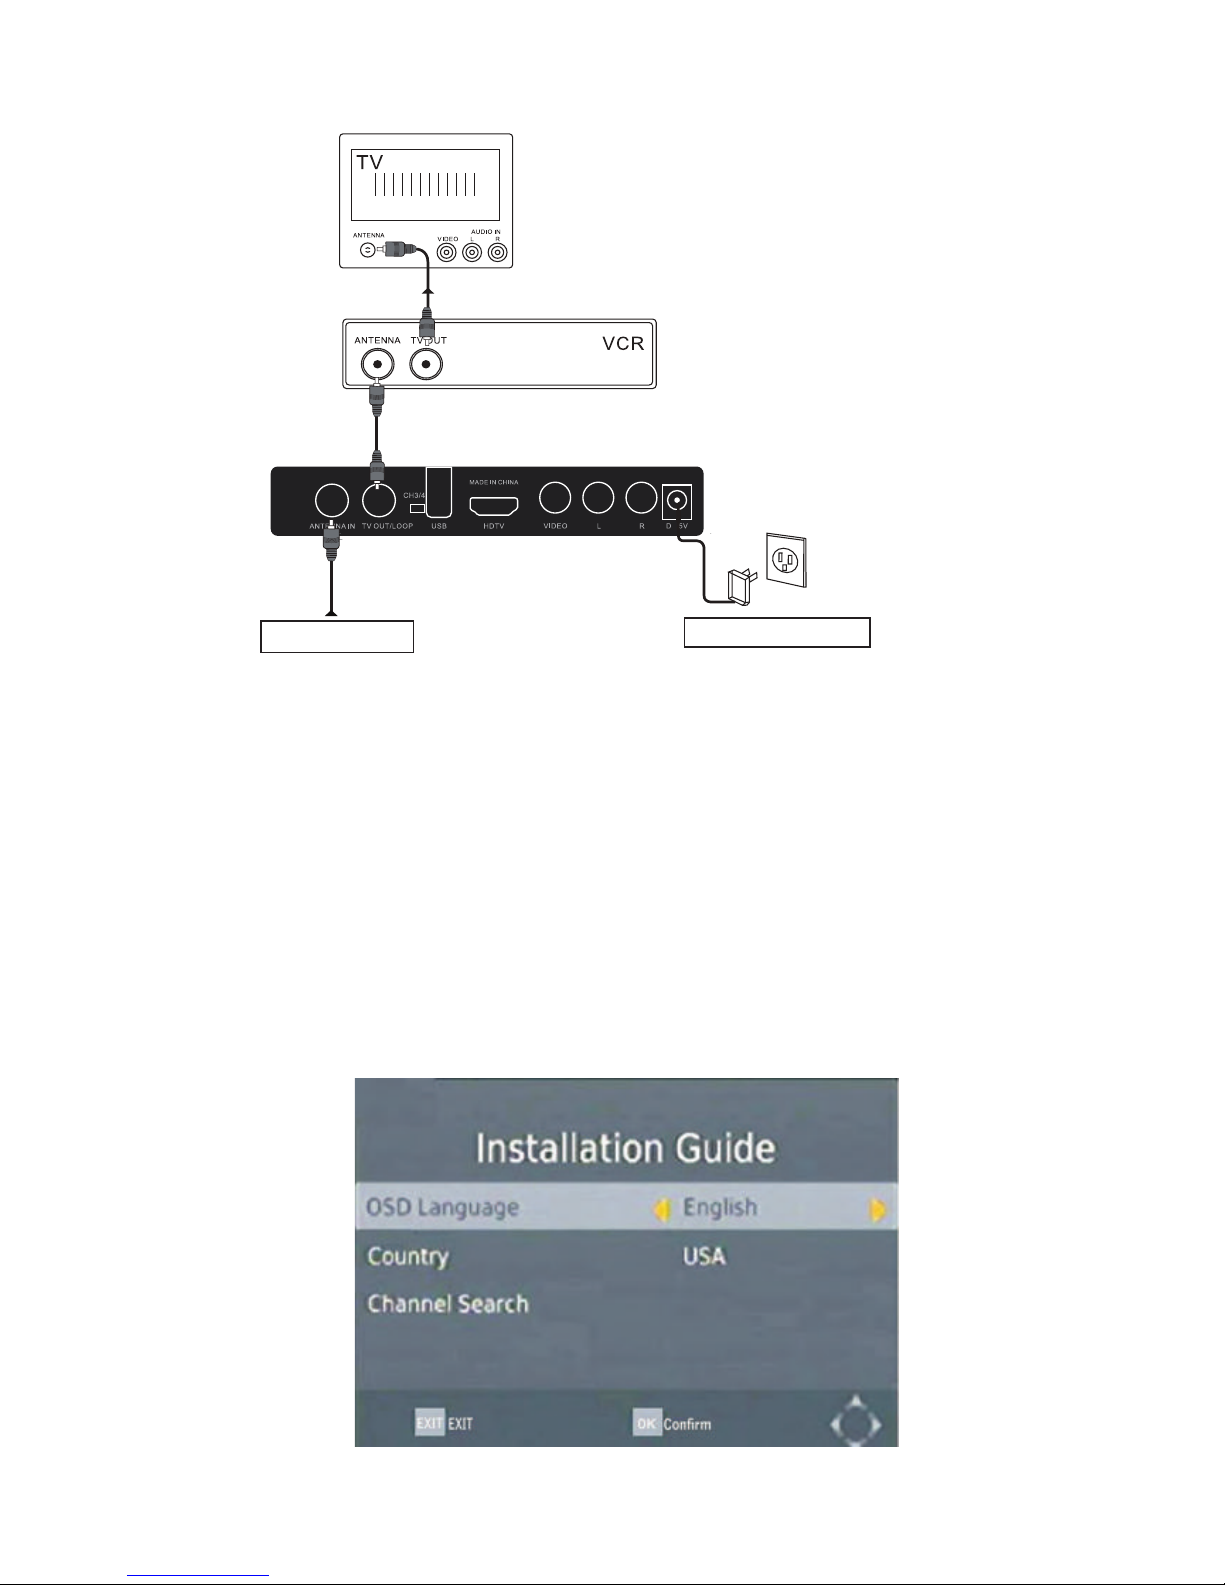
1.Connect your existing antenna cable to the ANTENNA I N of the converter box.
2.Connect the RF coaxial cable from the TV OUT of the converter box to the ANTENNA
jack of the VCR.
3.Connect the other RF coaxial cable ( not included, you may use the one supplied from
VCR ) from the TV OUT jack of VCR to the antenna jack of the TV set.
4.Insert the small plug from supplied AC/ DC Adapter into DC IN jack on the rear of the unit.
5.Insert the supplied AC/DC Adapter to any wall outlet having 120-240V~ , 60Hz
.
NOTE:This AC/ DC Adapter is intended to be correctly orientated in a vertical or floor mount
position.
CONNECTI NG THE CONVERTER BOX TO YOUR VCR
FI RST TI ME I NSTALLATI ON
After all connections have been made properly, switch on TV and make sure the receiver is
connected to the main power. Press POWER button to switch on receiver. If you are using
the receiver for the first time or restoring to Factory Default, the Main Menu will appear on
your TV screen.
AC/ DC Wall Outlet
From Antenna

1. Select (OSD Language) and press the RIGHT/LEFT button to select a language.
2. Select (Country) and press the RIGHT/LEFT button to select your country of residence.
3. Select (Channel Search) and press the RIGHT/LEFT or OK button to begin automatic
channel search.
4. Once channel tuning is complete, you are now ready to watch TV.
BASIC OPERATION
Program Manage Settings
Press the MENU button and select (Program). The Menu provides options to adjust the
Program Manage Settings. Select an option and press OK or RIGHT/LEFT button to change
setting. Press the EXIT button to exit the Menu.
Program Edit
To edit your program preferences ( 01Move, 02Skip, 03Lock, 04Delete, FAV FAV, RECALL
Rename), you will need to enter the Program Edit Menu. This Menu requires a password to
access. Enter the default password “000000”.

Set Favorite Program
You can create a shortlist of favourite
Set favourite TV program:
1. Select the preferred program then press the FAV button. A star symbol will appear and
the program is marked as favourite.
2. Repeat the previous steps to select more favourite programs.
3. Press OK, to confirm and press exit to save, press again to exit to the menu.
Disable favourite TV program:
Press the FAV button, move the cursor to highlight the program with a star-shaped symbol,
select “disable” on screen.
View Favorite Program
1. Press the FAV button and the favourite menu will appear.
2. Press the UP/DOWN button to highlight the program that you have marked as favourite.
3. Press the OK button to select your favourite program.
Delete a TV program
1. Select the program then press the 04 Delete button, a message will appear. Press OK
button to delete the program.
2. Repeat the previous steps to select more programs to delete.
Skip TV Program
1. Select the program you would like to skip and press the 02 Skip button, a skip symbol
will appear. The program is marked as skipped.
2. Repeat the previous steps to select more programs to skip.
3. To confirm and exit the menu, press EXIT button.
Disable a skipped TV program:
Press the 02 Skip button on skipped program.
Move a TV Program
1. Select the preferred program then press 01 Move button. A move symbol will appear.
2. Press the UP/DOWN button to move the program.
3. Press the OK button to confirm.
4. Repeat the previous steps to move more programs.
Lock Program
You can lock the selected programs for restricted view:
1. Select the preferred program then press 03 Lock button, a lock-shaped symbol will
appear. Input password “000000”, now the program is marked as locked.
2. Repeat the previous steps to select more programs.
3. To confirm and exit the menu, press the EXIT button.
4. Press the 03 Lock button to disable the locked program.

5. To view the locked program you will be requested to enter either the default password
“000000” or your last set password.
Rename
Select preferred program and press “Recall” button, the type the new name of the
program.
EPG(Electronic Program Guide)
Sort
The EPG is an on-screen TV guide that shows scheduled programs seven days in advance
for every tuned channel. Press the EPG button on the Remote Control to access to the
guide.
You can use the UP/DOWN button to select the preferred program. If there is more than
one page of information, use 01 button for page up and the 02 button for page down.
Sort your channels from the following options:
[LCN]- Sort the channels in ascending order according totheir logical channel number.
[Service Name]- Sort the channels in alphabetical order.
[Service ID]- Sort the channels according tothe stations.
[ONID]- Sort the orignial network identification.
Video Setting
Press the MENU button then select (Picture). The Menu provides options to adjust the
video settings. Press UP/DOWN button to select an option and press RIGHT/LEFT button to
adjust that setting. Press the EXIT button to exit the menu.

Aspect Ratio
You must set the display format to Auto 4:3Full, 16:9Wide Screen to get the maximum display
when watching TV.
Resolution
Resolution can reach up to 1080P.
If the images are not shown correctly on TV, user should change setting.
This setting must match the most common setting for TVs in location.
[NTSC]:for NTSC format TV.
[PAL]: for PAL format TV.
Channel Search
Press the MENU button and select (Channel Search). The Menu provides options to search
channel. Select an option and press the RIGHT/LEFT button to adjust the settings.
Press the EXIT button to exit the Menu.
Auto Search
Search and install all channels automatically. This option overwrites all preset frequencies.
1. Select (Auto Search) and press the OK or RIGHT button to start channel search.
2. To cancel channel search, press the EXIT button.
TV Format

Manual Search
Install new channels manually. This option adds new channels without changing the
current channels list.
1.Select ( Manual Search) and press the OK or RIGHT button to start channel search.
To channel search screen will appear.
2. Press the RIGHT/LEFT button to select the frequencychannel.
3. Press the OK or RIGHT button to start channel search.

If a channel is found, it will be saved and added to the channels list. If channels can not
be found, it exits the menu automatically.
Signal Type
Modulation
Our receiver supports both air and cable type of TV signal, please select the right signal
type here.
CV-100is not only compliant with NTSC analog TV (RF CH3/4) signal output, but also compliant
Time offset
to split digital TV signal to other device.
When user sets at "CH ON", NTSC analog TV (RF CH3/4) signal output will be switched on
meanwhile, no digital signalis split or output to any external device. When user sets at "Loop through"
analog TV (CH3/4) output will be switched off. Meanwhile, digital TV signal split and output
will be switched on.
Time Setting
Press the MENU button then select (Time). The menu provides options to adjust the time
settings.
Press the UP/DOWN button to select an option and press the RIGHT/LEFT button to adjust
the setting. Press the EXIT button to exit the menu.
Country Region
S
Select auto or manual for GMT setting.
Time Zone
Select the right [Time Zone] when [Time Offset] is set to Manual.
elect the right Country Region.
Sleep
The receiver can go to standby automatically when you do not operate it for a period of
time. The time selection are:off, 1-12 hours.
Power On/Off
If you do not want this function, please select off.
Press the menu button on the remote control, enter time, then select Power On/Off, this
screen will appear.

Please set Power On and Power Off as Enable, then select Power On Time and Power Off
Time and set the right time using remote control. After all the setting are made, press EXIT
to return, setting will be saved automatically.
Option
Press the MENU button and select(Option). The menu options to adjust the OSD Language,
Audio Language. Select an option and press the RIGHT/LEFT button to adjust the
setting .Press the EXIT button to exit the menu.
OSD Language
Select an OSD language

A
Close Caption
udio Language
S
CC option list:
elect the preferred audio language for watching TV channels.
If language is not available, the default language will be selected.
System setting
press the MENU button and select (System)
The Menu provides options to change the system settings.
Press the UP/DOWN button to select an option and press the RIGHT/LEFT button to
change the setting. Press the EXIT button to exit the Menu.
Parental Guidance
You can restrict the channel access of the channels which are unsuitable for children.
To restrict/ lock the channel, you will need to enter either the default password “ 000000”
or your own password.
Set Password
To set or change the password, enter your old password or the default password “000000”.
Then you will be asked to enter your new password. To confirm, re-enter your new
CC Display CC OFF, CC 1, CC 2, CC 3, CC 4, CC 5, CC6
CC Position Auto, Top, Bottom
Font Size Default, Small, Medium
Font Color Default, White, Black, Red, Green, Blue, Yellow, Magenta, Cyan
BG Color Default, White, Black, Red, Green, Blue, Yellow, Magenta, Cyan
CC Transparency Default, Solid, Translucent, Transparent,

password. Once it is confirmed, press the EXIT button to exit the menu. Then your old
password will be replaced with your new password.
Restore Factory Default
Reset your Set Top Box to the Default Factory Settings.
In main menu, move the cursor to “system”, select (Restore Factory Default) and press the
OK button. Enter your password or the default password “ 000000” and press OK to
confirm. This option will delete all preset channels and settings and restore factory
settings.
Information
Software Update
View model, hardware and software information.
CV-100 supports software upgrade through USB, it’s for professional stuff only.

Photo Configure
Slide show interval to 1 – 8sec Slide Mode: Randon, 0-59 for selection.
Aspect ratio: Keep to play picture in its original aspect. Discard to play picture in full screen mode.
Movie Configure
•Select size. Available settings are: Small, Normal and Big.
•Select subtitle background color. Available settings are: Transparent, Grey, Yellow green and
White.
•Select subtitle font color. Available settings are: White, Black, Red, Blue and Green.
PVR Configure
•Information of the connected USB storage device is displayed.
•Formats the connected device. WILL DELETE ALL FILES.
Record
- First, connect USB storage memory and press the RECORD button.
•Press the PVR button to record the current program via USB.
•For proper recording and playback USB 2.0 standard is required.
•Press the INFO button to watch recording information.
- The other way to schedule the program to record is pressing the blue button or from
the EPG menu.
•To schedule a recording press the Blue button, press the Red button to add a schedule.
Adjust the settings according to the schedule of the event (start-end time, record/view, etc.).
Press the OK button.
•To quit the menu, press the EXIT button.
Table of contents
Languages:
Other QFX Media Converter manuals
Popular Media Converter manuals by other brands

ADF Web
ADF Web HD67453 user manual

Questtel
Questtel B-HDMI-ASI-IP-2CH user manual

Baumer
Baumer Hubner HOG 16 + DSL Mounting and operating instructions

IAT
IAT IAT-HDMI/VGA/CVBS-H.264 mini decoder user manual

Advantech
Advantech B+B SmartWorx 485USB9F-2W quick start guide

Easylife
Easylife EL3640 instruction manual