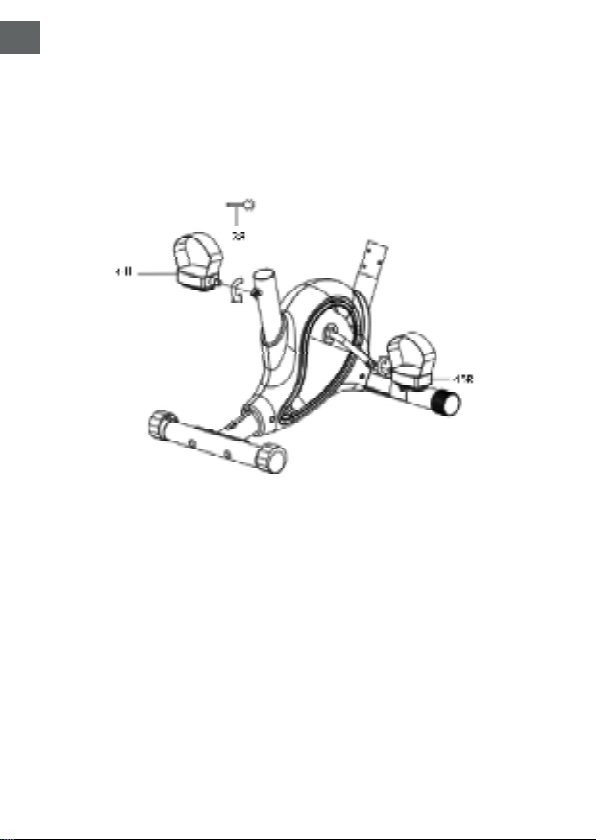
QUALIMAX JOCCA 1554 User manual

Ref. 1554


3
DESCRIPTION/ DESCRIPCIÓN/ DESCRIPTION/
DESCRIZIONE/ DESCRIÇÃO


5
EN
EXERCISE BIKE
PURCHASE ACKNOWLEDGEMENT
Thank you for your purchase we are confident that you will be
satisfied with this item.
DESCRIPCIÓN
Nº DESCRIPTION QTY.
1 Main frame 1
2 Front stabilizer 1
3 Rear Stabilizer 1
4 Front post 1
5 Handle bar 1
6 Seat post 1
7 Carriage bolt M8 * 60L 4
8 Curve washer ø8.5*22 8
9 Domed nut M8 4
20 Allen key 1
27 Allen bolt M8*15L 4
31 knob 1
36 Allen bolt M8*20L 2
38 Wrench 1
39 Computer holder 1
40 Computer 1
41 Nylon nut M8 3
42 Flat washer ø8.3*20 5
43 Seat 1
44L Left pedal 1
45R Right pedal 1
46 Cover for handle bar 1
B1 Middle computer wire 1
B2 Lower computer wire 1
C2 Lower tension knob 1

6
EN
SAFETY WARNINGS
-These instructions are highly important,
please read this instruction manual before
using the device and save it for future
reference.
-JOCCA is only responsible for proper use of
this product as describe in this manual.
-Before starting this or any exercise program,
consult your physician. This is especially
important for people who have not exercised
regularly before or people with pre-existing
health problems.
-Work within your recommended exercise
level, do not work yourself out. If you feel
any pain or abnormal systems, stop your
training immediately. Consult your doctor
immediately.
-It is recommended to use a protective cover
or carpet to avoid damaging the floor. For
safety, leave a space of 0.5 meters around
the bike when using it.
-Always wear proper exercise clothing and
shoes when using your bike. Do not wear
loose clothing. Do not wear shoes with
leather soles or high heels.
-Before using this unit, check to make sure

7
EN
that all of its nuts and bolts are securely
fastened. In order to keep the unit in top
condition, examine it regularly for signs of
damage or wear-and-tear.
-During the use, grip the handlebars securely.
- To reduce the chances of injury, warm up
and stretch prior to exercise. This will prepare
muscles and joints for exertion.
-Alaways increase exercise speed, intensity,
and duration at a gradual pace.
-Immediately stop to use if you experience
dizziness or other discomfort.
-Before using the device for the first time,
unpack and verify that it is in perfect condition,
if not, do not use the device and go to JOCCA
as the warranty covers all manufacturing
defects.
-This product is only suitable for domestic use.
Do not use the device outdoors. Do not leave
the device upon exposure to outside factors
such as rain, snow, sun, etc.
-This appliance can be used by children
of 8 and above, and people with reduced
physical, sensory or mental capabilities or
lack of experience or knowledge if they are
supervised or instructed in an appropriate

8
EN
and safe way about the use of the appliance
and understand the hazards involved. Any
cleaning and maintenance must be carried
out by the user or if they are carried out by a
child of 8 or above they must be supervised.
-Keep the appliance and its cable out of the
reach of children under 8 years old.
-Children should be supervised to ensure
they do not play with the device.
-Do not immerse the appliance or any part of
it in water or any other liquid.
-If your appliance has been dropped or fallen
into water or any other liquid do not use
it or try to repair it. Contact to the JOCCA
technical service department.
-For your safety and for the appliance to work
correctly, always use JOCCA spare parts and
accessories.
-Use the appliance on a smooth, horizontal,
stable and level surface.
-Do not move the appliance during use.

9
EN
ASSEMBLY STEPS
STEP 1.
-Attach the Front Stabilizer (02) to the main frame (01) fasten
and secure 2xcarriage bolts (07) with 2xCurve washer (08) and
2 x Domed nut (09).
-Attach the Rear Stabilizer (03) to the main frame (01) fasten
and secure 2xcarriage bolts (07) with2x Curve washer (08) and
2x Domed nut (09).

10
EN
STEP 2.
-Attach Left pedal (44L) and Right pedal (45R) to appropriate
Crank Arm. The right Pedal is on the right hand side of cycle
as you sit on it. Note that the right pedal should be threaded
on clockwise and the left pedal on counter-clockwise

11
EN
STEP 3.
-Attach the Seat (43) onto the Seat post (06), fasten with x 3
Flat washer (42) and x 3 Nut (41).
-Release the knob (31), and then Insert the Seat post (06) into
the Main Frame (01). Line up the holes and secure the seat in
position with the Spring knob (31). The correct height for the
seat can be adjusted after the bike is fully assembled.

12
EN
STEP 4.
-Take the Front post (04) and connect the Middle Computer
wire (B1) with Lower computer Wire (B2).
-Release the Tension Knob + Tension Cable (29) on the Front
Post (04) then connect with Lower Tension Cable(C2). Insert
Cable (C1) nut onto the lower tension cable (C2) bracket slot,
pull Tension Cable (C1) and slide through lower cable (C2)
bracket to vertical direction. The Cable nut will sit on top of
the cable bracket.
-Insert Front Post (04) into Main Frame (01) and finger tighten
with x 4 Curve Washer (08) and x 4 Allen Bolt (27).

13
EN
STEP 5.
-Attach the handle bar(05) onto the Front post(04), tighten
with x 2 Bolt (36) x 2 Washer (42) .
-Connect computer wire(A2) to Middle computer wire (B1),
And then Slide the Computer (40) onto the Computer holder
(39).

14
EN
How to adjust tension
-Once adjust tension knob (29), the tension still is light for you.
You can Open the Buckle (47), pull out Belt with felt(19) and
then close it.

15
EN
COMPUTER INSTRUCTIONS
1. SCAN: Auto scan
2. SPEED: Speed
3. DIST: Trip distance
4. TIME: Riding time
5. ODO: Total distance
6. CAL: Calorie
FUNCTIONS AND OPERATIONS:
AUTO ON /OFF:
The monitor will wake up automatically if the exercise machine
is in motion. If stop exercising over 4 minutes, monitor will turn
off automatically.
RESET:
Press the button over 3 seconds will reset all functional values
to zero except Odometer value.
SCAN:
Press the button until the monitor display SCAN. Monitor will
automatically rotate display SPEED, DIST, TIME, ODO & CAL
every 30 seconds. Each display will be held for 6 seconds.
SPEED:
Press the button until the arrow points to SPEED. Monitor will
display the current speed.
DISTANCE:
Press the button until the arrow points to DIST. Monitor will
display the trip distance you are traveling.
TIME:
Press the button until the arrow points to TIME. Monitor will
count up your riding time.
ODOMETER:
Press the button until the arrow points to ODO. Monitor will
display the total accumulated distance.
CALORIE:
Press the button until the arrow points to CAL. Monitor will
accumulate the calorie consumption.

16
EN
SPECIFICATION
Funtions Auto Scan Every 6 seconds
Speed Unit: KPH or MPH
(According to inside
setting)
Distance 0.1-999.9 Mile or KM
(According to inside
setting)
Time 0:00-99:59 (Minute:
Second)
Odometer 0.1-999.9 KM or Mile
(According to inside
setting)
Calorie 0.1-999.9 Kcal
Sensor No-contact magnetic type
Battery type Two pieces of SIZE-AAA
Operation
temperature
0ºC - +40ºC
( 32ºF - 104ºF )
CLEANING AND STORAGE
-Do not use abrasive detergents or products that could damage
the appliance. Simply clean the surface with a wet cloth.
-Do not immerse the appliance in water or any other liquid.
-Store the appliance in a safe and dry place.
TECHNICAL DATA
3VDC (2x AAA 1.5V)
Size: 807x445x1015 mm
Net weight: 10kgr. Max weight capacity: 100kgr
This device conforms to the directive 2001/95 /CE general
product safety and provisions of directive 2014/30/EU on
Electromagnetic Compatibility.

17
EN
PROTECTION OF THE ENVIROMENT DIRECTIVE 2012/96/EC
This product has been designed and manufactured with high
quality materials and components that can be recycled and
reused. When you see the symbol of a crossed out litter bin
on wheels next to a product, this means that the product
conforms to the European Directive 2012/96/EC. Please
obtain information about the local recycling system for electric
and electronic products. Follow the local rules and do not
dispose of used products by throwing them in the normal bins
at home. Proper recycling of your used product will help avoid
negative impacts on the environment and people’s health.
PRODUCT RECYCLING – ENVIROMENT
Packaging
The materials used in the package of thi item are
included in a system of waste collection, sorting and
recycling. If you wish to dispose of these materials, you should
use rubbish bins or other means of waste collection that are
appropriate for each type of material.
Electrical and Electronic Product
This symbol means that if you wish to dispose of this
product at the end of its life, you must take it to a waste
collection company authorized for the selective collection of
Waste Electronic and Electrical Equipment (WEEE). This product
does not contain concentrations of materials considered
harmful to the environment.

18
ES BICICLETA ESTÁTICA
AGRADECIMIENTO DE COMPRA
JOCCA le agradece la confianza depositada en nuestros
productos y estamos seguros de que quedará completamente
satisfecho con cualquiera de éstos. Para atender mejor todas
sus dudas y necesidades, el servicio de atención al cliente
de JOCCA queda a su plena disposición para solucionar
cualquier consulta:
DESCRIPCIÓN
Nº DESCRIPCIÓN UNID.
1 Marco principal 1
2 Estabilizador delantero 1
3 Estabilizador trasero 1
4 Poste delantero 1
5 Barra de la manija 1
6 Poste del asiento 1
7 Perno de carro M8 * 60L 4
8 Arandela curva ø 8.5 * 22 8
9 Tuerca abovedada M8 4
20 llave Allen 1
27 Perno Allen M8 * 15L 4
31 mando 1
36 Perno Allen M8 * 20L 2
38 Llave inglesa 1
39 Soporte para computadora 1
40 Computadora 1
41 Tuerca de nailon M8 3
42 Arandela plana ø 8,3 * 20 5
43 Asiento 1
44L Pedal izquierdo 1
45R Pedal derecho 1
46 Funda para manillar 1
B1 Cable de computadora medio 1
B2 Cable de computadora inferior 1
C2 Perilla de tensión inferior 1

19
ES
ADVERTENCIAS DE SEGURIDAD
-Estas instrucciones son muy importantes. Lea
atentamente este manual de instrucciones
antes de utilizar el aparato y guárdelo
para posteriores consultas. JOCCA no se
responsabiliza de las posibles consecuencias
derivadas de un uso inadecuado del producto
u otro uso que no estuviera descrito en este
manual.
-Antes de utilizar el producto por primera
vez, desembale el producto y compruebe que
está en perfecto estado. De no ser así, no
utilice el aparato y diríjase a JOCCA ya que
la garantía cubre cualquier daño de origen o
defecto de fabricación.
-Antesdecomenzar esteo cualquierprograma
de ejercicios, consulte a su médico. Esto es
especialmente importante para las personas
que no han hecho ejercicio regularmente
antes o las personas con problemas de salud
preexistentes.
-Trabaje dentro de su nivel de ejercicio
recomendado, no se ejercite usted mismo.
Si siente algún dolor o sistemas anormales,
detenga su entrenamiento inmediatamente.
Consulte a su médico inmediatamente.

20
ES -Se recomienda utilizar una funda protectora
o alfombra para no dañar el suelo. Por
seguridad, deje un espacio de 0,5 metros
alrededor de la bicicleta cuando la utilice.
-Siempre use ropa y zapatos adecuados para
hacer ejercicio cuando use su bicicleta. No
use ropa holgada. No use zapatos con suela
de cuero o tacones altos.
-Antes de usar esta unidad, asegúrese de
que todas sus tuercas y pernos estén bien
sujetos. Para mantener la unidad en óptimas
condiciones, examínela con regularidad para
detectar signos de daños o desgaste.
-Durante el uso, agarre el manillar de forma
segura.
- Para reducir las posibilidades de lesiones,
calienteyestírese antesdehacer ejercicio. Esto
preparará los músculos y las articulaciones
para el esfuerzo.
-Siempre aumente la velocidad, la intensidad
y la duración del ejercicio a un ritmo gradual.
-Deje de usar inmediatamente si experimenta
mareos u otras molestias.
-Este producto sólo está indicado para un
uso doméstico. No utilizar el aparato en
la intemperie. No deje el aparato bajo la
Table of contents
Languages: