QUALITY SERVICE GROUP HTP-T1MG28H User manual

PC Based Network Video Recorder
User’s Manual
Quality Service Group

Product name: PC Based Network Video Recorder
Release Date: 2011/7
Manual Revision: V1.7

0 0
Table of Contents
Package Contents............................................................................................ 1
System Requirements ..................................................................................... 2
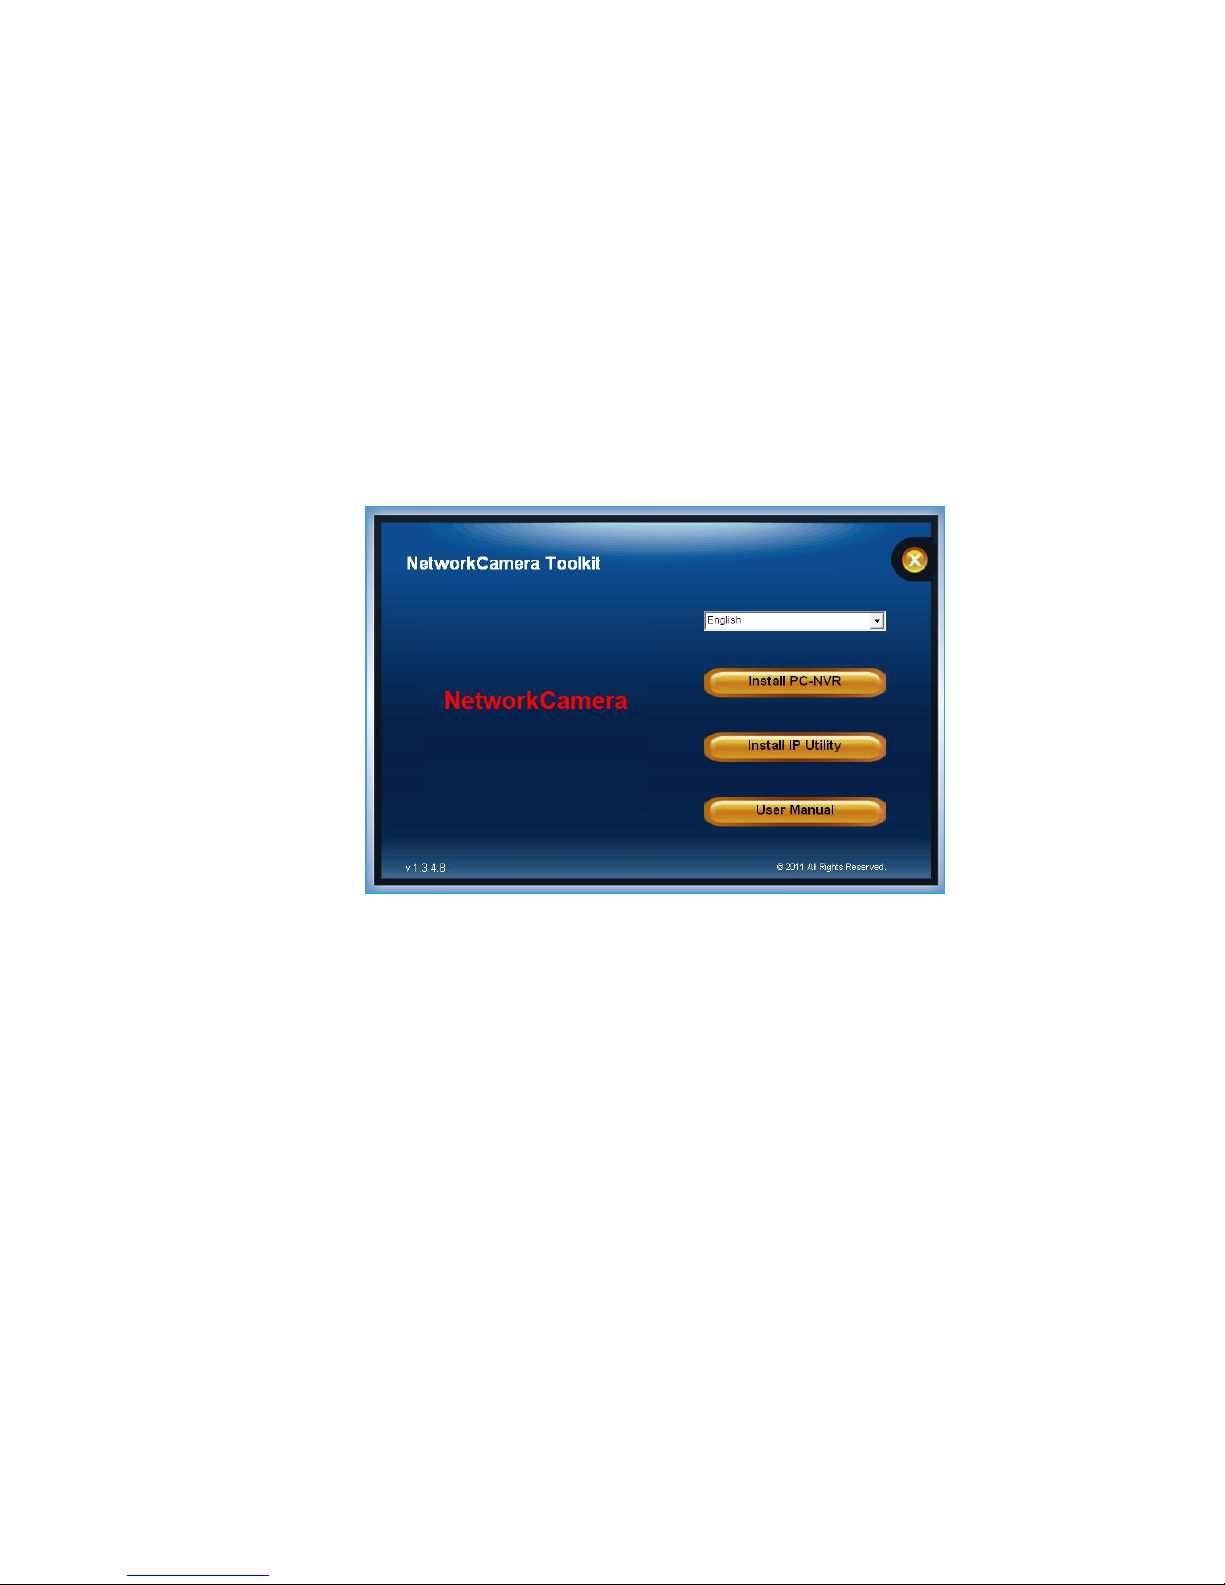
Software Installation ......................................................................................... 3
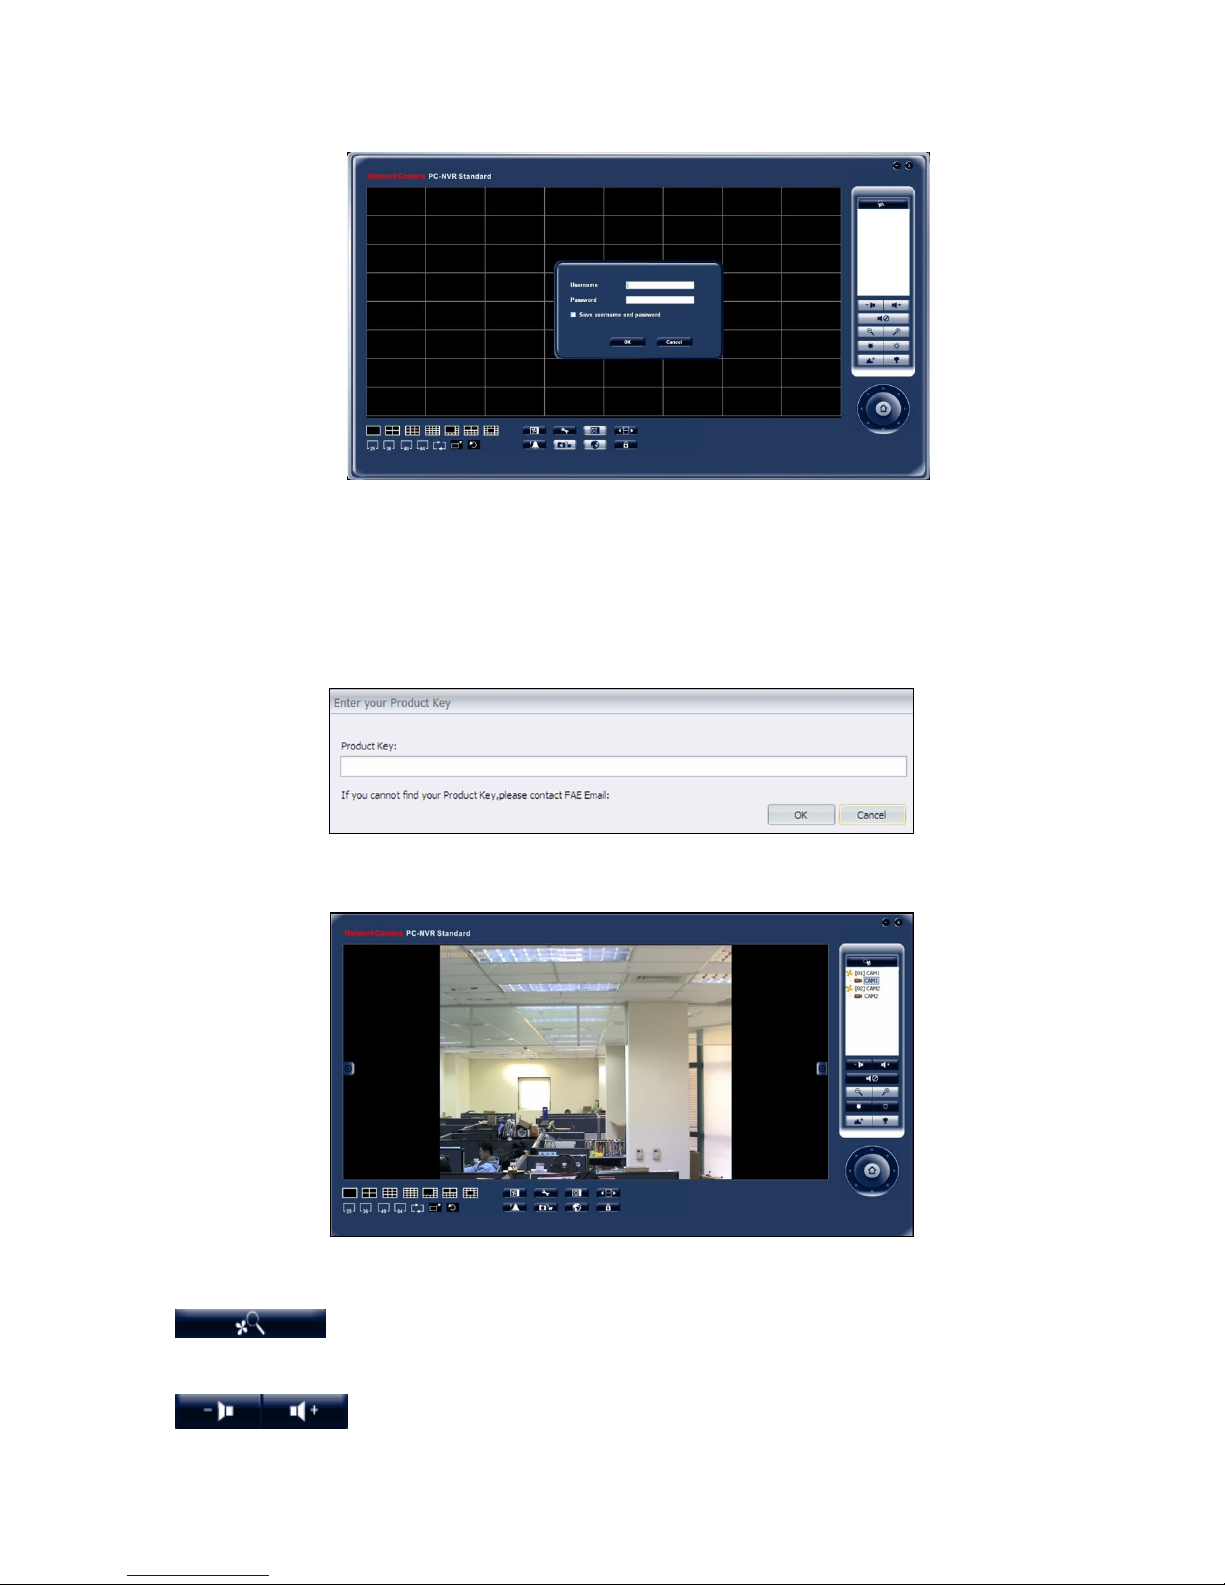
Start with PC-NVR ........................................................................................... 6
Authentication ........................................................................................... 7
Configure the PC-NVR ..................................................................................... 9
Live View................................................................................................ 9
Setting ................................................................................................. 11
Add/Remove a Site ............................................................................ 11
Camera ........................................................................................... 12
Sequence ........................................................................................ 16
System ........................................................................................... 17
Account .......................................................................................... 18
Video Wall ....................................................................................... 20
NVS Setting: .................................................................................... 22
Schedule Record .................................................................................... 25
Playback .............................................................................................. 30
Event................................................................................................... 35
Snapshot.............................................................................................. 37
Emap................................................................................................... 38
ACCOUNT MANAGE ................................................................................ 41
Lock.................................................................................................... 43
Hot-Key................................................................................................ 44
Watch dog ............................................................................................ 45

1 1
Package Contents
a. ToolKit CD
b. Easy Installation Guide

2 2
System Requirements
Operating System:
Microsoft Windows XP
Microsoft Windows Vista
Microsoft Windows 7
Computer:
IBM PC/AT Compatible
CPU:
Pentium 3GHz or faster
Memory:
1024 MB or more
Monitor:
1024 x 768 pixels or more, 24-bit True color or better
HDD
2048 MB or more
Network Interface:
10/100Mbps Network interface card must be installed
Web Browser:
Microsoft Internet Explorer 6.0 SP2 or higher
Adobe Reader:
Adobe Reader 8.0 or higher
Audio:
The audio function will not work if a sound card is not installed in the PC. Audio may
be interrupted depending on network traffic.

3 3
Software Installation
1. Insert the Installation CD into the CD-ROM driver. Run Auto-Run Tool directly
from the CD-ROM to start the installation. When installing the Network Camera
Toolkit for the first time, select a desired language for the interface. The available
languages are listed in the scroll box. Click <Install PC-NVR> or <Install IP
Utility>to install. If installing the PC-NVR program, follow the steps to install the
PC-NVR on the desired computer. If installing the IP Utility, please refer to the
Network Camera user manual.

4 4
2. In the Install Shield Wizard dialog box, click <Next> to continue.
3. Click <Next> to continue installation. If your device already exist another SQL server, you
can click <Browse> to search using.
4. Click <Change> to change the appointed folder where installation and program
files will be stored. Click <Next> to continue.

5 5
5. Select to create shortcuts. Click <Next> to continue.

6 6
5. Click to launch the application, and click <Finish> to complete the installation.
Start with PC-NVR
To launch PC-NVR, select PC-NVR from the start menu. The program should be
installed under "C:\Program Files\NetworkCamera\PC-NVR Standard" unless the program
was saved to a preferred directory. If a PC-NVR icon was installed on the desktop.
Double click to open the icon.
1. For first time use, the user name and password are assigned as “admin/admin”.
Click <OK> to login.
*Check <Save user name and password> to automatically login when the PC-NVR
starts.

7 7
Authentication
PC-NVR for sale has its own individual product key. The authentication window will
pop-up if the users want to implement specific functions such as NVS, broadcast, etc.
Please input the corresponding product key to finish the authentication.
Main Window
The usage and function of each button will be briefly described below:
Click this button to search for NetworkCamera devices within the LAN.
The button is moving round and round.
Volume decrease/Volume increase

8 8
Volume on/ Volume off
Increase Brightness
Decrease Brightness
Live View - Click on the <Live View> icon to view live video feed. Note:
After viewing recorded video, click this button to return to the live mode.
Note: The menu will jump if you use your mouse to click on this icon. The
content of this menu is:
(1) Enable all liveview
(2) Enable all liveview and record
(3) Enable all liveview and MD record
(4) Disable all record
Setting - Click on the <Setting> icon to adjust the camera, file path, event,
sequence, and login settings.
Schedule record - Click on the <Schedule Record> icon to schedule
recording times for cameras on the network.
Playback - Click on the <Playback> icon to view recorded video stored in the
HDD of the connected IP camera.
Event - List of system and camera event logs.
Snapshot - Click on the <Snapshot> icon to save a snapshot of the current
window(s).
Emap - Click on the <Emap> icon to open the Emap program. The Emap is
a program that allows the user to illustrate the positions of the cameras on a
self selected image.
Lock - Click on the <Lock> icon to lock the PC-NVR without closing the
program. To re-access the PC-NVR, the user will be prompted to enter the
username and password.

9 9
Display Modes
1x1 2X2 3X3 4X4 8 division 10 division 13 division
5X5 6X6 7X7 8X8 Sequence
Full Screen Resort Camera
Display Modes - to view the image in a multiple window mode. The selections include
1-window, 4-window, 9-window, 16-window, 8-window, 10-window, 13-window,
25-window, 36-window, 49-window, and 64-window modes.
Sequence: This function is used to set the display sequence.
Full Screen: Enlarge the viewing window to fit full screen. Hit <Esc> to exit.
Resort Camera: Resort Display Window Grids; to rearrange camera images of connected
sites in order.
Configure the PC-NVR
Live View
With the live view function, the user can view live video feed from any IP camera
connected to the network. To operate this feature:
1. Click on the <Live View> button to see the live view. Right click on a
desired grid and select < Disable Live View > from the pull down menu to disable
live view.
2. Click <UPnP Search> button on the control panel to start searching
for UPnP devices within the LAN.
3. Use the Display Modes to determine the amount of sites to view
4. The PC-NVR allows the user to assign any camera in the site tree to any grid in the
main window.
Step 1: Selects the camera to be viewed from the site tree.
Step 2: Drag and drop the selected camera into the window to view.

10 10
Re-sort Camera
If the user rearranges the camera sites during live view, they can return to the original
camera order by right clicking on any grid square and selecting <Re-sort camera>.
Zoom In – Double click on the desired grid, and use the scroll wheel on the mouse to
zoom in and out of the live view window.
If the camera has pan, tilt, and zoom capabilities, the following control panel will be

11 11
displayed.
Zoom out / Zoom in - Click to manually adjust the zoom on the
desired grid.
Focus – Click to manually adjust the focus on the desired grid.
PTZ Panel- Click on the arrows to pan and/or tilt the desired camera.
Setting
With the setting function, the user can manage up to 64 camera sites on the PC-NVR. It
includes adding, removing or configuring cameras.
Add/Remove a Site
There are two ways to add a site.
1. Setup the Site via UPnP Device Search
a. Click <UPnP Search> button on the control panel to start searching
for UPnP devices within the LAN.
b. Click and select the Network Camera from the survey list. Enter the user name,
password and select the stream type from the drop-down menu. For first time use

12 12
of an IP camera, the user name and password are “admin/admin”.
Setup the Site Manually
Camera
a. Click on the <Setting> icon and the figure below will be displayed.
Click button to add a site. Click to remove it.
b. To add a Network Camera to the PC-NVR, enter the required information, including
the Site name, IP address, Domain Name or EasyLink Name, as well as the Http
port, Username, and Password of the Network Camera. Click <Auto> to
automatically retrieve the Site name from the UPnP name of the camera being
added add to the PC-NVR. Select the <Model> and <Stream Type> of the IP
Camera from the drop-down menu. Click <OK> to complete the setting.

13 13
Click to automatically open the Web GUI of the selected camera.
Talk
If there has connected cameras in PC-NVR, 2-Way audio is accessible to carry out.
Single: Implement 2-Way audio with single camera. Select ‘Single(On/Off)’. Please see
below photo.
Broadcast: 2-Way audio with several cameras.
1. Please select Broadcast to start broadcast setting.

14 14
2. Please select to create group
3. Select to add camera
4. Add camera to broadcast list, then press ‘OK’.

15 15
5. Select group to start broadcast service, then press ‘OK’.
OSD Settings
“On-screen display” displays the camera data, which includes site-name, UPnP name and
Date/Time, of a connected IP camera on the live view screen. Click to select the options
on the camera setting page or right click on a desired grid and select < OSD setting > from
the pull down menu.

16 16
Sequence
This function is used to set the display sequence for live view of the cameras. There are
two ways to add cameras to the sequence.
1. Click on the <Setting> icon and choose <Sequence> to setup the sequence.
Select a camera and move from the “Camera List” to the “Sequence Display Camera
List” in the preferred sequence order. The user can setup the display time interval
(from 1 to 600 seconds) and split mode of sequence display (1*1, 2*2, 3*3, 4*4, and
5*5). Click <OK> to save the settings. Click on the button to start the
sequence.
2. Right click on a desired grid and select <Sequence> <Add to Sequence> to add, or
<Remove from Sequence> to remove. Note that when the sequence is added, a
capital “S” will be shown on the icon.

17 17
System
Record Path
The file path menu defines the storage located of recorded videos and snapshot. It is
recommended to use the default folders.
<C:\Program Files\NetworkCamera\PC-NVR Standard\Record> is the default path for
recorded videos. The recorded videos can be stored in more than one folder.
Check the “Enable” box and click <Browse> to set more destination folders.
When motion detection is enabled, the <Event Recording Duration> can be used to define
the amount of time for post-event recording. The duration must between 10 seconds to
600 seconds.
Language Selection – Select the desired language from the drop-down menu.
Circular Recording
The “Circular” is used to adjust the HDD space usage of the PC-NVR. If ”Circular” is
enabled, then once the free space remaining in the destination folder falls below the
threshold, the “Circular” will overwrite the oldest video and snapshot files in the storage
folder with new videos and snapshots files. The user can adjust the threshold by
megabytes or percentage of the file size.
Auto Reboot – Modify the process to reboot PC-NVR
Remaining days – Decide the period to store the video clips
Snapshot Settings
<C:\Program Files\NetworkCamera\PC-NVR Standard\Snapshot> is the default path for
Table of contents