Support
Contact Qualys Support
At Qualys, we are committed to providing customers and partners with the
highest quality service on all technical and account related questions. Our
dedicated staff of Security Engineers are specialized in network security to
assist customers quickly and effectively —24 hours a day, seven days a week
by telephone, e-mail, and the web.
US and Canada 1 (866) 801 6161
Europe/International +33 (0) 1 44 17 00 41
Web site www.qualys.com/support
Understanding Messages
During operation, the Scanner Appliance reports the following errors in the
Scanner Appliance user interface (LCD display and Remote Console).
Activation Code/ At startup, the Scanner Appliance failed to make a
Network Err. connection to the QualysGuard platform and the Scanner
Appliance has not been activated yet. Please activate the
Scanner Appliance as described in the Quick Start.
Network Error At startup, the Scanner Appliance failed to make a
connection to the QualysGuard platform. This message
may appear because you need to enable additional
configurations, such as a static IP address and/or
Proxy support.
Communications Failure A network communication error occurred when the
appliance tried to poll the QualysGuard platform during
normal operation. This error can occur only after successful
completion of the Quick Start.
See the QualysGuard Scanner Appliance User Guide for information on the
available configurations options and setup steps. Appendix B provides
comprehensive information about the appliance, including detailed
troubleshooting instructions that will assist you with resolving errors.
Rack Mount Instructions
To rack mount the appliance, follow these steps:
1 With a #2 flat blade screwdriver, remove all 6 plastic screws on both sides
of the Scanner Appliance.
2 Attach the mounting brackets to the sides of the Scanner Appliance using a
#2 Philips screwdriver and 6 10-32 x 5/16" stainless steel screws.
3Mount the Scanner Appliance onto the rack using 4 10-32 x 3/4" rack
screws.
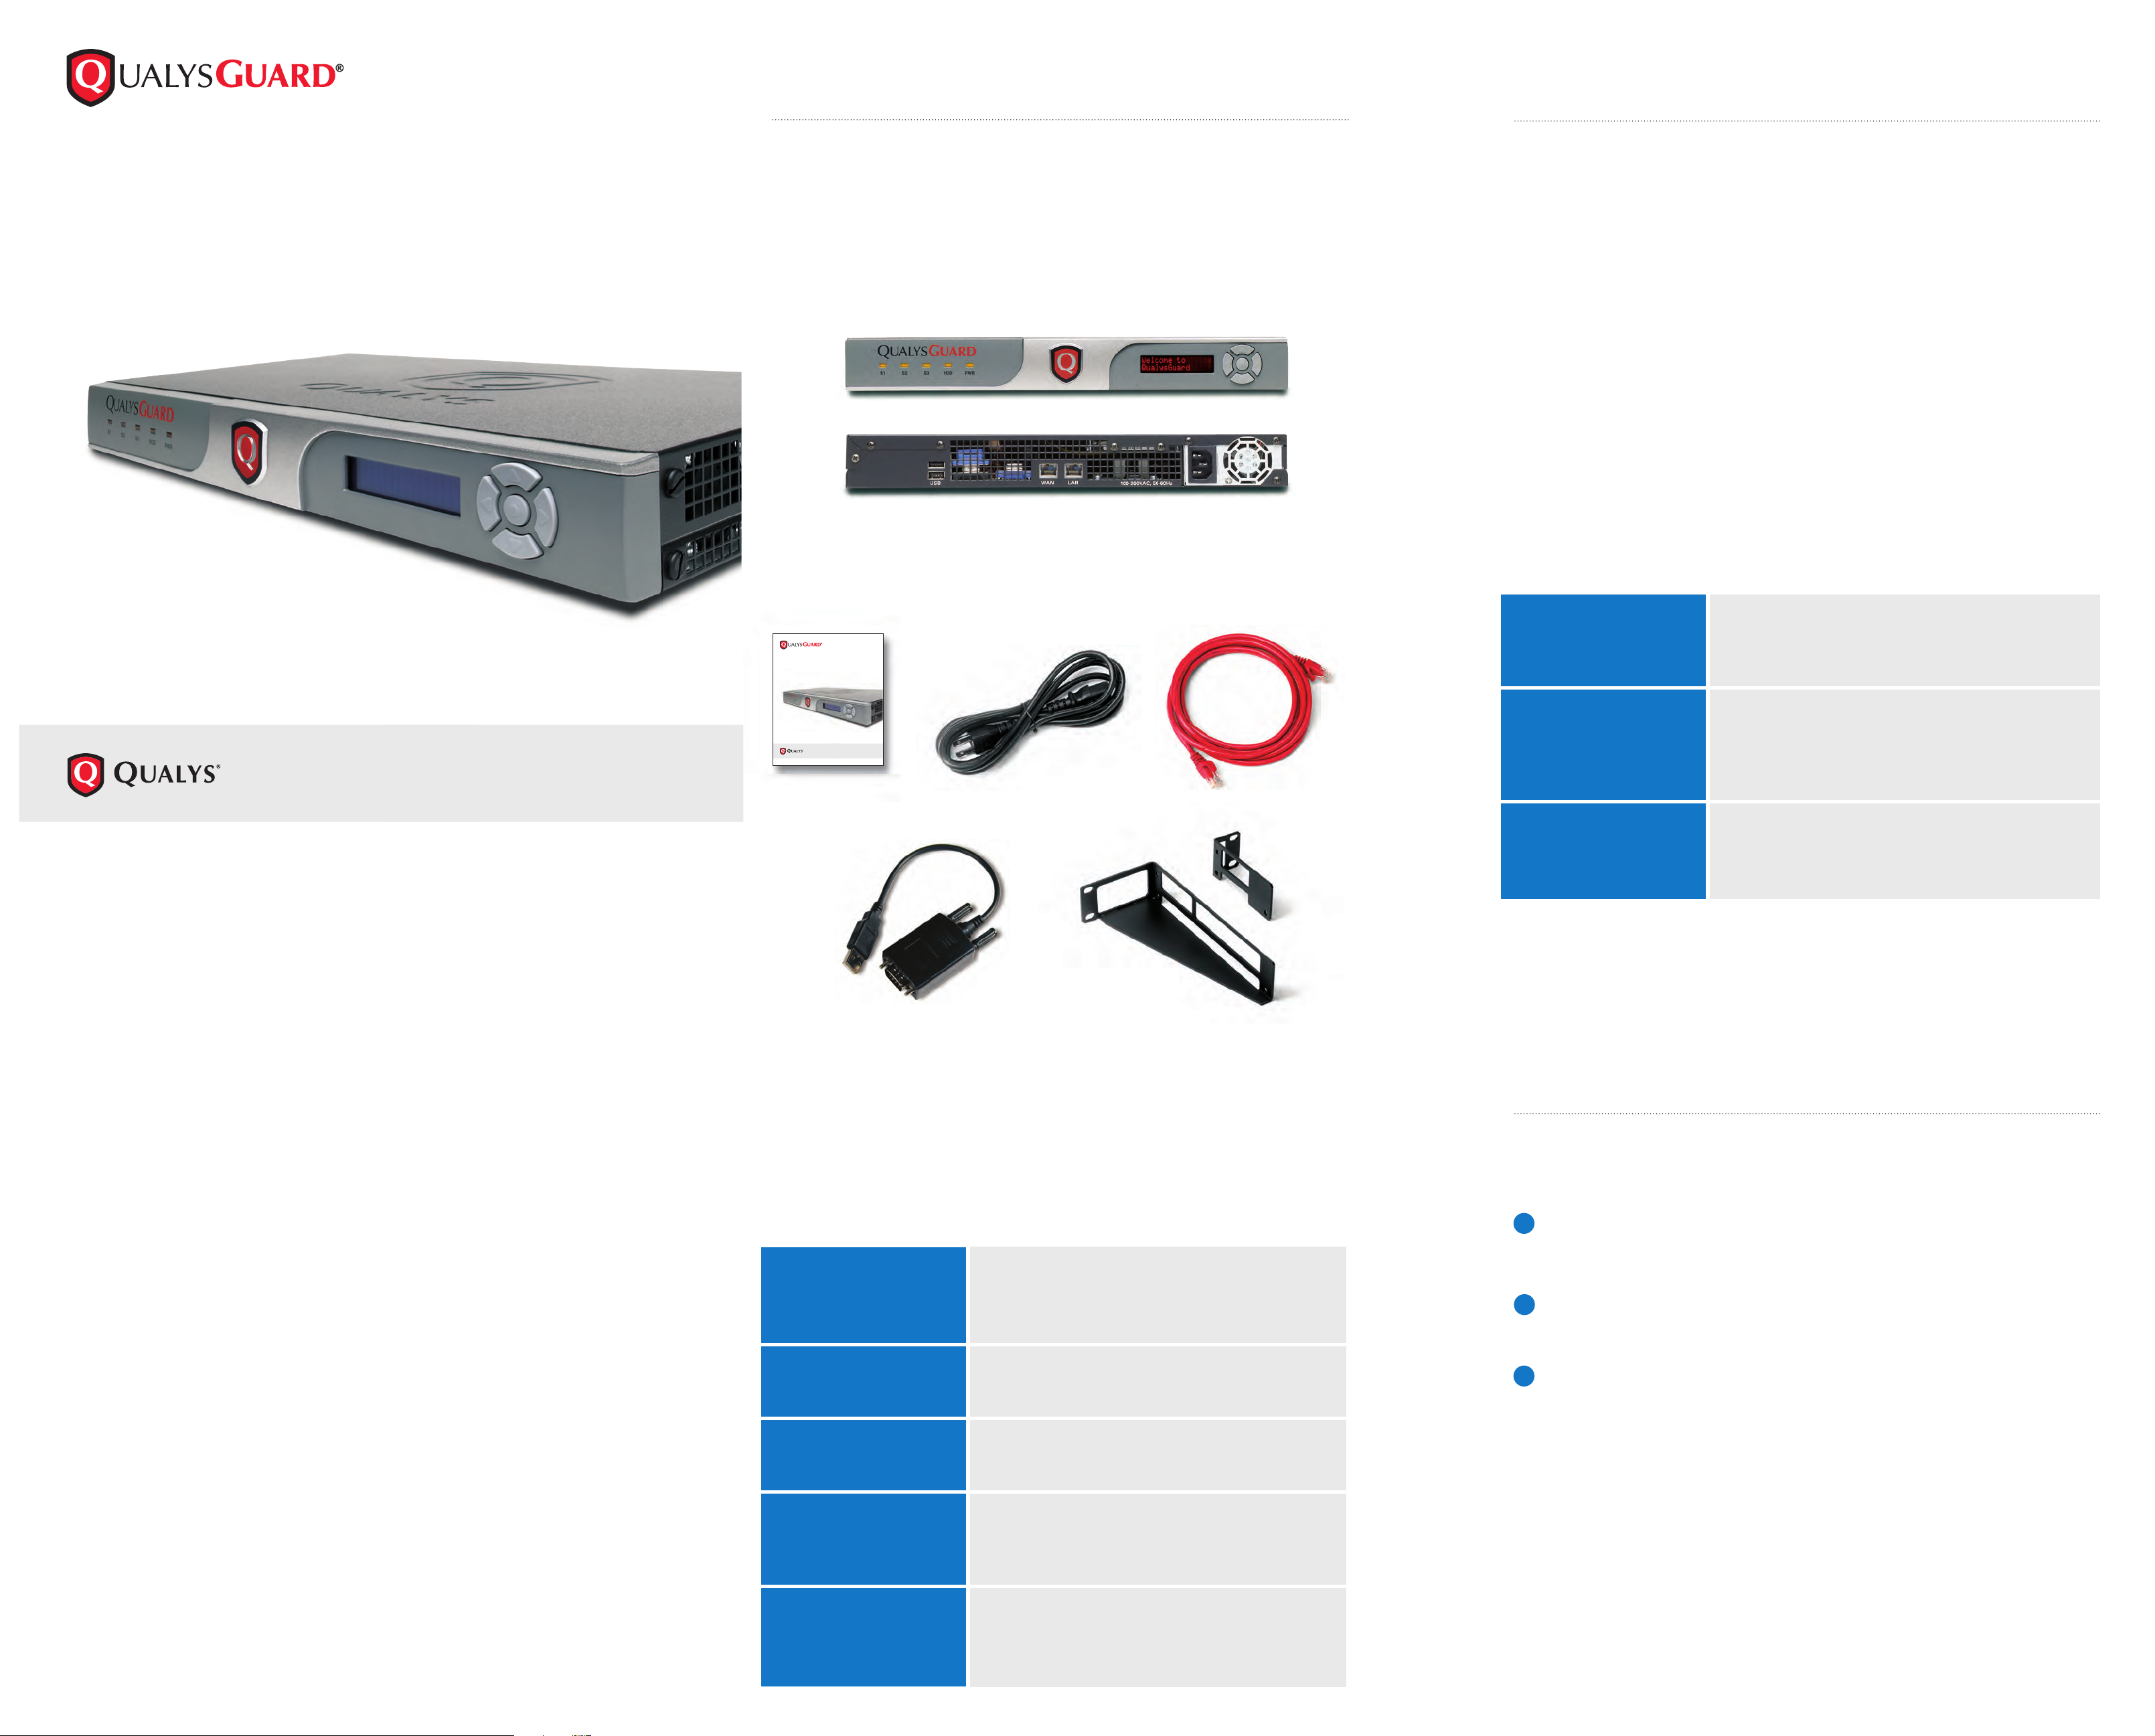
User Guide AC power cord CAT5 cable
19" rack mount bracket kit
(see Rack Mount Instructions —
to the left)
Support
Contact Qualys Support
At Qualys , we are committe d to providing customers and partners with the
highest q uality servi ce on all techni cal and account related questions. Our
dedicat ed staff of Secur ity Engineer s are special ized in netw ork securit y to
assist custo mers quickly an d effectivel y— 24 hours a day, seve n days a week
by telephon e, e-mail, and the w eb.
US and Canada 1 (866) 801 6161
Europe/International +33 (0) 1 44 17 0 0 41
Support e-mail support@qualys.com
Web site www.qualys.com/support
Understanding Messages
During ope ration, the Sca nner Applianc e reports the fo llowing erro rs in the
LCD inter face.
Network Erro r At startup, the Scanner Appliance failed to make a
connection to the QualysGuard platform. This message
may appear because you need to enable additional
configurations, such as a static IP address and/ or
Proxy support.
Login Qualys-Guard Your login to the appliancefailed because yo u did not
Web First complete yo ur login to the QualysGuard w eb application
first. Foll ow the instructions provided i n STEP 2 of the
Quick Start.
Authentication Failure Your login to the Scan ner Appliance failed. B e sure to
use the same ac count to log into the QualysGuard web
application and the appliance.
Communications Failure A n etwork communicati on error occurred when t he
appliance tri ed to poll the QualysGuard platform during
normal operation. This er ror can occur only after successful
completio n of the Quick Start.
The Qualy sGuard Scanne r Appliance Us er Guide provi des compreh ensive
information about the appliance, including the LCD interface and appliance
configuration options. Note that Appendix B provide s detailed troubleshooting
instructions that will assist yo u with resolvi ng errors.
User Guide AC power co rd
CAT5 cable 19" rack mount bracket kit
Before You Begin
You can easily ins tall the Scann er Applianc e on your networ k in minutes by
followi ng the 3-step Quic k Start. Before y ou begin, we rec ommend that you
review the sections below to become familiar with the Scanner Appliance
and its configuration options.
Check Package Accessories
Your Starter Kit package should contain these components:
If any components are missing or damaged, please contact Qualys Support.
Review Network Requirements
The Scann er Appliance h as the followi ng network requ irements.
Outbound HT TPS Access Your local network must be c onfigured to allow outbo und
https (port 443) a ccess to the Internet , so that the
Scanner Appliance can communicate with the
QualysGuard platfo rm.
Accessibility of Target IPs The IP addresses for the host s to be scanned must be
accessible to the Scanner Appliance. This ispart icularly
important if your network is designed with VLANs.
Bandwidth Minimum recommended bandwidth conne ction of
1.5 megabits per second (Mbps) to the QualysGuard
.mroftalp
DHCP or Static IP The Scanner Applianc e is pre-configured wit h DHCP.
If you wish to con figure with a static IP add ress, be sure
you have the IP address, netmask, defaultgateway, and
primary DNS.
Proxy Suppor t Proxy support is available with or without authentication—
basic or NTLM . The Proxy server must be assigned a
static IP address an d must allow transparent SSL
.gnilennut
© QualysGuard is a registered trademark of Qualys, Inc. Qualys and the Qualys logo are trademarks of Qualys, Inc.
All other trademarks are the property of their respective owners.
Qualys, Inc.
1600 Bridge Parkway
Redwood Shores, CA 94065
T: 1 (800)745 4355
For more information, visit: www.qualys.com
ENTERPRISE SCANNER APPLIANCE
QUICK START GUIDE
USB-to-RS232 converter cable
for Remote Console
Before You Begin
You can easily install the Scanner Appliance on your network in minutes by
following the 3-step Quick Start. Please review your Starter Kit package
contents before you begin. The Scanner Appliance includes a user interface
for configuration and management. Users may choose to use the LCD display
and keypad or the optional Remote Console interface for remote access via
a VT100 terminal, such as Windows HyperTerminal.
Check Package Accessories
Your Starter Kit package should contain these components:
If any components are missing or damaged, please contact Qualys Support.
Review Network Requirements
The Scanner Appliance has the following network requirements.
Outbound HTTPS Access Your local network must be configured to allow outbound
https (port 443) access to the Internet, so that the
Scanner Appliance can communicate with the
QualysGuard platform.
Accessibility of Target IPs The IP addresses for the hosts to be scanned must be
accessible to the Scanner Appliance. This is particularly
important if your network is designed with VLANs.
Bandwidth Minimum recommended bandwidth connection of
1.5 megabits per second (Mbps) to the QualysGuard
.mroftalp
DHCP or Static IP The Scanner Appliance is pre-configured with DHCP.
If you wish to configure with a static IP address, be sure
you have the IP address, netmask, default gateway, and
primary DNS.
Proxy Support Proxy support is available with or without authentication —
basic or NTLM. The Proxy server must be assigned a
static IP address and must allow transparent SSL
.gnilennut
ENTERPRISE SCANNER APPLIANCE
QUICK START GUIDE


