Quictent GM1407 User manual

User Manual
for Quictent Party Tent
Please read, understand, and practice the guidelines in this user manual before use, and
keep it for future reference.
20’ x 14.5’ (Octagonal) 29’ x 21’ (Decagonal)
The Parts List varies by the model. Please refer to the correct list
according to the product you have.

Table of Contents
About Quictent
..........................................................................
3
......................................................................
3
Safety Instructions
................................
5
20’ x 14.5’ Octagonal Party Tent (Model #GM1407)
..................................
10
29' x 21' Decagonal Party Tent (Model #GM5502)
1
.............................................................................
Maintenance 16
..................................................................................
16
Warranty
..................................................................................
18
Appendix

IMPORTANT
We’d love to hear from our customers. If you have any questions about our products,
the manual, or would like us to help in any way, please feel free to contact the support
team. We will reply in 12 hours (working days).
Check the Spam and your email Settings if you do not receive a reply in time as it is probably
blocked because our support team will always get back to you no later than the timeframe.
Add the following email address to your CONTACT LIST in case of any blocking.
This user manual applies to Quictent big party tents. It will help you to get to know your
Quictent big party tents. Please read the guidelines in this manual and keep the manual for
future reference.
We may update the manual without notice in advance. You can always search “Quictent
Instructions” online for the latest version.
2

Our Vision
Creating unique spaces to meet every specific need, and become a part of America's landscape.
Our Mission
To keep innovating and provide a wide range of reliable shelters and shades at consum-
er-grade prices with customer-first service.
About Quictent
Founded in the early 21st century, Quictent has grown into a popular brand with reliable
products and excellent customer services during the past decades. We started with pop up
canopies, and then expanded to other 6 categories for shelters and the like including party tents,
carports, greenhouses, shade sails, patio umbrellas and grow tents. Driven by the vision to create
unique spaces to meet every specific need and become a part of America's landscape, we at
Quictent would spare no effort to keep innovating.
3
The customer-centric services are what we at Quictent take great pride in. In addition to the
hassle-free warranty covering all Quictent products, an industrial-leading support team is
standing behind at all times. Whenever you need help or have any suggestions and comments
mail.com. You’re sure to get a to-the-point reply in 12 hours.
Our Service
Safety Instructions
You should read, understand, and practice safety instructions in this chapter. For any damages
due to not obeying guidelines as instructed, the owner (user) should take full responsibility.

4
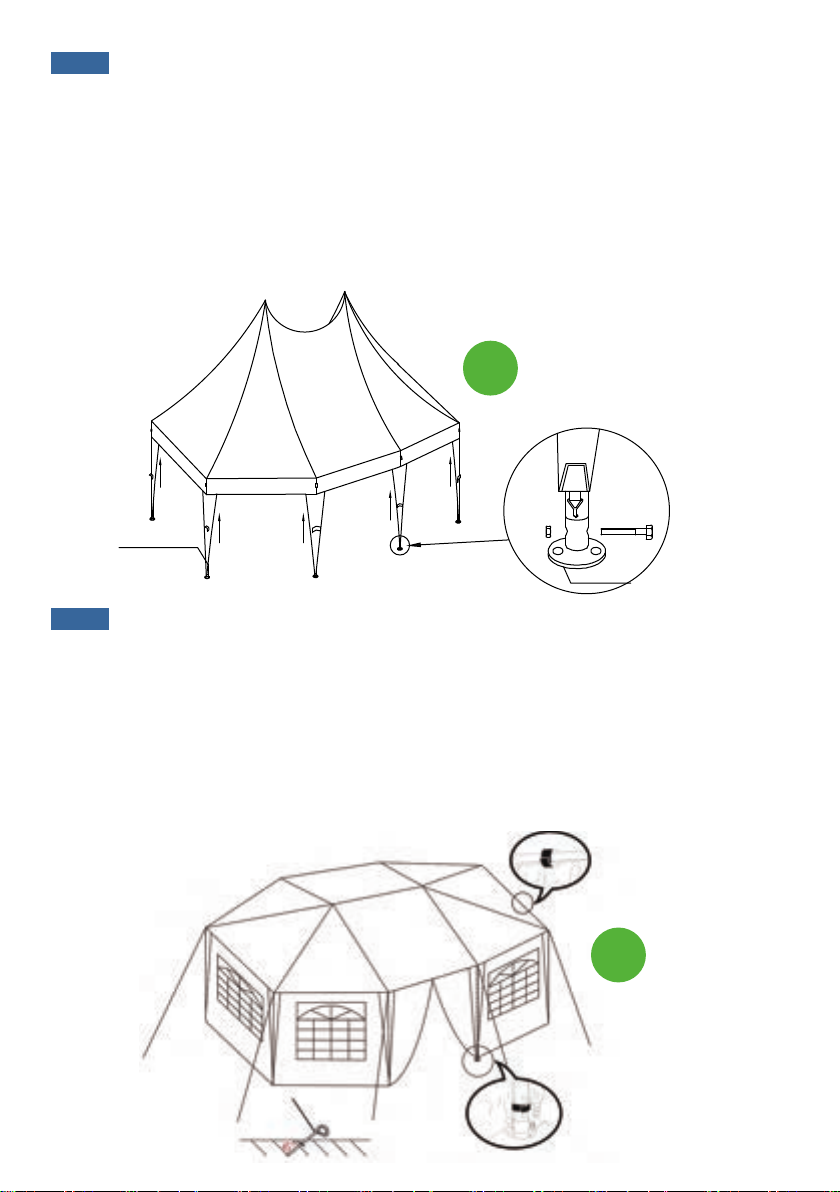
Do NOT insert the L-shaped
pegs and the Auger Anchors
vertically. Always form an
angle with the ground (As
shown, a 45-degree is the
best position).
Do NOT leave a tent
unattended overnight.
Do NOT light a fire inside the
party tents. Keep open flames,
flammable materials, and any
heat source away from your
Quictent party tents.
Do NOT throw away the
original packaging cartons
in case of a return or an
exchange.
You can ALWAYS contact the
support team for replacement
parts whenever in need.
Do NOT leave a tent outdoors
too long as it’s designed to be
used as a temporary structure.
45°
90°
Reminder
Do not use and leave the structure outside in inclement weather. The owner (or user) should
take down the structure for any potential inclement weather, including high winds, heavy
rain, sleet, snow, and the like, or he (she) should take the loss.
Warning
Stop using the party tent immediately if any damage is found, or Quictent will not be liable for
any loss thereafter.
Please do NOT place heavy objects on the top of a Quictent party tent, or leave it outside
overnight because it’s designed to be used as a temporary structure.

5
4m x 6m (Model # GM1403W)
Parts List (Model #GM1407)
You’ll receive three (3) boxes for this model. You can identify the packages by referring to
(Table B) below. Please also pay particular attention to making sure all parts are numbered
and graphically indexed as shown on the Parts List (Table A), so does the quantity for each
TY, and PART NUMBER), PICTURES (OR VIDEO CLIPS, IF APPLICABLE), we’ll get back to
help out soon.
20' x 14.5' Octagonal Party Tent
#1
#2
#3
#4
Steel Pole
(6.7ft)
Steel Pole
(7.0ft)
Steel Pole
(6.3ft)
Steel Pole
(6.8ft)
8
8
1
8
Part Number DescriptionDiagram Quantity
(PCS)
Table A. Parts List

#5
#6
#C
#A
#B
Table A. Parts List
SSteel Pole
(2.0ft)
Three Way Connector
Three Way Connector
Five WayConnector
Three Way Connector
Steel Pole
(2.1ft)
2
2
2
4
2
#D 2
#E Foot Base
#F
#G
#J
#H
#I
Part Number DescriptionDiagram Quantity
(PCS)
Roof Cover
Window Sidewall
Zipper Sidewall
Top Support Plate
32*300 Spring
16
24
8
8
8
1
8
2
2
2
2
2
#K Auger Anchor
#L
#M
#K
#L
#M
Bungee Cord
L-Shaped Peg
M8*50 Screw for Pole #4
M6*50 mm Screw
for Pole #5 & #D
Rope
6
Part Number Parts Included
Table B. Package Contents for Shipping Cartons
Box #1
Box #2
Box #3
8 x Part #1 (Steel Pole)
8 x Part #2 (Steel Pole)
1 x Part #3 (Steel Pole)
2 x Part #6 (Steel Pole)
8 x Part #4 (Steel Pole)
2 x Part #5 (Steel Pole)
All the Connectors &Other Accessories
not Mentioned in this Table


3
Step 3 Assemble the mainframe.
Attach the Roof Cover (#F) to the assembled top frame with Bungee Cords (#M) .
Connect the 8 x poles (#4) to the connectors (#A, #B, and #C) on the top frame.
a)
b)
A
A
A
A
B
C
B
C
Bungee
Cord
Roof Cover
8
4
44
4
4

4
Step 4 Secure the mainframe.
Tighten/loosen the leg covers (attached to the roof cover) by placing their hook
on a proper adjusting hole on the poles (#4).
Connect a Foot Base (#E) to the bottom of each pole (#4) and fix them togeth-
er with M8*50 Screws (#O).
b)
a)
Fix the Foot Bases (#E) to the ground by inserting the L-Shaped Pegs (#N) into their
pre-drilled holes. You can insert two pegs for each foot base as there are 16 pieces of
pegs in total.
c)
Step 5 Attach the 2 x Window Sidewalls (#G) and the 2 x Zippers Doors (#H) and secure
the whole structure.
Fix the fabric to the top frame and the mainframe by wrapping up their built-in
Velcro straps.
Secure the entire structure with the 8 x Ropes (#L) and the 8 x Auger Anchors (#K). To
secure the tent better, it is highly recommended that you insert the anchors diagonally
into the ground. As shown, a 45-degree to the ground is the best position.
b)
a)
Pole #4
Foot Base
M8*50
Velcro Strap
Velcro Strap
9
5

10
4m x 6m (Model # GM1403W)
Parts List (Model #GM5502)
You’ll receive four (4) boxes for this model (Model #GM5502). Please check to identify the
packages by referring to Table B below. Pay particular attention to make sure all parts are
numbered and graphically indexed as shown on the Parts List (Table A), so does the quantity
and photos (or video clips, if applicable), we will get back within 12 hours to help out.
29' x 21' Decagonal Party Tent
E
2
22
2
2
2
2
2
2A 2
2A
2A
2A
2A
2A
2A
2A
2A
2A
A
A
BC
A
AA
A
C
B
E F
F
F
F
E
E
E
3
3
3
3
3
3
5
3
3
4
44
4
4
1
1
11
41
1
4
14
4
1
1
1
1
1
1
1
3
E
A

Steel Pole (6.4ft) 10
11
4-Way Corner Connector 6
4-Way Corner Connector 2
Part Number DescriptionDiagram Quantity
(PCS)
5-Way Corner Connector
Top Plate
Roof Cover
Sidewall with Window
Bolt 10
2
2
1
8
L-Shaped Peg 30
Zipper Door
Erect Hook
Guy Rope
Bungee Cord
2
1
10
130
Leg Cover 10
4-Way Corner Connector 2
Table A. Parts List
Steel Pole (7.4ft)
Steel Pole (6.4ft)
Steel Pole (4.1ft)
10
Steel Pole (7.4ft) 1
10
10
Ground Bar (7.4ft) 10
L-Shaped Foot Base
(3-Corner) 6
T-Shaped Foot Base
(3-Corner) 4
Curtain Ring 40
#1
#2
#2A
#3
#4
#5
#A
#B
#C
#D
#E
#F
#G
#H
#I
#J
#K
#L
#M
#N1
#O
#P
#Q
Top Support Pole 2
#N2

Part Number Parts Included
Table B. Package Contents for Shipping Cartons
Box #1
10 x Part #1 (Steel Pole)
10 x Part #2 (Steel Pole)
1 x Part #O (Erect Hook)
2 x Part #L (Zipper Door)
2 x Part#N2 (Top Support Pole)
Box #3 10 x Part #3 (Steel Pole)
10 x Part #4 (Steel Pole)
Box #2
10 x Pole #2A (Steel Pole)
1 x Pole #5 (Steel Pole)
8 x Part #K (Sidewalls with Window)
Box #4
2 x Part #N1 (Top Plate)
1 x Part #J (Roof Cover)
All the Accessories not Mentioned in this Table
12

13
2
2
4
1
1
1
1
5
D
1
1
44
4
4
4
4
4
4
1
2
22
2
2
2
2
2
2
CB
A
A
1
11
1
C
B
A
A
A
Assembly
Please check to make sure that you have all the parts listed on the Parts List.
Read Before the Assembly
Form the top frame as per the layout. The parts you'll use in this step are
poles of 10 x #2 and connectors of 6 x #A, 2 x #B, and 2 x #C.
1
2
2
22
2
2
2
2
2
C
B
A
AA
C
B
A
A
A
Step 1
Continue assembling the top frame by:
Attaching one end of the poles (10 x #1 &10 x #4) to the connectors (#A, #B, and #C).
Attaching the other end of the poles (#1 ) to the connectors (2 x #D), then
inserting the 2 x Top Thread Poles (#N) into the hole on the connectors (#D).
a)
b)
Reminder: You should set the 2 x Top Thread Poles (#H) at the lowest position at the
beginning and adjust it to a proper height with the help of the Erect Hook (#O)
after all work is done.
D
Step 2

You can finish assembling the Roof Cover (#J) and the supporting frame by:
14
Tightening the Roof Cover (#J) to the assembled top frame with the Bungee
Cords (#Q).
Attaching one end of the 10 x poles (#3) to the connectors (#A, #B, and #C) on
the top frame.
Attaching the other end of the poles (#3) to the foot bases of 6 x #E and 4 x #F.
a)
b)
c)
Connecting the 10 x poles (#2A ) to the foot bases (#E & #F) on the bottom.
d)
Step 3
3
3
2A
2A
2A
2A
2A
2A
2A
2A
2A
2A
33
3
3
3
3
3
3
3
3
E
E F
F
E
E
E
F
F
E

Step 4 Attach the 8 x Sidewalls with Window (#K) and the 2 x Zipper Doors (#K) as
instructed below.
15
Fix all the sides and doors to the top frame with the Bungee Cords (#Q) and by
wrapping up the built-in velcros.
Attaching one end of the 10 x poles (#3) to the connectors (#A, #B, and #C) on the
top frame.
Tighten/Loosen the 10 x Leg Covers (#M) by placing the hook into the different
adjusting holes on the poles (#3).
a)
b)
c)
Fix the structure to the ground with the 10 x Guy Ropes (#M) and the 30 x
L-Shaped Pegs (#E). To secure the tent better, it is recommended that you insert
the L-Shaped Pegs diagonally into the ground. As shown, at a 45-degree to the
ground is the best position.
d)
4


Warning
Restructuring the product without written permission from Quictent in advance would
VOID the warranty.
Damages due to improper use in severe weather conditions, including but not limited
to high winds, heavy rain, sleet, snow, etc., will NOT be covered by the warranty.
17
Order number
Required parts (name, quantity, and part number for each)
Pictures (or video clips, if applicable)

18
Appendix
Shelter for Backyard, Party, Event
Quictent pop up canopies serve perfectly for your outdoor events, both personally and
commercially. They always provide shades for outdoor activities such as parties, picnics,
outings, etc, turning everywhere into a perfect place to relax. When it comes to selling at
outdoor events, they are easy to handle in all aspects – unfolding (and folding), transporting,
and storing. Rich in styles, sizes, and colors, you can always find one that goes well with your
needs.
Pop up Canopy
Party tent
Preparing for parties and events? We've got your back. Quictent party tents in different sizes
are available. From a small-sized one in 10' x 8' to some regular sizes in 10' x 20' or 10' x 30' to
a large one in 20' x 40', you can always find a perfect solution matching your demands.
What’s more, they span a wide range of styles.

19
Metal Gazebo
Owning a Quictent metal gazebo is just like having another beautiful room in your
backyard! The powder-coated steel frame is heavy-duty and can stand firmly outdoors for a
long time. The mosquito netting adds privacy and protects you from bugs. The tan ones go
with the surroundings well while the red ones are eye-catching.
Patio Umbrella
Quictent patio umbrellas turn anywhere in the
open air into a perfect site to "take a breath".
They are a must-have for small businesses such
as an outdoor café! For homeowners, they make
your backyard the best place to relax, especially
when you're looking for an escape from the
heavy work or energy-taking daily travails.
Shade Sail
Why Quictent provides so many choices for
shade sails in colors and shapes? For aesthetics.
Your patio would be pleasing to the eye if you
mix shades in different colors and shapes, or
overlap one a little while mounting others
several feet higher or lower.
This manual suits for next models
1
Table of contents
Other Quictent Tent manuals

Quictent
Quictent GM1203M User manual

Quictent
Quictent YS1106 User manual

Quictent
Quictent GM1411W-FP User manual

Quictent
Quictent YS1205-NS User manual

Quictent
Quictent CT1203 User manual

Quictent
Quictent Class A RV Cover User manual

Quictent
Quictent 1117 User manual

Quictent
Quictent GM1404W User manual

Quictent
Quictent HF1102 User manual

Quictent
Quictent Truck User manual