R2 RINALDI CONDOR 62 User manual

Operating Instructions
Before commissioning the machine, read operating instructions
and observe warning and safety instructions.
PLEASE ALSO READ ORIGINAL
BCS INSTRUCTION MANUAL
Stone Burier Attachment
Manufactured by R2 RINALDI S.r.l.
to t
BCS Power Units

R2 Stone Burier Attachment
Page 2 TWT/R2SB/0617
No liability will be accepted for any damage caused to persons or property
through failure to observe the operating and safety instructions.
!
IMPORTANT READ CAREFULLY
Contents
Page 4 Stone Burier & Its Proper Use
Page 5 Specication
Page 6 Handling & Transportation
Page 7 Safety Precautions
Page 8 Components & Coupling to the Power Unit
Page 9 Preparing for Use
Page 10 Using the Stone Burier
Page 12 Maintenance
Page 13 Tine Replacement
Page 13 End of Work & Storage of the Stone Burier
Page 15 Manufacturer Information

R2 Stone Burier Attachment
TWT/R2SB/0617 Page 3
!
IMPORTANT
PLEASE READ THE OWNER’S MANUAL
FOR THE POWER UNIT FIRST.
For any further information
or assistance please contact
Tracmaster on 01444 247689 or
visit www.tracmaster.co.uk

R2 Stone Burier Attachment
Page 4 TWT/R2SB/0617
The stone burier is designed to bury stones, mill, and compress the soil in a single operation.
The stone burier is equipped with rotating tines to dig the ground and a roller at the rear, which
can be adjusted to control the digging depth, and compresses the soil.
The stone burier is intended only for the purpose described above and any other use is considered
improper and therefore dangerous.
The manufacturer will not be liable for injury or damage to persons or property as a result or
improper use of the equipment.
Always read all instruction manuals fully and ensure you understand them.
Only use the machine as described in the instruction manuals.
Do not use any other spare parts other than the original manufacturer’s parts.
Ensure the machine is operated and maintained by competent persons.
Any persons using the machine must be properly trained and informed of the correct use of the
equipment and any risks involved in its operation.
The user is required to comply with any rules and legislation pertaining to safety at work.
Main body of machine
Roller assembly
Roller adjustment
PTO coupling
Joint protection guard
& chain guard
Gear box
A
B
C
D
E
F
Stone Burier & Its Proper Use
BAC
D
F
E
Figure 2

R2 Stone Burier Attachment
TWT/R2SB/0617 Page 5
Technical Specications
Model
CONDOR 62 CONDOR 75
Digging width Fig. 3 62cm 75cm
Compacting width Fig. 3 73cm 87cm
Depth Fig. 3 113cm 113cm
Max. height from ground Fig. 3 45cm 45cm
Power unit hp required 10-12hp 12-14hp
Max. working depth 14cm 14cm
Number of tines 16 20
Weight of stone burier 105kg 115kg
A
B
C
D
A
B
C
Figure 3
D

R2 Stone Burier Attachment
Page 6 TWT/R2SB/0617
Handling and Transportation
The machine must be handled with lifting equipment.
Make sure that lifting equipment (including the straps etc) has a carrying capacity appropriate
to the weight to be lifted and that it is in good condition.
The machine can be anchored at the coupling point as
indicated in Fig. 4; because of the position of the center
of gravity, the machine will lean while lifted at an angle of
25o(Fig. 4).
In order to make handling operations safely, always wear
safety shoes and make sure that there are no people or
animals nearby while working.
The machine can be transported by professional means of
conveyance (trucks, vans, etc.).
Transportation by car is permitted only if the car boot
is divided from the driving and passenger seats with a
barrier that can hold the machine in case of a frontal
collision.
In all cases, before transporting the machine, make sure
that it is well anchored with straps and strings and that it
is stable enough.
The anchor points can be the roller group support and the
coupling to the power unit.
Always check that any walkways, ramps, etc that must be crossed with means of conveyance
and lifting equipment are well anchored and have a capacity capable of supporting the total
load of the vehicle plus machine plus operator.
When using ramps for loading, ensure that the vehicle has the handbrake on and has been
positioned with wedges suitable for locking the wheels.
Figure 4
Condor Light
Condor
Figure 4

R2 Stone Burier Attachment
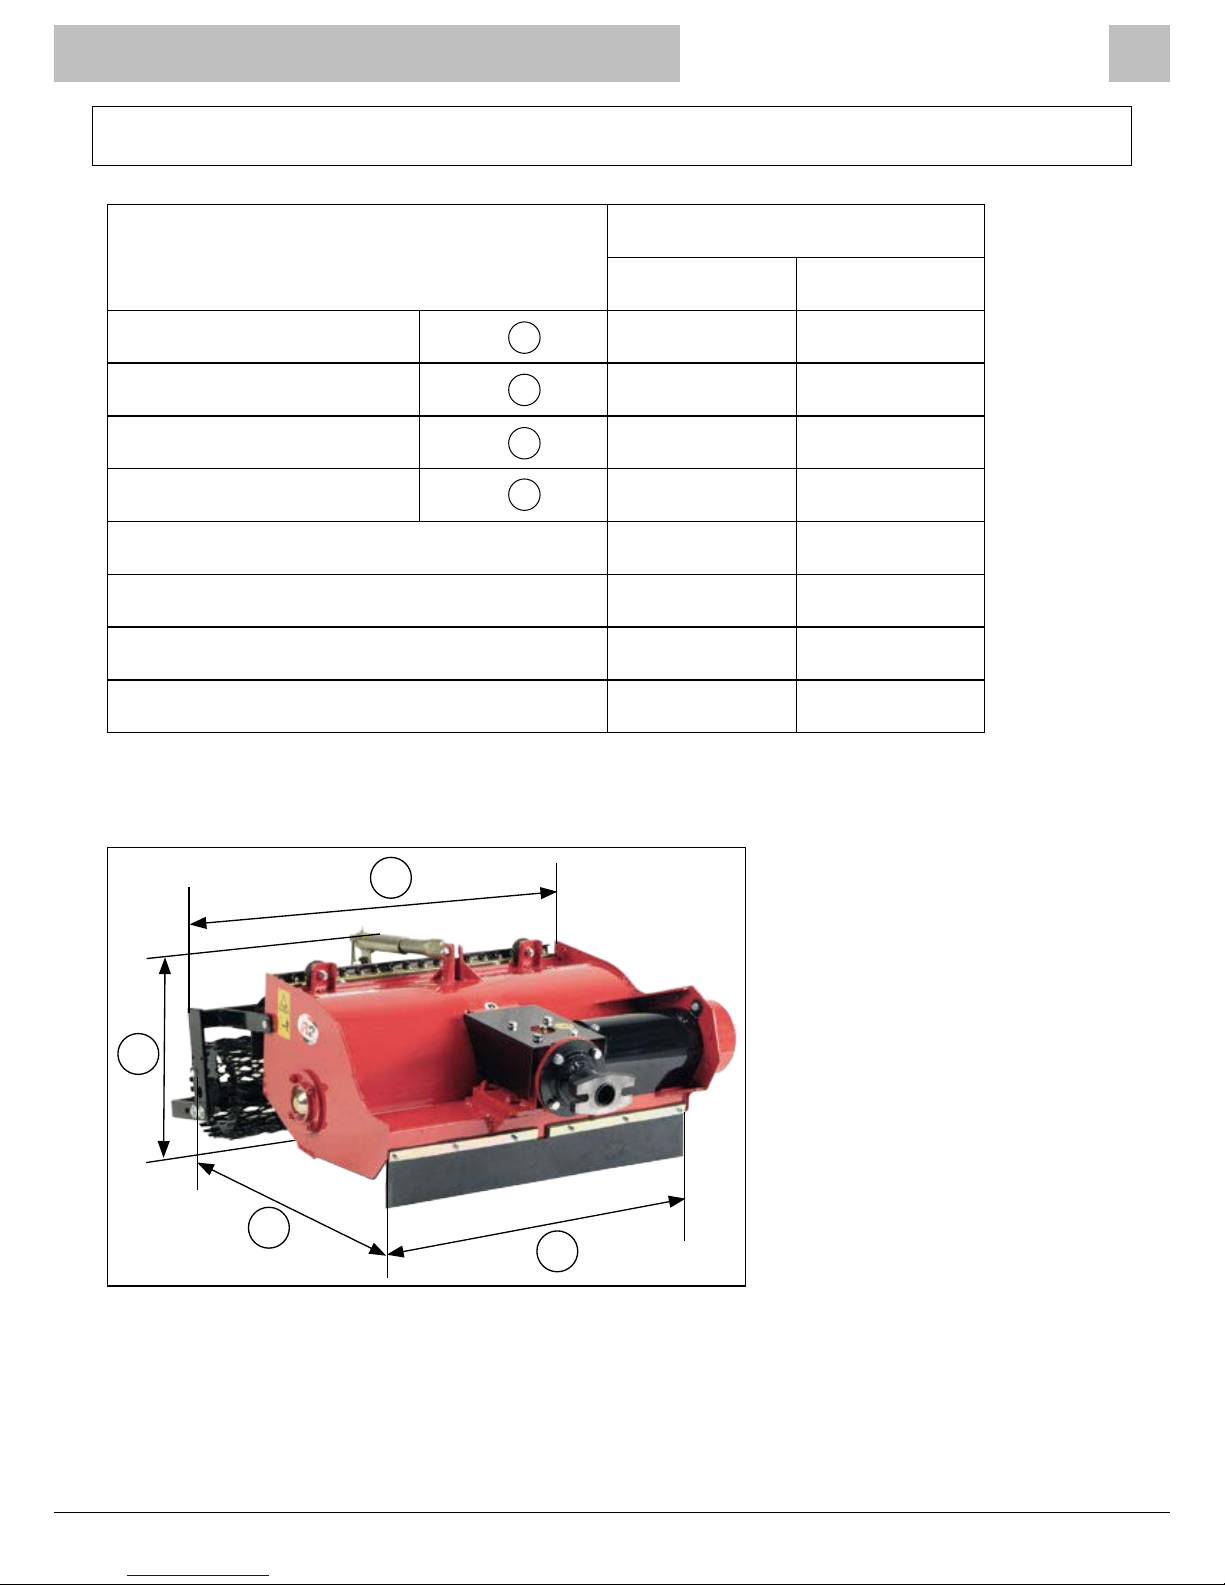
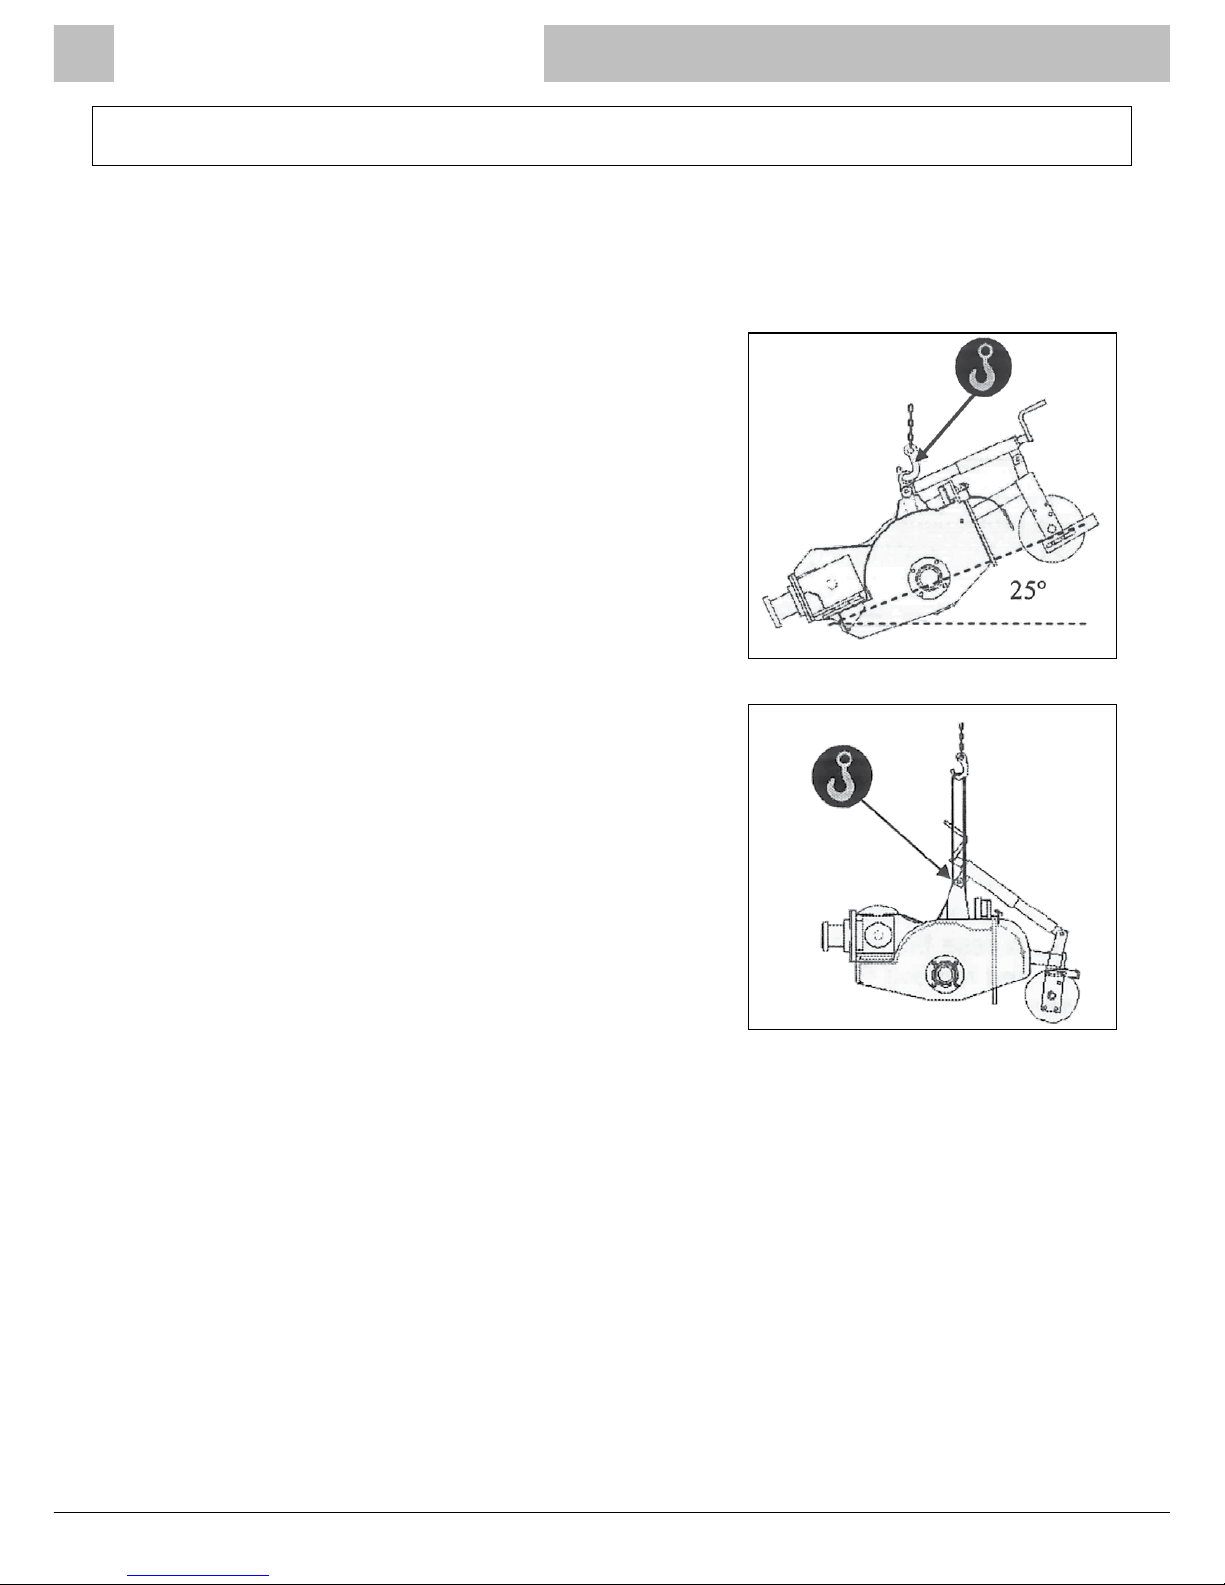
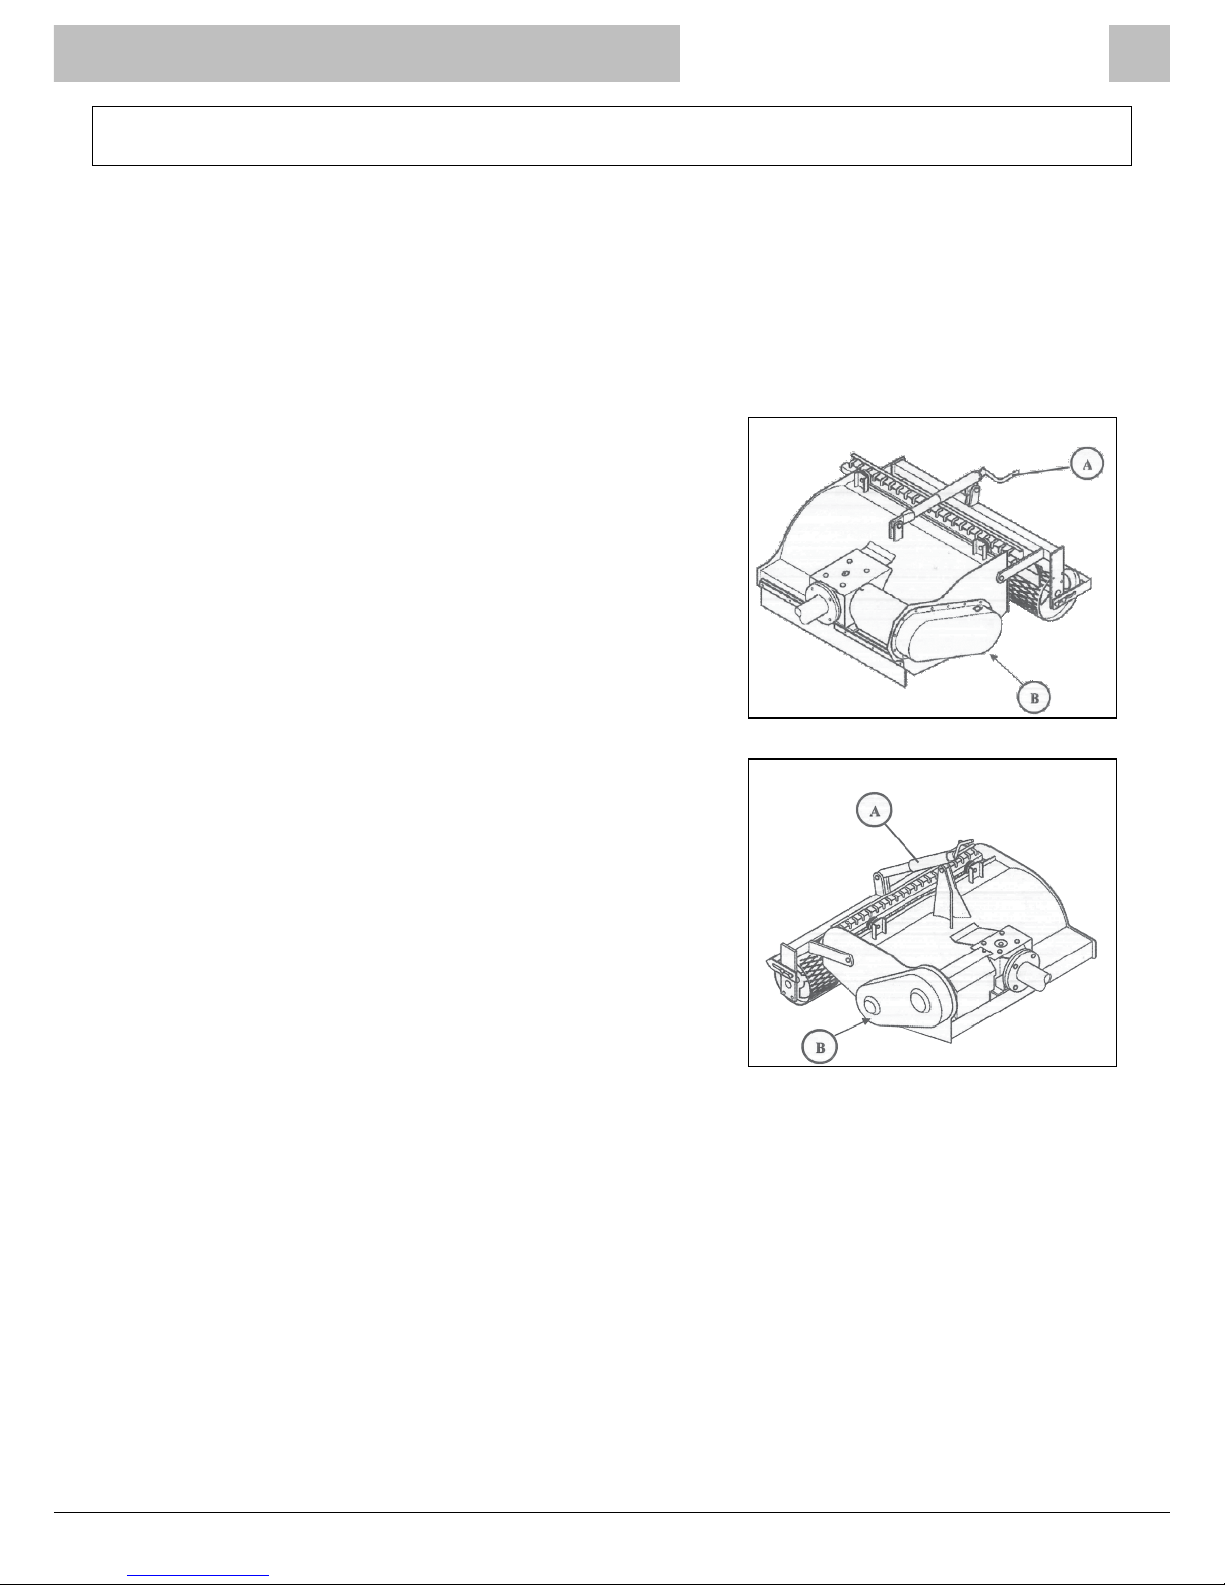
TWT/R2SB/0617 Page 7
Safety Precautions
Most accidents that happen during the maintenance or moving of machinery, are due to
negligence in the observance of the most elementary rules of accident prevention.
It is, therefore, necessary that whoever uses the machine reads and respects the rules written
below and the ones on the adhesive stickers of the machine.
1. Verify that all stickers on the machine are in ploace and are legible.
2. Before cleaning the machine, making any adjustments or repairs, turn off the power unit.
Before each operation put the machine on the oor or on steady supports.
3. Keep away from moving parts of the stone burier.
4. The stone burier has been manufactured for a specialised use. It must, therefore, always
be in perfect working condition and only R2 spare parts should be used when making any
repairs.
5. Before using the machine, check the tightening of the nuts and screws, in particular those
of the digging knives.
6. Keep people and animals away whilst working.
7. Be careful when working alongside roads, pathways or on sloping ground.
8. Never leave the machine unattended while the engine is running.
9. When checking or repairing the machine, be sure that nobody can start it up accidentally.
Always remove the spark plug rst.
10. Wear tight-tting clothes that cannot become entangled in the rotating parts of the
machine.
11. Do not climb on the machine.
12. Do not interfere with anything on the machine while working.
13. Never use the machine without the back roller or without the safety devices delivered with
the machine. Never remove the protection.
14. If the machine blocks, before making any repairs, turn off the power unit.
15. Always read the instruction manual for the power unit before tting and using the R2 stone
burier. Do not remove or bypass any safety devices on the power unit; before commencing
work be sure that the safety devices on the power unit work correctly; if not, do not use
the machine.
16. Do not carry people, animals or objects on the machine.

R2 Stone Burier Attachment
Page 8 TWT/R2SB/0617
Components & Coupling to Power Unit
Note: All components that need assembling before use have been designed to minimise the
user’s work; the parts should be assembled using hand tools.
The assembly must be made on a steady surface or on an homogeneous level oor.
During the assembly wear heavy gloves and safety shoes.
Roller group, grid and roller adjustment rod assembly
Assemble the roller group, screwing the two arms (Fig. 5
A) in the holes that you will nd in the back part of the
stone burier (Fig. 5 A).
Assemble the grid (Fig. 5 D), tightening the bolts in such
a way that the rubber cylinders leave a partial elasticity of
the grid in relation to the machine.
Screw the roller adjustment rod (Fig. 5 C) into the points
indicated on the roller support (Fig. 5 D) and on the stone
burier (Fig. 5 E).
NOTE: The screws used to t the roller group and the roller adjustment rod must be well
tightened in order that all the elements can turn during the adjustment.
Attaching the machine to the power unit
Put the transmission sleeve on the machine shaft
previously lubricated.
Then bring the power unit near to the stone burier, paying
attention that the sleeve engages with the connecting
shaft of the power unit, and that the ange ts snugly.
Fasten the nuts and screws on the PTO and ensure
everything is tightened (Fig. 6 A).
Figure 5
Figure 6

R2 Stone Burier Attachment
TWT/R2SB/0617 Page 9
Preparing for Use
Before using the machine always perform the following checks with the power unit not running
(engine off):
Check the bolts are tight and that all the elements are in perfect condition.
Check that all the safety stickers are present and are legible.
Working depth adjustment
The working depth is adjusted by the rotating crank lever
on the roller (Figs. 7 & 8 A).
Lifting the roller (rotating the lever) enables the digging
knives to sink into the soil. The roller must be adjusted
so that during working, the machine sides are leaning or
inserted into the soil (the underneath side of the chain
guard, Figs. 7 & 8 B) touches the soil.
To transport the stone burier attached to the power
unit when it is not in use, rotate the adjustment rod
(maximum extent of leverage); in this way the the stone
burier will not touch the soil and the roller will function as
a wheel.
To avoid dangerous situations, it is necessary that during
digging the machine sides touch the soil.
Figure 7
Condor
Figure 8
Condor Light

R2 Stone Burier Attachment
Page 10 TWT/R2SB/0617
Using the Stone Burier
Soil working
Once you have made the adjustments, it is possible to operate the power unit and so the PTO
that will drive the digging knives (hoes).
Moving forward, the digging of the soil will start. The operator’s position is at the rear of the
power unit (or offset to the side, on power units with adjustable handlebars).
It is important to remember that while driving you should not make any turning manoeuvres
while the hoes are inserted into the ground, only small corrections of direction.
To change direction, follow the steps below:
1. Disengage the drive to the power unit.
2. Disengage the PTO motion.
3. Lift the machine using the handlebars.
4. Position yourself in the direction that you would like to follow.
5. Lower the machine.
6. Engage the PTO lever.
7. Engage the wheel speed lever.
Keep in mind the rules for the prevention of accidents mentioned on page 7 (Safety
Precautions), and always remember to:
Keep people and animals away from the working area; do not allow anyone to approach the
machine while working.
Never approach the mechanical moving parts; wear safety shoes. If while working, there is a
lot of dust (which will depend on the type of soil) wear a dust mask.
Do not use the machine in reverse; do not use the machine on steep slopes (verify the power
unit instruction manual).
Before operating the machine, ensure that the safety devices on the power unit function
correctly.
Be prepared to let go of the red OPC lever to stop the stone burier and power unit instantly.

R2 Stone Burier Attachment
TWT/R2SB/0617 Page 11
Using the Stone Burier
Milling group locking
The stone burier has been designed and constructed so as to minimise the possibility that the
mill grader can lock while working.
However, this can happen if there are large stones, wires, or other elements that could get
stuck in the tines.
In order to avoid the stone burier locking, we advise that any large stones, wires, etc are
removed from the soil before starting to work.
If the stone burier does lock, then it can be unlocked in the following way:
Disengage the power unit PTO.
Position the stone burier on the ground and move forward a few metres (with the PTO
disengaged) so that the digging knives turn in the opposite direction to their usual working
direction.
If the machine should lock again, it may be necessary to check the milling group.
In this case, turn off the power unit engine and disconnect the stone burier completely from
the power unit.
Remove the debris with a suitable tool; do not use your hands.

R2 Stone Burier Attachment
Page 12 TWT/R2SB/0617
Maintenance
Operations to be carried out in order to maintain the machine in good working conditions:
Before using the machine:
1. Check the PTO coupling and ensure the stone burier is
sercurely fastened to the power unit and that all nuts and
bolts are tight.
2. Check that the screws are tight, in particular check that the
hoe screws are intact, if they break while working, then you
must stop working immediately and replace them.
At the beginning of the working season, and each 4 months:
1. Grease the roller supports (Fig. 9 A).
2. Check the oil level in the upper part of the
reduction gear (Fig. 9 B) using a dipstick; the oil
level must be 1cm.
3. Chain lubrication
For the Condor model, lubricate the chain by
adding grease at the indicated point (Fig. 9 C) in
case there are leaks.
For the Condor Light model, remove the guard
(Fig. 9 D) and lubricate the transmission chain
with a lubricant spray then reassemble the guard.
During the maintenance operations wear protective
gloves; for the lubrication/greasing operations always
wear nitrile gloves and protective glasses.
If maintenance is taking place on a raised plane (for example on a workbench), always wear
safety shoes.
All the maintenance work must be performed with the power unit off.
After nishing the lubrication/greasing operations, clean any residue of lubricant left on the
oor.
Figure 9
Figure 9
Condor
Figure 9
Condor Light

R2 Stone Burier Attachment
TWT/R2SB/0617 Page 13
Tine Replacement
In order to replace the tines,
the roller assembly must be
disassembled and the back grid
removed. Position the stone
burier upside down, so that the
tines are facing up (Fig. 10a).
Ensure the stone burier is on a
stable, safe surface.
The tines are important in the stone burier because the depth of the stone burying depends on
the length of the tines.
A higher consumption of the blades reduces the working quality.
Whenever you change the tines use new nuts, screws and bolts.
N.B. Use always original steel bolts.
While replacing the tines, wear protective gloves. If the maintenance is made on a raised
platform, always wear safety shoes.
Always ensure that the power unit/engine is off before undertaking any maintenance work.
If the tightening of the screws is made with pneumatic screwdrivers, wear ear defenders and
protective glasses.
Figure 10a
Figure 10b
10kg
6-7 bar
~1m
Tightening of the tine screws: 85 Nm
Steel self-locking nut
M10x1.25x30DIN 960-8.8
Nut seat
Steet nut M10 x 1.25
Tine
Disk tine holder
A
B
C
D
E

R2 Stone Burier Attachment
Page 14 TWT/R2SB/0617
End of Work & Storage of Stone Burier
If the stone burier is not going to be used for a long period, then prior to storage, follow the
instructions below:
1. Wash and dry the stone burier thoroughly. WARNING: Do not clean the double joint with
clutch with a polishing machine.
2. Check all the moving parts and replace any that are worn or damaged.
3. Check all the nuts and bolts are tight.
4. Check the oil level in the reduction gear and the grease level in the chain guard.
5. Protect and lubricate all the unpainted metal parts.
6. Cover the machine and keep it in a dry place.
IMPORTANT: Before using the machine after a period of storage, refer to the ‘Maintenance’
section on page 12.
Always ensure the machine is stored safely and that any prominent parts are protected so as not
to cause injury.
Ensure that the storage location does not block emergency exits, re extinguishers/hydrants,
rst aid boxes, or any other escape routes or emergency areas.
If pressure washing the machine (water or air) prior to storage, ensure that there are no people
or animals in the working area and wear protective goggles and if necessary a dust mask.

R2 Stone Burier Attachment
TWT/R2SB/0617 Page 15
Manufacturer Information
This machine is manufactured in Italy by R2 RINALDI S.r.l.
Tracmaster Ltd is the UK distributor for these models, the Condor Stone Buriers.
Please ensure you read the original manufacturer’s manual before operating this machine.
R2 RINALDI S.r.l.
via degli Artigiani 23
40024 Castel San Pietro Terme (BO)
Italy
Tel: +39 051 94 30 42
Fax: +39 051 69 42 086
Website: www.r2rinaldi.com

TWT/R2SB/0617
© Tracmaster Ltd 2017.
Specications are subject to change without prior notice.
Tracmaster Ltd, Sovereign Centre, Victoria Road, Burgess Hill RH15 9LR
T: +44 (0) 1444 247689 F: +44 (0) 1444 871612
W: www.tracmaster.co.uk E: info@tracmaster.co.uk
This manual suits for next models
2
Table of contents
Popular Tiller manuals by other brands

Garland
Garland MULE 341 G instruction manual

GreenWorks Pro
GreenWorks Pro TL60L410 Operator's manual

Briggs & Stratton
Briggs & Stratton S1227 Setup instructions

Troy-Bilt
Troy-Bilt 7HP Pony 12211 owner's manual

MTD
MTD Yard Machines 450 Series Operator's manual

Camon
Camon C2000 Operating instructions & safety notes

TrimmerPlus
TrimmerPlus GC720r Operator's manual

Pattfield Ergo Tools
Pattfield Ergo Tools E-EBH 750 Original operating instructions

KISANKRAFT
KISANKRAFT KK-IC-650D user manual

Wolf Garten
Wolf Garten UL 33 E instruction manual

Riwall PRO
Riwall PRO RET 3275 TRANSLATION OF ORIGINAL INSTRUCTIONS

Troy-Bilt
Troy-Bilt OEM-290-262 Installation and operation instructions