manuals.online logo
Brands
  1. Home
  2. •
  3. Brands
  4. •
  5. Racing
  6. •
  7. Sewing Machine
  8. •
  9. Racing PO Series Technical reference manual

Racing PO Series Technical reference manual

®
--PO/PR----------------
I
II
-
ACINl'!ii
~itF~fffi
NO.
GP0070
INSTRUCTION
AND
PARTS
MANUAL
ANLEITUNG
UNO
TEILELISTE
INSTRUCTIONS
ET
MANUEL
LIBRO
DE
INSTRUCCIONES
Y
RECAMBIOS
T
1[.
....
I
~*M
I
~~U!Hllll~*~~~
0
I
PLEASE
READ
INSTRUCTIONS
&
ASSOCIATED
DRAW
I
NGS
BEFORE
INSTALLATION
I
VOR
AUFSTELLUNG
LESEN
SIE
BIDE
DIE
ANLEITUNGEN
UNO
DIE
DAZ
U
GEHORIGEN
ZE
I
CHNUNGEN
I
VEUILLEZ
LIRE
LES
DIRECTIVEES
ET
LES
SCHEMAS
D'
ASSEMBLAGE
ATIENTIVEMENT
AVANT
DE
PROCEDER
AL'
INSTALLATION
I
POR
FAVOR
LEA
LAS
INSTRUCCIONES
DE
LOS
ESQUEMAS
ANTES
DE
INSTALARLO
§
~
CONTENTS
INHAL
TSVERZEICHNIS
TABLE
DES
MATIERES
·
CONTENIDO
~rx
Page
Page
Seite
Pagin
a
m
1511
----------------------------------------
1
Combination
Komb
in
ation
Combinaison
Combinaci6n
3:Z:
~
t!7
~~
---------------------------------------- 2-3
Installation
instruction
lnstallierung
Instructions
d'
installation
lnstrucciones
de
instalaci6n
~
j!:j:
~
---------------------------------------- 4-5
Parts
list
Auflistung
der
teile
Liste
des
pieces
Lista
de
piezas
05(
p
~
1'3~
!!.*
---------------------------------------- 6-7
Solution
for
error
function
Problemlbsung
Detection
des
problemes
Local
i
zaci6n
de
los
problemas
POPR
*9U*El8111
THE
COMBINATION
OF
POPR
SERIES
KOMBINATION
DER
POPR
SERlE
COMBINAISON
DES
SERIES
POPR
COMBINACION
DE
LAS
SERIES
POPR
~Wi!ti5ml®i~*Il.8
Assemble
the
puller
according
to
the
indicated
numbers
Zusammenbau
der
einzugsvorrichtung
Instructions
d'assemblage
du
mecanisme
d'entrainement
lnstrucciones
de
ensamblaje
de
los
tiradores
PR
~tl::li\
Floating type
Regul1er
Standard
Normal
0
l'
;
JCi\8~:1ff~Jl'a11~
Without stand for submerged machine
Wenn puller an
n1cht
versenkte maschme angebaut werden soli
Sans biHi pour machine integree
Sm
base pcana para s1stema sumerg1do
l';'ii;i\
Submerged type
Modele encastre
Vollversenkte Austellung
De
t1po
sumrg1do
0
~~~~
INSTALLATION INSTRUCTION
INSTALLIERUNG
0
_tt~~
(
t~~;f,gJH!Jt1i'iC.I!J:
l
Put studon (stud is optional parts)
Strfte fur
ubergroBe
antrrebsscherben
faku
ill
ve terle
Goujons
pour
pou
l
ies
pi
eces
optionnelles
Pernos
oara
poleas
piezas
opcronales
19U
1
E
xample
Bersprel 1
E
xemp
le 1
EJemplo 1
PO
INSTRUCTIONS D1
1NSTALLATION
INSTRUCCIONES
DE
INSTALACION
19
U2
E
xample
2
Beisprel
2
E
xemple
2
Ejemplo
2
19
U3
E
xample
3
Bersp
el 3
E
xemple
3
Ejemplo
3
2"I
Q
Q
~Q
7
2?
?
.99?
Adjusting high,low & parallel
Ernstellung hoch/tref & parallel
Reglage du haut, bas et parallele
Asustase superior rnferror y paralelo
8-1
!IPIJJ:
~!
U..t:
i!:!~
J
lil
@-4
il7
l!(
Do
not
tighten the
scr
ew until no.@-4
Schraube
ntcht fest an21ehen @-4
Ne pas s
errer
cette vis@-4
No
apretar
esle
torn 10 @-4
I
High & low
Hoch & tref
Haut et bas
Superior
e rnferror
2
8-2
1!\H
J!.i!i!E~
Pl
ll"
i
j
Tt
mrng
gea
rs
mus
t be
para
ll
el
Das
steueungsgestarge
mu~
;eraJ
syr.~hrOI"IISI£HI
Se
r
Les
engren
ages
de
di
St
ri
bU
ti
On
do
lv
en
t et
re
pa
rf
at
teme
nl a
ll
gnes
l(ls.
e~~rar.es
dt"
S.r'iCf,)I"IZacrof"
\!~?ber
•)S:a·
r::er·ecla~e'l!e
a
,o;ea'J:JS
7
J<Sf
Parallel
Parallel
Parallele
Paralelo
!J!l
!!!B<HJ!.
&:
l¥1~~
1!!'
Ad
1u
s1
1ens
1on
of
!lmrna
bell
v
_ I
Spa"lra
..
rg
des
Ube:·ragv
19H1e'Tle:
s
e•ns:e
ran
La
tens
1
on
de
Ia
co
urr
o d'aJ
uste
ment
=1e
'a·e
ce
a
co
ea
ce
ra.,~
8-3
O
ED
l\7J~);E[l
8-s
Adjust input shalt position Regier
Ia
position de l'arbre d'entree
Posi
t1on
der
ant
r~
ebswe
ll
e
AJusta
r Ia
pos1c16n
del
e1e
de entrada
!IHtr!Tt~I!~!E
1\eedte
to
tne
top::test
poSii·On
Nadel
m
1hre
hoch
s
te
ste
llung
onngen
Pl
acer
ra·gu·lle
a
sa
pos1t10n
Ia
plus
haute
Cotocar
a
ag
ura
sabre
su
m
as
au
oos
c•6n
~~~~•m•~
A~
~•~•·k~•~s~~•
Meet
the
both
•eo
I
me
on
transm.ss
on
,.,put
shalt.
trghten
the
t•m•ng
gear
sere.•,
Wenn
S
ICh
01e
roten
rn1en
b
er
uhren.
chraube
des
des
teuerunggestanges
anzt
ehen
Ouand
es
2
11gn
es
roug
es
se
rencontrent
se
rrer
Ia
vs
de
eng
reflage
de
d:str1bu:1on
Cuando
l
as
dos
lineas
rotas
se
toc
an
apretar
el
torm·.o
de
e
ngr
a
ne
de
s
mcron•
zac
,on
I
/
3
8-4
!:!J
~
!Jij>Jl.&:!!H3g~Jr
Ad1ust
tens1on
of
ummg
belt
:::ca~"u..
;~s
U:.;~·tr
~~
......
gs
al'"lens
erste• eil
La
t
ens
ton
de
Ia
courro
d'
aJustem
e
nt
fj]ffi
~%3~~~~~
Roller speed
Geschwrnd1gkert der rolie
Vitesse du rouleau
Veroc1dad del rodrllo
H~.t"fffili*
Needle
'.Jade
A
i
gutlle~
Agui
~
~··
~
1\
r-
r--
1\
j'-....
!\
Needle plate
s·,..
,....li!''t.
,---....
I \
1_
--
~
---
\
/
'-
I
\ I
1'---'
\i\
1'-
Plaque a aigu1lle
PlaC3
oe
agura 0
JO
60 90 120
!10
PO
10
2.&ll
2·0
lCXI
J.lO 0
JO
60
90
120
I~
UIO
mffi~~~'
~~•~•~·@~•~~llijmffi~&ffi•~~~m
The
puller
's
feeding amount should be
properly
larger than feed dog's to
procure
even
effect
on
sewn
mater
ial.
but
if it is
overmust.
either
sewn
material
or
rollerwill be torn
easily
.
S·e
,en
$1€
€
9€St.;
;
.
!'1~,.;
~ke1l
der
8111ZUQSVOrnchtung
SO
9tr!
daG
SICh
der
st.:J' n
,....
auselt
c1ne
zu
hohe
gesch\•.nnd1gken kann
den
staff
oeschad1gen
oder
fruhze.·1ge
abnutzung
der
rollen
verursachen
R8glez le
regime
d'ali
mentation
du
mecanisme
d'
entrainement
pour
que
le
tissu ne
lasse
pas de faux plis. un regime trap eleve peut
endommager
le
tissu
et
\o
u
causer
l'
usure
prematuree
du
rouleau
.
AjUStar e reg1mer1
de
alimentaci6n
del
tirador
para
que
Ia
tela no
se
frunza
una
veloctdad
cemas1ada
a1ta
puede
estropear
ta tela
~~
o
causar
u'"'
desgaste
orerT'.1turo
c:.,.
tos
roc.
•1cs.
!I
PO
*
9U
~
f!1=
Ill
PARTS
LIST
FOR
PO
SERIES
AUFLISTUNG
DER
TEILE
DER
SERlE
PO
§C.5m~BJ3:
Mark
description
:
Beschretbung
D
escription
:
Descnpct6n
8-
9-~
10
~
11~
78
__
.-.
!Jil1ii2f!l''
il!!iflfffl
:
__
..
·
Standard
parts.choose
the
suitable
one
St?l1dardlelle
P1€ces
standards
Ptezas
estanoar
0
il!tltzii2
f+
Opt1onal
parts
Fakultat
ve Tede
Pu.~ces
opti
onnelles
01ezas opc1onaleB
24
25
89
r-
43
~
~
45
I I ,
46
I
47
I
I
~
48
' ·
LISTE
DES
PIECES
DES
SERIES
PO
LISTA
DE
RECAMBIOS
DE
LAS
SERIES
PO
I1J
il!IJ!!Zi!Gf!l' ·
ilHS>OHliliii~!a~
Opt
i
onal
parts
.
please
mdicate
sew
ing
mach
1ne
model
no
.
Fakul·at•ve
Te11e- btrte
Modelinurnmer
der
Nahma.
:h•
e:
a 1geoerl
Pieces
optionnelles
. veui
llez
ind1quer le no
de
mod€
1e
de
Ia
machine
a
coudre
P1ezas opc10na1es nd1que
par
favor
e
l"urnero
de
'ill
e1r.
de
a mc3:qulfla
de
)!:)•.:,.
r16
17
a--31
32
,
~~33
34
I 35
' '
36 '
75
701-
[1]
37
PR*
9U
~
f~
Iii
PARTS
LIST
FOR
PR
SERIES
AUFLISTUNG
DER
TEILE
DER
SERlE
PR
LISTE
DES
PIECES
DES
SERIES
PR
LISTA
DE
RECAMBIOS
DE
LAS
SERIES
PR
gc
5m~s.13
= 0
jg~!H2f'i'
·
ill
a>O H!!!iil\>lm;;rJ
Opt1onal
parts
. please mdrcate sewing machrne
model
no.
Fakultatrve
Tt:
t..
br'te
Li
de
r u
1111
er
der
Nat
maschme
angebe
Mark
description
:
Beschre
bung
Descript
ion :
Descnpct6n
8-
9-~
,...,
10~
,
,--if
37 36
b
48-
38
123
126--®
........
.......
.......
, 1
27--J
'
64
Pieces
optronnelles
. veUillez
indrquer
le no de
modele
de
Ia
machine
a
coudre
Pre:zas
lpCr
-:>S
n
,u
;:w
·
or
el nume.c
de
"'10delo d
ra
maqurna
de
c s
l I
I
I
I
I
I
I
I
I
I
J
~fllil2f'!:·j!!ilfil!F.l
Standa
rd
pans.choose
the
suitable
one
Sta·1dardte1 t
Preces
standards
P•ezas
estanaa
C) jg!I!'Iil2
i!t
Opttonal
parts
Faku1tatrve
Te
e
Preces
opt10nneHes
Prezac;.
op<
a,es
19
2021
Ot
-
[1]
t-
22
'
1J
~
:Jf!g)
16
17
_
,8
-
102
107 108
,
14
1 , ts
'a.
1
116
.:._
'b
C@..
I
.
'If
,
(#_
119
1
120
, 17
~~~~~
SOLU
TI
ON
DES
PROBLE
M
ES
SOUL
TION
FOR
ERROR
FUNCT
ION
PROBLEMLOSUNG
LOCALIZAC
ION
DE
PROBLE
M
AS
DE
FUNCIONA
M
IENTO
I~
j~
@:
~
tiHfltlll
~
*'
~!!!
1.
tilffitlll~~IFJ.ltllll;H~Hl'ilt~tUH!l
tilffi~~~IFJ.ltlll~~HJ.Ji~
1~~tlll7\JJ~~~IFJ.ltlll>Ei.i11'IE~
1'FBJ:ift
2~
1Fllmme&~•~~~~•••~
3
~ijl,~~~~
tilffi~~:%~1~
1
tilffi~~UJJ~fsi::it
t~
(tilffi~f.i9PU~6b
•
~r§llijF
e
~'i§it::;
•
~~~:?-.&)
mm
~
fsi
t~~
;;r;:
t'3
"=?!
9.X
&:
1.
a~ttJ§BiBt~
Mf~~
.ttttJn
2.~i51.~~~~
3
.:
~u~~~~~
~~flllj~)ffi
1.
~~tlllt±il\JJ~~iH~!W
2
)
ffi'tJl~l~
3
;
~
;
ru:M.~-~~~
i*~WlPN
:
~Ll=
•8
Wll101!lt
5
n~~iE!ffl~t±i~8
Wl~18@Fl
f.i9~
C
1'.S~m~~M&tilffi~~~6b
)
·~~tllll*ft~$•~~m..t•mmffi
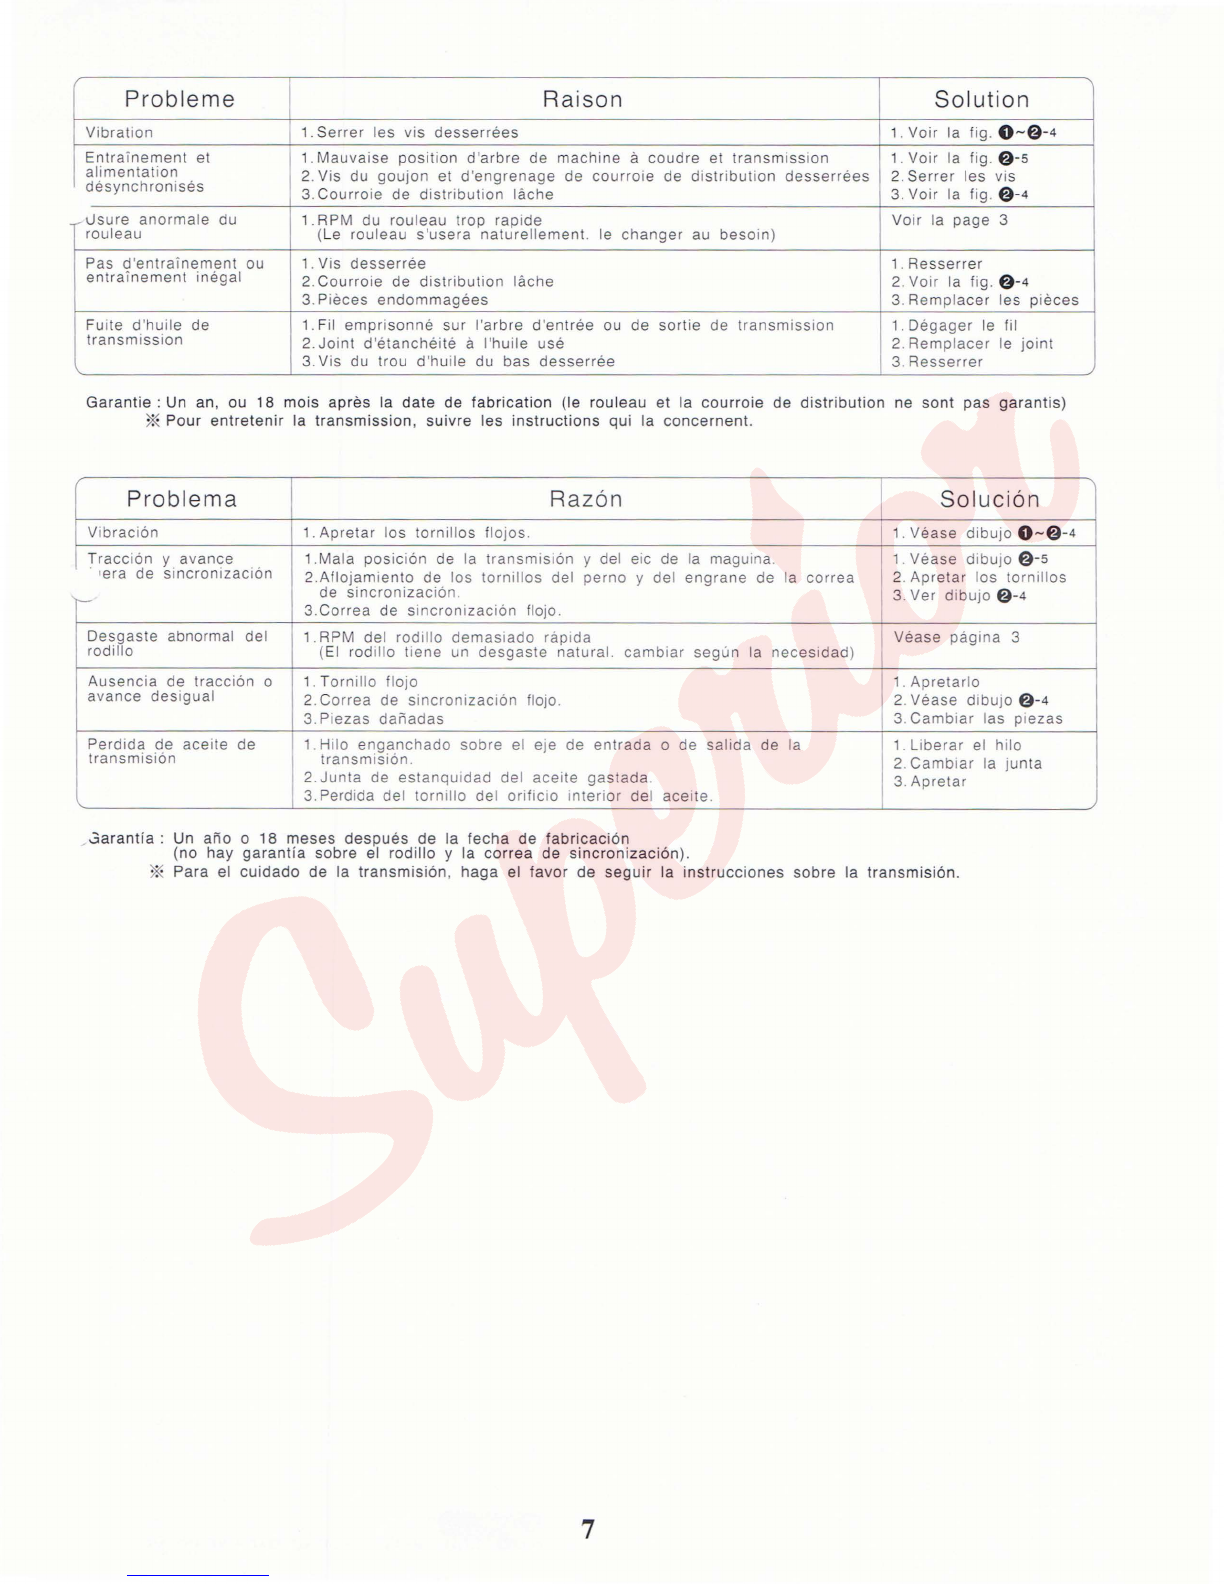
S
ituation
R
eason
Vibration
1.
F
ixed
screw
lossen
Un-
syncom
between
1.
Wrong
position
for
transmission
&
sewing
maching
shaft
pulling
& feeding
2.Screw
for stud &
timing
belt
gear
loosen
3.
T
iming
belt
loosen
Un-
normal
worn
out
for 1.
Roller
's RPM too fast
roller
(Ro
.ll
er is
made
by
PU
, will
naturely
worn
out
, do not
stock
for
long
time)
Stop
pulling
or
1.
Screw
loosen
unsteadable
pulling
2.Timing
belt
l
oosen
3.
Par
ts
damage
Transmission
oil
leaking
1.
Thread
wr
apped
in
transm
i
ssion
input
or
output
shaft
2.0 il seal worn
out
3.
Bottom
oil hole's
screw
loosen
~)~1J)ti
1.
$~
.~
0
-
f)
-
4
~Wfl6l>E
1.
%H~
f)
-
5~Wf>Ei.i1
2.
_tgf~~t~•
3
.
$~
.
~
f}
-4~Wf~~
$~/i\~
3~~wr~~
1.
_t
~
~Bt!lt~
M
2.
~H~
f}
-
4~Wf~~
3.
~~~~
~~~{~
1.~1l*~!W
2.
~
~~)ffi't}
3
_t~f~~t~•
S
olution
1.See fig. 0 -
f}
-4
1
1. See fig.
f}
-5
2.Ti
ghtem
the
screw
3.
See
fig.
f}
-4
See
page
3
1. Re-t
ightin
2.
See
fig.
f}
-4
3.
Replace
parts
1. Get rid
of
thread
2.
Replace
seal
3.
Re-t
ighten
Warranty
: One
year
,
or
18
months
after
manufactured
date
(
Roller
& ti
ming
belt
not
un
der
warranty
)
*As
transmission
care
, pl
ease
follow
instruction
sl
icked on
transmiss
ion
P
roblem
Ursache
Lbsung
Vibrieren
1.
L
ockere
Schrauben
anziehen
1.
Siehe
0 -
f}
-4
Einzug
und
Zufuhr
nicht
1.Falsche Stellung der Welle von Obertragungsgetriebe und Nahmaschine 1. Siehe
f)
-5
in
einklang
2.Sch
raube
fur St
il
t und
Obertragungsriemen
locker
2.
Schraube
anziehen
3.Obert
ragungsriemen
locker
3. S
iehe
f)
-4
Ungewbhnlicher
1.R.P.M.
der
Rolle zu hoch S
iehe
seite 3
VerschleiB
der
Rolle (Die Rolle
nutzt
nach
und
nach
ab.
austauschen
wenn
notwendig)
Kein Einzug bzw. 1.Die
Schraube
ist
locker
1.
Anziehen
ungleichmaB
i
ger
E
inzug
2.
Obertragungsriemen
locker
2.Siehe
f)
-4
3.Beschiidigte
Teile 3.
Te
ile
aus
t
auschen
Aus
l
aufen
von 1.
Faden
m der Antriebsoder
Obt
ri
ebswe
ll
e
des
u
be
rtragungsgetriebes e
ing
eklemm
t 1. F
aden
Ibsen
Gerriebebl 2.
Oldichtung
defekr
2.
Dichtung
austauschen
3.Schraube
des
unteren
Ollochs
l
ocker
3.
Anziehen
Garantie
: 1 jahr bzw. 18 monate nach dem Fabrikationsdatum. Rollen und Obertragungsri
em
.en fallen nicht unter diese Garantie.
*
Zur
wartung
des
Obertragungsgetriebes
den
entsprechenden
Anweisungen
folgen
.
Probleme
Raison
S
olution
Vibration
1_S
errer
les vis
desserree
s 1. Voir Ia fig. 0 -
f)
-4
Entra
ine
ment
et 1.
Mauvaise
position
d'
arbre
de
machine
a
coudre
et
transmission
1.
Voir
Ia
fig.
f)
-s
alimentation
2.
Vis du
goujon
et
d'engrenage
de
courroie
de
distribution
desserrees
2.
Serrer
les
vis
desynchron
ises
3.Courroie
de
distribution
Iache
3. Voir
Ia
fig_
f)
-4
usure
anormale
du 1.RPM du
rouleau
trap
rapide
Voir Ia
page
3
rouleau
(Le
rouleau
s'usera
naturellement.
le
changer
au
besoin)
Pas
d'entrainement
ou 1_Vis
desserree
1.
Resserrer
entrainement
inegal
2.Courroie
de
distribution
Iache
2. Voir
Ia
fig.
f)
-4
3.
Pieces
endommagees
3.Remp
lacer
les p
ieces
Fuite d'
huile
de 1.Fil
emprisonne
sur
l'arbre
d'
entree
ou de
sortie
de
transmission
1.
Degager
le til
transmission
2
Joint
d'
etancheite
a
l'huile
use
2.
Remplacer
le
joint
3 Vis du trou d
'h
uile du
bas
desserree
3.
Resserrer
Garant
ie : Un an, ou
18
mois
apres
Ia
date
de
fabr
i
cation
(le
rouleau
et Ia
cour
roie
de
distr
i
bution
ne
sont
pas
garantis
)
3*
Pour
entretenir
Ia
transmission
, su
iv
re
les
i
nstruct
i
ons
qui
Ia
concernent.
P
roblema
Raz6n
S
oluci6n
Vibrac
i6n 1.
Apretar
los
tornillos
flojos.
1.
Vease
dibujo
0 -
f)
-4
Tracci6n
y
avance
1.
Mala
posicion
de Ia
transmisi6n
y del eic de
Ia
maguina.
1.
Vease
dibujo
8-
s
•
era
de
sincronizaci6n
2.Aflojamiento
de
los
tornillos
del
perno
y
del
engrane
de Ia
correa
2.
Apretar
los
tornillos
r-
de
sincronizaci6n
. 3.
Ver
dibujo
f)
-4
3.Correa
de
sincronizaci6n
flojo.
Desgaste
abnormal del 1.RPM del
rodillo
demasiado
rapida
Vease
pagina
3
rodillo
(EI
rodillo
tiene un
desgaste
natural.
cambiar
segun
Ia
necesidad)
Ausencia
de
tracci6n
o 1.T
ornillo
flojo
1.
Apretarlo
avance
desigual
2.
Correa
de
sincronizaci6n
flojo. 2.
Vease
dibujo
f)
-4
3. Piezas
dan
adas 3.
Cambiar
las
piezas
P
erdida
de
aceite
de
1.
Hila
enganchado
sabre
el eje de
entrada
o de
salida
de Ia 1.
Liberar
el hila
transmisi6n
transmisi6n.
2.
Cambiar
Ia
jun
ta
2.
Junta
de
estanquidad
del
aceite
gastada.
3.
Apretar
3.
Perdida
del
tornillo
del
orific
io
interior
del
aceite.
3arantia
: Un a
Fi
o o
18
meses
despues
de Ia
fecha
de
fabricaci6n
(no
hay
garantia
sab
re el
rodillo
y Ia
correa
de
sincron
i
zac
i6n
).
3*
Para
el
cuidado
de
Ia
transmisi6n
,
haga
el
favor
de
seguir
Ia
instrucciones
sabre
Ia
transm
isi6n.
7

This manual suits for next models

1

Other Racing Sewing Machine manuals

Racing MDL 31 Technical reference manual

Racing

Racing MDL 31 Technical reference manual

Racing MC S6 Series User manual

Racing

Racing MC S6 Series User manual

Racing PK Series User manual

Racing

Racing PK Series User manual

Racing MC S8 User manual

Racing

Racing MC S8 User manual

Racing MC M8 Series User manual

Racing

Racing MC M8 Series User manual

Popular Sewing Machine manuals by other brands

JUKI DDL-8700 instruction manual

JUKI

JUKI DDL-8700 instruction manual

ELNA EnVision 8006 Supplementary instructions

ELNA

ELNA EnVision 8006 Supplementary instructions

JUKI DDL-9000B instruction manual

JUKI

JUKI DDL-9000B instruction manual

Pfaff 333-712/02 instruction manual

Pfaff

Pfaff 333-712/02 instruction manual

Singer 337 instruction manual

Singer

Singer 337 instruction manual

JUKI DU-141H-4 instruction manual

JUKI

JUKI DU-141H-4 instruction manual

morse fotomatic IV 4400 instruction manual

morse

morse fotomatic IV 4400 instruction manual

Duerkopp Adler 1183i-7 Spare parts

Duerkopp Adler

Duerkopp Adler 1183i-7 Spare parts

Grace Company Q'nique 16X Manual instruction manual

Grace Company

Grace Company Q'nique 16X Manual instruction manual

Necchi Automatic Supernova Ultra Mark 2 User instructions

Necchi

Necchi Automatic Supernova Ultra Mark 2 User instructions

Brother PD-3000 instruction manual

Brother

Brother PD-3000 instruction manual

Singer 71-142 parts list

Singer

Singer 71-142 parts list

JUKI HZL-E61 instruction manual

JUKI

JUKI HZL-E61 instruction manual

Singer 306K25 parts list

Singer

Singer 306K25 parts list

Janome 4120QDC Service manual and parts list

Janome

Janome 4120QDC Service manual and parts list

Kenmore 385.11607 Series owner's manual

Kenmore

Kenmore 385.11607 Series owner's manual

Strobel VEB100-1 operating instructions

Strobel

Strobel VEB100-1 operating instructions

Duerkopp Adler 1180-5 Instructions for service

Duerkopp Adler

Duerkopp Adler 1180-5 Instructions for service

manuals.online logo
manuals.online logoBrands
  • About & Mission
  • Contact us
  • Privacy Policy
  • Terms and Conditions

Copyright 2025 Manuals.Online. All Rights Reserved.