RADEMACHER RolloTron Standard User manual

VBD 589-2-1 (06.19)
Item No.:
1423 45 19
1423 60 19 (Standard Plus)
1415 45 19 (Small belt)
Electronic Roller Shutter Belt Winder RolloTron Standard
Translation of the Original Operating and Assembly Manual
EN

2
EN
With your purchase of a RolloTron Standard, you have
chosen a quality product manufactured by RADEMACHER.
Thank you for the trust you have placed in us.
This roller shutter belt winder has been designed both in
order to provide optimal convenience and operability as
well as to ensure solidity and durability. Having applied
uncompromising quality standards, and carried out
thorough testing, we are proud to be able to present you
with this innovative product.
It’s brought to you by all the
highly-qualified personnel here at
RADEMACHER.
Dear Customer,
These instructions...
...describe how to install the equipment, connect the elec-
trical system and operate your roller shutter belt winder.
Before you begin, please read these instructions through
completely and follow all the safety instructions.
This manual is a component of the product. Please store it
in an easily accessible place. When passing the RolloTron
Standard on to a third party, this manual must be passed
on as well.
Damage resulting from non-compliance with these in-
structions and safety instructions will void the guarantee.
We assume no liability for any consequential damage.
i

3
EN
Table of Contents
i Dear Customer,............................................................2
1. Hazard symbols...........................................................4
1.1 Levels of danger and signal words.................................4
1.2 Symbols and depictions used..........................................4
2. Safety instructions......................................................5
2.1 Proper use ...............................................................................6
2.2 Improper use..........................................................................7
2.3 Required expert knowledge of the installer...............7
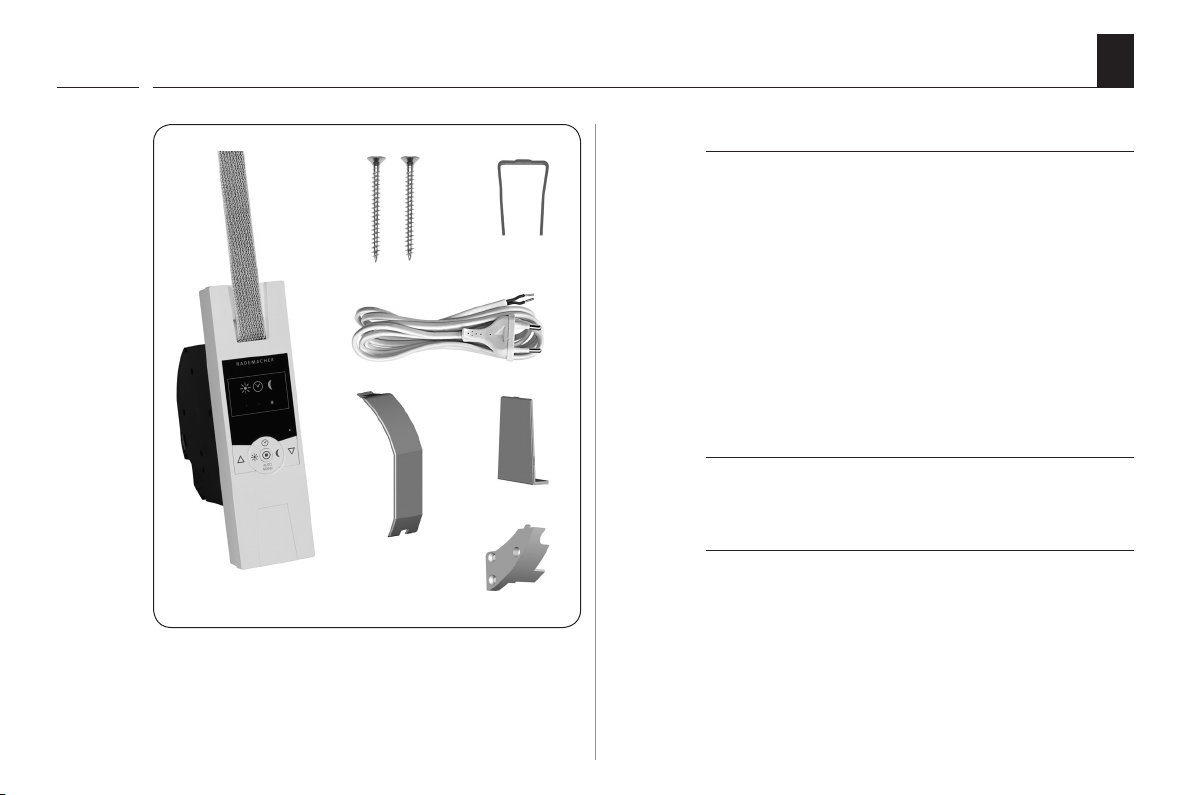
3. Scope of delivery (item no. 1423 45 19) *...............8
4. General view (item no. 1423 45 19) * ......................9
5. Permissible roller shutter belts ............................. 10
6. Functional description............................................ 11
6.1 Description of safety functions .................................... 12
7. General assembly instructions.............................. 13
7.1 You will need the following tools................................ 13
7.2 Preparation for installation............................................ 14
8. Safety instructions for electrical connection...... 16
8.1 Electrical connection........................................................ 17
9. Drawing in and fastening the belt........................ 18
10. Mounting the RolloTron Standard........................ 20
11. End point adjustment ............................................. 22
12. Manual operation .................................................... 24
13. Automatic mode; brief description...................... 25
13.1 Switch all automatic functions on / off
simultaneously................................................................... 25
14. Automatic timer; brief description....................... 26
14.1 Configuring an opening and closing time............... 26
14.2 Switching the automatic timer on/off....................... 27
15. Automated solar function; brief description...... 28
15.1 Automated solar function; configuring
sensitivity ............................................................................. 30
16. Automatic twilight function; brief description.. 31
16.1 Automatic twilight function; configuration of
sensitivity ............................................................................. 32
17. Setting the motor speed for automatic
functions.................................................................... 33
18. Erase all settings, software reset........................... 34
19. Carry out hardware reset........................................ 34
20. Removing the RolloTron Standard
(e.g. in the event of a move) .................................. 35
21. Removing the belt in the event of unit failure... 37
22. What to do if... ?........................................................ 38
23. Information about maintenance and care
of your equipment................................................... 41
24. Technical Specifications.......................................... 42
25. Tractive force diagrams .......................................... 43
26. Simplified EU Declaration of Conformity ............ 44
27. Accessories................................................................ 44
28. Warranty conditions................................................ 45
i

4
EN
1. Hazard symbols
Danger of fatal electric shock Danger area / dangerous situation
1.1 Levels of danger and signal words
i
i
i
DANGER!
This hazard will result in serious injury or death if not
avoided.
WARNING!
This hazard may result in serious injury or death if not
avoided.
CAUTION!
This hazard may result in minor or moderate injury if not
avoided.
ATTENTION!
This hazard may lead to property damage.
1.2 Symbols and depictions used
1. Steps to be taken
2.
◆Itemisation
1. List
Please read the
respective manual
further useful information
i

5
EN
2. Safety instructions
The use of defective equipment can lead to personal
injury and damage to property (electric shocks, short
circuiting).
◆Never use defective or damaged equipment.
◆Check the device and mains cable beforehand for
damage.
◆Should you discover damage to the equipment,
please consult our customer service department
(see page 48).
Incorrect use leads to an
increased risk of injury.
◆Train all personnel to use the RolloTron Standard
safely.
◆This device may be used by children from 8 years of age
upwards as well as by persons with reduced physical,
sensory or mental capacities or with lack of experience
and knowledge if they are supervised or have been
instructed on how to use the device safely and if they
understand what dangers may resulted from this.
◆Children must not play with the device.
◆Cleaning and user maintenance may not be carried out
by children without supervision.
◆Watch the moving roller shutters whilst carrying out
the settings and during normal operation, and keep
other people away from the area to avoid injury in the
event the shutters suddenly slip.
◆Carry out all cleaning work on the roller shutters whilst
the device is disconnected from the mains power.
i
The mains socket and plug must be easily accessible
at all times.
Exceeding the maximum permissible running time
(KB) can overload and damage the RolloTron Standard.
◆The maximum permissible running time for a cycle
may not be exceeded when the equipment is in op-
eration. For this reason, the RolloTron Standard has an
automatic running time limit (KB) of four minutes.
◆If the running time limit is triggered, then the
RolloTron Standard must be left for at least 12
minutes to cool down. Full operational availability is
re-established after approx. one hour.

6
EN
2. Safety instructions
According to DIN EN 13659, it is necessary to determine
that the movement conditions for the shutters are main-
tained in accordance with EN 12045.
2.1 Proper use
Only use the RolloTron Standard for opening and closing
roller shutters with a permissible belt.
Mechanical locks of any kind are not suitable for auto-
mated operation with this device.
Only use original spare parts
from RADEMACHER.
◆By doing so, you avoid the risk of malfunctions and
damage to your RolloTron Standard.
◆As the manufacturer, we provide no guarantee for the
use of third-party components and accept no liability
for consequential damage resulting from such.
◆All repairs to the RolloTron Standard must be under-
taken by authorised customer service personnel.
Operating conditions
◆Only operate the RolloTron Standard in dry rooms.
◆A 230 V / 50 Hz power supply, together with a site-
provided isolating device (fuse, MCB), must be perma-
nently available at the installation location.
◆An easily accessible 230 V / 50 Hz socket must be
available at the installation site if the enclosed
connecting cable with Euro plug is being used.
◆The roller shutters must run up and down smoothly
and should not stick.
◆The mounting surface for the RolloTron Standard
must be flat.
i
i
i
◆The displacement must amount to at least 40 mm on
the lower edge in the rolled-out position with a force
of 150 N in the upwards direction.
◆In doing so, it must be ensured that the extending
speed of the shutters for the final 0.4 m is less than
0.15 m/s.

7
EN
2.2 Improper use
Using the RolloTron Standard for purposes other than
previously mentioned is impermissible and is
regarded as improper use.
2.3 Required expert knowledge of the installer
The electrical connection, installation and commissioning of the RolloTron Standard must only be
carried out by a qualified electrician in accordance with the instructions in this manual.
i
i
There is a risk to life caused through short circuiting
and electric shocks if the RolloTron Standard is used
outside.
◆Never install or operate the RolloTron Standard
outside.

8
EN
1.
2.
5.
3.
4.
6.
7.
3. Scope of delivery (item no. 1423 45 19) *
Legend
1. Belt Winder RolloTron Standard or Standard Plus
2. 2 x assembly screws (4 x 55 mm)
3. Disengaging bracket (in housing)
4. Connection cable with Euro-plug
5. Reel compartment cover
6. Cover plate
7. Traction relief mechanism including assembly screws
i
* also applies to item numbers 1423 60 19 / 1415 45 19
After unpacking please check and compare ...
the contents of the package with the above specified.
Check the details on the type plate
Check that the voltage / frequency on the type plate cor-
responds to the local mains conditions.

9
EN
Up button
Front cover
Fastening holes
Cover plate
Clock button
Sun button
Deflection roller
Down button
Twilight button
Reel
Fastening
hooks
Traction relief
Cable duct Connecting terminals
Reset button
AUTO/MANU button
Fastening holes
4. General view (item no. 1423 45 19) *
Reel compartment
cover
Belt inlet
Sun LED
Clock LED
Twilight LED
Type plate
* also applies to item numbers 1423 60 19 / 1415 45 19
Disengaging
bracket
SET button
i
Connection socket for the light sensor

10
EN
5. Permissible roller shutter belts
ATTENTION!
The RolloTron Standard may be damaged if excessively
long belts are used.
Only use belts of the permissible lengths.
Table 1: Permissible roller shutter belts
RolloTron:
Item No:
Standard
(Small belt)
1415 45 19
Standard
1423 45 19
Standard Plus
1423 60 19
Belt width: Belt thick-
ness: Maximum belt length
15 mm (Small belt) 1.0 mm 7.6 m - - - - - -
23 mm (Standard belt)
1.0 mm - - - 7.6 m 15 m
1.3 mm - - - 6.2 m 12 m
1.5 mm - - - 5.2 m 11 m
Table 2: Permissible roller shutter surface area (m2)
Roller shutter type: Weight/m2Permissible roller shutter surface area (m2)
Plastic roller shutters (4.5 kg/m2) Approx. 6 m2Approx. 6 m2Approx. 10 m2
Aluminium and wooden roller shutters (10.0 kg/m2) Approx. 3 m2Approx. 3 m2Approx. 6 m2
The specifications are intended for guidance only and
apply to an ideal installation situation. The actual values
may vary due to local conditions.
i
i

11
EN
6. Functional description
The RolloTron Standard is a roller shutter drive designed
for use inside. It is fitted as a flush-mounted device and
the power supply is provided via the enclosed connect-
ing cable with plug or a fixed installed lead.
Automatic LED dimming
The RolloTron Standard is equipped with automatic dim-
ming LEDs to reduce the light intensity (e.g. bedrooms).
The LEDs dim as the roller shutters are lowered.
i
Features and control options:
◆Manual operation (MANU)
◆Automatic mode (AUTO), with a separate switching
time for UP ( ▲) and DOWN ( t)
◆AUTO/MANU - switchover
◆Automated solar function
◆Automatic darkness function
◆End point setting
◆Permanent storage of the settings
◆Obstacle detection
◆Overload cut-off
◆Soft-start and Soft-stop
◆Setting the motor speed for automatic functions
◆Automatic LED dimming

12
EN
There is a risk of injury if the obstacle detection is not
working.
◆The belt must be wound on as evenly as possible to
ensure safe and correct functioning of the obstacle
detection function.
◆Please ensure that the belt winds as straight and evenly
as possible into the device during its subsequent cycle
after the obstacle detection system has triggered.
Soft-start / Soft-stop
The RolloTron Standard is equipped with a Soft-start /
Soft-stop function. Gentle starting and stopping serves
to protect the belt winder mechanics and the belt.
Obstacle detection
The movement of the belt is monitored. If the roller shut-
ters hit an obstacle in the DOWN ( t ) direction, the belt
will stop moving and the belt winder is switched off.
6.1 Description of safety functions
i
Once the system has switched off, it is no longer
possible to directly operate the drive in the same
direction.
◆Run the belt winder back in the opposite direction and
remove any possible obstacle.
◆Subsequently it is possible to operate the drive in the
original direction again.
Overload cut-off
The RolloTron Standard is equipped with an overload
cut-off system.
If the drive jams in the UP ( ▲ ) cycle (for example, due to
ice), the belt winder will also switch off.
◆Once the cause for the overload has been rectified,
the drive is fully operational in both directions.

13
EN
1
2
3
4
5
7. General assembly instructions
Poor routing of the belt can cause the belt to fail and
leads to unnecessary loads on the RolloTron Standard.
◆Install the belt winder so that the belt runs as straight
as possible into the device, in order to avoid unneces-
sary friction and wear.
7.1 You will need the following tools
◆Screwdriver
◆Scissors
◆Carpenter's gauge or measuring tape
◆Pen
i
i
Incorrect installation can lead to
property damage.
◆Strong forces are exerted during operation of the sys-
tem which require secure installation on a firm base.

14
EN
2
7
1
7.2 Preparation for installation
1. Take measurements.
Check that the belt box has suf-
ficient space to house the RolloTron
Standard.
All dimensions in mm
RolloTron Standard
Item no.:
1415 45 19 (Small belt)
1423 45 19 (Standard belt)
RolloTron Standard Plus
Item no.:
1423 60 19 (Standard belt)
All dimensions in mm
i

15
EN
20 cm
CAUTION!
There is a risk of injury from the pre-tensioned springs
on the old belt winder.
◆The spring unit can suddenly recoil when it is removed.
◆Hold the spring unit firmly when loosening the belt
and allow it to recoil slowly until the spring unit has
completely unwound.
7.2 Preparation for installation
2. Remove the old belt winder, if you are carrying out a
conversion to an existing roller shutter system.
2.1 Let the roller shutter move fully down, until the slats are
completely closed.
2.2 Remove the old belt winder and unreel the belt.
3. Prepare the belt.
3.1 Cut the belt off approx. 20 cm under the belt box.
3.2 Fold the end of the belt over by approx. 2 cm and cut a
short slit in the centre. This enables you to subsequently
hook the belt onto the reel.
Recommendation
The belt must run as straight and freely as possible. For
stiff roller shutters, mount a deflection roller on the belt
box. This helps to prevent unnecessary friction and wear
to the belt.
i
Accessories, see page 44.

16
EN
8. Safety instructions for electrical connection
DANGER!
Danger due to electric shock when working on all
electrical systems.
◆Carry out all installation and connection work only in
an isolated, zero-volts state.
◆Disconnect all phases of the mains power supply cable
and secure it to prevent any reconnection.
◆Check the system for a zero-voltage status.
The electrical connection for the RolloTron Standard
can be made either with the supplied connecting
cable or via a fixed laid cable.
i
i

17
EN
8.1 Electrical connection
1. Connect the provided connecting cable to the connect-
ing terminals of the RolloTron Standard.
The colour coding is irrelevant for the installation.
2. Lay the connecting cable to the RolloTron Standard in a
cable duct.
3. Finally, screw on the traction relief mechanism with the
screws provided.
RolloTron Standard RolloTron Standard Plus
Cable duct
Traction relief
Traction
relief
i
WARNING!
Damaged cables can cause
short circuits.
◆Pay attention that cables are laid safely.
◆The connecting cable may not be pinched when
screwing on the belt winder as this could lead to
damage.

18
EN
9. Drawing in and fastening the belt
1. Insert the mains plug into the socket.
2. Press the UP button until the fastening hooks
are easily accessible in the reel compartment.
i
CAUTION!
There is a risk of injury from the reel.
Never reach into the reel compartment when the motor
is running.
As no end points have been set yet, the drive will stop
as soon as you release the button.
i
3. Always remove the mains plug from the socket.
4. Next, draw-in the belt into the RolloTron Standard
from the top.

19
EN
i
Belt
Fastening
hooks
Belt
End of belt
Belt path in
RolloTron Standard
9. Drawing in and fastening the belt
5. Continue to feed the belt into the device as shown in
the bottom right sectional diagram and subsequently
slide the belt over the fastening hooks from above.
6. Re-insert the mains plug into the socket.
7. Press the UP button until the belt has wound
around the reel once completely.
8. Pull the belt tight when winding, so that the deflection
roller turns at the same time.
9. Finally remove the mains plug from the socket again.
10. Finally, place the provided reel compartment cover onto
the reel compartment.

20
EN
10. Mounting the RolloTron Standard
Mount the RolloTron Standard as straight as possible, so
that the belt can wind correctly.
Ensure that the RolloTron Standard sits freely in the belt box
and that it is not in contact with the masonry, otherwise
noise will be generated during operation.
1. Slide the RolloTron Standard into the belt box and screw
it tight using the screws provided.
WARNING!
A damaged connecting cable may cause a short
circuit.
Ensure that the connecting cable is laid correctly inside
the cable duct, otherwise it can be crushed and damaged
when the cover is screwed in place.
2. Slide the enclosed cover plate over the lower mounting
holes.
i
This manual suits for next models
3
Table of contents
Other RADEMACHER Indoor Furnishing manuals
Popular Indoor Furnishing manuals by other brands

John Louis Home
John Louis Home WOODCREST JLH574 Assembly instructions

VEVOR
VEVOR HZS003 user manual

dg casa
dg casa 4 DRAWER TV STAND manual

Cooper Lighting
Cooper Lighting Metalux GCAFA Series Specification sheet

Rauch
Rauch ME007 Assembly instructions

Living Spaces
Living Spaces 51031067T Assembly instructions