RADICAL R-C10VW1 User manual


KOMPATIBILITÄTSLISTE
MARKE
MODELL
TYP
MODELLYAHR
VW
VW Amarok
2H
as of 2010
VW
VW Beetle Cabrio
5C
2011 – 2015
VW
VW Beetle Coupé
5C
2011 – 2015
VW
VW Caddy
2K/2C
2003 – 2013
VW
VW CC
35
2008 – 2014
VW
VW EOS
1F
2006 – 2013
VW
VW Golf V
1K
2003 – 2008
VW
VW Golf V Variant
1K
2007 – 2009
VW
VW Golf VI
5K
2008 – 2012
VW
VW Golf VI Variant
AJ
2009 – 2013
VW
VW Golf Cabrio
51
2011 – 2013
VW
VW Golf Plus
5M/52
2005 – 2013
VW
VW Jetta VI
16
2005 – 2015
VW
VW Jetta V / Bora
1K2
2005 – 2010
VW
VW Passat
3C/36
2005 – 2014
VW
VW Passat Alltrack
36
2012 – 2014
VW
VW Passat CC
35
2008 – 2012
VW
VW Passat Variant
3C/36
2005 – 2014
VW
VW Polo
6R
2010 – 2014
VW
VW Scirocco III
13
2008 – 2014
VW
VW Sharan
7N
2010 – 2013
VW
VW Tiguan
5N
2007 – 2013
VW
VW Touran
1T
2003 – 2013
VW
VW T5
7E/7J
2010 – 2015
SEAT
SEAT Alhambra
71
2010 – 2013
SEAT
SEAT Altea
5P
2004 – 2014
SEAT
SEAT Altea Freetrack
5P
2007 – 2009
SEAT
SEAT Altea XL
5P
2006 – 2014
SEAT
SEAT Leon
1P
2005 – 2012
SEAT
SEAT Toledo
5P
2004 – 2009
SEAT
SEAT Toledo
KG
2012 – 2013
ŠKODA
ŠKODA Octavia II
1Z
2009 – 2013
ŠKODA
ŠKODA Octavia II Combi
1Z
2009 – 2013
ŠKODA
ŠKODA Octavia II Scout
1Z
2009 – 2013
ŠKODA
ŠKODA Rapid
NH
2013 – 2015
ŠKODA
ŠKODA Rapid Spaceback
NH
2013 – 2015
ŠKODA
ŠKODA Superb II
3T
2008 – 2014
ŠKODA
ŠKODA Superb II Combi
3T
2008 – 2014
ŠKODA
ŠKODA Yeti
5L
2009 – 2014

BITTE BEACHTEN:
- Der Einbau des Radical-Geräts sollte von einem autorisierten Fachhändler durchgeführt werden.
Zur Montage werden spezifische Kenntnisse und Werkzeuge benötigt. Unsachgemäßer Einbau
kann zu Schäden am Fahrzeug und am Radical-Gerät führen.
HINWEIS:
- Das Zielfahrzeug muss mit einem Radio- oder Navigationssystem ausgerüstet sein. Das Radical-
Gerät ist nicht mit Fahrzeugen kompatibel, welche ab Werk mit einem Hybrid- oder Elektroantrieb
ausgestattet sind.
- Diese Installationsanleitung gilt für die Fahrzeugplattformen, welche in der Kompatibilitätsliste
aufgeführt sind und den Zustand, wie er vom jeweiligen Fahrzeughersteller angeboten wird.
Davon abweichende Ausstattungen und Installationen können zu Komplikationen und
Fehlfunktionen führen.
LIEFERUMFANG:
Nr.
Artikel
Menge
1
Radical-Gerät
1
2
GPS-Antenne
1
3
WIFI-Antenne
1
4
Externe BT MIC und Kabel 3m
1
5
USB-Kabel 4P to 4P,USB-B
Weiblich, Lila
1
6
USB-Kabel 4P to 6P,USB-B
Weiblich, Grün
1
7
AUX+RCA Kabel 10PIN
1
8
SUBWOOFER Kabel
1
9
Sicherung 15A250V
1
10
Montagewerkzeug
Kunstoffgriff
1
11
Hauptanschlusskabel für VW
Quadlock II
1
12
CAN-BUS für VW
1
13
FM Antennenadapter TWIN
FAKRA
1
14
Kamera Filter Box
1
15
Doppelseitiges Klebepad
1
16
Kurzanleitung
1

EINBAUBEISPIEL GOLF VI
DEMONTAGE UND VORBEREITUNG:
1. Hebeln Sie von rechts beginnend,
vorsichtig den das Originalgerät
umgebenden Plastikrahmen aus
seiner gesteckten Verankerung.
Verwenden Sie für diesen Schritt das
im Lieferumfang enthaltene
Kunststoff Entriegelungswerkzeug.
2. Fahren Sie mit dem
Entriegelungswerkzeug einmal
gegen den Uhrzeigersinn um den
Plastikrahmen. Der Plastikrahmen
sollte sich nun vollständig ablösen
lassen. Lösen und entfernen Sie die
vier Torx-Schrauben (T25) vom
Originalgerät.
3. Ziehen Sie das Originalgerät nun
vorsichtig aus dem Radioschacht.
Trennen Sie anschliessend alle
Kabel an der Geräterückseite.

INSTALLATION:
4. Montieren Sie die GPS-Antenne (Nr.
2) an einer geeigneten Stelle und
achten Sie darauf, dass der GPS-
Empfang nicht durch die Abschattung
von metallischen Fahrzeugteilen
negativ beeinflusst wird
(Wärmeschutzverglasung etc.).
Verlegen Sie das Anschlusskabel
anschließend in den Radioschacht.
5. Verlegen Sie die USB-
Verlängerungskabel (Nr. 5, 6) vom
Radioschacht an die von Ihnen
gewünschte Stelle.

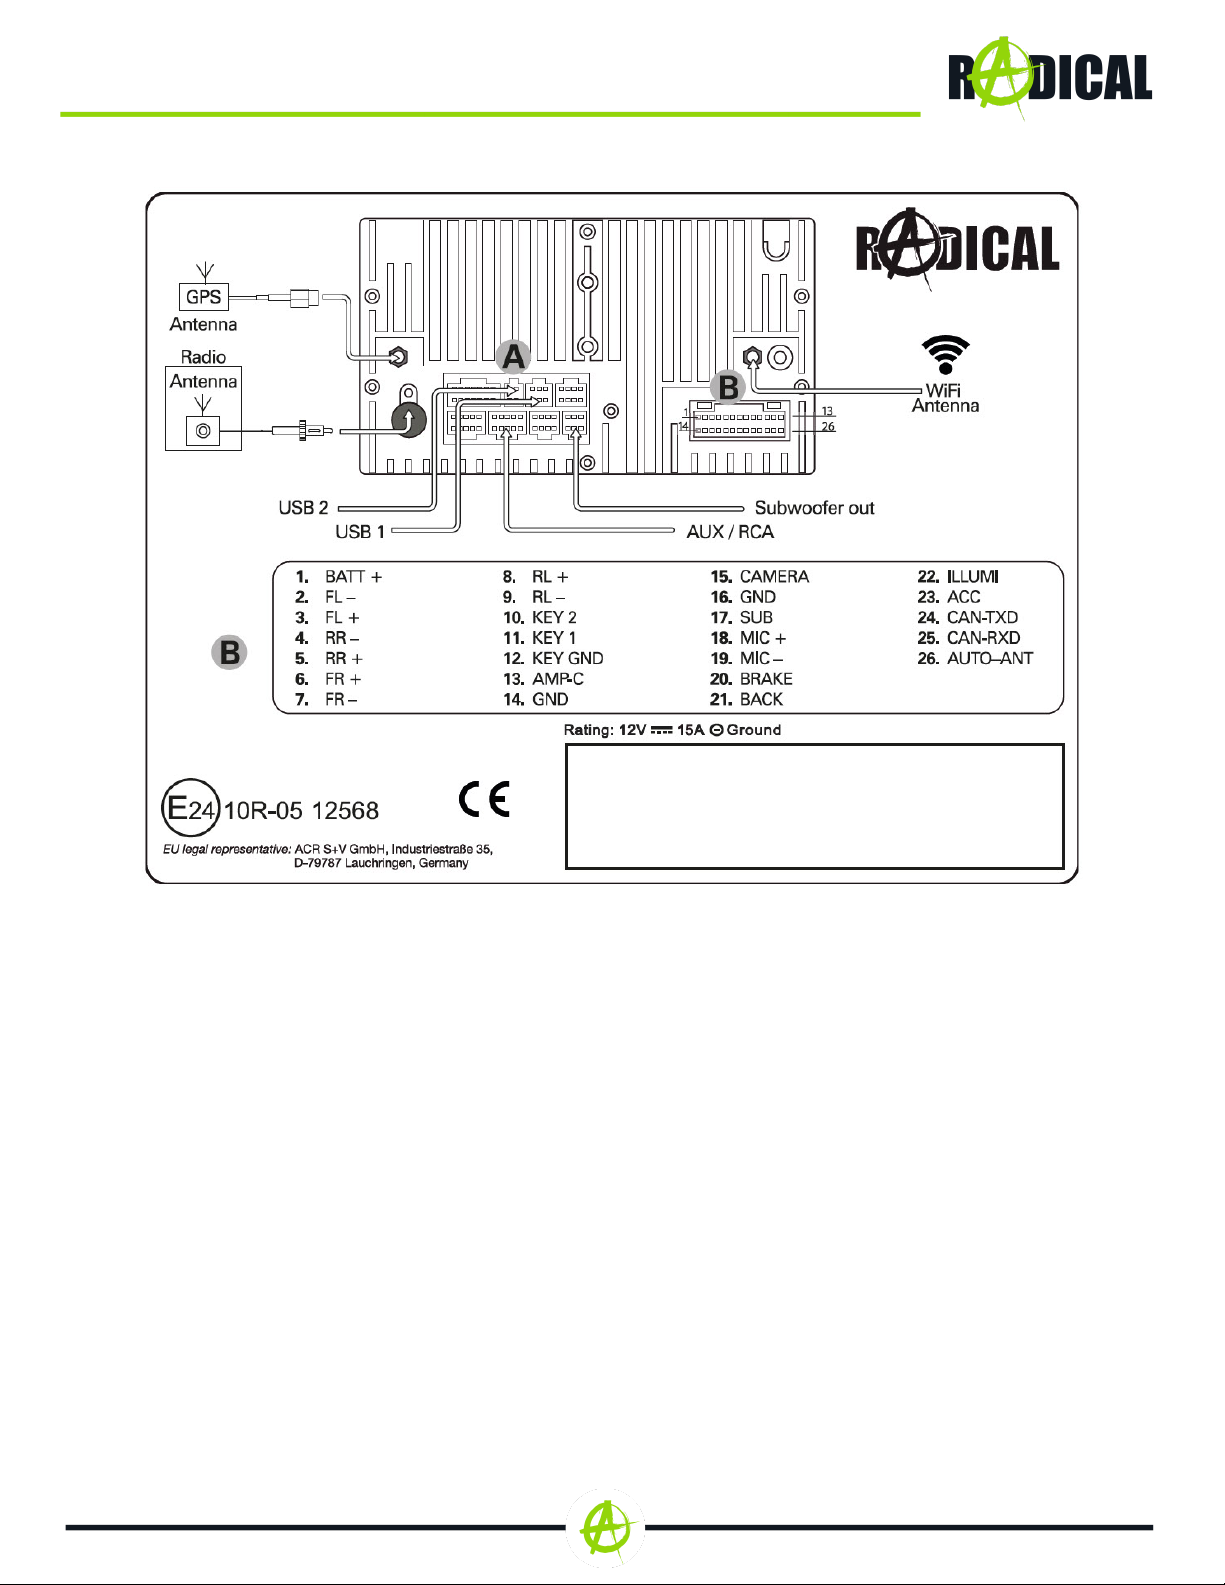
6. Verbinden Sie das jeweilige
Hauptanschlusskabel (Nr. 11) des
Radical-Geräts (Nr. 1) mit dem
Stecker des Fahrzeugs und
schließen Sie den
Verriegelungsmechanismus des
Steckers. Verbinden Sie
anschließend das CAN-Bus Interface
(Nr. 12) mit dem
Hauptanschlusskabel. Verbinden Sie
alle zuvor in den Radioschacht
verlegten Kabel und die originalen
Antennenkabel mit dem Radical-
Gerät (Nr. 1).
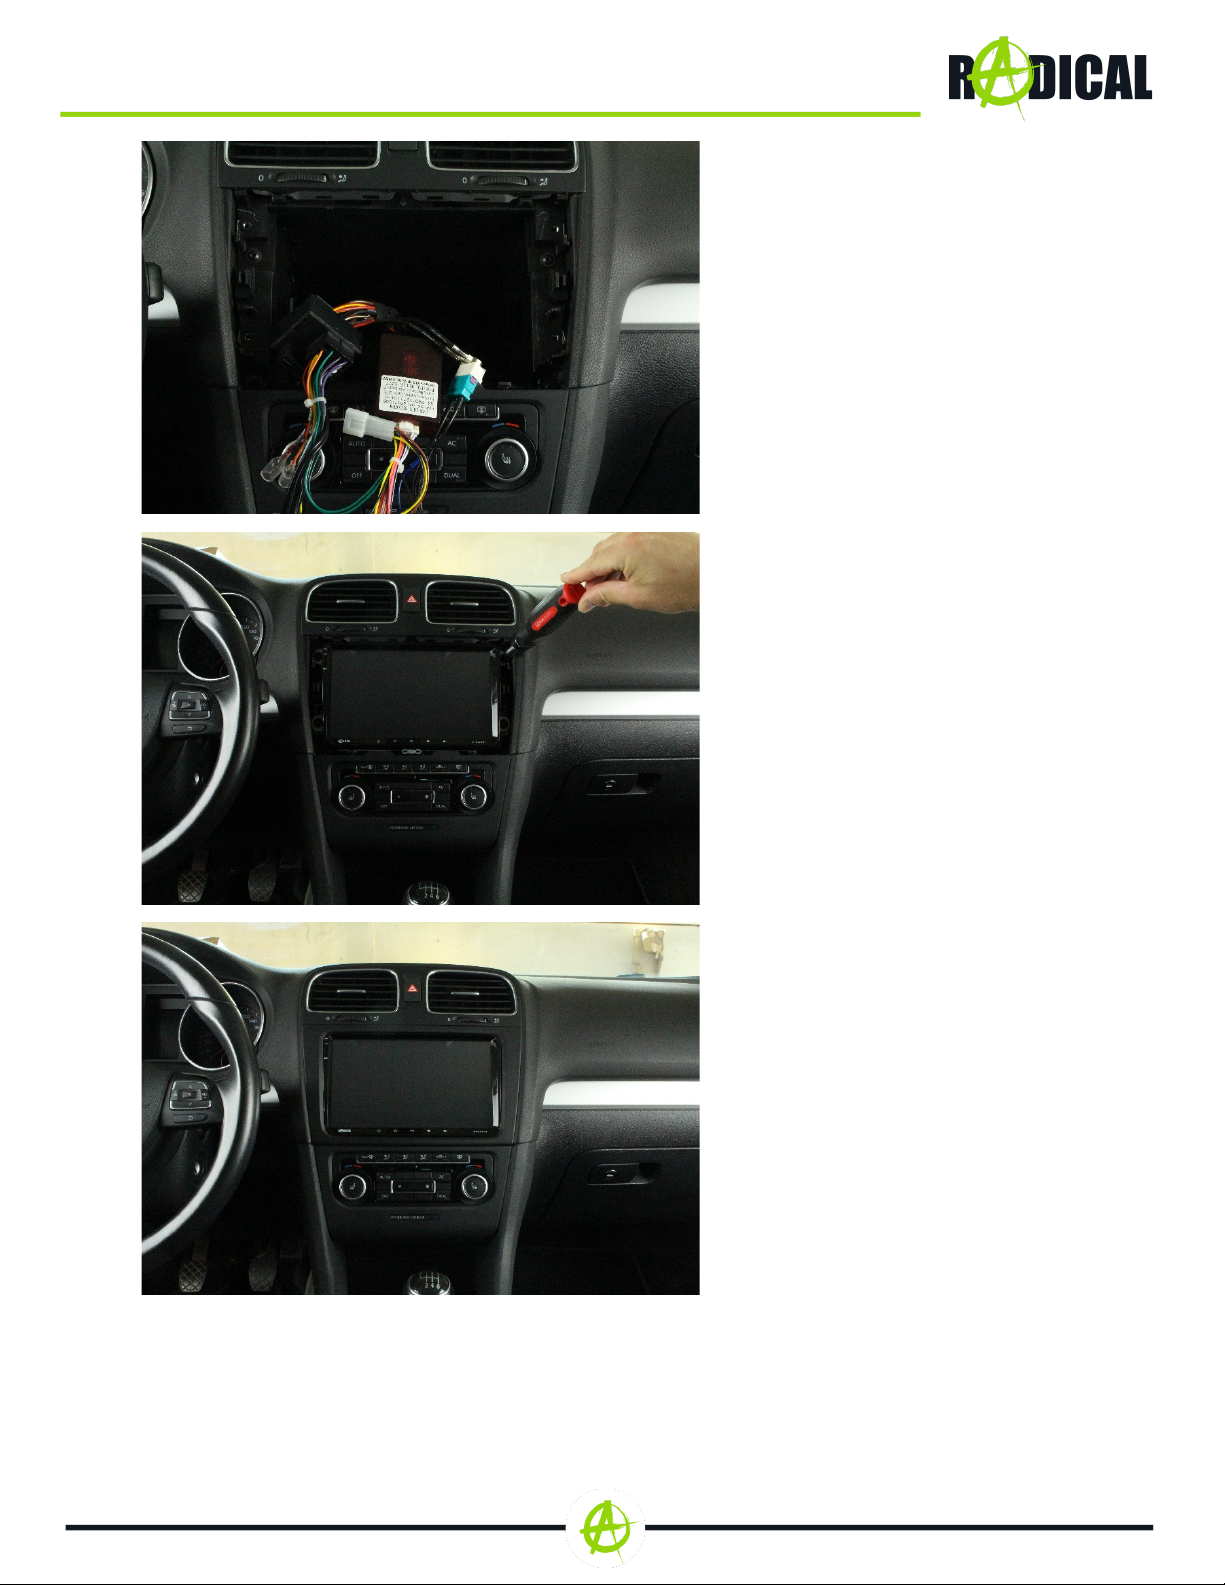
7. Verlegen Sie die diversen
Anschlusskabel des Radical-Geräts
sorgfältig im unteren Bereich der
Radioschachts. Schieben Sie
anschließend das Radical-Gerät
vorsichtig und mit dosierter
Kraftaufwendung zurück in den
Radioschacht. Verschrauben Sie es
wieder mit den vier Torx-Schrauben.
8. Nachdem das Radical-Gerät wieder
verschraubt wurde, müssen Sie nur
noch den Plastikrahmen aufstecken,
um die Montage zu beenden.
Der Einbau des R-C10VW1 ist
hiermit beendet.

ANSCHLUSSSCHEMA:

COMPATIBILITY LIST
BRAND
MODEL
TYPE
MODEL YEAR
VW
VW Amarok
2H
as of 2010
VW
VW Beetle Cabrio
5C
2011 – 2015
VW
VW Beetle Coupé
5C
2011 – 2015
VW
VW Caddy
2K/2C
2003 – 2013
VW
VW CC
35
2008 – 2014
VW
VW EOS
1F
2006 – 2013
VW
VW Golf V
1K
2003 – 2008
VW
VW Golf V Variant
1K
2007 – 2009
VW
VW Golf VI
5K
2008 – 2012
VW
VW Golf VI Variant
AJ
2009 – 2013
VW
VW Golf Cabrio
51
2011 – 2013
VW
VW Golf Plus
5M/52
2005 – 2013
VW
VW Jetta VI
16
2005 – 2015
VW
VW Jetta V / Bora
1K2
2005 – 2010
VW
VW Passat
3C/36
2005 – 2014
VW
VW Passat Alltrack
36
2012 – 2014
VW
VW Passat CC
35
2008 – 2012
VW
VW Passat Variant
3C/36
2005 – 2014
VW
VW Polo
6R
2010 – 2014
VW
VW Scirocco III
13
2008 – 2014
VW
VW Sharan
7N
2010 – 2013
VW
VW Tiguan
5N
2007 – 2013
VW
VW Touran
1T
2003 – 2013
VW
VW T5
7E/7J
2010 – 2015
SEAT
SEAT Alhambra
71
2010 – 2013
SEAT
SEAT Altea
5P
2004 – 2014
SEAT
SEAT Altea Freetrack
5P
2007 – 2009
SEAT
SEAT Altea XL
5P
2006 – 2014
SEAT
SEAT Leon
1P
2005 – 2012
SEAT
SEAT Toledo
5P
2004 – 2009
SEAT
SEAT Toledo
KG
2012 – 2013
ŠKODA
ŠKODA Octavia II
1Z
2009 – 2013
ŠKODA
ŠKODA Octavia II Combi
1Z
2009 – 2013
ŠKODA
ŠKODA Octavia II Scout
1Z
2009 – 2013
ŠKODA
ŠKODA Rapid
NH
2013 – 2015
ŠKODA
ŠKODA Rapid Spaceback
NH
2013 – 2015
ŠKODA
ŠKODA Superb II
3T
2008 – 2014
ŠKODA
ŠKODA Superb II Combi
3T
2008 – 2014
ŠKODA
ŠKODA Yeti
5L
2009 – 2014

PLEASE NOTE:
- The installation of the Radical device should be carried out by an authorized installer. Specific
knowledge and tools are required to do the installation. Incorrect installation can cause damage to
the vehicle and the Radical device.
CAUTION:
- The target vehicle must factory configured with an OE radio or navigation systems. The Radical
device is not compatible with vehicles, which are equipped with a hybrid or electro drive.
- This device installation manual applies to vehicle platforms appearing in the compatibility list on
the previous page, and in a condition as offered by the respective vehicle manufacturer. Other
differing configurations and installations may result in complications and malfunctions.
THE KIT INCLUDES:
Nr.
Artikel
Menge
1
Radical device
1
2
GPS antenna
1
3
WIFI Antenna
1
4
External BT MIC and Cable
3m
1
5
USB Cable 4P to 4P,USB-B
Female, Purple
1
6
USB Cable 4P to 6P,USB-B
Female, Green
1
7
AUX+RCA Cable 10PIN
1
8
SUBWOOFER Cable
1
9
Fuse 15A250V
1
10
Installation Tool Plastic
Handle
1
11
Power Cables for VW
1
12
CAN BUS for VW
1
13
FM antenna adapter TWIN
FAKRA
1
14
Camera Filter Box
1
15
3M double Sticker
1
16
Quick start guide
1

EXAMPLE OF INSTALLATION GOLF VI
REMOVAL WORK AND PREPARATION:
1. Gently lift the trim frame starting on
the right side of OE device. Use the
supplied plastic removal tool for this
step.
2. Set the prying tool anticlockwise
around the trim frame, to release it
from the console. The trim frame
should come off of the console
completely. Unscrew and remove the
four Torx screws (T25) of the original
device.
3. Remove the original device by pulling
it out of the radio slot. Disconnect all
the cables from its backside.

INSTALLATION:
4. Install the GPS antenna (No. 2) in a
suitable position, making sure that
the GPS reception is not adversely
affected by unwanted shielding of
metallic vehicle parts (thermal
insulation glazing, etc.). Then route
the connection cable into the radio
bay.
5. Route the USB extension cable´s
(No. 5, 6) from the radio bay to your
preferred position.

6. Connect one of the main connection
cables (No. 11) of the Radical device
(No. 1) to the Plug connector of the
car and close its locking mechanism.
Following this, connect the CAN bus
interface (No. 12) to the main
connection cable. Connect all the
cables to the Radical device (No. 1)
those previously run in the radio bay
and the original antenna cables.
7. Neatly arrange the wires to the side,
making room for the ZENEC system.
Carefully slide it into the radio slot
and fix it in place, using the four
original Torx screws.
8. Mount the trim frame back on to
make the installation complete.
The installation of your R-C10VW1 is
now complete.

CONNECTION DIAGRAM:
Radical – Bohrturmweg 1 – CH-5330 Bad Zurzach – Schweiz/Switzerland – www.my-radical.com – RevA
Table of contents
Languages:
Other RADICAL Car Stereo System manuals
Popular Car Stereo System manuals by other brands

Clarion
Clarion CDI500R owner's manual

Sony
Sony MV-900SDS - Dream System 3 operating instructions

Blaupunkt
Blaupunkt Compact Drive MP3 Operation and installation instructions

Philips
Philips CID3681/93 quick start guide

Pioneer
Pioneer DEH-P7150UB Operation manual

Blaupunkt
Blaupunkt BROOKLYN MP35 operating instructions