Radio Shack 16-3314 User manual

©2003 RadioShack Corporation.
All Rights Reserved.
RadioShack and RadioShack.com
are trademarks used by
RadioShack Corporation.
OWNER’S MANUAL —
Please read before using this equipment.
www.radioshack.comSM
What’s Included
AC Adapter — power the Travel Theater from a
standard AC outlet.
DC Adapter — power the Travel Theater from your
vehicle’s cigarette lighter socket.
Carrying Case — protects the Travel Theater and
enables convenient carrying.
Two Pairs of Stereo Earbuds — for private listening
.
Audio/Video Cables — connect the Travel Theater
to a TV, amplifier, video game, or camcorder.
RF Antenna Adapter — connect cable TV or an
external antenna for viewing regular TV.
Shoulder Strap — Attaches to the carrying case.
Four Straps for Vehicle Installation — install the
Travel Theater in your vehicle.
Remote Control
10.4-InchFlatLiquid Crystal Display(LCD) —
delivers higher resolution and brighter colors
than standard LCD screens.
Fluorescent Backlight — illuminates the LCD
so you can watch the TV in the dark or in low-
light conditions.
Automatic Electronic Tuning System —
scans VHF and UHF bands and locks in your
favorite stations at the touch of a button.
Dual speakers – enjoy stereo sound from the
DVD player.
10.4” Go Vision
DVD Travel Theater
!IMPORTANT !
If an icon appears at the end of a paragraph, go to the box on that page
with the corresponding icon for pertinent information.
!— Important Ô—Note —Caution
16-3314

Region Management Information
2
Thank you for purchasing the 10.4-Inch Go Vision Travel
Theater. It uses the latest in solid state design to give you
the highest quality picture and sound. It is small, lightweight,
and easy to carry. It is perfect for use in your car, SUV, or
van.
Your Travel Theater Plays:
• DVD Video Discs — Video discs consisting of movies,
concerts, and so on.
• Audio Discs — Audio CDs containing musical or sound
content only.
• CD-R — A disc that you can write information to once
(for example, downloading MP3 or JPEG photo files).
• CD-RW — A re-writable disc. You can write information
onto this type of disc more than once. For example, if
you have previously downloaded MP3 or JPEG files to
a CD-RW disc, you can write information to the disc
again, after it erases the previously written information.
REGION MANAGEMENT
INFORMATION
This Travel Theater is designed and manufactured to
respond to the Region Management Information that is
recorded on a DVD disc. If the region number on the DVD
disc does not correspond to the region number on this
Travel Theater, the Travel Theater cannot play that disc.
The Region number of this Travel Theater is
1 (USA/CANADA).
IMPORTANT SAFETY
INFORMATION
This manual contains important information about how to
safely and properly install, operate, and care for this
product.Failure to properly install, operate, and care for this
product can increase the risk of electric shock or fire. It can
also increase the risk of product failure and possibly
personal injury. To reduce the risk of serious injury, death,
or damage, read and follow these instructions. Heed all
warnings.
• Do not attempt to service or repair the Travel Theater
yourself. Refer all servicing to qualified service
personnel.
The lightning symbol is intended to alert you to the
presence of uninsulated dangerous voltage within this
product’s enclosure that might be of sufficient
magnitude to constitute a risk of electric shock. Do not
open the product’s case.
The exclamation symbol is intended to informyou that
important operating and maintenance instructions are
included in the literature accompanying this product.
!
WARNING:To reduce the risk of fire or shock
hazard, do not expose this product to rain or moisture.
..CAUTION..
CAUTION: TO REDUCE THE RISK OF ELECTRIC
SHOCK, DO NOT REMOVE COVER OR BACK. NO
USER-SERVICEABLE PARTS INSIDE. REFER
SERVICING TO QUALIFIED PERSONNEL.
RISK OF ELECTRIC SHOCK
DO NOT OPEN
!
CONTENTS
Region Management Information ........... 2
Important Safety Information .................. 2
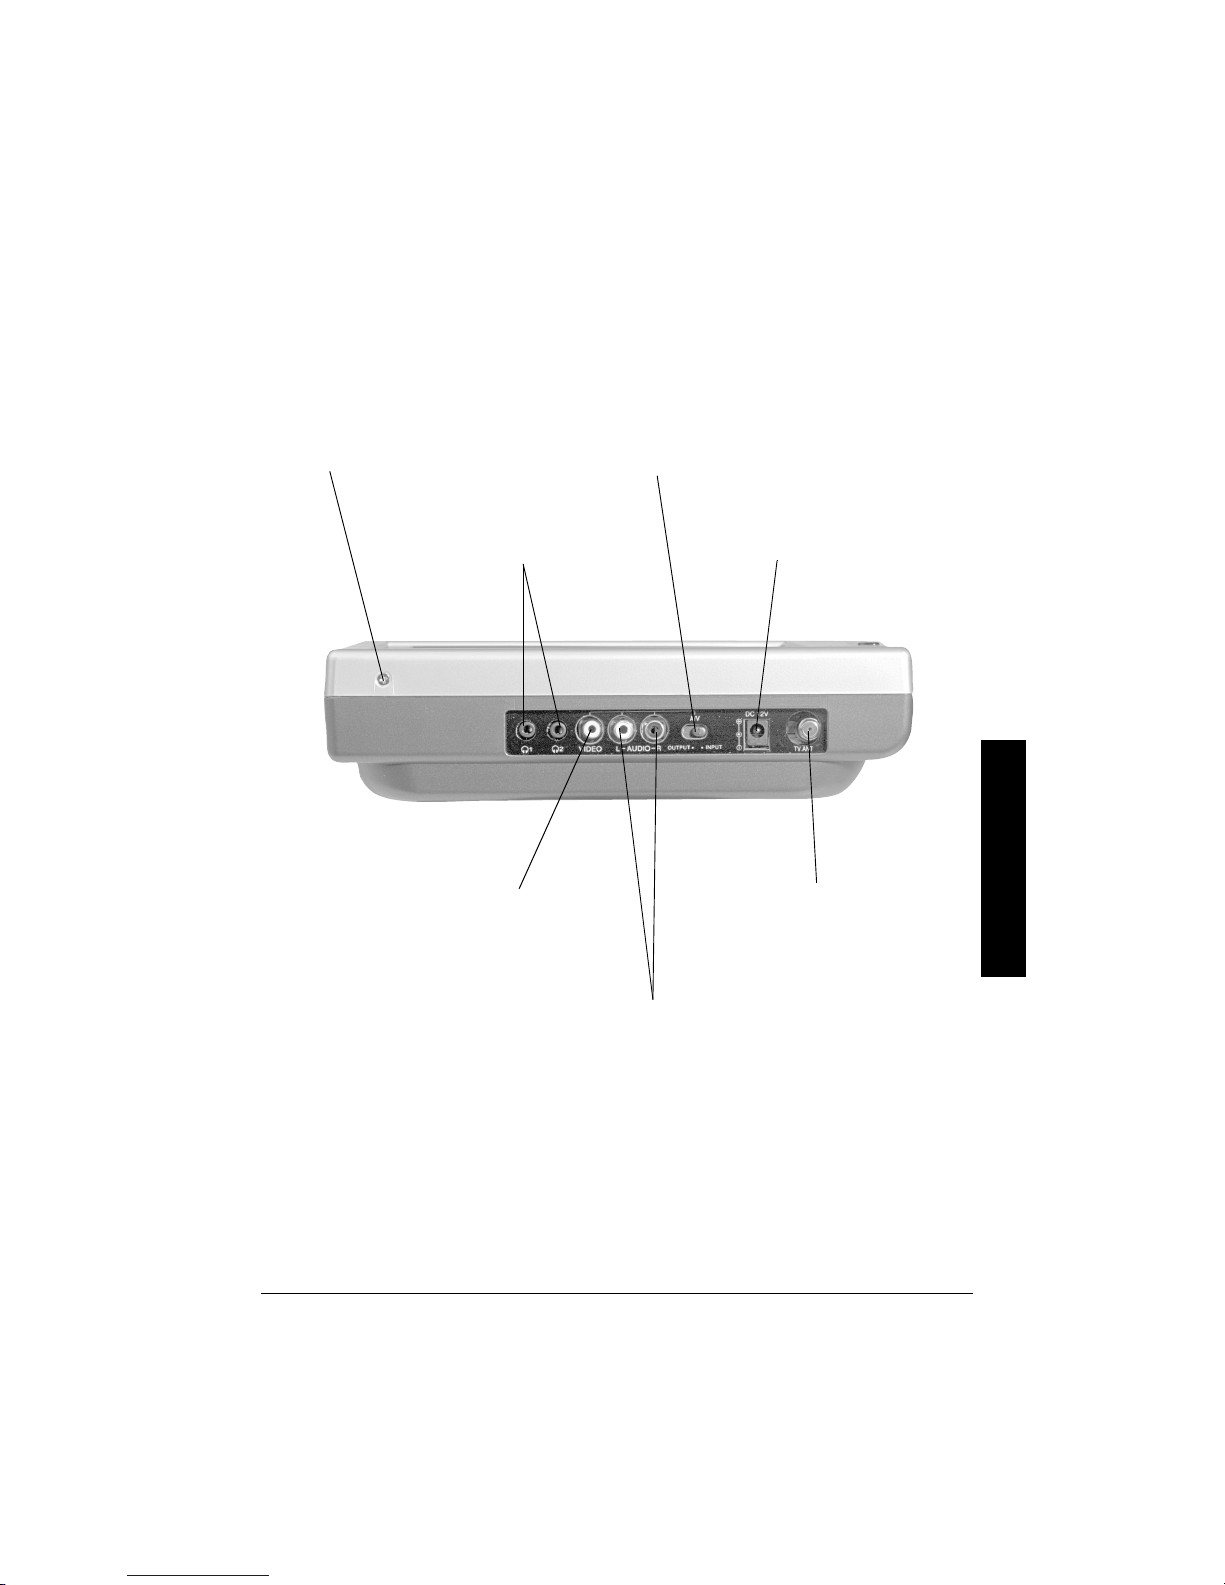
A Quick Look at Your Travel Theater ..... 4
Front View .......................................... 4
Side View ............................................ 5
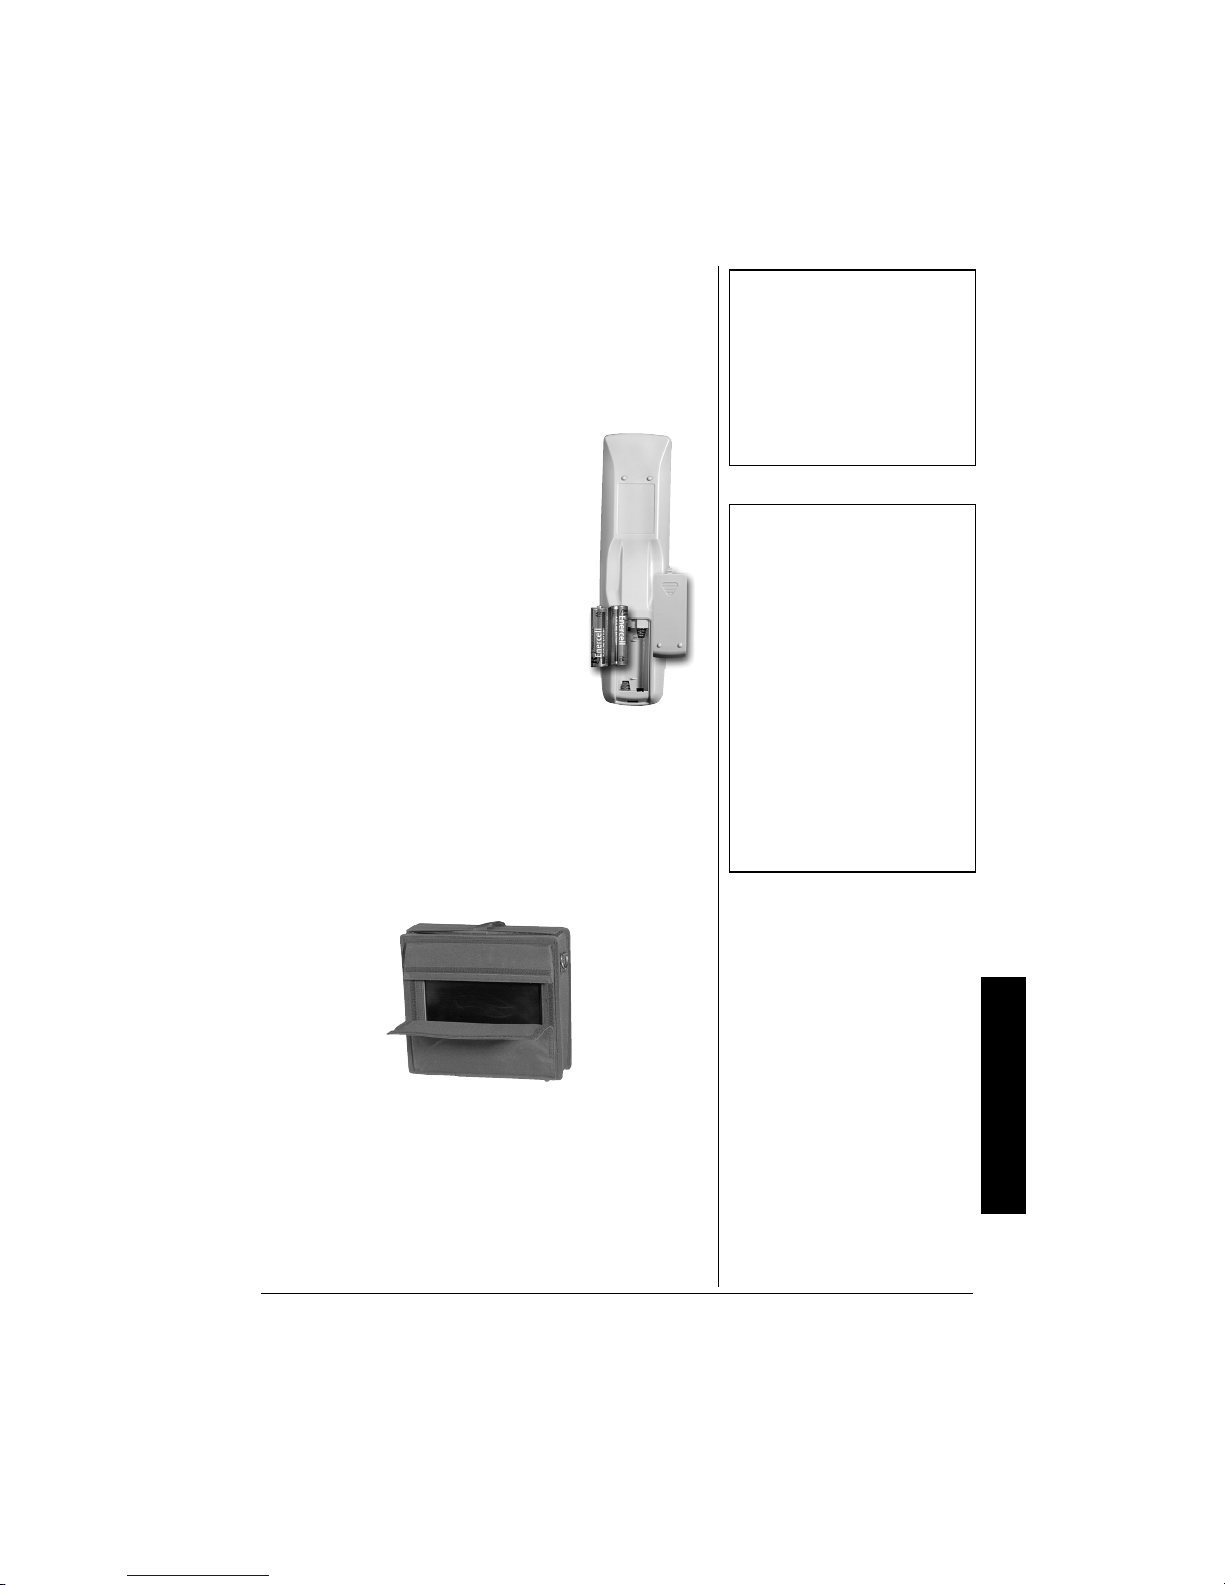
A Quick Look at Your Remote Control ... 6
Preparation ............................................. 7
Installing Batteries in the Remote ....... 7
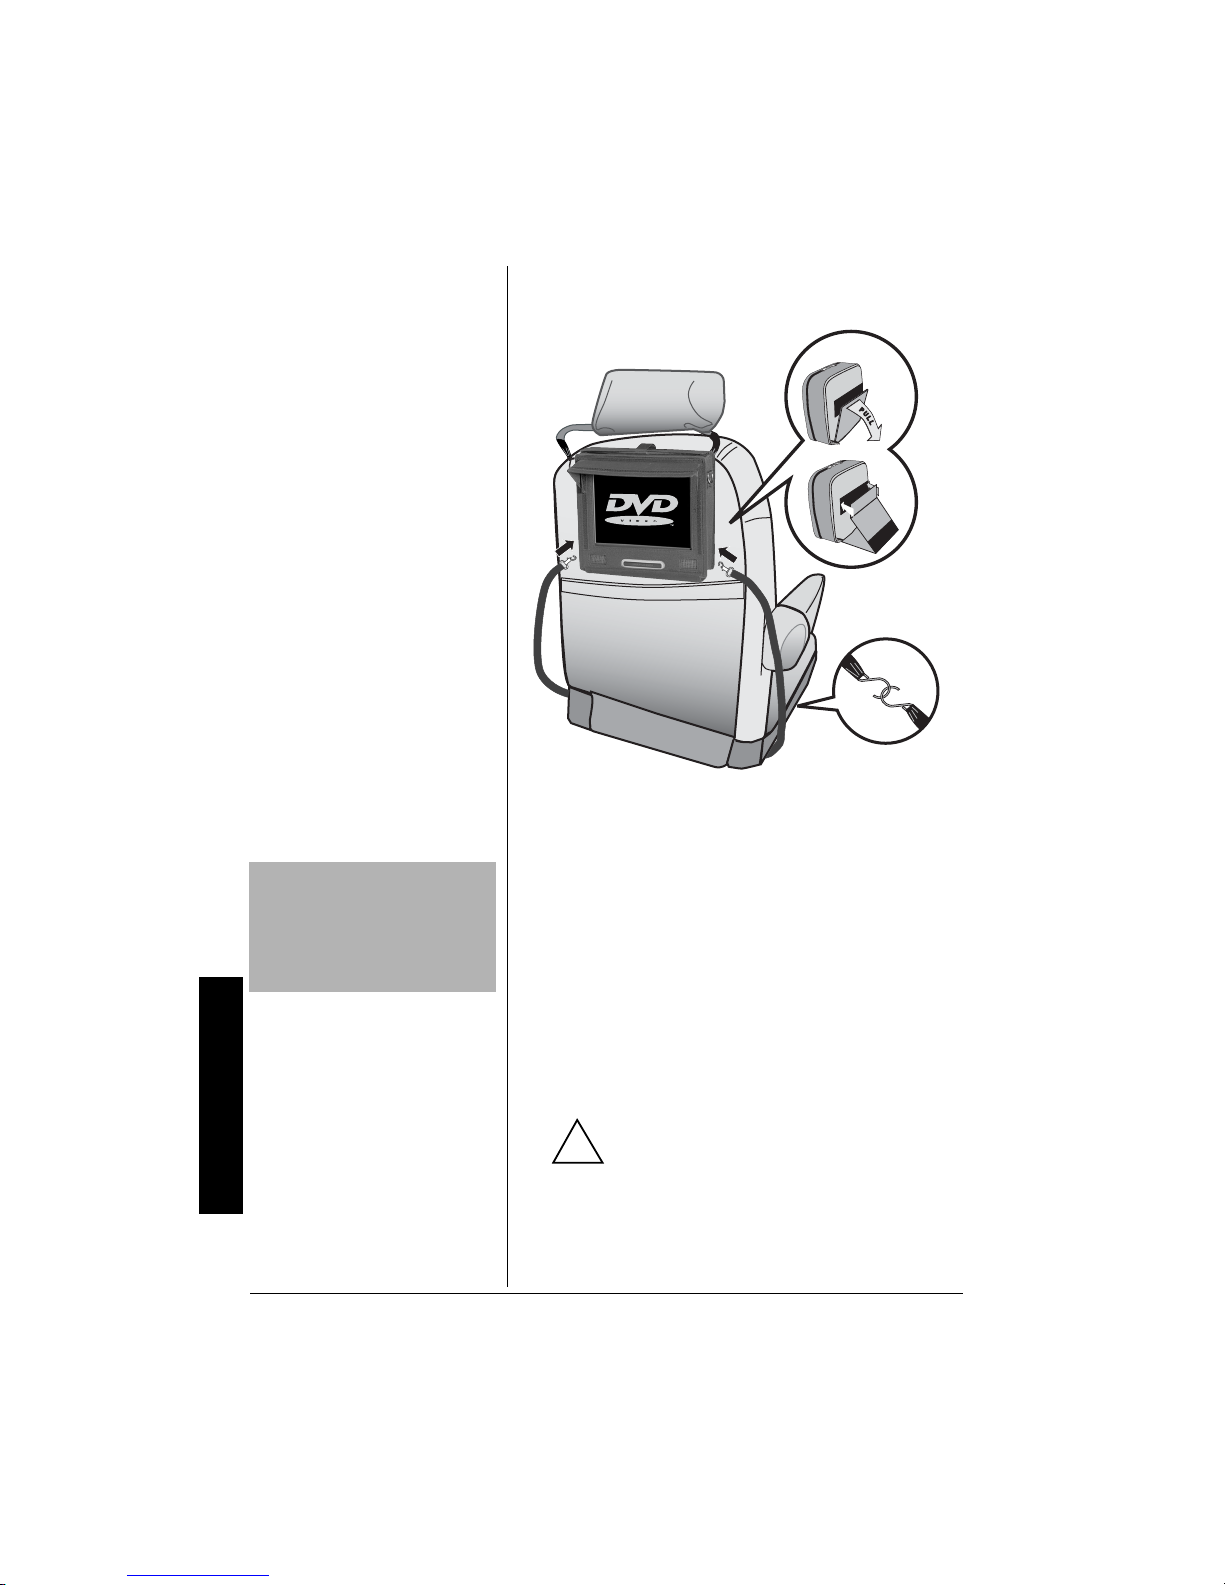
Installing the Travel Theater ............... 7
Connecting to Vehicle Battery Power . 8
Connecting Headphones .................... 9
Other Connections ............................... 10
To an External TV Antenna
or Cable TV ...................................... 10
To a TV and Audio/Video Receiver ... 10
To a Camcorder, Game Console,
or Digital Camera .............................. 11
Connecting to AC Power ................. 12
Operation ............................................. 13
Compatible Disc Types ..................... 13
Loading and Playing a Disc .............. 13
Programming TV Channels .............. 14
Watching TV ..................................... 14
DVD Advanced Features ..................... 15
Menus ............................................... 15
DVD Playback Features ................... 15
Using ZOOM ..................................... 17
Playing Audio CDs ............................... 17
Skipping Tracks ................................ 17
Using Repeat ................................... 17
Using the Display Function ............... 17
Playing MP3 Discs ............................... 18
Selecting Tracks ............................... 18
Skipping Tracks ................................ 18
To Repeat an MP3 Track .................. 18
Using the Display Function ............... 18
Playing JPEG Discs ............................. 19
To Repeat a JPEG Photo ................. 19
Default Setup ....................................... 20
General Setup .................................. 20
Setting Preferences .......................... 20
Troubleshooting .................................... 23
Care ..................................................... 24
Service and Repair ............................... 25
The FCC Wants You to Know ............... 26
Specifications ....................................... 27

Important Safety Information
3
• Do not block ventilation openings. Do not place the
Travel Theater on a bed, sofa, or other soft surface that
may block ventilation openings.
• Do not install the Travel Theater near heat sources,
such as radiators, stoves, or other devices that produce
heat.
• Do not use this product near water (for example, sinks,
tubs, and pools) or expose it to rain, moisture, or
dripping or splashing liquids. No objects filled with
water (such as vases) should be placed on the product.
• Do not play headphones at a high volume. Even if your
headset is an open-air type (designed to let your hear
outside sounds), do not turn up the volume so high that
you cannot hear what is around you.
• THE VEHICLE’S DRIVER SHOULD NEVER
OPERATE OR WATCH THE TRAVEL THEATER
WHILE DRIVING. There are laws that prohibit usage of
this unit when viewable by the driver.
• As with many other electrical devices, failure to take
precautions can result in serious injury or death from
electrical shock or fire, and can damage the Travel
Theater.
• As thelaser beam used in the TravelTheater is harmful
to eyes, and to avoid electrical hazards, do not attempt
to disassemble the housing. Refer servicing to qualified
personnel.
• Protect the AC adapter cord from being walked on or
pinched, particularly at plugs, and the point where they
exit from the apparatus.
• Do not jerk, knot, sharply bend, or otherwise abuse the
AC adapter cord.
• Do not expose the AC adapter cord to sources of heat.
• Keep children and pets away fromthe AC adapter cord.
Do not allow them to bite or chew on it.
• When disconnecting the AC adapter cord from the
Travel Theater or a power outlet, pull on the plug. Do
not pull on the cord.
• If the AC adapter cord becomes damaged in any way,
stop using it immediately. Ô
ÔNOTE Ô
Notes on Copyright
It is forbidden by law to copy,
broadcast, show, broadcast on
cable, play in public, and rent
copyrighted material without
permission. DVD video discs are
copy protected, and any recordings
made from these discs will be
distorted.
Thisproduct incorporatescopyright
protection technology that is
protected by method claims of
certain U.S. patents and other
intellectual property rights owned
by Macrovision Corporation and
other rights owners. Use of this
copyright protection technology
must be authorized by Macrovision
Corporation and is intended for
home and other limited viewing
uses only, unless otherwise
authorized by Macrovision
Corporation. Reverse engineering
or disassembly is prohibited.

A Quick Look at Your Travel Theater
4
A QUICK LOOK AT YOUR TRAVEL THEATER
ºPOWER —
Press to turn
power on or off.
P
ROG — Press to scan through
a
vailable antenna and Cable TV
c
hannels. (Same as AUTO
M
EMORY on the remote)
d CHANNEL e —Press to
scroll downward or upward to
view TV channels.
d VOLUME e —Press to
decrease or increase volume.
PICTURE — Press repeatedly to adjust the on-screen
picture contrast, brightness, tint, and color.
TV/AUX — Press
repeatedly to toggle
between TV and AUX mode.
FPREV — Press to go back
to the previous chapter of a
DVD or the last track of a CD.
gPLAY — Press to
play a DVD or CD.
J Next — Press to go to the next DVD
chapter or to the next track on a CD.
DSTOP — Press to stop
playing a DVD or CD.
ÏEJECT—Press
to eject a disc.
FRONT VIEW

A Quick Look at Your Travel Theater
5
SIDE VIEW
s1ands2—Insert upto two sets
of headphones for private listening.
VIDEO — Insert the supplied audio/
video cable’s yellow plug here to
connect to a TV and amplifier.
L-AUDIO-R — Insert the supplied audio/
video cable’s white plug to the AUDIO L
jack, and insert the cable’s red plug to the
AUDIO R jack to hear sound from the
external, connected device.
A/V Output-Input — Set to OUTPUT to
output the Travel Theater’s A/V signal to
external A/V equipment. Set to INPUT to
input an external A/V signal to the Travel
Theater. DC 12V — Insert the supplied DC
adapter cord plug here to connect to
vehicle battery power.
TV ANT. — Insert the supplied
75-ohm coaxial cable connector
here to connect to cable TV or to
an external antenna.
Remote Control Sensor

A Quick Look at Your Remote Control
6
A QUICK LOOK AT YOUR REMOTE CONTROL
TV/DVD/AUX — Press
repeatedly to toggle between
TV, AUX, and DVD mode. DVD — Press this button,
and then press number
buttons to enter a DVD
chapter/track number.
Number Buttons (0–9, 1--) —
Use to input chapter and track
numbers,or to make selectionson
menu screens. Before pressing a
numberbutton,youmustpressTV
or DVD.
TV/CATV — Press to toggle
between antenna and cable TV.
MUTE — Presstosilencethe
Travel Theater’s sound.
PICTURE — Press repeatedly to adjust
picture contrast, brightness, tint, and colo
r.
V
OL + and VOL – Press to
i
ncrease or decrease volume.
E
JECT — Presstoejectadisc.
POWER º
—Press toturn power
on or off.
TV — Press this button, and
then press number buttons to
enter TV channels.
AUTO MEMORY — Presstotunet
o
all TV or cable TV channels and stor
e
the channels automatically.
SKIP SEARCH — In SKIP mode, the
TV stops only on channels that are
programmed into memory. In SEARCH
mode, the TV scans and stops at
available channels.
ERASE WRITE — Press while in Erase
modeto erasea TVchannel.Presswhile
inWritemodetostoreaTVchannel.
CH + and CH– Press to scroll upward or
downward through external antenna or
Cable TV channels.
MENU — Pressto viewtheTravel
Theater’s menu options.
DISPLAY — Press during DVD
playback to view elapsed and
remaining time.
SETUP — Press to view the setup menu.
A
UDIO — Lets you select a
d
ifferent languageduring DVD
p
layback.
SUBTITLE — Presstoviewthe
subtitle banner. SLOW — Slowly advances
DVD’s picture.
REPEAT — Press to repeat part or
all of a chapter or track, or torepeat
an entire disc.
edf g —Use to navigate onscreen
menus. After highlighting your
selection, press ENTER to select.
NEXT J—Press during disc
playbacktoskiptothenextchapterof
a DVD, or the next track of a CD.
REV@—Pressduringplayback
to fast reverse a disc.
STOP D—Presstostopdisc
playback.
PREV F—Press to return to the last chapter
of a DVD, or to the last track of a CD during
playback.
FWD I—Press during playback
to fast forward through a disc.
PAUSE — Press during playback to
pause disc play.
PLAY g—Presstoplayadisc.
ZOOM — Press while playing a DVD
to zoom in on picture. Press ZOOM
and REV @ or FWD I while playing a
JPEG to zoom in or out.

Preparation
7
PREPARATION
INSTALLING BATTERIES IN THE REMOTE
Your remote control requires two AAA batteries (not
supplied) for power. Batteries are available at your local
RadioShack store or online at www.radioshack.com.
1. Press the battery compartment
cover in the direction of the arrow
to slide it off.
2. Insert two AAA batteries into the
battery compartment according to
the polarity marks inside.
3. Replace the cover.
When the remote becomes inoperative,
replace the batteries. Ô
INSTALLING THE TRAVEL THEATER
In a Vehicle
1. Make sure the Travel Theater is securely fastened in
the carrying case.
2. Pull down the flap on the back of the carrying case and
reattach it, aligning the velcro strip to the panel.
3. Attach one of the supplied straps to the carrying case
and hang the strap over the back of the headrest.
4. Attach one strap to each loop on the bottom of each
side of the carrying case.
ÔNOTE Ô
• Make sure there is a clear path
between the remote and the
Travel Theater so the signal is
not blocked.
• Aim the remote at the Travel
Theater’s Remote Sensor when
you press any button on the
remote.
ÔBATTERY NOTES Ô
• Dispose of old batteries
promptly and properly.
• Do not burn or bury batteries.
• Use only fresh batteries of the
required size and
recommended type.
• Do not mix old and new
batteries, different types of
batteries (standard, alkaline, or
rechargeable), or rechargeable
batteries of different capacities.
• If you do not plan to use the
remote for a month or more,
remove the batteries. Batteries
can leak chemicals that can
damage electronic parts.

Preparation
8
5. Wrap the straps around the bottom front of your seat
and attach them together. The configuration varies
depending on you car seat.
6. Secure the Travel Theater to your seat by adjusting the
straps to the appropriate length.
CONNECTING TO VEHICLE BATTERY POWER
You can power the Travel Theater from your vehicle’s 12V
power source (such as a cigarette-lighter socket) using the
supplied DC adapter.!
1. Connect the supplied DC adapter cord’s barrel plug to
the Travel Theater’s DC 12V jack.
2. Connect the other end of the adapter to the vehicle’s
cigarette lighter socket.
Cautions:
You must use a power source that supplies
12V DC and delivers at least 2.5A. Its center
tipmustbesettopositiveanditsplugmustfit
the Travel Theater's DC 12V jack. Using an adapter that
does not meet these specifications could damage the
Travel Theater or the adapter.
!IMPORTANT !
To avoid draining your car’s
battery power, do not leave the
Travel Theater on or connected to
the cigarette lighter socket when
your vehicle is not running.
!

Preparation
9
CONNECTING HEADPHONES
The Travel Theater has two 3.5 mm (1/8-inch) headphone
jacks for private listening. Connect the supplied stereo
headphones’ plug(s) into the s1and/or s2jack(s). Ô
Listening Safely
To protect your hearing, follow these guidelines when you
use headphones.
• Set the volume to the lowest setting before you begin
listening. After you begin listening, adjust the volume to
a comfortable level.
• Do not listen at extremely high volume levels. Extended
high volume listening can lead to permanent hearing
loss.
• Once you set the volume, do not increase it. Over time,
your ears adapt to the volume level, so a volume level
that does not cause discomfort might still damage your
hearing.
Traffic Safety
Do not wear headphones while operating a motor vehicle or
riding a bicycle. This can create a traffic hazard and could
be illegal in some areas.
Even though some headphones let you hear some outside
sounds when listening at normal volume levels, they still can
present a traffic hazard.
ÔNOTE Ô
The Travel Theater’s speaker is not
disconnected when the
headphone(s) are connected.

Other Connections
10
OTHER CONNECTIONS
You can connect to an external TV antenna or cable TV, or a TV and audio/video receiver. The
picture below shows the Travel Theater connected to an external TV antenna, TV, and audio/
video receiver.
TOAN EXTERNAL TV ANTENNA OR CABLE TV
1. Plug the supplied 75-ohm coaxial cable connector into the Travel Theater’s TV ANT. socket.
2. Connect the antenna’s or cable TV’s 75-ohm connector to the coaxial cable connector as
shown
TO ATV AND AUDIO/VIDEO RECEIVER
1. Connect the supplied audio/video cable’s yellow plug to
the Travel Theater’s VIDEO jack. Connect the yellow
plug’s other end to the TV’s VIDEO IN jack. Ô
2. Connect the supplied audio/video cable’s white plug to
your Travel Theater’s AUDIO L jack. Connect the other
end to your TV or receiver’s Audio In L jack.
3. Connect the supplied audio/video cable’s red plug to
your Travel Theater’s AUDIO R jack. Connect the other
end to your TV’s or receiver’s Audio In R jack.
4. Set the Travel Theater’s A/V INPUT/OUTPUT switch to
OUTPUT.
75-ohm coaxial
cable connector
ÔNOTE Ô
• Position cables properly to
avoid audio interference. Insert
each cable firmly into the
designated jack.
• If you place components above
the TV, route all cables down
the side of the back of the TV.
• If your antenna uses 300-ohm
twin lead cables, do not coil the
cables. Keep the twin lead
cables away from audio/video
cables.

Other Connections
11
TO ACAMCORDER, GAME CONSOLE, OR DIGITAL CAMERA
You can connect a camcorder or a digital camera using the supplied audio/video cable. The
picture shown below is an example of a connection to a camcorder
1. Connect the audio/video cable’s white plug to your
device’s left output socket. Connect the other end of the
cable to the Travel Theater’s AUDIO L jack.
2. Connect the audio/video cable’s red plug to your
device’s right output socket. Connect the other end of
the cable to the Travel Theater’s AUDIO R jack.
3. Connect the supplied audio/video cable’s yellow plug to
the Travel Theater’s VIDEO jack. Connect the other end
of the yellow plug to the Video Output jack on your
camcorder, game system console, or digital camera. Ô
4. Set the Travel Theater’s A/V INPUT/OUTPUT switch to
INPUT.
ÔNOTE Ô
Some game systems have a
proprietary output cable. Follow
your game system’s hookup
instructions to send audio/video to
the Travel Theater.

Other Connections
12
CONNECTING TO AC POWER
You can power the Travel Theater using the supplied 12V,
2.5A AC adapter.
1. Turn the “feet” on the bottom of the Travel Theater
counterclockwise to remove them
2. Remove the Travel Theater from the carrying case, and
position the stand so it supports the Travel Theater on a
flat surface.
3. Connect the supplied AC adapter’s barrel plug to the
Travel Theater’s DC 12V jack.
4. Insert the AC plug to a standard AC outlet.
Cautions:
YoumustuseaClass2orITEpowersource
that supplies 12V DC and delivers at least
2.5A. Its center tip must be set to positive and
its plug must fit the Travel Theater's DC 12V jack. Using
an adapter that does not meet these specifications
could damage the Travel Theater or the adapter.
!

Operation
13
OPERATION
COMPATIBLE DISC TYPES
Your Travel Theater plays DVD discs, audio CD discs, and
most CD-R / CD-RW discs. Before loading a disc, make
sure that it is compatible with the Travel Theater.
The following discs cannot be played:
• Video CD discs
• Laserdiscs and mini discs
• CD-I, CD-ROM (computer-only discs), DVD-ROM discs
• Discs recorded using other broadcast standards (PAL
or SECAM).
• CD-G discs
LOADING AND PLAYING ADISC
1. Press POWER º to turn on the Travel Theater.
2. Press TV/DVD/AUX on the remote until the DVD logo
appears on screen, indicating DVD mode.
3. With the disc’s label facing front, slowly insert a disc
into the slot on top of the Travel Theater.
4. Press PLAY g. The Travel Theater reads the disc’s
table of contents, and then one of following happens
depending on how the disc was programmed:
The disc starts playing.
The disc menu appears on the screen. Highlight the
option to play the disc using eor d.PressENTER on
theremotetoconfirm.
D
V
D
L
A
B
E
L
Remote Control
Sensor

14
Operation
5. Adjust VOLUME to a comfortable listening level.
6. To stop playing a disc, press STOP D.Ô
7. Press EJECT to remove the disc from the player.
8. To turn off the Travel Theater, press POWER º.
PROGRAMMING TV CHANNELS
1. Press POWER º.
2. Press TV/DVD/AUX on the remote or TV/AUX on the
Travel Theater to select TV mode.
3. Press TV/CATV on the remote to select regular
broadcast TV or cable TV (Standard Cable, HRC
Cable, and IRC Cable).
4. Press AUTO MEMORY on the remote or PROG. on the
Travel Theater. All available channels are searched
and tuned. Channels with signals detected are
automatically stored.
5. Repeatedly press SKIP/SEARCH to turn SKIP on or off.
If SKIP is on, when you use d CHANNEL eor CH+/CH–
to scroll through channels, the TV stops only on
channels that were stored into memory. If SKIP is off,
the TV searches and stops at all available channels.
6. To manually store a TV channel, tune to that channel
and press ERASE/WRITE until MANUAL MEMORY ADD
appears on the screen.
To erase a channel from memory, tune to that channel
and press ERASE/WRITE on the remote until MANUAL
MEMORY ERASE appears on the screen.
WATCHING TV
1. Press d CHANNEL eon the Travel Theater or CH+/CH–
on the remote to tune to the desired channel. You can
also use the number buttons to manually enter the
channel number.
2. To adjust the volume, press d VOLUME eon the Travel
Theater or VOL +/ VOL– on the remote.
ÔNOTE Ô
When you stop playing a disc, the
Travel Theater remembers where
you stopped. When you press
PLAY g to start playing the disc
again, the Travel Theater picks up
where you left off unless you press
STOP D, eject the disc, or turn off
the Travel Theater.

DVD Advanced Features
15
DVD ADVANCED FEATURES
MENUS
Each disc is programmed with different features. There are
three menus available to access features:
Disc
The Disc menu is part of each individual disc, separate from
the Travel Theater’s menu. Disc menu content varies
according to how the disc was authored and what features
are included. Press MENU while a disc is playing to view the
disc menu. Press eor dto highlight the desired menu
option, and press ENTER on the remote to confirm.
Info
The Info menu appears across the top of the screen when a
disc is playing. It shows Title Elapsed Time, Title Remaining
Time, Chapter Elapsed Time,and Chapter Remaining Time.
Repeatedly press DISPLAY to view the desired option.
DISPLAY OFF appears when the Info menu is off.
Setup Main Menu
The Setup Main Menu can be accessed when a disc is not
in the player. It allows you to specify general setup
information and preferences. Press SETUP to view the Main
Menu. This menu appears automatically when you press
STOP D.
DVD PLAYBACK FEATURES
Fast Motion Playback (Picture Scan)
1. During playback, press REV @or FWD Ion the
remote to search backward or forward through a disc.
2. Press REV @or FWD Iagain to accelerate search
speed. There are four speeds — 2X, 4X, 8X, and 16X.
With each consecutive press of the button, the search
speed increases. If you press the button more than four
times, Picture Scan returns to normal playback speed.
3. Press PLAY g to resume normal playback.
Freeze Frame
1. Press PAUSE on the remote to freeze playback.
2. Press PLAY g or PAUSE to resume normal playback.

DVD Advanced Features
16
Slow Motion Playback
1. Press SLOW to begin slow motion playback.
2. Press SLOW again to decrease the speed. There are
four speeds in reverse (1/2, 1/4, 1/8, 1/16), and four
speeds forward (1/2, 1/4, 1/8, 1/16).
3. To return to normal speed, press PLAY g.
Skipping Chapters
Use NEXT J to go to the next chapter and PREV Fto go to
the previous chapter.
Subtitles
When a DVD is recorded with subtitles, you can use the
Subtitle feature to view them on screen. Ô
1. Press SUBTITLE. The subtitles appear in the default
language.
2. To view subtitles in a different language, press
SUBTITLE again until the desired language appears.
3. To turn subtitles off, press SUBTITLE until SUBTITLE OFF
appears.
Changing Audio Language
When a DVD is recorded with multiple soundtracks, you can
use the Audio feature to temporarily change the audio
language. Ô
1. During disc playback, press AUDIO. The audio
language banner appears if the disc is programmed for
a different audio language. Otherwise, ½appears.
2. Continue pressing AUDIO until the desired language
appears.
Using Repeat
There are three repeat options:
• Chapter — repeats the chapter that is playing.
• Title — repeats the title that is playing.
• All — repeats the entire disc.
1. While a disc is playing, press REPEAT.ÙCHAPTER
appears. The current chapter is repeated.
2. To repeat the current title, press REPEAT again.
ÙTITLE appears.
ÔNOTE Ô
Subtitles
Any settings you change on the
disc menu temporarily override the
default settings in the Travel
Theater’s menu. Default settings
are the factory presets in the Travel
Theater’s menu system. See
“Setting Preferences” on Page 20
Changing Audio Language
When you play a disc, the Travel
Theater’s default audio language is
selected. If the disc does not
contain this language, the disc’s
default language is automatically
selected. This feature is disc-
dependent and may not work with
all DVDs.

Playing Audio CDs
17
3. To repeat the entire disc, press REPEAT again.
ÙALL appears.
4. To turn repeat off, press REPEAT until REPEAT OFF
appears.
Using Zoom
While a DVD is playing, repeatedly press ZOOM to enlarge
the picture.
PLAYING AUDIO CDS
1. Press POWER º.
2. Press TV/AV on the Travel Theater or TV/DVD/AUX on
theremotetoselectDVDmode.
3. With the disc’s label facing front, slowly insert a disc
into the disc slot on the top of the Travel Theater.
4. Adjust VOLUME to a comfortable listening level.
5. To remove the CD from the player, press EJECT.
SKIPPING TRACKS
Press NEXT Jto go to the next track and PREV F to go to
the previous track.
USING REPEAT
There are two repeat options:
• TRACK — repeats the track that is playing
• ALL — repeats the entire disc
1. While a disc is playing, press REPEAT.ÙTRACK
appears. The current track repeats.
2. To repeat the entire disc, press REPEAT again. Ù ALL
appears.
3. To turn repeat off, press REPEAT until REPEAT OFF
appears.
USING THE DISPLAY FUNCTION
While an audio CD is playing, repeatedly press DISPLAY.
The following options appear in sequence:
SINGLE ELAPSED (timeforasong)
SINGLE REMAIN (time for a song)

Playing MP3 Discs
18
TOTAL ELAPSED (time for the entire disc)
TOTAL REMAIN (timefortheentiredisc)
DISPLAY OFF
PLAYING MP3 DISCS
When you play an MP3 disc, the MP3 menu appears. Ô
1. Press POWER º.
2. Press TV/AV or TV/DVD/AUX to select DVD mode.
3. With the disc’s label facing front, slowly insert a disc
into the disc slot on the top of the Travel Theater.
SELECTING TRACKS
1. Use e,d,f ,or
g , to highlight a track.
2. Press ENTER on the remote to select the track.
3. Press PLAY g to begin playing the track.
SKIPPING TRACKS
1. Press NEXT J to skip to the beginning of the next
song.
2. Press PREV F to skip to the beginning of the previous
song.
TOREPEAT AN MP3 TRACK
While a disc is playing, press REPEAT to toggle among the
following:
SINGLE (plays the highlighted track)
REPEAT ONE (repeats the highlighted track)
REPEAT FOLDER (repeats the highlighted folder)
FOLDER (plays the folder and then stops)
USING THE DISPLAY FUNCTION
While a disc is playing, press DISPLAY to view the track,
elapsed time, and track remaining time.
ÔNOTE Ô
This Travel Theater only plays
discs containing MP3 files
recorded from your CD-R and CD-
RW drives. Though it plays most
MP3 files, it may not play them all.

Playing JPEG Discs
19
PLAYING JPEG DISCS
1. After loading a JPEG disc, the JPEG main menu page
appears. Use e,d,f ,or
g to highlight the desired
picture.
2. Press ENTER on the remote to select it.
3. During playback, use e,d,f ,or
g to rotate the
picture.
4. Press ZOOM, and then FWD Ior REV @on the remote
to shrink or enlarge the picture by 50%, 75%, 100%,
125%, 150%, or 200%. While enlarging the photo, use
e,d,f ,or
g to pan up, down, left, or right to view the
whole picture. To exit zoom mode, press PLAY g,
NEXT J,orPREVF.
5. Press STOP D to view the JPEG submenu pages. Use
e,d,f ,or
g and ENTER to highlight and select the
desired function. To return to the JPEG main menu,
press STOP D.
TOREPEAT AJPEG PHOTO
While in the JPEG main menu, press REPEAT to toggle
among the following:
SINGLE (plays the highlighted track and then stops)
REPEAT ONE (repeats the highlighted track)
REPEAT FOLDER (repeats the highlighted folder)
FOLDER (plays the folder and then stops)
While playing JPEG photos, repeatedly press REPEAT to
toggle among the following:
SINGLE (plays the photo and then stops)
REPEAT ONE (repeats the current photo)
REPEAT ALL (repeats the highlighted folder)
REPEAT OFF (turn off repeat function)

Default Setup
20
DEFAULT SETUP
GENERAL SETUP
1. Press SETUP.TheSETUP MENU -- MAIN PAGE appears.
2. Select GENERAL SETUP using e ord, and then press
ENTER.
3. Select TV DISPLAY using e ord, and then press ENTER.
Press e ord on the remote to select one of the
following options. Press ENTER to confirm the setting.
NORMAL/PS — When watching a DVD with wide picture
with a normal TV (not wide one), a portion may be cut
off automatically to fit the screen.
NORMAL/LB — When watching a DVD with wide picture
with a normal TV (not wide one), a black strip at both
the top and bottom of the screen appears.
WIDE — When the Travel Theater is connected to a
wide screen TV, a wide picture is then shown on the full
screen.
4. Select MAIN PAGE using e ord on the remote.
5. Press ENTER to return to the main page.
6. To resume play, press SETUP.
SETTING PREFERENCES
When there is no disc inside the Travel Theater, press
SETUP.SETUP MENU -- MAIN PAGE appears. Use e ord on
theremotetoselectPREFERENCE SETUP. Then press ENTER.
Audio
1. Select AUDIO using e ord on the remote.
2. Press gto access the audio options.
3. Select the desired audio language using e ord
(ENGLISH,FRENCH,SPANISH,CHINESE,orJAPANESE).
4. Press ENTER to confirm the setting.
5. Press f to return to the PREFERENCE SETUP menu.
Subtitles
1. Select SUBTITLE using e ord on the remote.
Table of contents
Other Radio Shack Portable DVD Player manuals