Radio Shack Go Vision 16-3255 User manual

©2002 RadioShack Corporation.
All Rights Reserved.
RadioShack and RadioShack.com
are trademarks used by
RadioShack Corporation.
AXION is a registered trademark of
Action Electronics Taiwan.
OWNER’S MANUAL —
Please read before using this equipment.
16-3255
)Q"8KUKQP &8&"6TCXGN"6JGCVGT
#"+/2146#06"#
If an icon appears at the end of a paragraph, go to the box on that page
with the corresponding icon for pertinent information.
R
RR
Rý— Warning #— Important ±
±±
±—Note
.
..
.— Caution
°
°°
°— Hint
Thank you for purchasing a Go
Vision DVD Travel Theater. Your
DVD player uses the latest in solid-
state design to give you high-
quality picture and sound as well
as reliable operation. It is a
compact, all-in-one audio/video
entertainment system. You can
use it to enjoy music from your
favorite CDs as well as DVDs. It is
small, lightweight and easy to carry
using the supplied carrying case
and shoulder strap. It is perfect for
use in your car, SUV or van.
Dual AC/DC Power Sources —
let you power the player using either
your car’s DC power source or
household AC power.
5.6'' TFT Flat LCD Color Monitor —
makes the DVD player more
compact and use less power than a
standard picture tube.
Remote Control — lets you
conveniently control the DVD player.
Dual Headphones Jacks — let you
connect the supplied headphones for
private listening.
Audio/Video Input Jacks — let you
connect a video game console,
camcorder, or digital camera.
Audio/Video Output Jacks —
let you connect to an external TV.
;QWT"&8&"6TCXGN"6JGCVGT"2NC[U<
•DVD Video Discs — Video discs
consisting of movies, concerts, and so on.
•Audio Discs — Audio CDs containing
musical or sound content only.
•CD-R — A disc that you can write
information to once (for example,
downloading MP3 files).
•CD-RW — A re-writable disc. You can write
information onto this type of disc more than
once. For example, if you have previously
downloaded MP3 files to a CD-RW disc,
you can write information to the disc again,
after it erases the previously written
information.

The FCC Wants You to Know
2
6*'"(%%"9#065";17"
61 -019
This equipment has been tested and found to comply with
the limits for a Class B digital device, pursuant to Part 15 of
the
FCC Rules
. These limits are designed to provide
reasonable protection against harmful interference in a
residential installation. This equipment generates, uses and
can radiate radio frequency energy and, if not installed and
used in accordance with the instructions, may cause
harmful interference to radio communications.
However, there is no guarantee that interference will not
occur in a particular installation. If this equipment does
cause harmful interference to radio or television reception,
which can be determined by turning the equipment off and
on, the user is encouraged to try to correct the interference
by one or more of the following measures:
• Reorient or relocate the receiving antenna.
• Increase the separation between the equipment and
receiver.
• Connect the equipment into an outlet on a circuit
different from that to which the receiver is connected.
• Consult your local RadioShack store or an experienced
radio/TV technician for help.
• If you cannot eliminate the interference, the FCC
requires that you stop using your DVD player.
Changes or modifications not expressly approved by
RadioShack may cause interference and void the user’s
authority to operate the equipment. R
RR
Rý
4')+10"/#0#)'/'06"
+0(14/#6+10
This DVD Player is designed and manufactured to respond
to the Region Management Information that is recorded on
a DVD disc. If the Region number described on the DVD
disc does not correspond to the Region number of this DVD
player, this DVD player cannot play that disc.
The Region number of this DVD player is 1
(USA/CANADA).
R"9#40+0)"R"
• This system employs a laser
light beam. Only a qualified
service person should remove
the cover or attempt to service
this device, due to possible eye
injury.
• The use of controls,
adjustments, or procedures
other than those specified
herein might result in
hazardous radiation exposure.
%106'065
Important Safety Information ................ 3
Avoid Damaging the
AC Adapter Cord ............................... 4
A Quick Look at Your DVD Player ........ 5
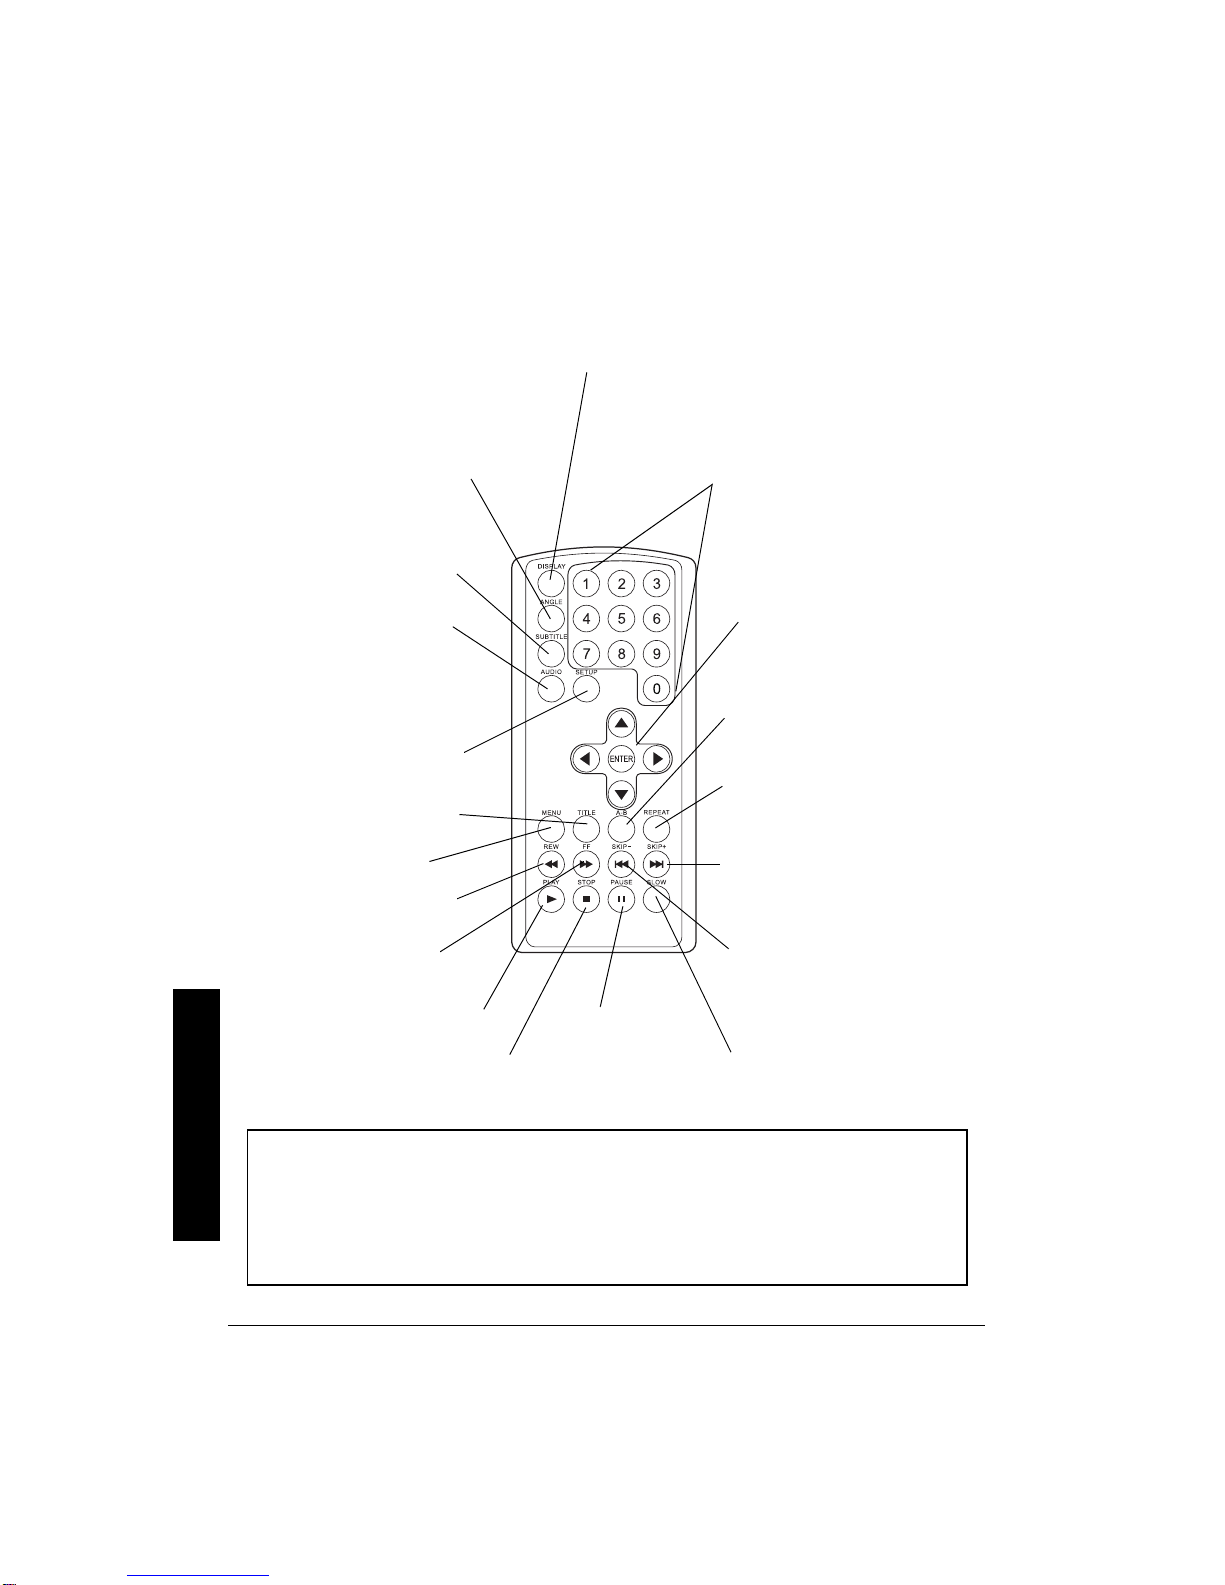
A Quick Look at the Remote Control .... 6
Included Accessories ............................ 7
Basic Installation ................................... 9
Installing the DVD Player in a Vehicle 9
Connecting Vehicle Battery Power .... 9
Connecting Headphones ................... 9
Basic Operation .................................. 10
Loading and Playing a DVD ............ 10
Compatible Disc Types .............. 10
Loading and Playing a Disc ........ 10
Other Connections ............................... 11
Connecting to a TV .......................... 11
Connecting to a TV and Amplifier ... 12
Connecting to a Camcorder, TV, Game
Console, or Digital Camera ............. 13
Connecting a Game Console ..... 13
Connecting AC Power
for Indoor Use ................................. 13
Advanced Features ............................. 14
Menus ............................................. 14
Using Different Menus ................ 14
Using a Disc Menu ..................... 14
DVD Playback Features .................. 15
Fast Motion Playback
(Picture Scan) ............................. 15
Freeze Frame ............................. 15
Slow Motion Playback ................ 15
Skipping Chapters ...................... 15
Title ............................................. 15
Subtitles ...................................... 16
Changing the Audio Language ... 16
Changing the Camera Angle ...... 16
Using the Repeat Feature .......... 17
Playing Audio CDs .............................. 18
Loading and Playing an Audio CD .. 18
Audio CD Playback Features .......... 18
Skipping Tracks .......................... 18
Using the Repeat Feature .......... 18
A-B Repeat ................................. 18
Using the Display Function ......... 19
(Continued)
The lightning symbol is intended to alert you to the presence of
uninsulated dangerous voltage within this product’s enclosure that
might be of sufficient magnitude to constitute a risk of electric
shock. Do not open the product’s case.
The exclamation symbol is intended to inform
you that important operating and maintenance
instructions are included in the literature
accompanying this product.
!
WARNING: To reduce
the risk of fire or shock
hazard, do not expose this
product to rain or moisture.
CAUTION: TO REDUCE THE RISK OF
ELECTRIC SHOCK, DO NOT REMOVE COVER
OR BACK. NO USER-SERVICEABLE PARTS
INSIDE. REFER SERVICING TO QUALIFIED
PERSONNEL.
RISK OF ELECTRIC
SHOCK DO NOT OPEN
!
CAUTION

3
016'5"10"%12;4+)*6
It is forbidden by law to copy, broadcast, show, broadcast
on cable, play in public, and rent copyrighted material
without permission. DVD video discs are copy protected,
and any recordings made from these discs will be distorted.
This product incorporates copyright protection technology
that is protected by method claims of certain U.S. patents
and other intellectual property rights owned by Macrovision
Corporation and other rights owners. Use of this copyright
protection technology must be authorized by Macrovision
Corporation, and is intended for home and other limited
viewing uses only, unless otherwise authorized by
Macrovision Corporation. Reverse engineering or
disassembly is prohibited.
+/2146#06"5#('6;"
+0(14/#6+10
This manual contains important information about how to
safely and properly install, operate and care for this product.
Failure to properly install, operate and care for this product
can increase the risk of electric shock or fire. It can also
increase the risk of monitor failure and possibly personal
injury. To reduce the risk of serious injury or death, or
damage:
• Read these instructions
• Keep these instructions
• Heed all warnings
• Follow all instructions
Do not attempt to service or repair the monitor & DVD player
yourself. Refer all servicing to qualified service personnel.
Do not block any ventilation openings. Do not place the
Monitor and DVD player on a bed, sofa, or other soft surface
that may block ventilation openings.
Do not install the Monitor and DVD player near any heat
sources, such as radiators, stoves, or other devices that
produce heat.
Do not use this apparatus near water (for example, sinks,
tubs, and pools) or expose it to rain, moisture, or dripping or
splashing liquids. No objects filled with water (such as
vases) should be placed on the apparatus.
%106'065
(continued)
Playing MP3 Discs ............................... 19
Selecting Tracks .............................. 19
Skipping Tracks ............................... 19
To Repeat a MP3 Track or Disc ....... 20
Using the Display Function .............. 20
Setting Up Defaults .............................. 20
General Setup .................................. 20
Setting Preferences ............................. 21
Replacing the Remote’s Battery .......... 22
Setting the
Parental Levels .................................... 22
Changing the Password ...................... 23
Troubleshooting ................................... 24
Specifications ...................................... 25
Care ..................................................... 26
Handling Cautions ........................... 26
Case Maintenance ........................... 26
Formation of Condensation ............. 26
Handling Discs ................................. 27
Cleaning Discs ................................. 27
Service and Repair .............................. 27
Important Safety Information

Important Safety Information
4
Do not play headphones at a high volume to avoid exposure
to excessive sound pressures. You should use extreme
caution or temporarily discontinue use in a potentially
hazardous situation. Even if your headset is an open-air
type, designed to let your hear outside sounds, do not turn
up the volume so high that you can not hear what is around
you.
THE VEHICLE’S DRIVER SHOULD NEVER OPERATE
OR WATCH THE DVD PLAYER WHILE DRIVING.
General Electrical Precautions — As with many others
electrical devices, failure to take precautions can result in
serious injury or death from electrical shock or fire, and can
damage the Monitor and DVD player.
Avoid Laser Hazards — As the laser beam used in the
DVD player is harmful to eyes, and to avoid electrical
hazards, do not attempt to disassemble the housing. Refer
servicing to qualified personnel.
#81+&"&#/#)+0)"6*'"#%"#'4"
%14&
• Protect the AC adapter cord from being walked on or
pinched particularly at plugs, and the point where they
exit from the apparatus.
• Do not jerk, knot, sharply bend, or otherwise abuse the
AC adapter cord.
• Do not expose the AC adapter cord to the sources of
heat.
• Keep children and pets away from the AC adapter cord
do not allow them to bite or chew on it.
• When disconnecting the AC adapter cord from DVD
player or a power outlet, pull on the plug do not pull on
the cord.
If the AC adapter cord becomes damaged in any way, stop
using it immediately.

5
#"37+%-".11-"#6";174"
&8&"64#8'."6*'#6'4
–VOLUME+LCD POWER Indicator
STOP
PREV )
))
)— Press while a
disc is playing to view
previous chapters.
PLAY J
NEXT -
--
-— Press while
a disc is playing to view
upcoming chapters.
OPEN
IR (infrared)
SENSOR
CLOSE
POWER
V1and V2
G
GG
GBRIGHT H
HH
H— Adjusts
brightness of LCD display.
ì
ìì
ìOFF/ON —
——
—
Turns the LCD
display on or off.
DVD Player
Power Indicator
Your DVD Travel Theater

6
#"37+%-".11-"#6"6*'"4'/16'"%10641.
DISPLAY — Press during playback
to briefly display the elapsed time
and disc remaining time.
ANGLE — Press to access various
camera angles on a disc (If the disc
contains multiple camera angles,
otherwise }
}}
}appears).
Number Buttons — Use to input
information such as chapter
numbers, track numbers, or to make
selections on some menu screens.
H
HH
H/ G
GG
G/ I
II
I/ J
JJ
J
— Use to move through
theonscreenmenus.Tohighlight a
menuitem, press
H
HH
H,G
GG
G,I
II
I,or J
JJ
J
then
press ENTER to select it.
TITLE — Returns you to
the title menu.
MENU — Displays the
DVD player’s root menu.
A-B — Lets you repeat a portion of
thediscfromadesignatedpoint(A)
to another designated point (B).
REPEAT — Press to display the
Repeat info banner. You can
repeat part or all of a chapter,
track, or an entire disc.
FF/,
,,
,— Press during playback to
fast forward through a disc.
*SKIP+/-
--
-— Press to search
forward through a disc during
playback. Advances forward one
chapter or track at a time.
*SKIP–/)
))
)— Press to search
backward through a disc during
playback. Advances backward
one chapter or track at a time.
*PLAY/J
JJ
J— Press to begin disc
play and select menu items.
*STOP/'
''
'— Press
to stop disc play.
PAUSE/f
ff
f— Press
to pause disc play.
For audio CDs, a
second press
resumes playback.
SLOW — Advances
picture slowly.
AUDIO — Lets you select a
different language during DVD
playback (if the disc was
authoredwithmultiplelanguages
otherwise
}
}}
}appears.
SUBTITLE — Press to briefly
show the subtitle banner (If the
disc was created with subtitles,
otherwise }
}}
}appears).
REW/#
##
#— Pressduring playback
to fast reverse through a disc.
SETUP—Pressto displaythe
setup menu main page.
±"016'"±"
• Make sure there is a clear path between the remote and the DVD player so the signal is not
blocked.
•*— indicates the control has the same function as the controls on the DVD player.
• Your remote is shipped with a vinyl insulation slip to prevent battery drain. Pull out the insulation
slip before using the remote.
A Quick Look at the Remote

7
+0%.7&'&"#%%'5514+'5
Your DVD player includes the following accessories.
Carrying Case — protects the DVD player and lets you easily carry it (and all of the
accessories) anywhere. An accessory pouch is also included.
Shoulder Strap — Attaches to the carrying case (Clip hooks on both ends).
DC Adapter — lets you power the DVD player from your vehicle’s cigarette lighter socket.
Two (2) Pairs of Earbuds — for private listening.
Included Accessories

8
AC Adapter — lets you power the DVD player from a standard AC outlet.
Audio/Video Cables — let you connect the DVD player to a TV, amplifier, video game, or
camcorder.
Four (4) Straps for Vehicle Installation — let you install the DVD player securely in your
vehicle (Clip the hook on one end and the “S” hook on the other).
Included Accessories

Basic Installation
9
$#5+%"+056#..#6+10
For a graphical view of the installation, see the Quick Start.
+056#..+0)"6*'"&8&"2.#;'4
+0"#"8'*+%.'
1. Make sure the DVD player is securely fastened in the
carrying case.
2. Pull down the panel on the back of the carrying case
and reattach it, aligning the velcro strip to the catch
panel.
3. Attach one of the supplied straps to the carrying case
and hang the strap over the back of the headrest.
4. Attach one strap to each loop on the bottom of each
side of the carrying case.
5. Wrap the straps around the bottom front of your seat
and attach them together. The configuration varies
depending on you car seat.
6. Secure the DVD player by adjusting the straps to the
appropriate length for your car seat.
%100'%6+0)"8'*+%.'"$#66'4;"219'4
You can power the DVD player from your vehicle’s 12V
power source (such as a cigarette-lighter socket) using the
supplied 12 volt, 2.5 Amp DC adapter. .
..
.
1. Unzip the middle zipper on the carrying case to insert
the adapter plug into the jack.
2. Connect the supplied 12V DC adapter cord’s barrel
plug to the DC IN 12V jack on the back of the DVD
player.
3. Connect the other end of the adapter to the vehicle’s
cigarette lighter socket. #
%100'%6+0)"*'#&2*10'5
The DVD player has two 1/8-inch (3.5 mm) headphones
jacks on the left side of the screen panel for private
listening. Connect the supplied stereo headphones’
1/8inch (3.5 mm) plug(s) into the V1and/or V2jack(s).
."%#76+10".
• You must use a power source
that supplies 12V DC and
delivers at least 2.5A. Its center
tip must be set to positive and its
plug must fit the DVD player's
DC IN 12V jack. The supplied
adapter meets these
specifications. Using an adapter
that does not meet these
specifications could damage the
DVD player or the adapter.
• Always connect the adapter to
the DVD player before you
connect it to the power source.
When you finish, disconnect the
DC adapter from the power
source before you disconnect it
from the DVD player.
#"+/2146#06"#
To avoid draining your car’s
battery power, do not leave the
DVD player on or the DC adapter
connected to the cigarette lighter
when your vehicle is not running.

Basic Operation
10
$#5+%"12'4#6+10
.1#&+0)"#0&"2.#;+0)"#"&8&
%QORCVKDNG"&KUE"6[RGU
Your DVD player plays DVD discs, Audio CD discs, and
most CD-R discs/CD-RW discs. Before you load a disc,
make sure that it is compatible with the player.
The following discs cannot be used with this player:
• Video CD discs
• Laserdiscs and mini discs
• CD-I, CD-ROM (computer-only discs), DVD-ROM
• Discs recorded using other broadcast standards (PAL
or SECAM).
• CD-G Discs play audio only, not graphics.
.QCFKPI"CPF"2NC[KPI"C"&KUE
1. Lift up the DVD player’s upper case.
2. To turn power on, press POWER, located on the lower
left of the DVD player . The DVD player’s POWER
indicator lights.
3. Open the disc tray by pressing OPEN at the lower right
of the disc tray.
4. Place a disc in the tray with the disc’s label facing up
(double-sided discs have content on both sides, so you
can place either side up). Make sure the disc fully seats
on the tray’s spindle.
5. Press CLOSE at the right side of the tray door until it
clicks shut.
6. Slide OFF/ON,located below the LCD display, to ON to
turn on the LCD display. The LCD’s POWER indicator
below the LCD display lights.
7. Press PLAY J,ýlocated on the right side of the disc tray
or on the remote. The DVD player reads the disc’s table
of contents, and then one of following happens
depending on how the disc was programmed:
• The disc starts playing.
• The disc menu appears on the screen. One of the
options starts disc play. Highlight that option using
H/G/ Iýor Jpress ENTER on the remote.
Listening Safely
To protect your hearing, follow
these guidelines when you use
headphones.
• Set the volume to the lowest
setting before you begin
listening. After you begin
listening, adjust the volume to a
comfortable level.
• Do not listen at extremely high
volume levels. Extended high-
volume listening can lead to
permanent hearing loss.
• Once you set the volume, do not
increase it. Over time, your ears
adapt to the volume level, so a
volume level that does not cause
discomfort might still damage
your hearing.
Traffic Safety
• Do not wear headphones while
operating a motor vehicle or
riding a bicycle. This can create a
traffic hazard and could be illegal
in some areas.
• Even though some headphones
let you hear some outside
sounds when listening at normal
volume levels, they still can
present a traffic hazard.

Other Connections
11
8. Rotate BRIGHT and VOLUME,located below the LCD to
adjust the LCD’s brightness and the DVD player’s
volume.
9. To stop playing a disc, press STOP '.
• When you stop playing a disc, the DVD player
remembers where you stopped.
• When you press PLAY Jto start playing the disc
again, the player picks up where you left off unless
you removed the disc or unplugged the DVD player.
10. To turn off the DVD player, press POWER on the DVD
player. The DVD player’s POWER indicator turns off.
To turn off the display, slide OFF/ON to OFF. The LCD’s
POWER indicator turns off.
16*'4"%100'%6+105
You can connect your DVD player to a TV, a TV and Audio/
Video receiver, a camcorder, a game system console, or a
digital camera.
%100'%6+0)"61"#"68
Position Cables Properly to Avoid Audio
Interference.
• Insert each cable firmly into the
designated jack.
• If you place components above the
TV, route all cables down the side of
the back of the TV instead of straight
down the middle of the back of the TV.
• If your antenna uses 300-ohm twin
lead cables, do not coil the cables.
Also, keep the twin lead cables away
from audio/video cables.
1. Connect the supplied Audio/Video
cable’s yellow plug to the VIDEO
OUTPUT jack on the back of the DVD
player and connect the yellow plug’s
other end to the TV’s Video Input jack.
2. Connect the supplied Audio/Video
cable’s red plug to the AUDIO OUTPUT
Rsocket on the rear of the DVD
player. Connect the red plug’s other
end to the TV’s Audio Input Right jack.

Other Connections
12
3. Connect the supplied Audio/Video cable’s white plug to
the AUDIO OUTPUT L jack on the rear of the DVD player
and connect the white plug’s other end to the TV’s
Audio Input Left jack. ±
±±
±
%100'%6+0)"61"#"68"#0&"#/2.+(+'4
You can also connect the DVD player to a TV and to a
stereo amplifier to enjoy high quality stereo sound.
1. Connect the audio/video cable’s left (white) and right
(red) plugs to your audio/video receiver’s Audio In Left
and Right jacks. Connect the other end of the cable to
your DVD player’s AUDIO OUTPUT L and R jacks.
2. Connect the audio/video cable’s yellow plug to the
VIDEO OUTPUT jack on the back of your DVD player,
and the other yellow plug to the Video Input jack on
your TV.
±"016'"±"
• Some TVs do not have an RCA
or S-Video jack, they only have a
coaxial antenna jack. In this
case, you must purchase an RF
modulator (not supplied,
available at your local
RadioShack store).
• When you connect the DVD
player to a TV, the DVD player’s
display and speakers remain on.
To turn off the display, slide OFF/
ON under the screen to OFF.
• You may turn the DVD player’s
volume to the minimum level
when listening to the TV’s
speaker.

Other Connections
13
%100'%6+0)"61"#"%#/%14&'4."
)#/' %1051.'."14"&+)+6#."%#/'4#
You can connect a camcorder for video playback, or a
digital camera to view pictures. For this connection, if you
have not connected the OUTPUT jacks to a TV, use the
supplied audio/video cable for this connection.
%QPPGEVKPI"C")COG"%QPUQNG
If you are connecting a game system console, you may
need to connect a DC to AC inverter (not supplied, available
from RadioShack). ±
±±
±
%100'%6+0)"#%"219'4"(14"
+0&114 75'
You can power the DVD player using the supplied 12V, 2.5
Amp AC adapter..
..
.
1. To use the DVD player indoors, connect the supplied
AC adapter’s barrel plug into the DC IN 12V jack.
2. Lift up the AC plug module’s two blades and insert the
AC plug to a standard AC outlet.
1. Connect the left (white) and right
(red) plugs on the audio/video
cable to your camcorder’s or
game console’s left (white) and
right (red) Output sockets, and
connect the other end to the
AUDIO INPUT L (white) and R(red)
jacks on the back of your DVD
player.
2. Connect the audio/video cable’s
yellow plug to the VIDEO INPUT
jack on the back of your DVD
player, and the other yellow plug
to the Video Output jack on your
camcorder, game system
console, or digital camera.
±"016'"±"
Some game systems have a
proprietary output cable. Follow
your game system’s hookup
instructions to send audio/video to
the DVD player.
."%#76+10".
• You must use a Class 2 or ITE
power source that supplies 12V
DC and delivers at least 2.5
Amps. Its center tip must be set
to positive and its plug must fit the
DVD player's DC IN 12V jack.
The supplied adapter meets
these specifications. Using an
adapter that does not meet these
specifications could damage the
DVD player or the adapter.
• Always connect the AC adapter
to the DVD player before you
connect it to AC power. When
you finish, disconnect the adapter
from AC power before you
disconnect it from the DVD
player.

Advanced Features
14
#&8#0%'&"('#674'5
/'075
7UKPI"&KHHGTGPV"/GPWU
Each disc is programmed with different features. There are
three separate menu paths that you can use to access
features:
•The Disc menu — The Disc menu is part of each disc
and is separate from the DVD player’s menu. The
contents of each Disc menu varies according to how
the disc was authored and what features are included.
Press MENU on the remote (while a disc is playing) to
view the the Disc menu. Press MENU again to turn off
the Disc menu.
•The DVD player’s Info Display — The Info Display
appears across the top of the screen when a disc is
playing. It can only be accessed while you are playing a
disc. Press DISPLAY on the remote to turn Info Display
on and off.
•The DVD player menu — The DVD player’s menu
system is accessed only when a disc isn’t playing. It
appears automatically when you press STOP/'
''
'on the
remote or the DVD player.
A feature only works if the disc was programmed with that
feature. For example, if you choose subtitles on the Info
Display, the subtitles only appear if the disc was created
with subtitles. If a menu item is “grayed out” it means that
item is not available.
7UKPI"C"&KUE"/GPW
A disc may have an on-screen menu that is separate from
the DVD player’s menu system and on-screen Info Display.
The disc menu might only contain a list of the titles and
chapters, or it may allow you to change features such as
language and playback settings.
Although the content and operation of disc menus vary from
disc to disc, the following example gives you an idea of what
to expect.
1. While the disc is playing, press MENU on the remote.
The disc menu appears.
2. Press H/Gto highlight the section of the disc menu
you want to choose, and press ENTER on the remote.

Advanced Features
15
3. Press H/Gto select a language, and press ENTER on
the remote.
4. Press MENU on the remote to resume playback. ±
±±
±
&8&"2.#;$#%-"('#674'5
(CUV"/QVKQP"2NC[DCEM"
*2KEVWTG"5ECP+
You can search in forward or reverse mode.
1. Press #(reverse) or ,(forward) on the remote during
playback to search through a disc.
2. Press the button again on the remote to search at the
next speed. Picture Scan has 4 speeds. With each
consecutive press of the button, the search speed
increases. If you press the button more than 4 times,
Picture Scan cycles back to normal playback.
3. Press PLAY/ Jon the remote to resume normal
playback.
(TGG\G"(TCOG"
1. Press fPAUSE on the remote once to freeze playback.
2. Press PLAY/ Jto resume normal playback.
5NQY"/QVKQP"2NC[DCEM
Press SLOW on the remote for slow motion playback.
Press the button again to decrease the speed. Each time
you press SLOW, the playback speed decreases (see
“Playback Speed” to the right).
You may also press PLAY/ Jto return to normal speed.
5MKRRKPI"%JCRVGTU
Use SKIP +-
--
-to go to the next chapter and SKIP –)
))
)to go
to the previous chapter.
6KVNG
If your DVD is programmed with a title menu, pressing TITLE
on the remote returns the program to the start then the title
menu appears. If the DVD is not programmed with a title
menu, }
}}
}appears.
5WDVKVNGU
When a DVD is recorded with subtitles, you can use the
Subtitle feature to view the subtitles on-screen. To turn
subtitles on:
±"016'"±"
Any settings you change on the
disc menu only override the default
settings in the DVD player’s menu
temporarily. Default settings are
the settings that you set up in the
DVD player’s menu system. To
change the default settings, see
“Setting Up Defaults” on Page 20.
Playback Speed
"2TGUU"
5.19
2NC[DCEM"5RGGF1
&KTGEVKQP
12X,Forward
24X, Forward
3 8X, Forward
4 2X, Reverse
5 4X, Reverse
68X, Reverse
7 Normal Speed,
Forward

Advanced Features
16
1. Press SUBTITLE on the remote. The Info banner
displays the default subtitle language and the number
of subtitle languages available. If no subtitles are
available, }
}}
}appears.
2. Press SUBTITLE again to turn subtitles on. The subtitles
appear in the default language. To see subtitles in a
different language, press SUBTITLE to scroll through
the available subtitles.
3. To turn subtitles off, press SUBTITLE until the subtitles
disappear.
%JCPIKPI"VJG"#WFKQ".CPIWCIG
When a DVD is recorded with multiple sound tracks, you
can use the Audio feature to temporarily change the audio
language (the language of the sound track).
1. During disc playback, press AUDIO on the remote (the
audio language banner appears if the disc is
programmed for a different audio language. Otherwise
}appears).
2. Continue pressing AUDIO to scroll through available
languages. ±
±±
±
%JCPIKPI"VJG"%COGTC"#PING"
Some DVDs contain multiple angles of a particular scene or
sequence. Follow these steps to change the camera angle.
1. During disc playback, press ANGLE on the remote. The
current and total angle numbers appear.
If no camera angle is available, }appears. If multiple
camera angles are available, appears and shows
the current angle number and the number of angles
available. For example, 1/4 indicates that angle one is
being displayed, and there are four different angles
available.
2. Press ANGLE again to go to the next camera angle.
3. Continue to press ANGLE to resume normal
playback. ±
±±
±
7UKPI"VJG"4GRGCV"(GCVWTG
There are four repeat options:
•Off
• Chapter — repeats the chapter that is playing
• Title — repeats the title that is playing
±"016'"±"
Changing the Audio
Language
• If the disc does not contain the
language desired, the disc’s
default language is automatically
selected.
• When you play a disc, the
player’s default audio language
is selected. If the disc does not
contain this language, the disc’s
default language is automatically
selected. This feature is disc-
dependent, and may not work
with all DVDs.
Changing the Camera Angle
• This feature only works when a
DVD has been recorded with a
multi-camera angle system.

Advanced Features
17
• A-B Repeat — repeats a selected segment of the disc
To Repeat a Chapter or Title
REPEAT on the remote toggles between 9>7FJ;H
9>7FJ;H9>7FJ;H
9>7FJ;H H;F;7J
H;F;7JH;F;7J
H;F;7J,
J?JB;
J?JB;J?JB;
J?JB; H;F;7J
H;F;7JH;F;7J
H;F;7J and H;F;7J
H;F;7JH;F;7J
H;F;7J E<<
E<<E<<
E<<.
1. While a disc is playing, press REPEAT to turn on
chapter repeat. 9>7FJ;HýH;F;7J
9>7FJ;HýH;F;7J9>7FJ;HýH;F;7J
9>7FJ;HýH;F;7J ED
EDED
ED appears. The
current chapter repeats.
2. To repeat a title, press REPEAT again. J?JB;
J?JB;J?JB;
J?JB; H;F;7J
H;F;7JH;F;7J
H;F;7J ED
EDED
ED
appears.
3. To turn repeat off, press REPEAT until H;F;7J
H;F;7JH;F;7J
H;F;7J E<<
E<<E<<
E<<
appears.
A-B Repeat
A-B Repeat lets you repeat a specific segment on the DVD
that you define.
1. At the beginning of the segment you want to repeat,
Press A-B on the remote to mark the start (A) point of
the segment (the on-screen display shows “A TO B
SET A”).
2. Allow the movie to play to the end of the segment you
want to mark. You must let the movie play in standard
playback mode to set the B point in A-B Repeat. If you
reverse or fast-forward, A-B Repeat is cancelled.
3. Press A-B again to set the B point (“A TO B SET B”
appears on-screen).
4. The segment that you set plays until you turn off A-B
Repeat. To turn A-B repeat off, press A-B to resume
normal playback (7
77
7JE
JEJE
JE 8
88
897D9;BB;:
97D9;BB;:97D9;BB;:
97D9;BB;: appears).

Playing Audio CDs
18
2.#;+0)"#7&+1"%&U
.1#&+0)"#0&"2.#;+0)"#0"#7&+1"%&
1. Press OPEN at the front right of the DVD player.
2. Place a disc into the tray with the disc’s label facing up.
Make sure the disc fully seats onto the spindle.
3. Press down on CLOSE at the lower right side of the tray
door to close the tray. The DVD player reads the disc’s
table of contents and the current track number/total
track number appears (CDDR1/(total track number))
Track 1 begins playing automatically.
4. Press STOP/'
''
'to stop playback.
#7&+1"%&"2.#;$#%-"('#674'5
When playing audio CDs, your DVD player has many of the
same features that a CD player has, including track skip and
repeat play.
5MKRRKPI"6TCEMU
Press SKIP + -to go to the next track and SKIP – )to go
to the previous track.
7UKPI"VJG"4GRGCV"(GCVWTG
There are three repeat options:
•Track — repeats the track that is playing
•Disc — repeats the entire disc
•A-B Repeat — repeats a selected segment of the disc
To Repeat a Track or Disc:
1. While a disc is playing, press REPEAT on the remote.
H;F#ED;
H;F#ED;H;F#ED;
H;F#ED; appears. The current track repeats.
2. To repeat the entire disc, press REPEAT again. H;F#7BB
H;F#7BBH;F#7BB
H;F#7BB
appears.
3. To turn repeat off, press REPEAT until H;F;7J
H;F;7JH;F;7J
H;F;7J E<<
E<<E<<
E<<
appears.
#/$"4GRGCV
A-B Repeat lets you repeat a specific segment on the disc.
See “A-B Repeat” on Page 17 to use A-B Repeat with a
DVD disc.

Playing MP3 Discs
19
7UKPI"VJG"&KURNC["(WPEVKQP
While an audio CD is playing, consecutively press DISPLAY
on the remote. The following appears on the screen in turns
for 2 seconds:
•I?D=B;
I?D=B;I?D=B;
I?D=B; ;B7FI;:
;B7FI;:;B7FI;:
;B7FI;: time for a song
•I?D=B;
I?D=B;I?D=B;
I?D=B; H;C7?D
H;C7?DH;C7?D
H;C7?D time for a song
•JEJ7B
JEJ7BJEJ7B
JEJ7B ;B7FI;:
;B7FI;:;B7FI;:
;B7FI;: time for the entire disc
•JEJ7B
JEJ7BJEJ7B
JEJ7B H;C7?D
H;C7?DH;C7?D
H;C7?D time for the entire disc ±
±±
±
•E<<
E<<E<<
E<<
2.#;+0)"/25"&+5%U
When you play a MP3 disc, the MP3 menu appears instead
of the DVD player menu. The DVD player menu is not
available when playing MP-3 discs.
1. Press OPEN on the front right of the DVD player.
2. Insert an MP3 disc into the tray with the disc’s label
facing up.
3. Press CLOSE at the right side of the tray door until it
clicks shut. Track 1 begins playing.
4. Press STOP/'
''
'to stop playback.
5'.'%6+0)"64#%-5
Once you stop an MP3 disc, press PLAY/ Jon the player to
bring up the list of tracks available on that disc. The track list
is displayed in two columns.
Use H/ G/Iand Jýon the remote to select different tracks.
As you highlight a track in the track list, that track begins
playing when you press PLAY/ Jýagain.
5-+22+0)"64#%-5
To skip forward to the beginning of the next song on a MP3
disc, press SKIP +-on the remote or the front of the
player.
To skip backward to the beginning of the previous track on
an MP3 disc, press SKIP –)on the remote or the front of
the player.
±"016'"±"
When playing a CD or MP3, we
recommend that you turn off the
LCD display by setting the OFF/ON
switch below the LCD display to
OFF. To view the disc’s menu, set
the OFF/ON switch to ON.
This DVD player only plays discs containing MP3 files
recorded from your CD-R and CD-RW drives. Though
it plays most MP3 files, it may not play them all.
#

Setting Up Defaults
20
When skipping tracks, the highlight moves from left to right
across the columns, so track 1 is the first track listed in
column one, track 2 is the first track listed in column 2, track
3 is the second track in column 1, and so on.
61"4'2'#6"#"/25"64#%-"14"&+5%
1. While a disc is playing, press REPEAT on the remote.
H;F#ED;
H;F#ED;H;F#ED;
H;F#ED; appears. The current track repeats.
2. To repeat the entire disc, press REPEAT again. H;F#7BB
H;F#7BBH;F#7BB
H;F#7BB
appears.
3. To turn repeat off, press REPEAT until H;F;7J
H;F;7JH;F;7J
H;F;7J E<<
E<<E<<
E<<
appears.
75+0)"6*'"&+52.#;"(70%6+10"
While a disc is playing, press DISPLAY to display single
track elapsed time, I?D=B;
I?D=B;I?D=B;
I?D=B; ;B7FI;:
;B7FI;:;B7FI;:
;B7FI;: displays briefly.
5'66+0)"72"&'(#7.65
)'0'4#."5'672
Press SETUP on the remote to view the I;JKF
I;JKFI;JKF
I;JKF C;DK
C;DKC;DK
C;DK C7?D
C7?DC7?D
C7?D
F7=;
F7=;F7=;
F7=;.
Select =;D;H7B
=;D;H7B=;D;H7B
=;D;H7B I;JKF
I;JKFI;JKF
I;JKF using HýorýG on the remote and then
press ENTER to enter to the General Setup page.
JLý:?IFB7O0
JLý:?IFB7O0JLý:?IFB7O0
JLý:?IFB7O0 Select JL
JLJL
JL :?IFB7O
:?IFB7O:?IFB7O
:?IFB7O using H/ G/ Ior Jon the
remote and then press Jto enter the submenu. Press H/
Gon the remote to select one of the following then press
ENTER to confirm the setting.
•DEHC7B%FI0
DEHC7B%FI0DEHC7B%FI0
DEHC7B%FI0 When watching a DVD with wide picture
with a normal TV (not wide one), a portion may be cut
off automatically to fit the screen.
•DEHC7B%B80
DEHC7B%B80DEHC7B%B80
DEHC7B%B80 When watching a DVD with wide picture
with a normal TV (not wide one), a black strip at both
top and bottom screen appear to fit the screen.
•M?:;0
M?:;0M?:;0
M?:;0 When the player is connected to a wide screen
TV, a wide picture is then shown on the full screen.
7D=B;ýC7HA0
7D=B;ýC7HA07D=B;ýC7HA0
7D=B;ýC7HA0 Select 7D=B;
7D=B;7D=B;
7D=B; C7HA
C7HAC7HA
C7HA using H/ G/ Ior Jon the
remote and then press Jto enter the submenu.
Some DVDs may contain scenes shot simultaneously
from different angles. For these discs, the same scene
can be viewed from each of these different angles
using ANGLE. The recorded angles differ depending on
the disc. ±
±±
±
±"016'"±"
This function only works for discs
with scenes recorded at different
angles.
Table of contents
Other Radio Shack Portable DVD Player manuals