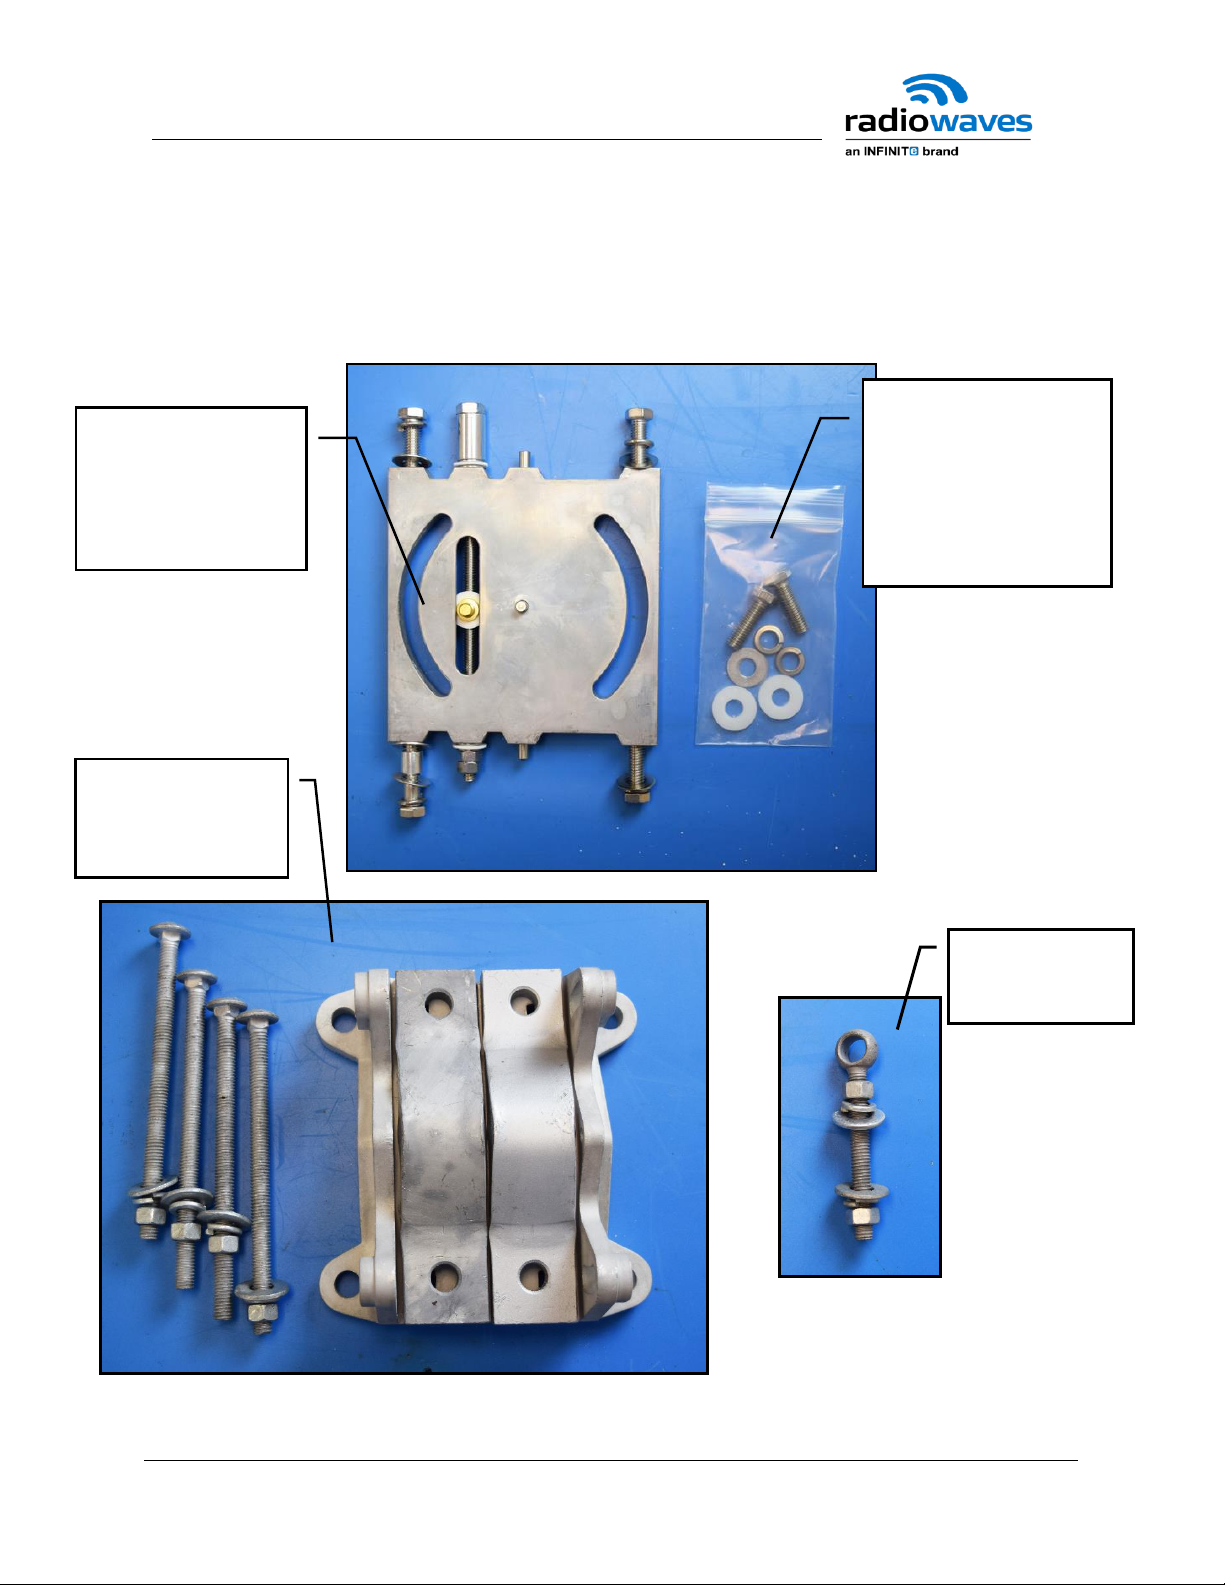
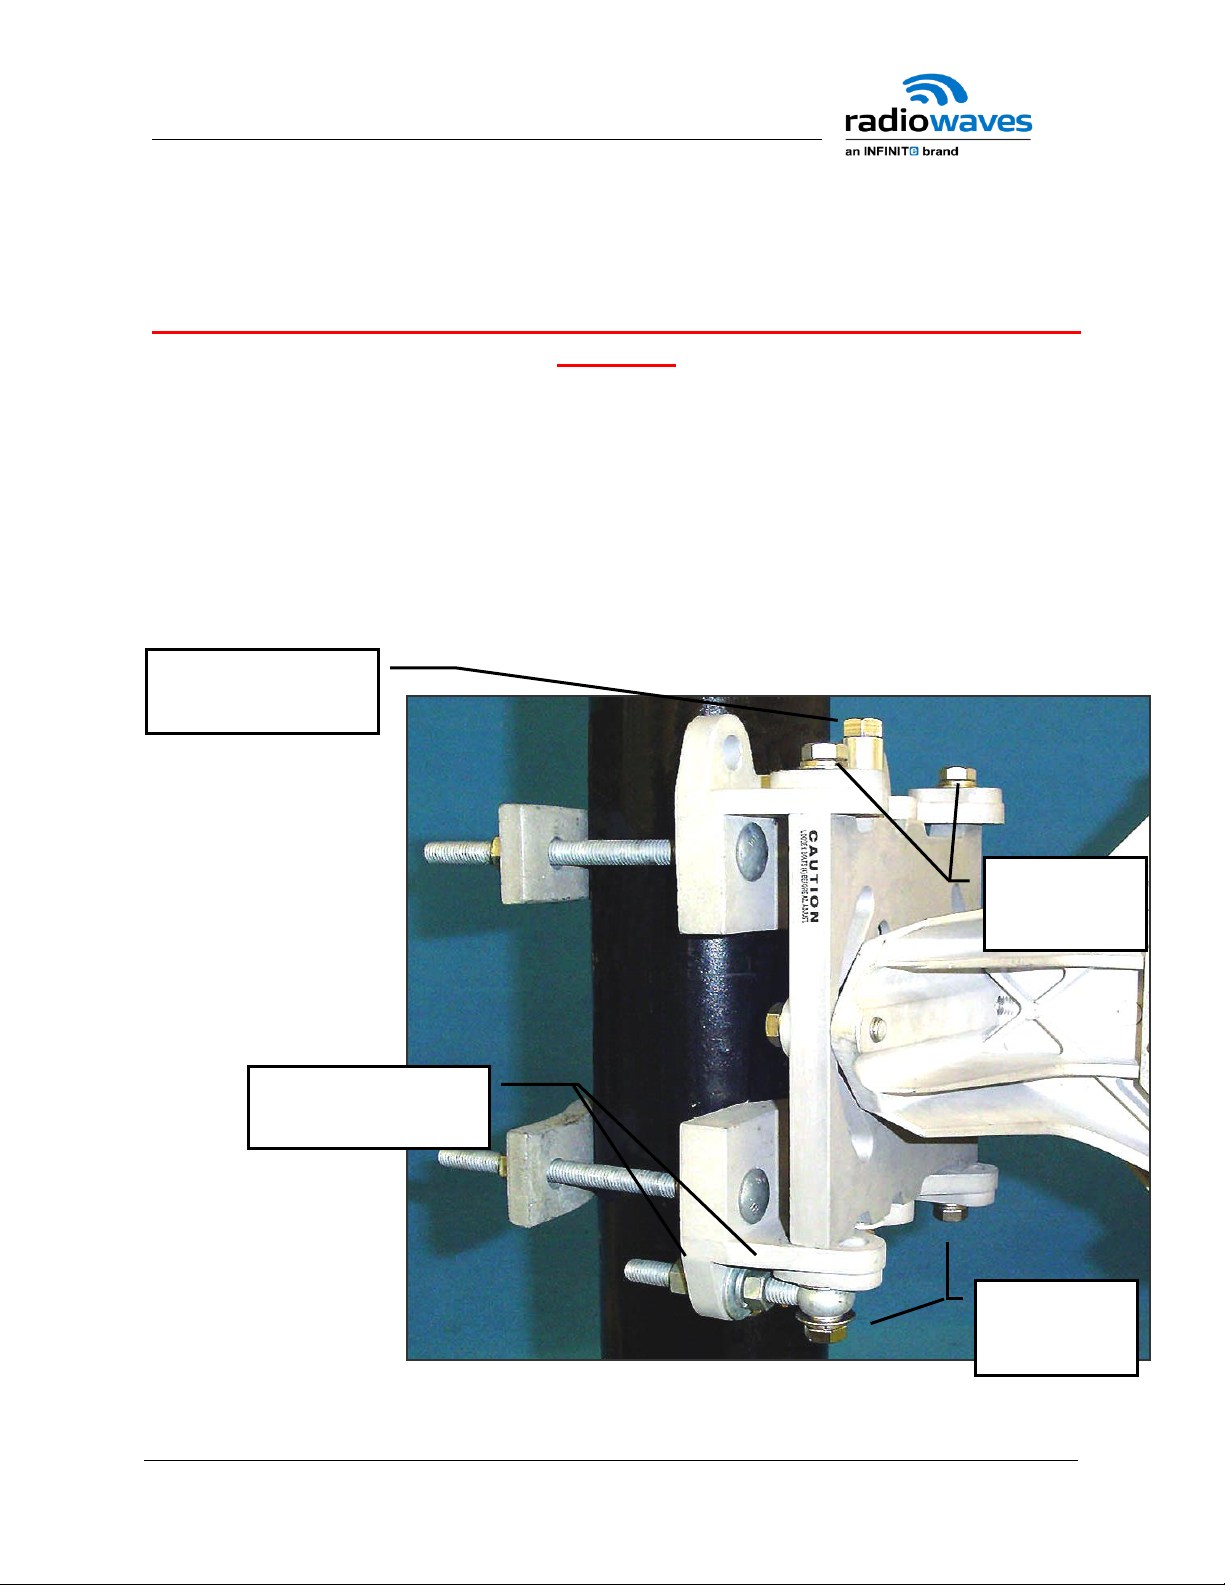
RadioWaves HPCPE User manual

FP103230-1 REV.K Page 2of 12
Your Pole Mount Kit is shipped to you in one box containing the following
components:
1. Antenna assembly
2. Pole Mount Kit
Note: Options and accessories are shipped separately and include
separate installation guides. Check the packing slip.
Tools Required:
1. 9/16” Open/box wrench or deep socket wrench
2. Torque Wrench with appropriate sockets
3. #2 Phillips screwdriver (FOR SP2/SPD2 UNITS ONLY)
NOTE: The pictures provided in this document are for illustrative purposes
only and may not be identical to your antenna system.

FP103230-1 REV.K Page 3of 12
Mounting Kit Component identification:
Pole Mount
Components
and hardware
Antenna
Mounting Plate
with associated
hardware
Antenna
Hardware Kit
(attaches
antenna to
mounting plate)
Azimuth
Adjust Bolt

FP103230-1 REV.K Page 4of 12
Assembly of the Mount Kit:
1. Assemble the upper and lower pole
mounts. Add the Azimuth Adjust Bolt to the
lower pole mount.
2. Attach the upper pole mount to top of
antenna mounting plate using hardware
supplied with plate.
Notes:
Right hand offset is shown, for Left hand offset rotate mounting plate 180º.
(See step 3 for photo).
Adjustments to the antenna may be necessary for Left hand offset mounting,
refer to additional instructions for your antenna model.
Top of mounting plate
indicated by Elevation
Adjustment Nut
Confirm that the Mount
is centered as shown.
Tighten bolts Securely
Align pin in plate
with hole on mount

FP103230-1 REV.K Page 5of 12
3. Attach the lower pole mount to opposite side of plate as shown.
(Adjustment Nut)
Align pin in plate
with hole on mount
Hardware sequence:
Flat washer (between mount and
rod), bushing (fits inside rod end),
flat washer, lock washer, bolt.
Confirm that the Mount is centered as shown.
Use the flat washer, lock washer and nut for each
lock bolt. (4X) Tighten securely.

FP103230-1 REV.K Page 6of 12
4. Completed assembly views.
Top
Adjustment
nut on top
Top
Adjustment
nut on
bottom
Rod
on
bottom
Right hand offset
Left hand offset

FP103230-1 REV.K Page 7of 12
FOR SP2/SPD2 UNITS ONLY!
1. In addition to the items listed above, you will
receive a “diamond” mount adapter plate with your
SP2/SPD2 series antenna. This plate is shipped in
the same box as the antenna, and packed with the
pole mount. You will need a #2 Phillips
screwdriver to install the plate.
2. Prior to attaching the mount assembly
to the pole install “diamond” mount
adapter plate on antenna as shown.
Tighten securely.
“Diamond” Mount
adapter plate
Mount Adapter plate:
Attach using (4) 1/4-20
screws, lock washers
and flat washers
provided with antenna.
Tighten securely.
Ensure
slot faces
away from
antenna

FP103230-1 REV.K Page 8of 12
Mounting on Pole
1. Fasten the
assembled Mount to
a maximum 4.5" OD
mounting pipe using
pole mounts as
shown. Position so
that face of mounting
plate is parallel to
desired beam path.
2. Align center hole of
antenna with pivot
pin, and elevation
slot with elevation
pin. Push antenna
towards mount and
engage pins. Hold in
place.
IMPORTANT: Do
not loosen the 4
bolts securing the
upper and lower
mounting brackets
Pole Mount
Antenna
Pivot Pin
Elevation Pin
Elevation Slot
Center Hole

FP103230-1 REV.K Page 9of 12
3. While supporting antenna, install (2)
3/8-16 bolts (with washers as shown)
through mounting plate and into
antenna. Tighten securely. Antenna is
now mounted.

FP103230-1 REV.K Page 10 of 12
Azimuth Adjustment:
1. Loosen the 4 Azimuth Lock Bolts so mounting plate can move.
Caution: Failure to loosen bolts before adjusting will result in damage
to mount
2. Adjust mounting plate using eyebolt adjustment nuts to drive antenna to
required location. Monitor RCL (Receive Carrier Level) and adjust per
radio manufacturer’s instructions. Verify antenna is adjusted on main
beam by passing through main beam and out to left and right 1st
sidelobe. Return antenna to main beam RCL.
3. Securely tighten the 4 Azimuth Lock Bolts.
4. Securely tighten eyebolt adjustment nuts.
5. Re-check Elevation and adjust if necessary
Elevation
Adjustment Nut
Azimuth
Lock Bolts
Azimuth
Lock Bolts
Eyebolt Azimuth
Adjustment Nuts

FP103230-1 REV.K Page 11 of 12
Elevation adjustment:
1. Loosen (2) Antenna Mounting Bolts slightly so antenna is able to move.
Loosening bolts excessively will cause difficulty during adjustment.
Caution: Failure to loosen bolts before adjusting will result in
damage to mount
2. Rotate Elevation Adjustment Nut
as required to set elevation.
Monitor RCL (Receive Carrier
Level) and adjust per radio
manufacturer’s instructions.
Verify antenna is adjusted on
main beam by passing through
main beam and out to upper and
lower 1st side lobe. Return
antenna to main beam RCL.
Note: Adjustment is smoother
when adjusting beam upward.
(Drive antenna down past
desired location and adjust while
driving antenna up.)
3. Tighten mounting bolts securely after elevation is set.
4. Re-check Azimuth and adjust if necessary.
Final Inspection:
When the antenna orientation is satisfactory, re-check all hardware and
torque to 15 Lb-Ft (20.3 N-m)
After the installation:
Inspection of the antenna should be performed at least once a year to check
its condition and to ensure safe operation and maintenance.
Mounting
Bolts

FP103230-1 REV.K Page 12 of 12
SAFETY INFORMATION
This Information May Save You From Death or Injury
Do not attempt to install or dismantle any Radio Waves Inc.
products until you have read and understood the information
and instructions in this document.
Installations: Only trained professional installers should be used to install or
dismantle antennas, mounts, and related hardware. It is the responsibility of the installer
to be sure that all building and safety codes are met and that the installation is complete
and secure.
Lightning Protection: All antennas and related hardware must be attached to
and connected correctly to a properly grounded structure. It is the responsibility of the
installer to be sure that the installation is completed in accordance with all applicable
grounding and safety codes.
Electrocution Hazard: Do not install or dismantle Radio Waves Inc. products
near any type of power line. Should your antenna or related hardware come in contact
with power lines you could be killed! Be sure your installation is out of falling distance of
any overhead wires-including the lead to any building or structure.
NEVER OPERATE OR LOCATE THIS OR ANY EQUIPMENT NEAR POWER LINES.
Electrocution Hazard: Portable or Mobile Installation.
If you are installing a Radio Waves Inc. component or part on a portable or mobile
platform such as a Portable Tripod, Mast, Truck, or Van, be sure all safety procedures
are followed and that operators have been properly trained. No one should be allowed to
operate or set up the equipment that has not been properly trained.
Radio Waves Inc. is a component supplier and is not the system designer and has no
control over how its products are used and installed. It is the responsibility of the System
Designer, Van Manufacturer and Owner / Operator to be sure that the overall system is
built in accordance with all applicable design and safety standards and procedures and
that the operators have been properly trained.
NEVER OPERATE OR LOCATE THIS OR ANY EQUIPMENT NEAR POWER LINES.
This manual suits for next models
9
Table of contents
Other RadioWaves Antenna manuals
Popular Antenna manuals by other brands

Steren
Steren ANT-HD-100 user manual

Komunica
Komunica BAZOKA-PRO quick start guide

SCAN-LINK
SCAN-LINK armour SLAU-UV-NB-07 user manual

Sirius Satellite Radio
Sirius Satellite Radio 128-8662 installation manual

CUSHCRAFT
CUSHCRAFT DX-120 Assembly instructions

Assa Abloy
Assa Abloy RF4510-EA installation instructions