Raider Outboards R504500 User manual

SAFETY JET MODEL 50
R504500
OWNER’S MANUAL
RAIDER OUTBOARDS, INC
1885 ARMSTRONG DRIVE,
TITUSVILLE, FL 32780
(321) 383 9585

i
Revision A/2022.05.25//
MULTI-FUEL SUBMERSIBLE ELECTRIC START OUTBOARD ENGINES
The Raider Outboards series of submersible outboard motors are dedicated to the United States
Marine Raiders. Established by the United States Marine Corps during WWII, the Raiders are considered
to be the first United States Special Operations Force. Handpicked from the elite, these men were given
specialized training and the best equipment. The Raiders operated behind enemy lines in direct support
of combat operations in the Central Pacific and Solomon Islands, and distinguished themselves during
the conduct of clandestine amphibious landings utilizing small, inflatable boats. Although the Raiders
were disbanded at the close of WWII, the need for specially trained warfighters and the requirement for
specialized equipment did not. Today’s Special Operations Forces under the United States Special
Operations Command (USSOCOM) are expected to conduct similar and far more demanding missions.
With those warfighters in mind, the Raider Outboards line of Submersible Outboard Motors and
accessories are specifically developed for Special Operations Forces operating within the unforgiving,
demanding, dynamic maritime environment.
ABOUT RAIDER
Raider Outboards, Inc. is a US-owned and operated company located in the Space Port Commerce
Park, near Kennedy Space Center in Central Florida. Raider designs and produces a line of submersible
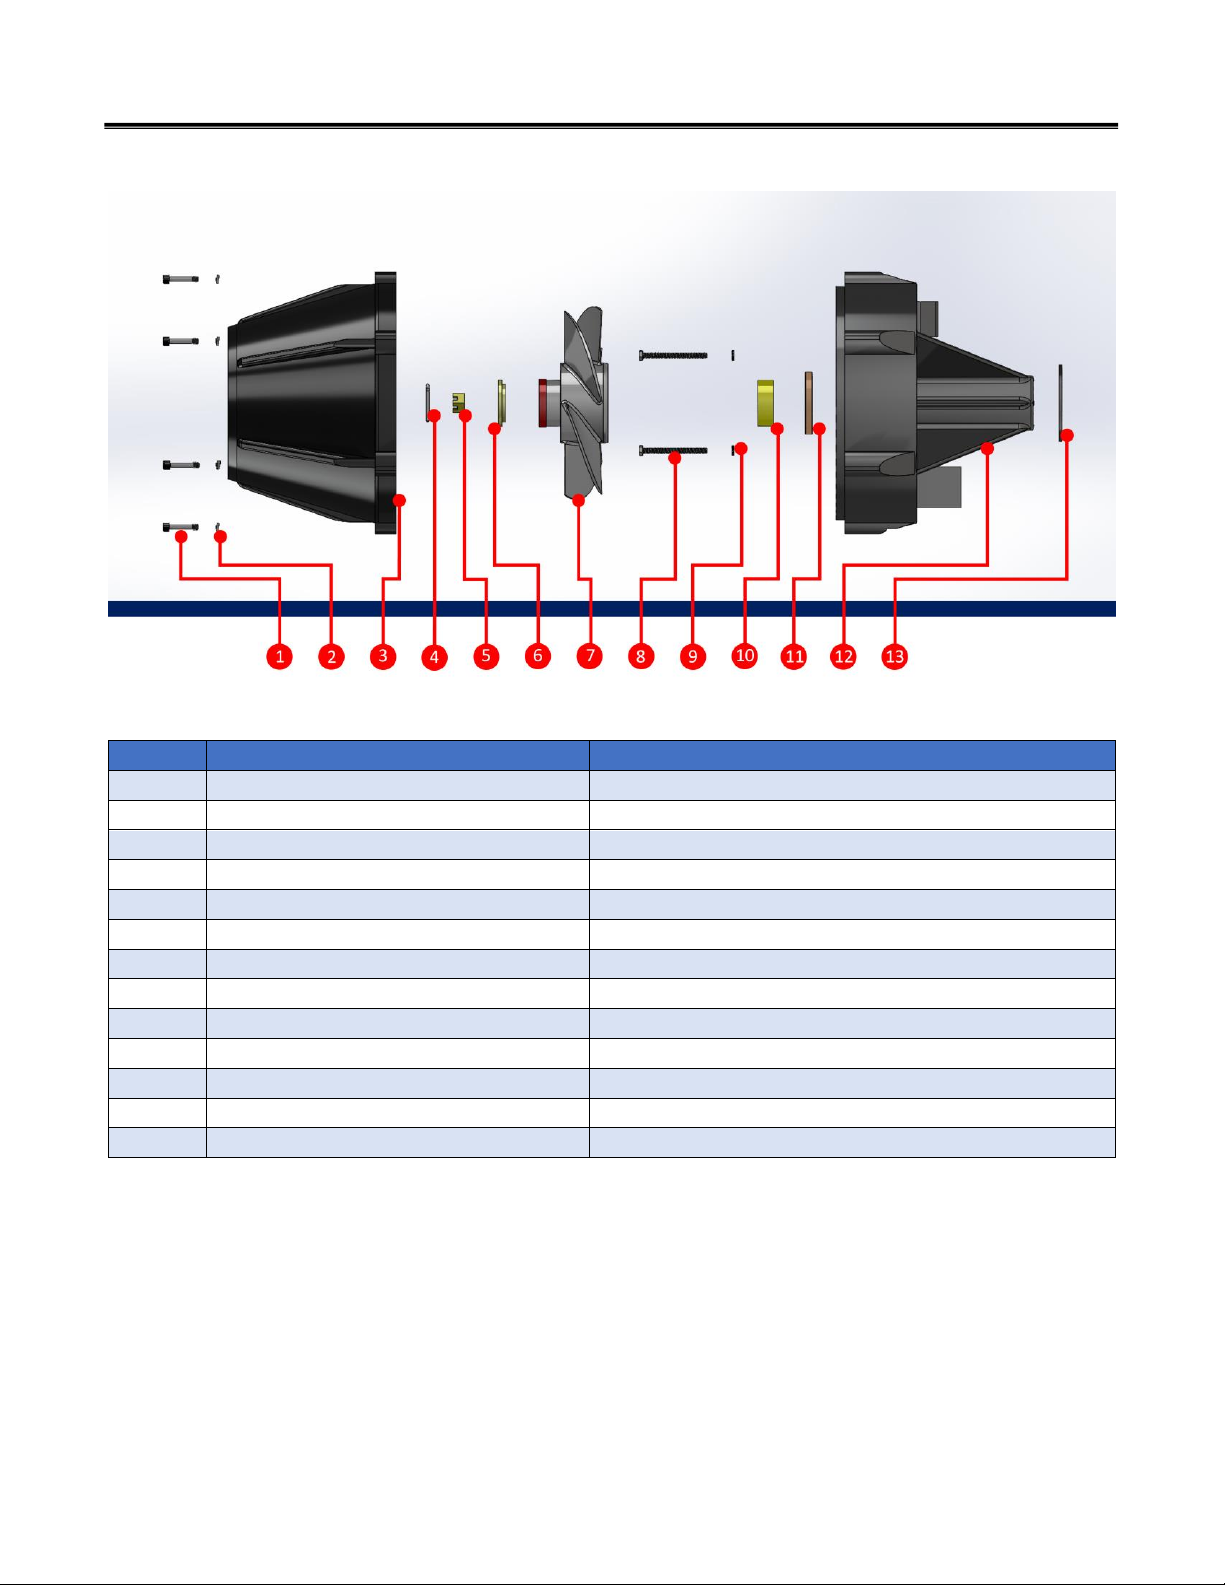
outboard motors and associated parts, including the Raider Safety Jet.
OUR MISSION
Raider Outboards strives to provide the most reliable, premium products alongside hands on
training and technical support of the highest quality. We strive to serve as the world leader in
submersible outboard motors, while honoring those who protect, defend, and support our communities,
our country, and our partners around the world.

RAIDER SAFETY JET
R504500
ii
Revision A/2022.05.25//
CONTENTS
INTRODUCTION TO THE SAFETY JET....................................................................................................................................1
LIMITED WARRANTY .......................................................................................................................................................1
GENERAL SAFETY PRECAUTIONS .......................................................................................................................................3
ASSEMBLY OVERVIEW.....................................................................................................................................................5
INSTALLATION INSTRUCTIONS...........................................................................................................................................7
TROUBLESHOOTING ..................................................................................................................................................... 11

RAIDER SAFETY JET
R504500
1
Revision A/2022.05.25//
INTRODUCTION TO THE SAFETY JET
The Raider Outboards Safety Jet Model 50 is a specially manufactured outboard motor jet
pump for use on Tohatsu and Mercury 50 horsepower two-stroke outboard motors.
Successful usage can only be assured on condition that this manual is read through in its entirety
and the maintenance routines described in this manual are followed. Should difficulty arise with the
Raider Safety Jet, please follow the troubleshooting procedures listed at the end of this manual. For any
issues, contact Raider Technical Support via email or Phone.
•321-567-2306
LIMITED WARRANTY
a. Unboxing. Visually inspect each component, ensure that all physical aspects of the Raider Safety
Jet are free of damage. All parts and part numbers are detailed within this manual to include
pictures.
b. Raider Safety Jet is fully guaranteed against defective materials and workmanship for the period
from the date of purchase for one year. The limited warranty will not apply to the normal wear
and tear of parts, adjustments, tune-ups, maintenance items or damage caused by:
•Damage caused due to collisions, contact with foreign objects, both in and out of water.
•Damage caused due to marine growth on Safety Jet surfaces.
•Damage caused due to operator neglect, lack of or the conduct of improper maintenance
procedures.
•Damaged caused due to use of other than Raider Safety Jet authorized parts.
•Damaged caused due to improper Safety Jet installation.

RAIDER SAFETY JET
R504500
2
Revision A/2022.05.25//
This page intentionally left blank

RAIDER SAFETY JET
R504500
3
Revision A/2022.05.25//
GENERAL SAFETY PRECAUTIONS
a. As the operator of a Safety Jet-equipped vessel, you are responsible for the well-being of those
aboard, those in other craft around yours, and swimmers. It is imperative that you possess
thorough knowledge of correct operation of the vessel and the Safety Jet. Please read through
this manual carefully to learn the correct operation and maintenance of the Safety Jet.
b. Prior to the installation of the Safety Jet, remove the Lock Plate from the Engine Stop Switch and
disconnect the Start Battery. This will prevent the motor from starting or turning over in the event
of inadvertent contact with the Start Button.
c. Boats are rated and certified in terms of their maximum horsepower and the weight of the
outboard motor. The Safety Jet will add weight to the outboard motor. The combined weight of
the motor and Safety Jet should not exceed the weight limitation displayed on the vessel’s
certification plate.
d. Do not operate the Safety Jet-equipped motor until it has been securely mounted to the vessel
in accordance with the motor and vessel instructions.
e. Serious injury is likely to occur if a moving vessel or Safety Jet housing makes contact with a
person in the water.
f. Use extreme caution when navigating near or picking up swimmers. Swimmers are NOT able to
avoid collision with vessels and should be treated as pedestrians.
g. When a swimmer is in the water near a Safety Jet the Operator should place the motor into
neutral if possible.
h. Although unlikely to occur during normal usage, it is not impossible to insert hands or fingers into
the Safety Jet front or back. This risk is greatest for young children and those with very small
hands. Warn children not to stick their hands or fingers into these chambers.
i. Should inadvertent contact with the Safety Jet occur during operation, clench hands into fists and
cross arms over your head to minimize impact.

RAIDER SAFETY JET
R504500
4
Revision A/2022.05.25//
This page intentionally left blank

RAIDER SAFETY JET
R504500
5
Revision A/2022.05.25//
ASSEMBLY OVERVIEW
Ref. No.
Part Number
Description
1
R504501
Captive Screw (6)
2
R504502
Washer (6)
3
R504503
Stator
4
R504504
Cotter Pin
5
R504505
Castle Nut
6
R504506
Brass Impeller Washer
7
R504507
Impeller
8
R504508
Stator Carrier Bolt (2)
9
R504509
Wedge-Locking Washer (2)
10
R504510
Brass Spacer
11
R504511
Seal
12
R504512
Stator
13
R504513
O-ring

RAIDER SAFETY JET
R504500
6
Revision A/2022.05.25//
This page intentionally left blank

RAIDER SAFETY JET
R504500
7
Revision A/2022.05.25//
INSTALLATION INSTRUCTIONS
a. This section of the owner’s manual provides the instructions for the proper installation and
service of the Raider Safety Jet to your outboard motor. Improper installation or servicing of this
Raider product could result in damage to the Safety Jet, outboard motor, or personal injury to
those installing or operating the product.
b. Installation will not require the use of special OEM mounting hardware when assembling the
Safety Jet. Use only hardware provided by Raider or your outboard motor OEM. Anodic rim tab
or anodic plate on your existing motor can be left intact. There should not be a clearance issue
between the anodic trim plate and Safety Jet.
Prior to the installation of the Safety Jet remove the Lock Plate from the Engine Stop Switch
and disconnect the Start Battery. This will prevent the motor from starting or turning over
in the event of contact with the Start Button.
Performing service or maintenance without first disconnecting the battery can cause
product damage, personal injury, or death due to fire, explosion, electrical shock, or
unexpected engine starting. Always disconnect the battery cables from the battery before
maintaining, servicing, installing, or removing Safety Jet components.
After completing installation, place these instructions, propeller, and bolts in a secure place
for future use in the event you want to reinstall to the propeller.

RAIDER SAFETY JET
R504500
8
Revision A/2022.05.25//
1. PROPELLER &ANODE REMOVAL
a. Begin by using a pair of needle nose pliers or similar to remove the cotter pin from the castle
nut.
b. Remove the castle nut using a socket wrench and appropriate socket.
c. Remove the washer and propeller from the prop shaft. The spacer between the propeller and
the lower unit should be left on the prop shaft.
d. Remove the zinc anode from the underside of the cavitation plate using a socket wrench and
appropriate socket.
e. Remove the carrier bolts from the lower unit using a socket wrench and appropriate socket.
Img 1a. Cotter pin removed
Img 1c. Spacer remains on prop shaft
Img 1d. Remove zinc anode
Img 1e. Remove carrier bolts

RAIDER SAFETY JET
R504500
9
Revision A/2022.05.25//
2. SAFETY JET INSTALLATION
a. Install the modified zinc anode provided with the Safety Jet using the hardware removed in step
1d.
b. Install the stator onto the lower unit, with the wider-slotted standoff oriented towards the top,
contacting the lower unit above the prop shaft. The narrower-slotted standoff should contact the
skeg.
c. Secure the stator using the longer bolts and wedge-lock washers provided with the Safety Jet.
d. Apply a light coat of marine grease to the rubber seal and the prop shaft and install the brass
spacer onto the shaft, inserting the spacer into the seal.
e. Install the impeller onto the prop shaft.
f. Install the brass washer onto the prop shaft.
g. Secure the impeller with the castle nut and cotter pin provided. Do not over-tighten the castle
nut.
h. Install the nozzle onto the stator, aligning the captive screws in the nozzle with the threaded
holes in the stator.
i. Secure the nozzle by tightening the captive screws using the included T-handle wrench.
Img 2a. Install modified anode
Img 2b. Install stator
Img 2d. Install brass spacer into seal
Img 2c. Secure with bolts & washers

RAIDER SAFETY JET
R504500
10
Revision A/2022.05.25//
PERFORMANCE CONSIDERATIONS
An outboard motor with Raider Safety Jet installed will perform similarly to an outboard motor with a
propeller, however:
•There may be some difference in steering feel dependent upon the vessel to which installed.
•Raider Safety Jet turns at a tighter radius than a propeller.
•The craft will typically plane out quicker.
•Top speed will be reduced by a small amount.
•Performance is heavily influenced by trim angle, proper craft inflation (if applicable), weight
distribution, prevailing environmental conditions, and operator experience level. To ensure
best performance, all variables should be considered.
Img 2e. Install impeller
Img 2f. Install brass impeller washer
Img 2g. Secure with castle nut & cotter pin
Img 2i. Secure nozzle using captive screws

RAIDER SAFETY JET
R504500
11
Revision A/2022.05.25//
TROUBLESHOOTING
Symptom
Corrective Action
Craft will not plane
•Change the Trim Angle of the Motor by
moving/changing the Thrust Rod position.
•Check for proper craft inflation.
•Adjust craft load distribution.
•Check fuel supply.
Noise in Safety Jet
•Remove motor from water.
•Inspect pump for foreign objects.
•Inspect Captive Screws for tightness.
•Remove, Impeller check Stater Bolt Torque
Settings.
Knock in Lower Unit at idle speeds
•This is normal and caused by the shifter
spring movement against Propeller Shaft
Assembly.
Cavitation
•Reduce Speed and secure motor.
•Change the Trim Angle of the Motor by
moving/changing the Thrust Rod position.
•Tilt the motor up and check for damage to
the Safety Jet.
•Check for bio matter, or debris caught in the
stator.

RAIDER SAFETY JET
R504500
12
Revision A/2022.05.25//
This page intentionally left blank
Table of contents
Other Raider Outboards Outboard Motor manuals