Rainbow Quantum User manual

The Rainbow Quantum Micro-Injector represents
a new era in tree injection design and battery-
powered performance for the care of urban
ecosystems. The Quantum protects trees from
deadly pests while doing minimal harm, using a
variable pressure system and plug-less tips. It is
lightweight, accurate, and able to work all day.
www.RainbowEcoscience.com/quantum
Digital Download of this Manual Available at:
Manual
Ordering & Tech Support: 877-272-6747 www.RainbowEcoscience.com
Or scan here for the "How To" video

Quantum Overview
Approved Product List
Equipment Checklist
Quantum Instruction For Use
Set Up Your New Device
Starting The Device
Priming The Device
Calibrate
Injecting With The Device
Drilling Injection Sites
Injecting
Injections Wrap Up
Storing Of The Device
Quantum General Care & Storage
Quantum Troubleshooting
Quantum Repair Instructions
1
1
1
2-7
2
2
2-3
3-4
4
5
5-6
6
7
7-9
10-12
12-15
Table of Contents
Ordering & Tech Support: 877-272-6747 www.RainbowEcoscience.com

Equipment Checklist:
1 x 20 V Battery
1 x Battery Charger
1 x Floating Injection Tee
1 x 14’ Self-Retracting
Coiled 5/32” OD Tube
2 x Product Reservoirs with
Caps, Fittings, Filters
1 x Coiled Tubing Clip with
Injection Tee Holster
2 x 15/64” High Helix Drill
Bits
1 x Quantum Maintenance
Kit
1 x Quantum Manual
1 x Storage Bag
1 x Carrying Strap
1 x Reservoir Labels
1 x 10ml Measuring
Cylinder
Electric Drill (Dewalt For Optimal
Battery Swapping)
DBH Tape
Proper PPE
Safety Glasses
NOTE: polarized glasses may help with
screen legibility in direct sunlight situations
Product
1
You Will Need:
Overview
Approved Products List
• Mectinite
• Arbormectin
• Transtect Infusible
• Xytect 10%
• Bacastat
• Lepitect Infusible
Floating Injection Tee
Clear Product
Reservoir
Coiled Tubing Clip With
Injection Tee Holster
20 V Battery
Coiled Tubing
Filter
O-Ring Fitting
Reservoir Cap

Instructions For Use
I.
Start by charging battery for at least 24
hours before use.
1.
Connect floating tee to the device by inserting
one end of the coiled tubing into the ball valve
on the back of the injection tee handle.
2.
Connect the other end of the
tube into the straight push to
connect fitting on the side of
the device.
3.
Set Up Your New Device
2Ordering & Tech Support: 877-272-6747 www.RainbowEcoscience.com
II. Starting The Device
1.
Insert fully charged battery, display will automatically turn on.
2.
Device will be in ‘injection mode’ setting.
III. Priming The Device
1.
Make sure reservoir is fully locked into position in device and fill
the reservoir with product.
2.
After start up, press the left or right button to select
prime mode.

Instructions For Use
3
3.
Remove the plug from the reservoir
priming port and insert injection tee
tip into port. Turn the ball valve to
the open position.
4. press the start/
pause button and
allow product to
flow until there
are no visible air
bubbles within the
tubes.
5.
After completing the priming process, press
pause, then switch setting back to injection
mode by pressing the left or right arrows until
screen display changes over to injection mode.
IV. Calibrate
1.
Once in purge mode, press the up button to switch the
device to calibration mode.
2.
Once in calibration mode, insert injection tip into a gradu-
ated cylinder and press start to inject the ‘10 ml’ calibration
dose (a 10 ml graduated cylinder has been provided with the
device for this purpose). The device will distribute a dose
that may be above or below the intended 10 ml dose.
Press the left or right arrows until screen display
changes over to purge mode.
10mL
Perform calibration at start of day and when changing products.

4Ordering & Tech Support: 877-272-6747 www.RainbowEcoscience.com
Instructions For Use
V. Injecting With The Device
1.
Determine number of injection sites by
measuring DBH and dividing by 2.
2. Determine amount of product per injection site by dividing total
amount of product needed for tree by the number of injection sites.
Example: You have a 22 inch tree and are treating at a 5 ml/ in rate
for a total of 110 mls.
110ml total / 11 injection sites = 10 ml dose per injection site
If you have an odd number, adjust the last dose
accordingly.
Example for setting dose: for a tree requiring 89 mls
you will inject (8) 10 ml doses and (1) 9 ml dose,
when you complete the 8th dose you will need to
reset the injection amount to 9 ml and proceed
to inject the remaining ml proceed to inject the
remaining volume. (refer to resetting injection dose
instructions on pg. 5)
3.
DBH
2
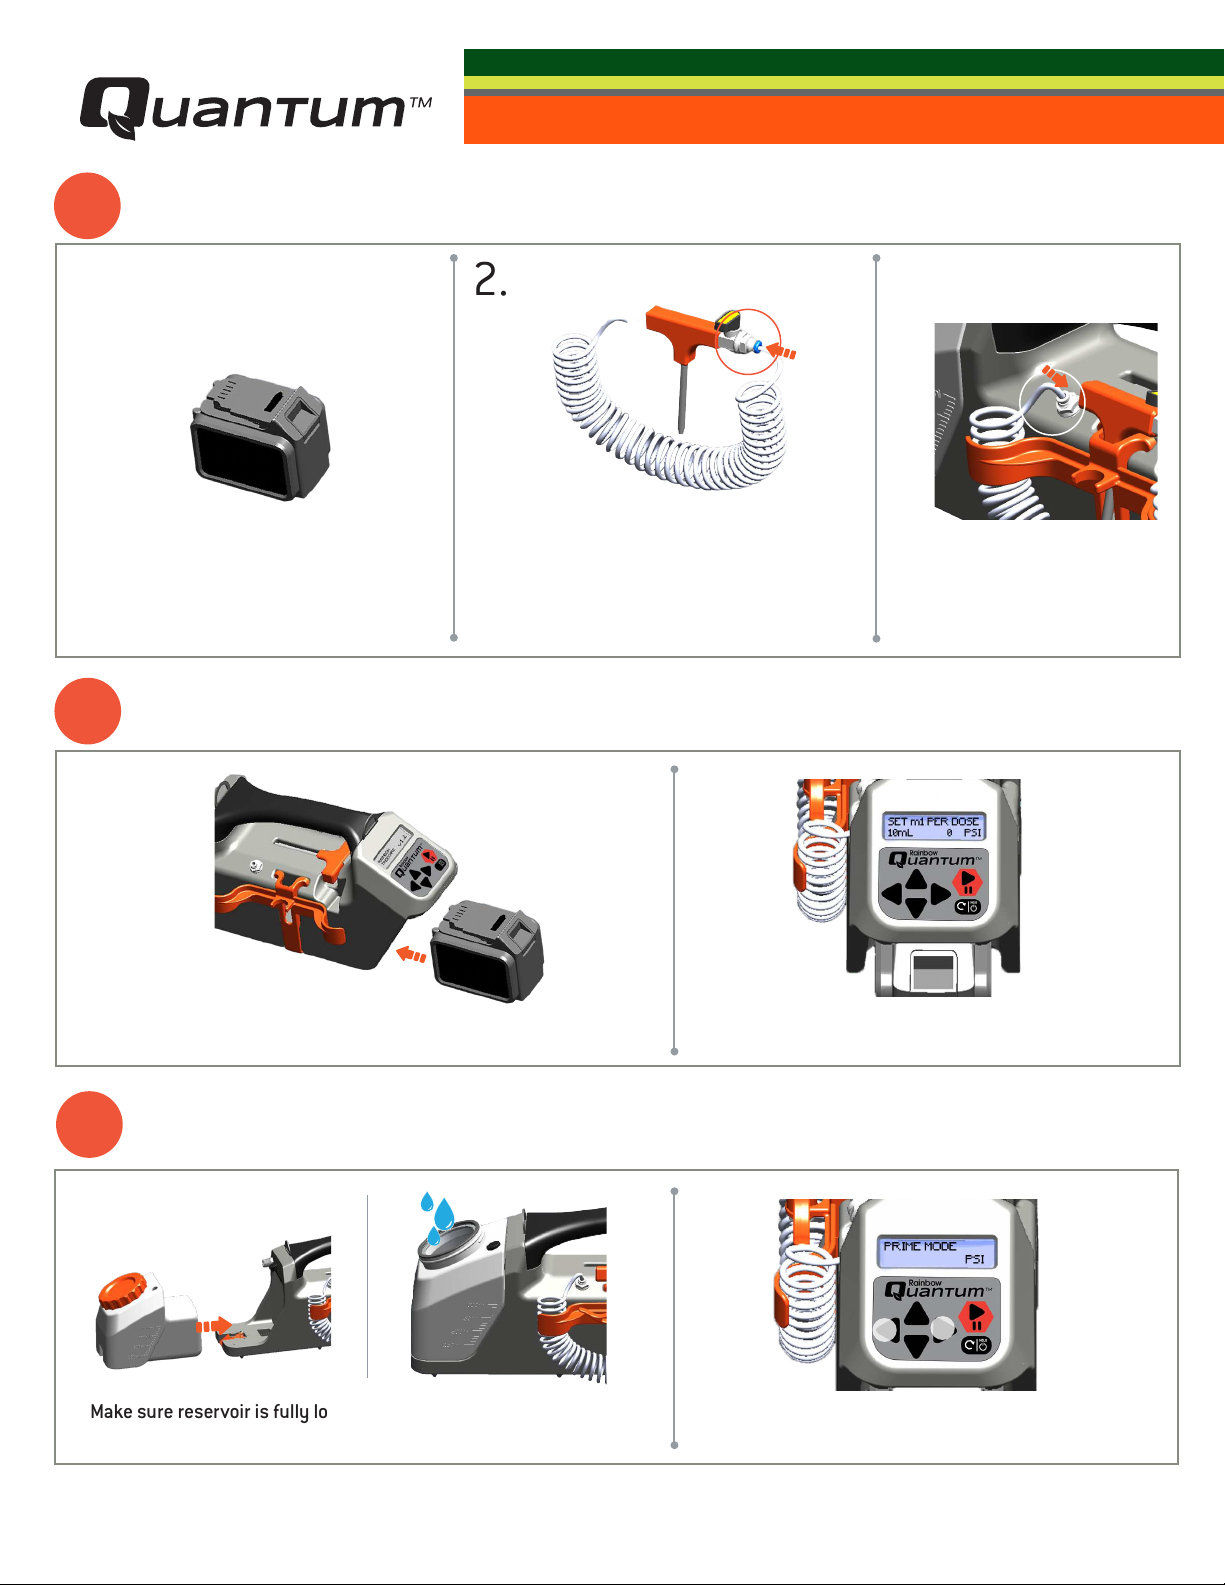
To set dose on the device: When device is in injection mode,
use up or down arrows to adjust ml of dose per injection site.
4.
3.
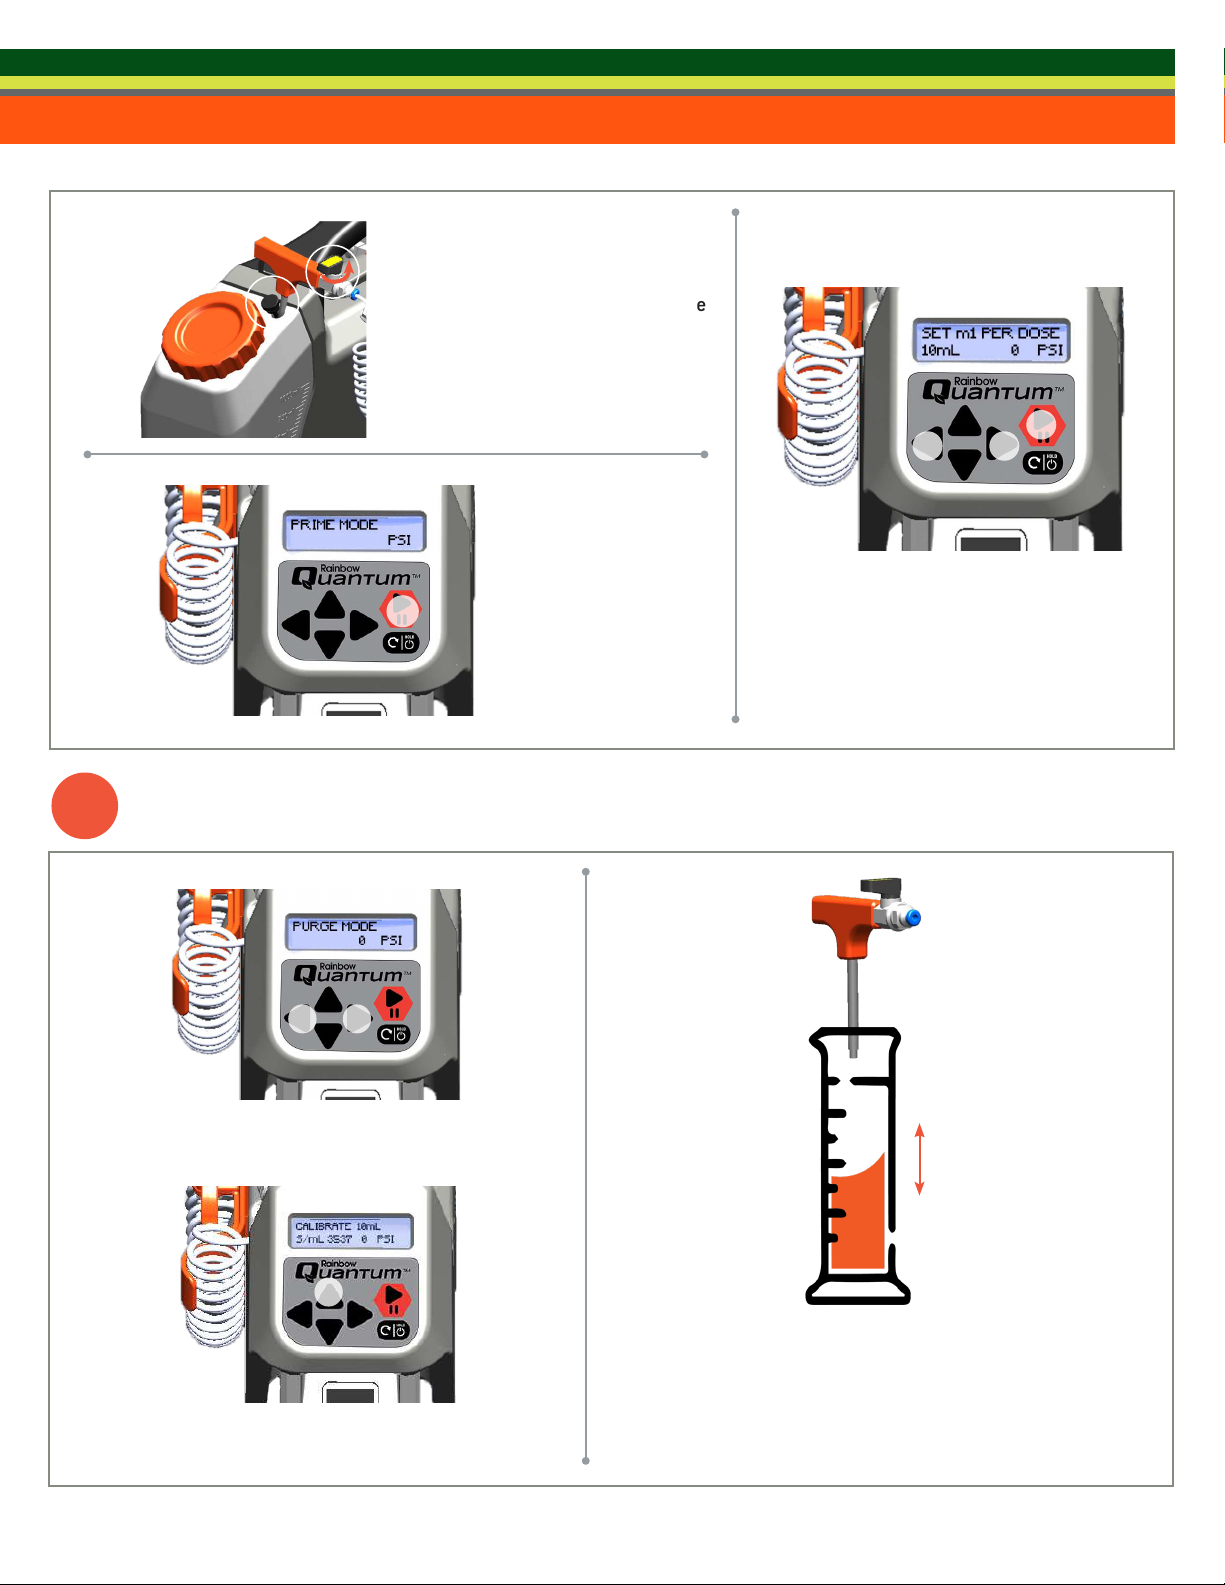
Use the up or down arrows to enter the actual amount
of product injected into the graduated cylinder and
press reset to submit the actual dose.
4.
Repeat the 10 ml calibration dose by pressing start to
inject the now adjusted 10 ml dose into the graduated
cylinder. Continue the above steps 1-3 until the device
distributes an accurate 10 ml dose.
10mL

1. 2.
5
VI. Drilling Injection Sites
Drill your injection sites into root flares as
close to soil grade as possible. Avoid cavities
or areas with rot.
Use a 15/64” high helix drill bit and drill to a depth of ¾” to 1”, depending
on bark thickness. Drill bit should be perpendicular to the bark surface
and you should begin drilling before touching the bit to the surface.
1. 2. 3.
VII. Injecting
Insert the tip into tree, turning
clockwise until you feel it
seating into place (avoid rotating
counterclockwise when inserting and
the injection tip from the injection
handle).
Open ball valve on
injection tee, and
press start button
to inject, screen
will turn green
during injection
and display current
psi.
When injection is complete, the
screen will turn red and display the
total dose that has been injected and
the total amount injected for that
dose. Once the pressure drops below
10 psi, the device will beep 5 times.
like 10 | 30mL
Continued on next page »
avoid cavities or rot
Drill in
healthy tissue
past bark
open
volume of last
injection Total amount
injected at
that dose
# of injections made

6Ordering & Tech Support: 877-272-6747 www.RainbowEcoscience.com
Instructions For Use
Shut o ball valve before
proceeding to the next injection
site.
4.
Repeat the injection
steps until you have
completed the treatment.
5.
If you have completed injections for the day, proceed to purging the device (below).
6.
7.
1-4
STEPS
Close the ball valve and insert the tee into
device holsters.
1. 2.
VIII. Finishing Injection
If you are done and don’t plan
on using the device any longer,
proceed to purging the device
(pg. ).
If you want to continue injecting,
proceed to resetting injection
dose (below).
Power o the device by pressing the
power on/o button for 5 seconds
until device goes into sleep mode.
When you are ready to use the
device again press and hold power
button for 5 seconds to turn back on.
1. 2.
IX. Resetting Injection Dose
Press the reset button
(also power on/o
button) once to reset
total amount injected
and number of doses
and keep injection
dose consistent.
Press the reset but-
ton twice to reset
the dose back to a
10 ml injection dose
and to reset the total
dose count and total
volume injected at
that dose.
close
press 2x

7
1. 2.
X. Purging Product From Lines (Back Into Reservoir)
Open the ball valve on the tee handle and
ensure that reservoir tank is fully inserted into
device.
Press the arrows left or right until the
mode is switched to ‘purge mode’.
3.
Press start/pause to begin running
pump backwards, purging product
from lines back into the tank .
Instructions For Use
General Care & Storage
1.
2.
Daily Cleaning
Thoroughly clean the device with gentle cleanser to remove any chemical residue.
Rinse out device at the end
of each workday with at
least 200 mls of water.
Note: When treating with
3. After adding water into the
reservoir, remove the resevoir
and swish the water continously
for 5-10 seconds and reinsert the
reservoir into device.
4.
Start the priming sequence until lines
are completely void of water.
5. 6.
Air dry.
Remove
battery from
the device.
open
200+ mls of water

8Ordering & Tech Support: 877-272-6747 www.RainbowEcoscience.com
General Care & Storage
1. 2.
Weekly Cleaning
First complete daily cleaning steps on previous page
Remove the reservoir and remove the cap,
cap gasket and filter and let air dry.
3.
Add silicone based lubricant to valve and
place reservoir mouth down for air drying
process.
Remove battery from the device.
4. 5.
Lubricate valves in
the device (female
and male valve on pump
inlet).
Place in a controlled indoor enviroment.
After Heavy Use
Follow all cleaning and lubrication protocols to maximize longetivity of all rubber seals and components.
Season Wrap Up/Long-Term Storage Cleaning
1. 2.
Complete daily
and weekly
steps above,
increase water
to 500 ml total
for rinsing.
3.
Add lubricant to valve and place
reservoir mouth down to allow for
air drying.
Make sure device is rinsed out and emptied of all moisture,
allow air drying for 24 hrs before storing.
Continued on next page »
LUBRICANT
LUBRICANT
LUBRICANT

9
Remove battery from the device.
4.
Lubricate valves in the device.
5.
General Care & Storage
Once dry, place device
in storage bag.
6. 7.
Store in a controlled
indoor enviroment.
General Recommendations
• Calibrate device at start of day and when changing products.
• Do not let batteries fully drain.
• Charge batteries daily, preferably after end of the day and leave charging overnight.
• Do not leave product inside the pump, system, and tubing while storing device.
• Always rinse out device when switching between dierent products.
• Store above 32°f (0°c) and below 110°f (43°c).
LUBRICANT

10 Ordering & Tech Support: 877-272-6747 www.RainbowEcoscience.com
Troubleshooting
SYMPTOM POSSIBLE PROBLEM SOLUTION
Product will not circulate
through the lines
Reservoir not attached correctly Detach and re-attach reservoir ensuring that
the locking clip is engaged.
Battery power is low Replace with charged battery and or
recharge battery.
Product will not circulate
through lines and
device is making a loud
"screaming" sound
Motor has stalled Hard reset the device by removing battery and
gently reinserting battery into device.
Product will not flow out
of the injection tee
Reservoir not attached correctly or is
empty
Detach and re-attach reservoir ensuring that
the locking clip is engaged.
Ball valve on injection tee is closed Open ball valve.
Injection tee tip or tubing is clogged Use a pick or compressed air to dislodge clog.
Kinked tubing Check tubing for kinks. If kink is found, cut
tubing to create fresh new end.
Tubing not pushed all the way into
push-to-connect fitting on tee or device
Push tubing into fitting or tee until you hear a
click.
Product programmed to be injected has
already been dispensed
Reset dosing amount proceed to next injection
site.
Wrong setting – may be in purge mode Press arrows left or right to switch to the
correct mode.
Product will not flow out
of the injection tee (with
high psi recording)
Ball valve on injection tee is closed Open ball valve.
Injection tee tip is clogged Use a pick or compressed air to dislodge clog.
Leaking from injection
tee handle
Injection tip is loose Tighten injection tip, ensure set screw is in
place, and tightened.
Ball valve is loose Tighten ball valve.
Tubing not inserted properly Push tubing into fitting until you hear a click.
Tubing has been scored too deeply Re-cut end or replace tubing segment.
Tubing may have been cut incorrectly Re-cut end to ensure straight edge, or replace
tubing segment.
Damaged push-to-connect fitting Replace push-to-connect fitting.
Fluid leaking from pump
or inside device
Pump seals are worn out or need
lubrication
Performance may be improved temporarily
with lubrication. O-rings should ultimately be
replaced. Send in for repairs.
Pump damaged Send in for repairs.
Tubing on interior push-to-connects has
been scored too deeply
Carefully open housing and re-cut end by cut-
ting or replace tubing segment.
Tubing not inserted properly on internal
connections.
Carefully open housing and push tubes in until
you hear a click.
Continued on next page »

11
SYMPTOM POSSIBLE PROBLEM SOLUTION
Leaking from
push-to-connect fittings
Tubing only partially inserted Push tubing into fitting until you hear a click.
Tubing has been scored too deeply Re-cut end or replace tubing segment.
Tubing may have been cut incorrectly Re-cut end to ensure straight edge, or
replace tubing segment.
Damaged push-to-connect fitting Replace push-to-connect tee.
Product seems to be
taking too long to inject
Wrong mode – device may be in purge or
prime mode
Stop injection by pressing start/pause
button, and press arrows to adjust mode.
Kinked or clogged tubes or tee Inspect the tubing and tee to ensure that the
lines are free of kinks or debris.
Injection solution has high viscosity will
take longer to inject.
The product used may aect uptake time.
More viscous products typically take longer
to inject.
Poor uptake conditions
Poor uptake conditions (very dry or very wet
soils, weather conditions, time of day) may
result in slow uptake.
Dicult-to-inject tree or injection site If uptake is poor with device operating
correctly, try changing injection sites.
Site drilled with dull bit Be sure to replace drill bit every 5-10 trees
when pigtails cease.
Injecting into trunk instead of root flares Ensure drilling into root flares versus trunk
tissue.
Species of tree
Tips for slow trees:
-Use sharp drill bit
-Wait until resin flow has subsided to
inject conifers (dormant season)
-Inject during optimal weather conditions,
sunny, windy, warm
Try changing injection sites on the tree.
Battery power is low Replace with fully charged battery or
recharge battery.
Troubleshooting
Continued on next page »

12 Ordering & Tech Support: 877-272-6747 www.RainbowEcoscience.com
Troubleshooting
SYMPTOM POSSIBLE PROBLEM SOLUTION
Air bubbles in the
system
Reservoir not attached correctly or is
empty Detach and re-attach reservoir.
Tubing not inserted properly Push tubing into fitting until you hear a click.
Seals are worn out or need lubrication
Performance may be improved temporarily
with lubrication. O-rings should ultimately be
replaced. Send in for repairs.
Tubing may have been cut incorrectly Re-cut end to ensure straight edge, or
replace tubing segment.
Kinked or blocked tubes Inspect the tubing to ensure that the lines
are free of kinks or debris.
Didn't prime the product through device
Set device to prime mode and use priming
port to run product through the lines until air
bubbles have cleared.
Device is placed with reservoir downhill
on slope
Situate device so that reservoir is on uphill
side of slope when working on uneven
surfaces.
Quantum Repair Instructions
1. 2.
Replacing Set Screws/Tightening Injector Tee Tips
Loosen set screw with a small flathead screwdriver. If screw is
3.
Use a wrench to tighten the tip (turn tip in clockwise
direction).
4.
If a threaded part will not turn in one direction, give it a slight turn in the opposite
direction to loosen up the seal. *Avoid over-tightening and stripping of the set screw.
Place in a controlled
indoor enviroment.

13
1. 2.
Replacing Or Removing The Fill Cap Gasket
Remove gasket and filter from mouth of
reservoir.
3.
Filter should pop out of gasket and can be
removed for cleaning.
To replace, add gasket to the mouth of
reservoir before inserting filter.
Quantum Repair Instructions
1. 2.
Replacing The Priming Port
Remove by gently pulling on plug. Reinsert by squeezing T shaped end and pushing gently back
into place.
1. 2.
Repairing Or Replacing Tubing
Disconnect tubing by pushing in the plastic collet of the push-
to-connect fitting and at the same time pulling out the tube.
If needed, cut o about ¼" - ½" o the ends of the tubing with a
sharp razor knife.
Continued on next page »
Insert rubber
¼" - ½"

3.
Inspect the tubing ends for chemical residue build-up, deep scoring and kinks. Replace damaged tubing completely if necessary.
Quantum Repair Instructions
Repairing or Replacing Tubing Continued »
1. 2.
Removing Cut Off Tube From Ball Valve
Remove the blue collet push-to-connect part and then gently
pull back the teeth until they are fully parallel with the out-
side walls of the valve.
3.
Gently pry out the cut tubing *This process needs to be done
very carefully, don’t rush this.
After removing the cut tube out of the valve gently push the
teeth back into place to where they are perpendicular to the
outside walls of the valve.
4.
Push the blue collet back into the ball valve.
14 Ordering & Tech Support: 877-272-6747 www.RainbowEcoscience.com
Residue
Damaged tubing
damaged tubing

Quantum Repair Instructions
15
1. 2.
Replacing Ball Valve
Disconnect tubing by pushing in the plastic collet of the push-
to-connect fitting and at the same time pulling out the tube.
3.
Use a 9/16” wrench to loosen the ball valve, turn counter-
clockwise until ball valve is completely removed.
After removing the ball valve, clean the inside of the injection tee. Add pipe sealant
to the threads on the ball valve and insert the threads into the injection handle, turn
clockwise to tighten ball valve until hand tight.
4.
Insert tubing into the push-to-
connect fitting.
1. 2.
Cleaning The Device Valve
Clean valve on pump with a rag or
cleansing wipe.
3.
Use a small pipe cleaning brush and/or
cleansing wipe to clean inside of valve
on reservoir as needed.
Lubricate valves with silicone based
lubricant.
Apply pipe sealant
Clean inside Tee
Counter-clockwise
Counter-clockwise
LUBRICANT

Our Guarantee
Our products and services
are guaranteed to give
100% satisfaction in every
way - service, performance,
quality, and value. If you are
ever dissatisfied, in any way,
please contact us so that
we can address whatever
concern you have. Our goal is
your complete satisfaction.
Manual
www.RainbowEcoscience.com/quantum
Digital Download of this Manual Available at:
Ordering & Tech Support: 877-272-6747 www.RainbowEcoscience.com
Table of contents
Popular Lawn And Garden Equipment manuals by other brands

Ruris
Ruris F455 manual

Redexim
Redexim Verti-Core III 1600 User Manual and Parts Manual

Ransomes
Ransomes Magna Mk13 LJBA015 Assembly and operation manual

John Berends Implements Pty Ltd
John Berends Implements Pty Ltd Grow-Master 2000 Operator's manual

Best Barns
Best Barns Sierra II Assembly Book

Palram
Palram Cold Frame 3'x3' Assembly instructions