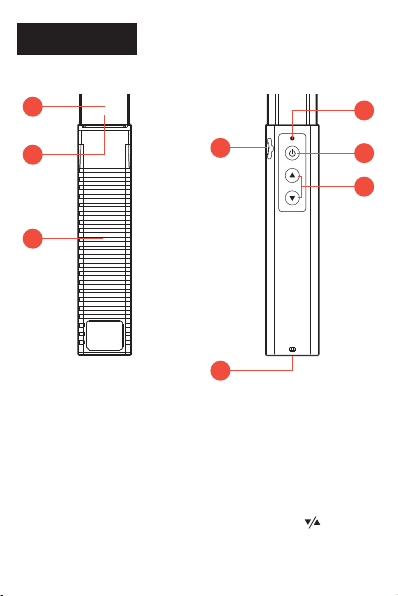
raya BRITE STIX SB-B User manual

SB-B
USER MANUAL
BRITE STIX
BI-COLOR LED WAND
WITH REMOTE

THANK YOU FOR CHOOSING RAYA
The Raya Brite Stix Bi-color LED wand provides
even illumination along its 15-inch length. It’s
extremely simple to operate, and it packs up in
its own carry bag so it can go anywhere light
is needed for photos or video. It has a color
temperature range of 3000 to 5600 K that’s
adjustable in six 400 K increments, and brightness
that’s adjustable in six steps.
As a handheld wand, the Brite Stix can deliver
creative and dramatic lighting effects. The handle
is also equipped with a standard 1/4-20 socket
for tripod mounting. This fixture is powered by
a rechargeable battery that plugs into a powered
USB computer port or a power adapter (not
included). A remote is included for hands-free
operation from up to 23 feet away.

PRECAUTIONS ⚠⚡
•
Please read and follow these instructions, and keep
this manual in a safe place.
•
Keep this unit away from water and any flammable
gases or liquids.
•
Do not attempt to disassemble or repair the
equipment—doing so will void the warranty, and Raya
will not be responsible for any damage.
• Handle the unit with care.
•
Do not stare directly at the lights when they are
powered on.
• Clean the unit with only a soft, dry cloth.
• Keep this unit away from children.
• Use only parts provided by the manufacturer.
•
Make sure the item is intact and that there are no
missing parts before use.
• All images are for illustrative purposes only.

FEATURES
• Built-in rechargeable lithium-ion battery
•
3000 to 5600 K adjustable color temperature
range
• 15 in. illumination area
• 6-step adjustable brightness
• All LED mode for extra brightness
• 1/4-20 socket for tripod mounting
• Remote included

BOX CONTENTS
• Brite Stix Bi-color LED Wand
• Remote
• Wrist strap
• Charging cable
• Carry bag
• User manual

OVERVIEW
Light
1. LED panel
2. Built-in diffuser
3. Handle
4. USB charging port
5. 1/4-20 mounting
socket
6. Charging indicator
7. Power button/
mode selector
8. Color temp and
brightness
Mode
1
2
3
5
6
7
8
Front Back
4

Remote
9. Power button
10. All LEDs button
11. Brightness buttons
12. Color temperature
buttons
13. Battery lock
14. Battery tray
13
910
14
1211
Front Back

POWERING ON AND SELECTING
THE MODE
Press and hold the power button to turn the Brite
Stix on or off.
Press the power button to switch from Color
Temperature mode to Brightness mode.
Note: The Brite Stix cannot be powered on or off by
the remote. The remote sets the Brite Stix to sleep
mode. See
Remote Operation
below.
Color Temperature (CCT) Mode
In Color Temperature mode, the Brite Stix’s color
temperature can be adjusted from 3000 to 5600 K
in six steps. Press the buttons to adjust the color
temperature in 400 K increments. Press and hold
either button to rapidly adjust.

Brightness Mode
In Brightness mode, the light’s output can be
adjusted from 10% to 100% in six 15% increments.
Press the buttons to adjust the brightness
incrementally. Press and hold either button to
rapidly adjust.
All LED Mode
All LED mode provides a 30-second burst that
increases the Brit Stix’s output by illuminating all
tungsten and daylight LEDs at full brightness. The
color temperature will be approximately 4400 K,
and it will maximize the light’s output.
Double-press the power button for All LED mode.
Double-press again to exit All LED mode, or wait
30 seconds for the light to return to its previous
settings.

CHARGING THE BATTERY
Connect the Brite Stix to a powered USB port with
the included cable. The charging indicator will
blink while the battery is charging and will stop
blinking when the battery is fully charged.
To charge the Brite Stix from an AC outlet, plug
the USB cable into a USB power adapter (not
included).
MOUNTING THE LIGHT
The Brite Stix has a 1/4-20 mounting socket.
Screw the light onto the threaded screw of a tripod,
light stand, or ball head until it’s secure.

REMOTE OPERATION
Power Button: Once the Brite Stix is powered
on via the on-handle power button, press the
remote’s power button to activate Sleep mode.
Press the power button again to resume operation.
Brightness Buttons: Press the Brightness buttons
to adjust the brightness in 15% increments.
Color Temperature Buttons: Press the Color
Temperature buttons to adjust the color
temperature in 400 K increments.
All LEDs Button: Press to illuminate all LEDs to
maximize the light’s output at approximately
4400 K. Press the button again to resume at the
previous setting, or the light will return to the
previous setting in 30 seconds.

REPLACING THE BATTERY
The remote is powered by a CR2025 battery. To
replace the battery, follow these steps:
1.
Push in the battery
lock and slide the
battery tray out of
the remote.
2.
Remove the old
battery, and replace it with a new battery in the
correct orientation, indicated by the illustration
on the back of the remote.
3.
Push the battery tray in until it locks into place.
PUSH
OPEN
CR2025

SPECIFICATIONS
Light Fixture
Color Temperature 3000 to 5600 K
CRI 84.6 (3000 K),
87.2 (4400 K),
84.9 (5600 K)
TLCI 75 (3000 K),
74 (4400 K),
73 (5600 K)
Light Intensity
@ 3 ft.
171 lx (3000 K),
197 lx (4400 K),
183 lx (5600 K)
Cooling System Passive
Dimming Yes, 6-step
Display None
Housing Material Plastic
Dimensions
(L × W × D)
21.75 × 1.25 × 1.1 in.
(55.2 × 3.2 × 2.8 cm)
Weight 7.9 oz. (229 g)

Mounting
Fixture Mount 1/4-20 socket
Remote Operation
Remote Control Type IR
Wireless Range 23 ft. (7 m)
Cable
Cable Type Micro-USB
Cable Length 22.25 in. (56.5 cm)
Power
AC Input 5 V / 1.5 A DC
Power Source Li-ion battery
Max Power Consumption 7.2 W

ONE-YEAR LIMITED WARRANTY
This Raya product is warranted to the original purchaser to be free from defects
in materials and workmanship under normal consumer use for a period of one
(1) year from the original purchase date or thirty (30) days after replacement,
whichever occurs later. The warranty provider’s responsibility with respect to
this limited warranty shall be limited solely to repair or replacement, at the
provider’s discretion, of any product that fails during normal use of this product
in its intended manner and in its intended environment. Inoperability of the
product or part(s) shall be determined by the warranty provider. If the product
has been discontinued, the warranty provider reserves the right to replace it with
a model of equivalent quality and function.
This warranty does not cover damage or defect caused by misuse, neglect,
accident, alteration, abuse, improper installation or maintenance. EXCEPT AS
PROVIDED HEREIN, THE WARRANTY PROVIDER MAKES NEITHER ANY
EXPRESS WARRANTIES NOR ANY IMPLIED WARRANTIES, INCLUDING
BUT NOT LIMITED TO ANY IMPLIED WARRANTY OF MERCHANTABILITY
OR FITNESS FOR A PARTICULAR PURPOSE. This warranty provides you with
specific legal rights, and you may also have additional rights that vary from
state to state.
To obtain warranty coverage, contact the Raya Customer Service Department
to obtain a return merchandise authorization (“RMA”) number, and return the
defective product to Raya along with the RMA number and proof of purchase.
Shipment of the defective product is at the purchaser’s own risk and expense.
For more information or to arrange service, visit www.rayalighting.com or call
Customer Service at 212-594-2353.
Product warranty provided by the Gradus Group.
www.gradusgroup.com
Raya is a registered trademark of the Gradus Group.
© 2020 Gradus Group LLC. All Rights Reserved.

GG5
Table of contents
Other raya Light Fixture manuals
Popular Light Fixture manuals by other brands

Modulex
Modulex MPP-10/0300/F/R installation guide

Sharp
Sharp 6" installation instructions

Acclaim Lighting
Acclaim Lighting Spectrum AL Cove DMX user guide

Larson Electronics
Larson Electronics HALP-96-2L-LED instruction manual

Cooper Lighting
Cooper Lighting MPWA Specifications

IKEA
IKEA LUNNOM LED1839S2 quick start guide