manuals.online logo
Brands
  1. Home
  2. •
  3. Brands
  4. •
  5. RB RELIABILT
  6. •
  7. Indoor Furnishing
  8. •
  9. RB RELIABILT LS-SW-B27B User manual

RB RELIABILT LS-SW-B27B User manual

RELIABILT and logo design are trademarks or registered trademarks of LF,
LLC. All rights reserved.
RELIABILT y el diseño del logotipo son marcas comerciales o marcas
registradas comerciales de LF, LLC. Todos los derechos reservados.
Thank you for purchasing this RELIABILT product. We’ve created these easy-to-follow instructions to ensure you spend your time enjoying the product instead
of putting it together. But, if you need more information than what is provided here, please visit Lowes.com, search the item number and refer to the Guides &
Documents tab on the product’s page.
If the item is no longer for sale, or if you have any questions or problems, please call our customer service department at 866-386-7941, 8 a.m. - 8 p.m., EST,
Monday - Sunday. You could also contact us at [email protected].
Gracias por comprar este producto RELIABILT. Hemos creado estas instrucciones fáciles de seguir para garantizar que pase su tiempo disfrutando el
producto en lugar de armándolo. No obstante, si necesita más información que la entregada aquí, visite Lowes.com, busque el número de artículo y consulte
la pestaña Guides & Documents (Guías y documentos) en la página del producto.
Si el artículo ya no está a la venta o si tiene alguna pregunta o problema, llame a nuestro Departamento de Servicio al Cliente al 866-386-7941, de lunes a
domingo de 8 a.m a 8 p.m, hora estándar del Este. También puede ponerse en contacto con nosotros en [email protected].
SAFETY INFORMATION/INFORMACIÓN SOBRE SEGURIDAD
PREPARATION/PREPARACIÓN
Estimated Assembly Time: 30 - 40 minutes
Tiempo estimado de ensamblaje: entre 30 y 40 minutos
TOOLS REQUIRED (NOT INCLUDED) / HERRAMIENTAS NECESARIAS (NO SE INCLUYEN):
FEELING CONFIDENT? START YOUR NEXT PROJECT/¿SE SIENTE CONFIADO? INICIE SU PRÓXIMO PROYECTO
•Visit lowes.com for more information. / Para obtener más información, visite lowes.com.
•A damp cloth is sufficient for normal spills. Dry the surface immediately. / En caso de derrames habituales, es suficiente con un paño húmedo. Seque la
superficie inmediatamente.
•Most general-purpose household cleaners can be used to clean doors. / La mayoría de los limpiadores domésticos de uso general se pueden utilizar para
limpiar las puertas.
•Caustic agents and/or abrasive scrubbers, or oven cleaners, should not be used. / No use productos cáusticos ni limpiadores abrasivos o limpiadores de
hornos.
•Liquid on the surface should not be left for long periods of time. / No deje que líquidos permanezcan sobre la superficie durante mucho tiempo.
WARRANTY/GARANTÍA
ITEM/ARTÍCULO #
5212663 5212664 5212665
5212720 5212721 5212722
BASE CABINET
GABINETE BASE
MODEL/MODELO#
LS-SW-B27B B30B B36B
LS-SG-B27B B30B B36B
AS23371
Printed in Vietnam
Impreso en Vietnam
Please read and understand this entire manual before attempting to assemble, operate or install the product.
Lea y comprenda completamente este manual antes de intentar ensamblar, usar o instalar el producto.
WARNING/ADVERTENCIA
•Electric, plumbing, gas lines and other utilities, are frequently installed or embedded behind walls where cabinets are being installed. Before drilling any holes
or driving any screws, be sure you will not be contacting any of these utilities. Failure to follow these instructions may result in property damage and serious or
fatal injury. If you do not feel confident in your ability to ensure that you will not contact utilities behind a wall during installation, please contact a licensed
contractor to install the cabinets. / Es frecuente que existan líneas eléctricas, de agua, gas u otros servicios instaladas o incrustadas detrás de las paredes
donde se están instalando los gabinetes. Antes de taladrar orificios o atornillar tornillos, asegúrese de que no entre en contacto con ninguno de estos servicios.
Si no se respetan estas instrucciones, pueden producirse daños materiales y lesiones graves o fatales. Si no está seguro de asegurar que no entrará en
contacto con ningún servicio detrás de la pared durante la instalación, comuníquese con un contratista certificado para la instalación de los gabinetes.
•This product can expose you to chemicals including wood dust, which is known to the State of California to cause cancer. For more information go to
www.P65Warnings.ca.gov / Este producto lo puede exponer a sustancias químicas, incluido el polvo de madera, reconocido por el estado de California como
causante de cáncer. Para obtener más información, visite www.P65Warnings.ca.gov.
CAUTION/PRECAUCIÓN
•Avoid using cleaners that contain bleach, ammonia, citrus based products or any type of abrasives (see cleaner label). These cleaners can cause damage
to the cabinet finish. / Evite usar limpiadores que contengan blanqueador, amoníaco, productos a base de cítricos o cualquier tipo de abrasivos (consulte la
etiqueta del limpiador). Estos limpiadores pueden dañar el acabado del gabinete.
CARE AND MAINTENANCE/CUIDADO Y MANTENIMIENTO
•Contact the customer service team at 866-386-7941 / Póngase en contacto con el equipo de servicio al cliente llamando al 866-386-7941
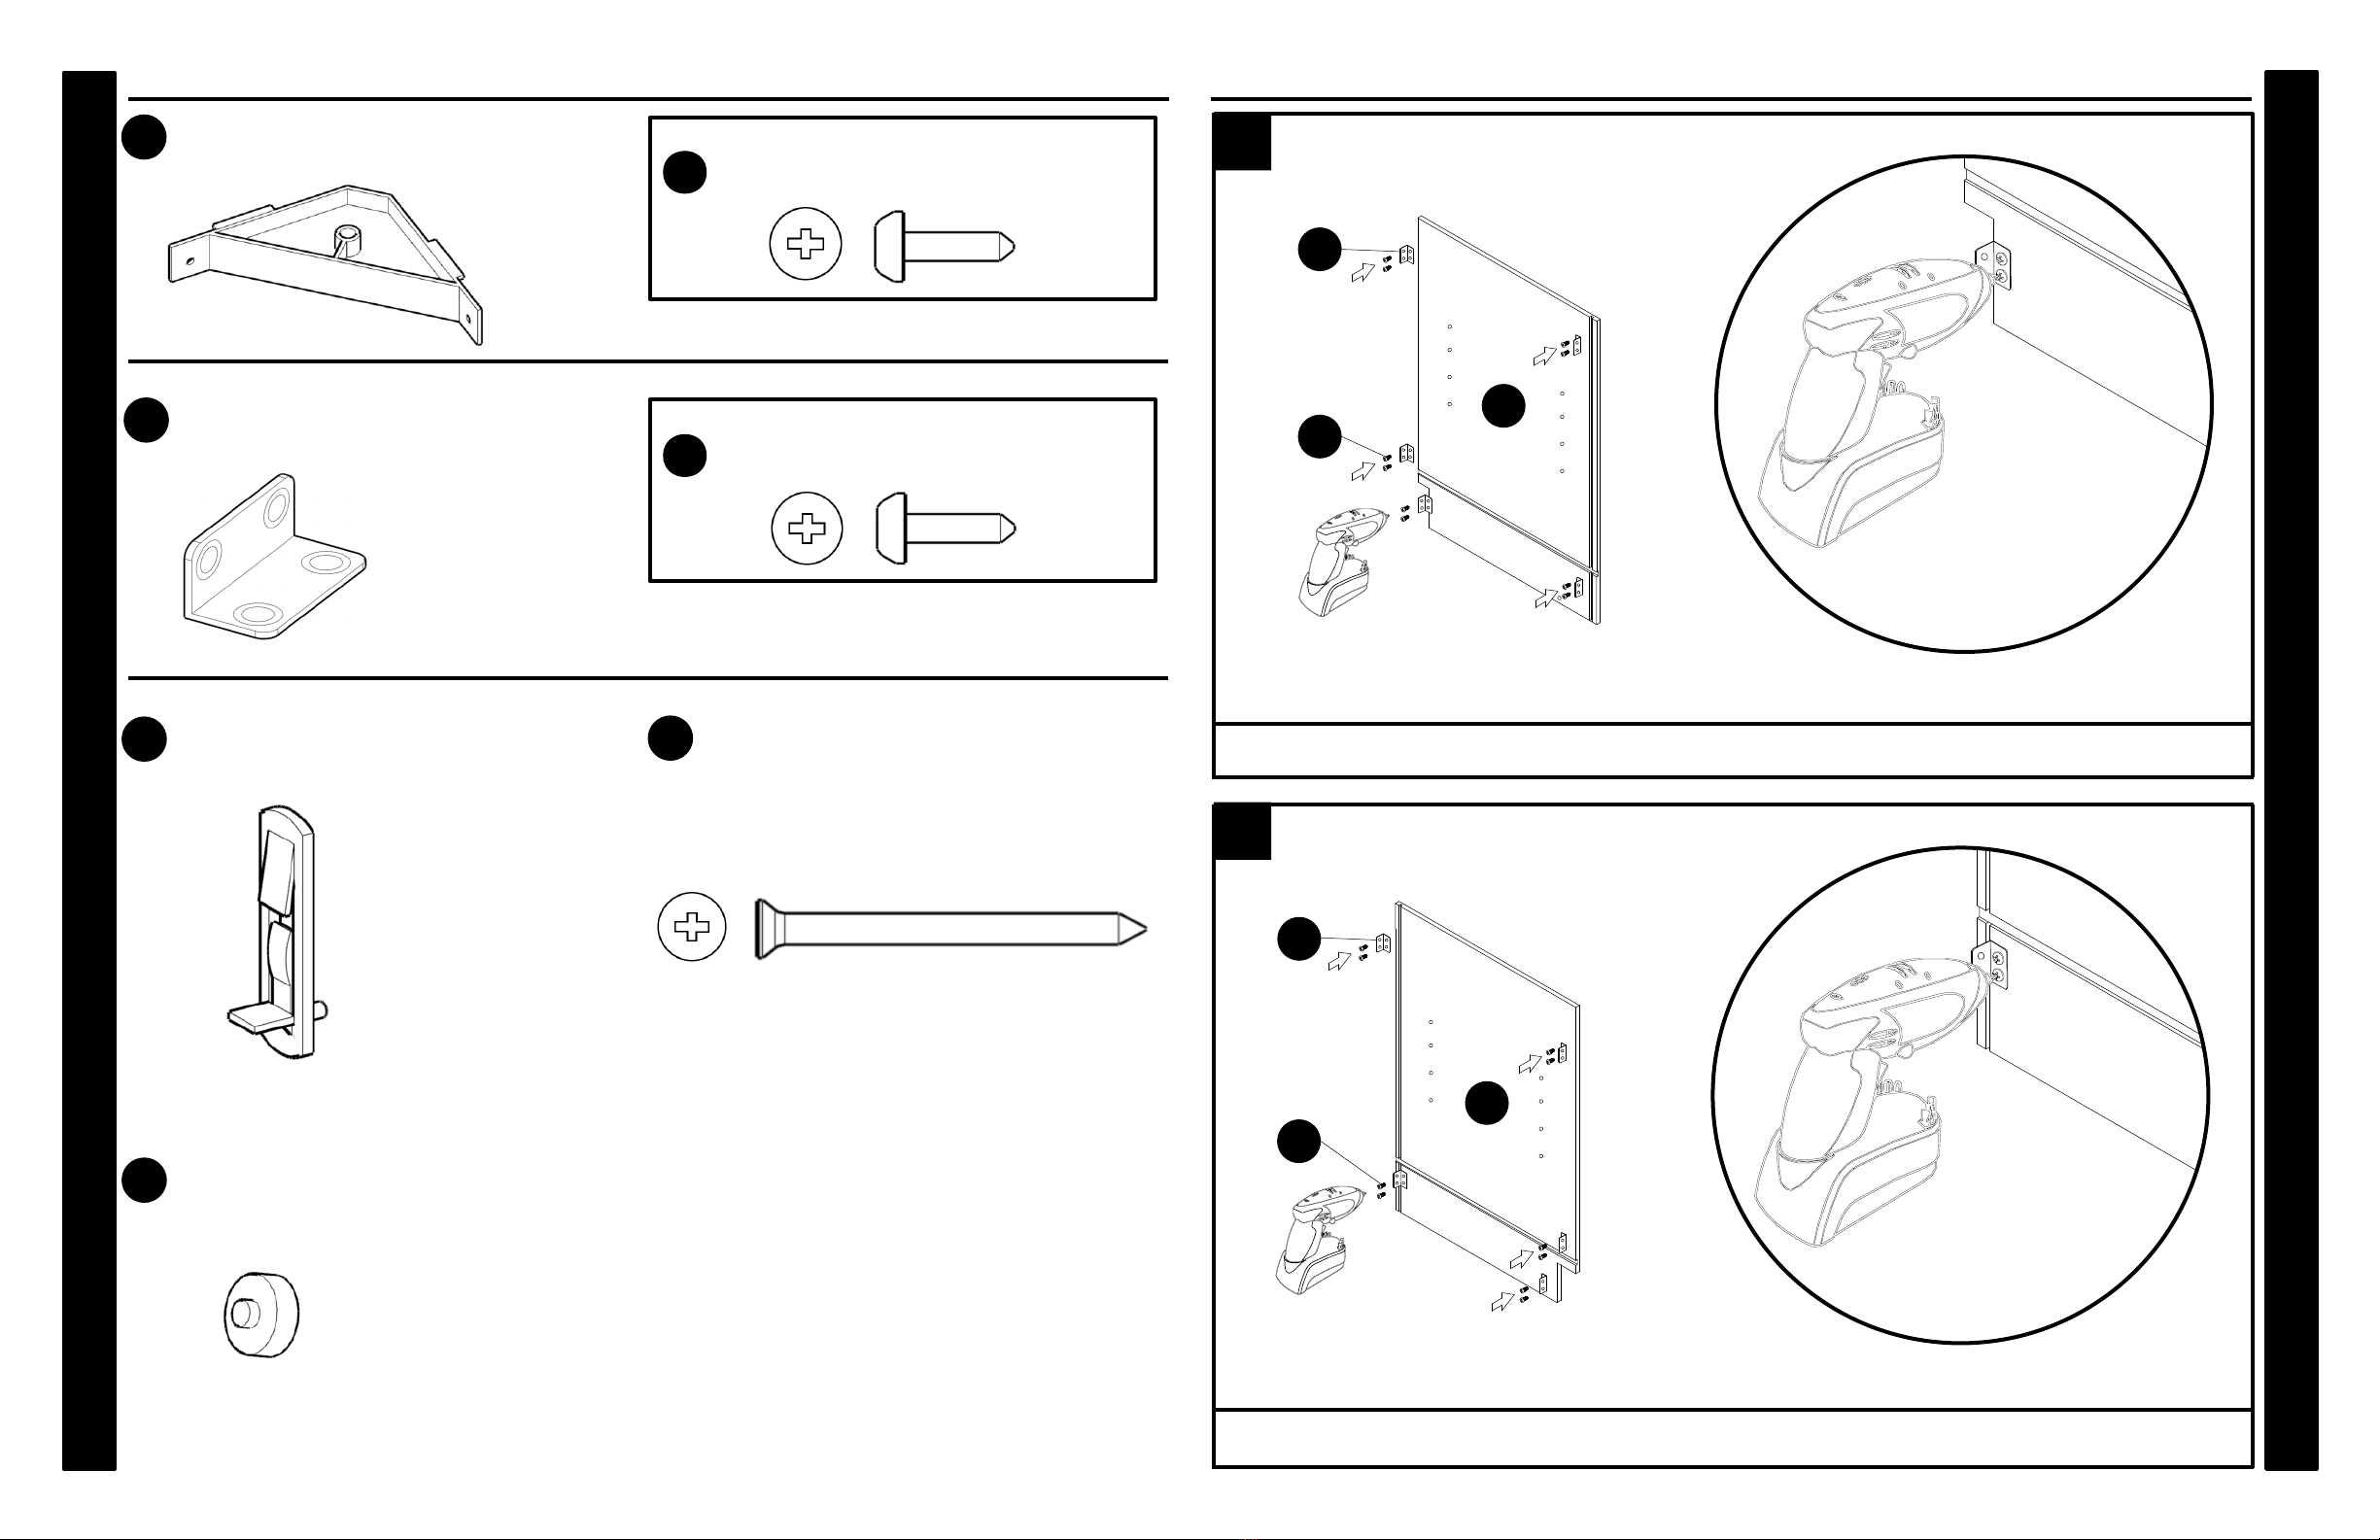
Before beginning assembly of product, make sure all parts are present. Compare parts with package contents list and hardware contents list. If any part is
missing or damaged, do not attempt to assemble the product.
Antes de comenzar a ensamblar el producto, asegúrese de tener todas las piezas. Compare las piezas con la lista del contenido del paquete y la lista de
aditamentos. No intente ensamblar el producto si falta alguna pieza o si alguna está dañada.
Please visit Lowes.com for additional assembly resources./ Visite Lowes.com para obtener recursos de ensamblaje adicionales.
2-person assembly recommended / Se recomienda ensamblaje entre 2 personas
PACKAGE CONTENTS/CONTENIDO DEL PAQUETE
QUICK REFERENCE GUIDE/GUÍA DE REFERENCIA RÁPIDA
HARDWARE CONTENTS/ADITAMENTOS
QUICK REFERENCE GUIDE/GUÍA DE REFERENCIA RÁPIDA
BOX BOTTOM PANEL
BOX SIDE PANEL - LEFT
BOX BACK PANEL
DOOR PANEL
FACE FRAME
BOX SIDE PANEL - RIGHT
DRAWER SIDE PANEL - RIGHT
DRAWER SIDE PANEL - LEFT
DRAWER BACK PANEL
DRAWER BOTTOM PANEL
TOE KICK PANEL
DRAWER FACE PANEL
ADJUSTABLE SHELF
C
G1
A1
H
K
B
E
J
F
D
G2
A2
I
PART DESCRIPTION QUANTITY
A1 Box side panel - left
A2 Box side panel - right
B Box bottom panel
C Box back panel
Face frame
Toe kick panel
Drawer face panel
Drawer side panel - left
D
E
F
G1
1
1
1
1
1
1
1
1
G2 Drawer side panel - right
Drawer bottom panel
Door panel
Adjustable shelf
H
J
K
1
1
2
1
IDrawer back panel 1
Adjustable drawer clips x 2
Sujetadores de gaveta × 2
Soft-close hinge x 4
Bisagra de cierre suave × 4
BB
Included/Incluye:
5/8” Flat Head Phillips Screw x 4
Tornillo Phillips de cabeza plana de 5/8” × 4
3/8” Flat Head Phillips Screw x 4
Tornillo Phillips de cabeza plana de 3/8” × 4
CC
Included/Incluye:
5/8” Flat Head Phillips Screw x 8
Tornillo Phillips de cabeza plana de 5/8” × 8
3/4” Round Head Phillips Screw x 4
Tornillo Phillips de cabeza redonda de 3/4” × 4
Glide and runner profile x 2
Deslizador y perfil de riel × 2
*Two additional pieces are included as an extra
*Se incluyen dos piezas adicionales
AA Included/Incluye:
5/8” Flat Head Phillips Screw x 10
Tornillo Phillips de cabeza plana de 5/8” × 10
aa
bb1
bb2
cc2
cc1
HARDWARE CONTENTS/ADITAMENTOS
Adjustable shelf clip x 4 1” Flat head Phillips screw x 3
Rubber bumper x 8
Sujetador de repisa ajustable × 4 Tornillo Phillips de cabeza plana de 1” × 3
Amortiguador de goma × 8
FF
HH
GG
INSTALLATION OVERVIEW/DESCRIPCIÓN GENERAL DE LA INSTALACIÓN
QUICK REFERENCE GUIDE/GUÍA DE REFERENCIA RÁPIDA
Plastic counter corner block x 4
Bloque esquinero de plástico para cubierta × 4
Corner brace x 11
Soporte esquinero × 11
Included/Incluye:
1/2” Round Head Phillips Screw x 8
Tornillo Phillips de cabeza redonda de 1/2” × 8
DD
EE Included/Incluye:
1/2” Round Head Phillips Screw x 44
Tornillo Phillips de cabeza redonda de 1/2” × 44
dd
ee
1
1
Use 1/2” round head phillips screw x 10
Utilice 10 tornillos Phillips de cabeza redonda de 1/2"
1
2
Use 1/2” round head phillips screw x 10
Utilice 10 tornillos Phillips de cabeza redonda de 1/2"
QUICK REFERENCE GUIDE/GUÍA DE REFERENCIA RÁPIDA
A1
EE
EE
A2
ee
ee
INSTALLATION OVERVIEW/DESCRIPCIÓN GENERAL DE LA INSTALACIÓN
QUICK REFERENCE GUIDE/GUÍA DE REFERENCIA RÁPIDA
INSTALLATION OVERVIEW/DESCRIPCIÓN GENERAL DE LA INSTALACIÓN
QUICK REFERENCE GUIDE/GUÍA DE REFERENCIA RÁPIDA
1
3
Use 1/2” round head phillips screw x 4
Utilice 4 tornillos Phillips de cabeza redonda de 1/2"
1
4
1
5
Use 1/2” round head phillips screw x 4
Utilice 4 tornillos Phillips de cabeza redonda de 1/2"
1
6
C
A2
A2
C
EE
Insert the box back panel (C) into the right box side panel (A2) groove.
Inserte el panel posterior de la caja (C) en la ranura del panel lateral derecho de la caja (A2).
ee
C
A1
A2
C
EE
Rotation
Insert the left box side panel (A1) into the box back panel (C) groove.
Inserte el panel lateral izquierdo de la caja (A1) en la ranura del panel posterior de la caja (C).
A1
A2
ee
INSTALLATION OVERVIEW/DESCRIPCIÓN GENERAL DE LA INSTALACIÓN
QUICK REFERENCE GUIDE/GUÍA DE REFERENCIA RÁPIDA
INSTALLATION OVERVIEW/DESCRIPCIÓN GENERAL DE LA INSTALACIÓN
QUICK REFERENCE GUIDE/GUÍA DE REFERENCIA RÁPIDA
1
7
1
8
1
9
1
10
C
A1
A2
B
B
EE
Upright
Use 1/2” round head phillips screw x 2
Utilice 2 tornillos Phillips de cabeza redonda de 1/2"
ee
Insert the box bottom panel (B) into the grooves.
Inserte el panel inferior de la caja (B) en las ranuras.
GG
Use 1” flat head phillips screw (GG) to fasten box back panel (C)
Use un tornillo Phillips de cabeza plana de 1" (GG) para sujetar el panel posterior de la caja (C)
D
Attach the face frame (D) to the cabinet box.
Fije la estructura frontal (D) a la caja del gabinete.
INSTALLATION OVERVIEW/DESCRIPCIÓN GENERAL DE LA INSTALACIÓN
QUICK REFERENCE GUIDE/GUÍA DE REFERENCIA RÁPIDA
INSTALLATION OVERVIEW/DESCRIPCIÓN GENERAL DE LA INSTALACIÓN
QUICK REFERENCE GUIDE/GUÍA DE REFERENCIA RÁPIDA
1
11
1
12
1
13
1
14
Inside
EE
ee
E
EE
Bottom view
E
ee
B
D
A1
A2
C
AA
aa
Secure four corner braces (EE) using 1/2” round head phillips screw (ee) x 8.
Fije cuatro soportes esquineros (EE) con 8 tornillos Phillips de cabeza redonda de 1/2" (ee).
Attach the toe kick panel (E) to the cabinet box and align with the pre-drilled holes
Fije el panel del rodapié (E) a la caja del gabinete y alinéelo con los orificios pretaladrados
Secure the toe kick panel (E) and face frame (D) with corner braces (EE) using 1/2” round head phillips screw (ee) x 6.
Asegure el panel de rodapié (E) y el marco frontal (D) con soportes esquineros (EE) con 6 tornillos Phillips de cabeza
redonda de 1/2" (ee).
Insert the base of glide and runner profile (AA) into the pre-drilled holes on the box back panel (C). Secure two bases
using 5/8” flat head phillips screws (aa) x 4
Inserte la base del deslizador y el perfil del riel (AA) en los orificios pretaladrados del panel posterior de la caja (C).
Asegure dos bases con 4 tornillos Phillips de cabeza plana de 5/8" (aa).
Upright
INSTALLATION OVERVIEW/DESCRIPCIÓN GENERAL DE LA INSTALACIÓN
QUICK REFERENCE GUIDE/GUÍA DE REFERENCIA RÁPIDA
INSTALLATION OVERVIEW/DESCRIPCIÓN GENERAL DE LA INSTALACIÓN
QUICK REFERENCE GUIDE/GUÍA DE REFERENCIA RÁPIDA
1
15
1
16
1
17
1
18
Use 5/8” flat head phillips screw x 4.
Utilice 4 tornillos Phillips de cabeza plana de 5/8”.
B
D
A1 A2
AA
C
aa
G2
F
G2 F
G1
H
G2
G1
F
I
Attach the right drawer side panel (G2) to the drawer face panel (F)
Fije el panel lateral derecho de la gaveta (G2) al panel frontal de la gaveta (F)
Attach the left drawer side panel (G1) to the drawer face panel (F)
Fije el panel lateral izquierdo de la gaveta (G1) al panel frontal de la gaveta (F)
Tilt the drawer side panels slightly and insert the drawer bottom panel (H) and the drawer back panel (I)
Incline los paneles laterales de la gaveta ligeramente e inserte el panel inferior de la gaveta (H) y el panel posterior de
la gaveta (I)
INSTALLATION OVERVIEW/DESCRIPCIÓN GENERAL DE LA INSTALACIÓN
QUICK REFERENCE GUIDE/GUÍA DE REFERENCIA RÁPIDA
INSTALLATION OVERVIEW/DESCRIPCIÓN GENERAL DE LA INSTALACIÓN
QUICK REFERENCE GUIDE/GUÍA DE REFERENCIA RÁPIDA
1
19
1
20
1
21
1
22a
H
G2
G1
F
I
I
G1
G2
F
BB
H
bb1
I
G1
H
G2
F
BB
bb2
Firmly connect the drawer side panels with the drawer back panel (I)
Conecte firmemente los paneles laterales de la gaveta con el panel posterior de la gaveta (I)
Rotate drawer to bottom side facing up, attach the adjustable drawer clips (BB) to the drawer bottom panel (H).
Secure the adjustable drawer clips with the inside of drawer face panel (F) using 5/8” flat head phillips screw (bb1) x 4.
Gire la gaveta hasta que el lado inferior apunte hacia arriba, fije los sujetadores de gaveta ajustables (BB) al panel
inferior de la gaveta (H). Fije los sujetadores de gaveta ajustables con el interior del panel frontal de la gaveta (F) con
4tornillos Phillips de cabeza plana de 5/8" (bb1).
Bottom
Secure adjustable drawer clips (BB) to drawer bottom panel (H) using 3/8” flat head phillips screw (bb2) x 4
Asegure los sujetadores de gaveta ajustables (BB) al panel inferior de la gaveta (H) con 4 tornillos Phillips de cabeza
plana de 3/8" (bb2).
Insert the drawer
Inserte la gaveta
INSTALLATION OVERVIEW/DESCRIPCIÓN GENERAL DE LA INSTALACIÓN
QUICK REFERENCE GUIDE/GUÍA DE REFERENCIA RÁPIDA
INSTALLATION OVERVIEW/DESCRIPCIÓN GENERAL DE LA INSTALACIÓN
QUICK REFERENCE GUIDE/GUÍA DE REFERENCIA RÁPIDA
Insert the drawer on the extended runner. To secure the drawer clips with the runner, push the drawer in. Upon
successful locking, a click can be heard.
Coloque la gaveta en el riel extendido. Para asegurar los sujetadores de la gaveta con el riel, empuje la gaveta
hacia adentro. Cuando se haya fijado de forma correcta, se escuchará un clic.
Ensure that the hook on each runner profile fits into the corresponding holes on the drawer back panel.
Asegúrese de que el gancho en los perfiles del riel se ajuste a los orificios correspondientes en el panel posterior
de la gaveta.
To level the drawer, use the green spur gears 1 to adjust drawer left and right, the green spur gears 2 to adjust
drawer up and down, and the green spur gears 3 to adjust drawer inside and outside.
Para nivelar la gaveta, utilice los engranajes rectos verdes 1 para ajustar la gaveta a la izquierda y a la derecha,
los engranajes rectos verdes 2 para ajustar la gaveta hacia arriba y hacia abajo, y los engranajes rectos
verdes 3 para ajustar la gaveta por dentro y por fuera.
3
22
1
3
22b
22c
22d
22e
To take the drawer out, push the green clips at the same time to unlock drawer clips.
Para sacar la gaveta, empuje los sujetadores verdes al mismo tiempo para desbloquear los sujetadores de la gaveta.
INSTALLATION OVERVIEW/DESCRIPCIÓN GENERAL DE LA INSTALACIÓN
QUICK REFERENCE GUIDE/GUÍA DE REFERENCIA RÁPIDA
INSTALLATION OVERVIEW/DESCRIPCIÓN GENERAL DE LA INSTALACIÓN
QUICK REFERENCE GUIDE/GUÍA DE REFERENCIA RÁPIDA
1
23
J
CC
cc1
Insert the hinge (CC) to the door panel (J) and secure the hinge to door use 5/8” flat head phillips screw x 8 (2 screws
for one hinge).
Inserte la bisagra (CC) en el panel de la puerta (J) y fije la bisagra a la puerta con 8 tornillos Phillips de cabeza plana
de 5/8" (2 tornillos para una bisagra).
CC
24a
Locate the pre-drilled holes in the door opening of the face frame and use 3/4” round head phillips screw x 4 (2 screws
for 1 door panel) to attach the door panel (J) to the face frame (D).
Ubique los orificios pretaladrados en la abertura de la puerta del marco frontal y use 4 tornillos Phillips de cabeza
redonda de 3/4" (2 tornillos para 1 panel de puerta) para fijar el panel de puerta (J) al marco frontal (D).
24b
If the door is not level when it is installed, the customer will need to turn the screw clockwise to extend the hinge or
counterclockwise to shorten the hinge.
Si la puerta no está nivelada durante la instalación, el cliente deberá girar el tornillo en dirección de las manecillas
del reloj para extender la bisagra o en dirección contraria a las manecillas del reloj para acortar la bisagra.
DD
25
Place 4 plastic counter corner blocks (DD) on each corner of the cabinet.
Coloque 4 bloques esquineros de plástico para cubierta (DD) en cada esquina del gabinete.
INSTALLATION OVERVIEW/DESCRIPCIÓN GENERAL DE LA INSTALACIÓN
QUICK REFERENCE GUIDE/GUÍA DE REFERENCIA RÁPIDA
INSTALLATION OVERVIEW/DESCRIPCIÓN GENERAL DE LA INSTALACIÓN
QUICK REFERENCE GUIDE/GUÍA DE REFERENCIA RÁPIDA
1
26
27
28
29
Secure the plastic counter corner blocks (DD) using 1/2” round head phillips screw (dd) x 8 (2 screws for 1 corner block)
Asegure los bloques esquineros de plástico para cubierta (DD) con 8 tornillos Phillips de cabeza redonda de 1/2" (dd)
(2 tornillos para 1 bloque esquinero).
DD
dd
HH
K
FF
Inserte el sujetador de repisa ajustable (FF) en el gabinete donde desea las repisas.
Insert the adjustable shelf (K).
Inserte la repisa ajustable (K).
Attach the rubber bumper (HH) to the top and bottom corner of the door panel (J).
Fije el tope de goma (HH) a la esquina superior e inferior del panel de la puerta (J).
Insert the adjustable shelf clip (FF) into the cabinet where shelves are desired.
INSTALLATION OVERVIEW/DESCRIPCIÓN GENERAL DE LA INSTALACIÓN
QUICK REFERENCE GUIDE/GUÍA DE REFERENCIA RÁPIDA
1
30
MORE INFORMATION/MÁS INFORMACIÓN
To see a video of the assembly process and to get information on the suggested installation process scan here.
Para ver un video del proceso de ensamblaje y obtener información sobre el proceso de instalación sugerido, escanee
aquí.
SCAN HERE FOR VIDEO ASSEMBLY AND INSTALLATION INSTRUCTIONS.
ESCANEE AQUÍ PARA VER UN VIDEO CON LAS INSTRUCCIONES DE ENSAMBLAJE E INSTALACIÓN.

This manual suits for next models

11

Other RB RELIABILT Indoor Furnishing manuals

RB RELIABILT LS-SW-U1884R User manual

RB RELIABILT

RB RELIABILT LS-SW-U1884R User manual

RB RELIABILT LS-SW-DB18 DB24 User manual

RB RELIABILT

RB RELIABILT LS-SW-DB18 DB24 User manual

Popular Indoor Furnishing manuals by other brands

Amart Furniture Insurgent 75373 Assembly instruction

Amart Furniture

Amart Furniture Insurgent 75373 Assembly instruction

Costway OP70387 user manual

Costway

Costway OP70387 user manual

Triarch 32340/2 owner's manual

Triarch

Triarch 32340/2 owner's manual

ADC PG-PLUS PCS-718 Technical practice

ADC

ADC PG-PLUS PCS-718 Technical practice

Riverside AVON Assembly instructions

Riverside

Riverside AVON Assembly instructions

Accora Configura Care instruction manual

Accora

Accora Configura Care instruction manual

HENN Moscow D315-10 Assembly instructions

HENN

HENN Moscow D315-10 Assembly instructions

Walker Edison NORL8K Assembly instructions

Walker Edison

Walker Edison NORL8K Assembly instructions

IKEA AVSIKT instructions

IKEA

IKEA AVSIKT instructions

Do+Able Products 12307 Assembly instructions

Do+Able Products

Do+Able Products 12307 Assembly instructions

Lynk Roll-Out Double Drawer installation instructions

Lynk

Lynk Roll-Out Double Drawer installation instructions

Milly Mally SPEEDWAY 12 Operational manual

Milly Mally

Milly Mally SPEEDWAY 12 Operational manual

Next 903635 Assembly instructions

Next

Next 903635 Assembly instructions

VTI 10400 instruction sheet

VTI

VTI 10400 instruction sheet

Happy Babies HAPPY RW01 Assembly instructions

Happy Babies

Happy Babies HAPPY RW01 Assembly instructions

Coaster 120577 Assembly instructions

Coaster

Coaster 120577 Assembly instructions

Hiddenbed Double Decker Assembly instructions

Hiddenbed

Hiddenbed Double Decker Assembly instructions

MONTESSORI ROOM Foldable Waldorf Rocker Assembly instructions

MONTESSORI ROOM

MONTESSORI ROOM Foldable Waldorf Rocker Assembly instructions

manuals.online logo
manuals.online logoBrands
  • About & Mission
  • Contact us
  • Privacy Policy
  • Terms and Conditions

Copyright 2025 Manuals.Online. All Rights Reserved.