RB Rockboard User manual

OWNER’S
MANUAL
MAXIMUM RIDER WEIGHT: 200 LB.
FOR AGES 8 AND UP
TM
R

IMPORTANT
Please read this entire manual
before unfolding and operating your
ROCKBOARD SCOOTER™.
CONGRATULATIONS!
By now you have already made a great decision in purchasing a cutting-
edge ROCKBOARD SCOOTER™. No doubt you are ready to start
“Rockboarding” the neighborhood sidewalks or park trails. We realize
that the last thing you want to do at this point is read our little owner’s
manual booklet.
While reading this may not be as exciting as actually tearing up the
pavement with your new ROCKBOARD SCOOTER™, there is a reason
why we spent the time creating this owner’s manual. Please give us a
little bit of yours.
So before you begin mastering your “Rockboarding” techniques outside,
make sure you read through all of the following pages to help you stay
safe and keep your ROCKBOARD SCOOTER™ in perfect condition,
just like it is now, the first time you took it out of the box!
We promise the reading won’t take long. When you finish, make sure that
a parent or guardian helps you set up your ROCKBOARD SCOOTER™
before your first ride. Then you’ll be outside before you know it!
CONTENT ...............................................................................................3
PARENTS/GUARDIANS ....................................................................... 4
BEFORE YOU RIDE .........................................................................4 - 5
DIAGRAM .............................................................................................. 6
ELEMENTS ............................................................................................ 7
RIDING YOUR ROCKBOARD SCOOTER™ ......................................8
- Unfold and Get Your Rock On ......................................... 9 - 10
- Rockboarding-to-Kick Conversion ........................................ 11
- Fold ‘N Go ............................................................................. 12
BRAKE ADJUSTMENT ....................................................................... 13
LEGAL .................................................................................................. 14
MAINTENANCE .................................................................................. 15
WARRANTY ........................................................................................ 16
NOTES .................................................................................................. 17
2 3www.rockboard.com 866.881.1799

PARENTS / GUARDIANS
Before your child goes speeding down the pavement, please review this
manual. Sit down with them and explain the importance of being cautious
and staying safe. As with a bicycle, we want you to take every precaution to
help prevent any type of accident.
BEFORE YOU RIDE
INSPECTYOUR ROCKBOARD SCOOTER™BEFORE EACH USE.
Check all bolts and fasteners to confirm that they are firmly secured and not
broken. Brake system should be adjusted if necessary and wheels inspected
for signs of excessive wear. Regularly maintaining your scooter will keep it
working like new and, more importantly, help keep you safe!
While riding your ROCKBOARD SCOOTER™always wear a helmet,
elbow pads and knee pads. Please be sure to wear long pants, long sleeves
and gloves. Proper footwear such as athletic shoes with rubber bottoms must
be worn while riding. Never ride barefoot or in sandals. Be sure that your
shoelaces are tied tight and take precautions to prevent them from dragging.
Operate the ROCKBOARD SCOOTER™on level, dry pavement. Be sure
that the area is completely free of debris such as limbs, rocks, sand or gravel.
Be sure that you can always see the path you are riding on. Never ride in
the rain or at night. Be sure to avoid puddles or wet pavement. Never ride in
snow or in icy conditions.
Avoid excessive speed associated with down hill rides.
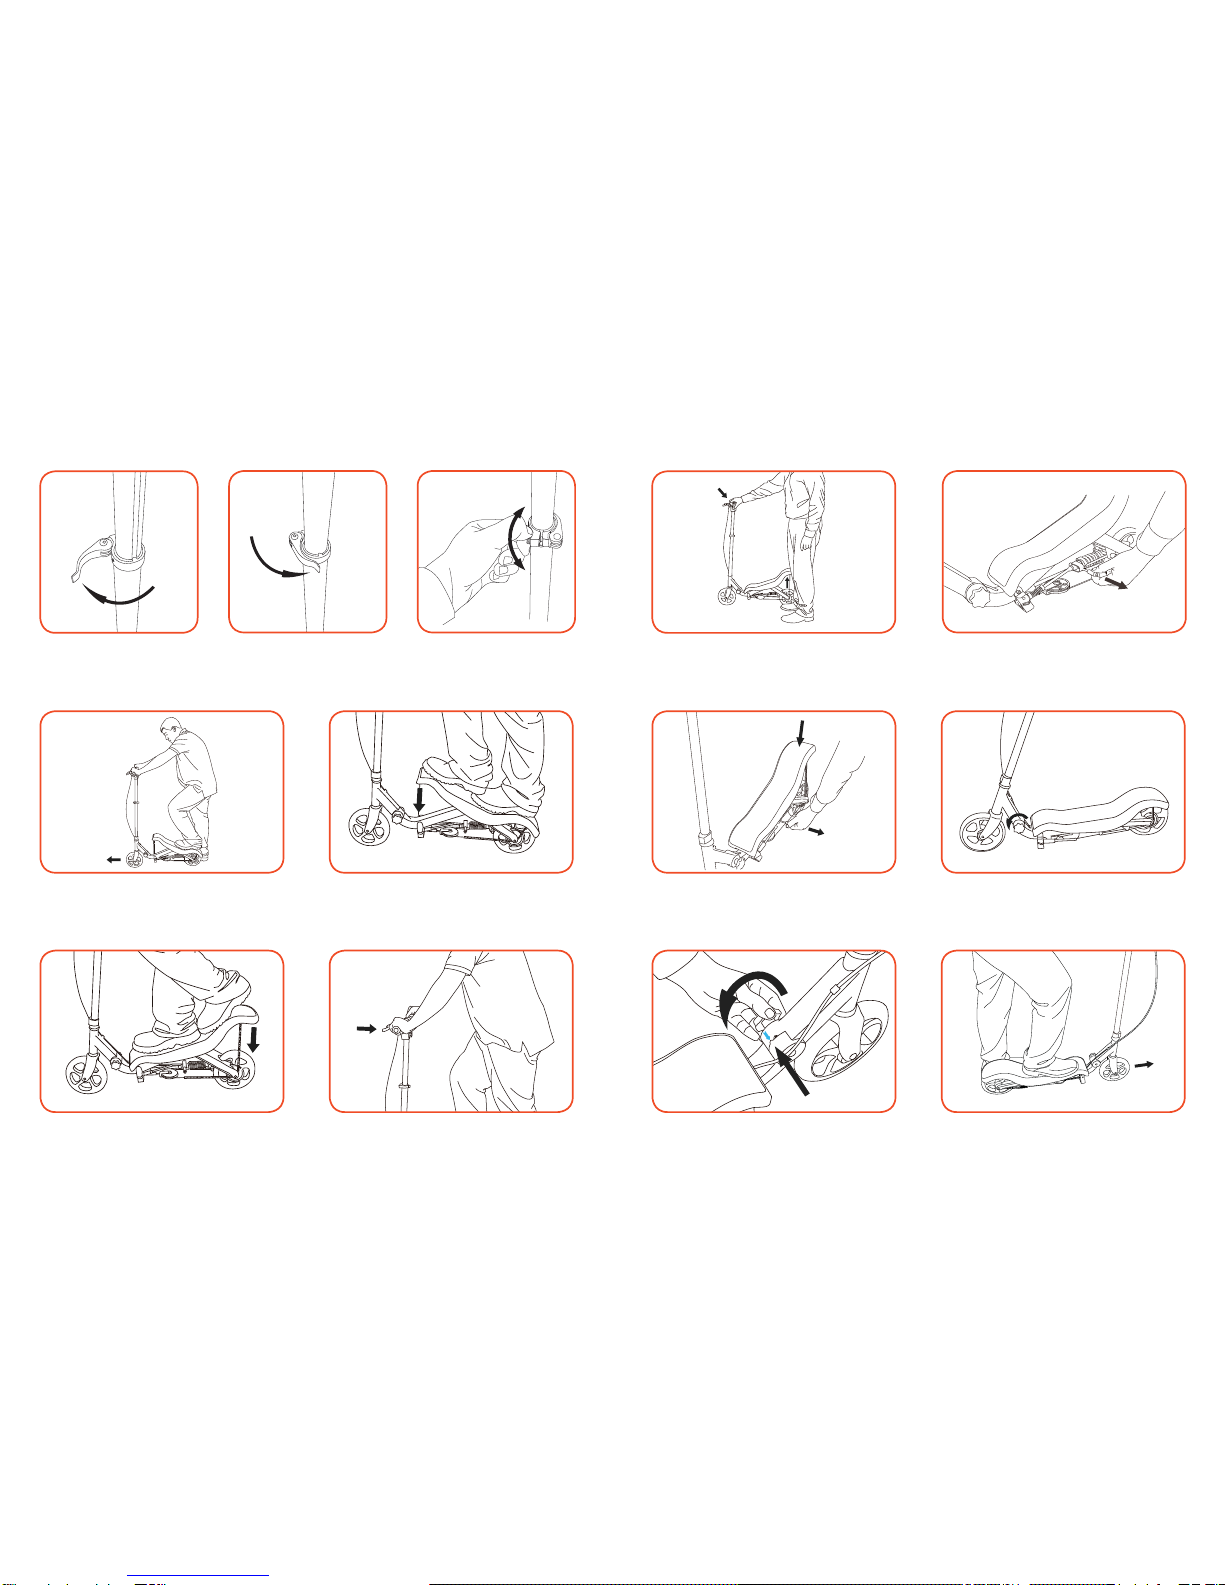
Adults must assist children in the initial adjustment procedures to unfold
scooter, adjust handlebar and steering to height, and finally to fold scooter.
Inspect your environment. Avoid sharp bumps, drainage grates and sudden
surfacechanges.Scootermaysuddenlystop.Ride on smooth, paved surfaces
away from motor vehicles.
Check the local laws and regulations before riding. Be sure to always ride
in legal, designated areas.
Brake pad & components will get hot from continuous use. Do not touch
after braking.
The ROCKBOARD SCOOTER™ is designed to be ridden alone.
Never operate your scooter with a passenger. Never attempt to tow or carry
objects with the ROCKBOARD SCOOTER™.
The ROCKBOARD SCOOTER™ was not designed to perform any types
of jumps or tricks.
Besurethatyourhandsandfeetandanyoneelse’shandsorfeetareclearofthe
ROCKBOARD™ mechanisms and moving parts while the ROCKBOARD
SCOOTER™ is in motion.
WARNING
Failure to use caution and common sense will further
increase the risk of serious injury or death. Always
practice safe operation. Use at your own risk.
4 5www.rockboard.com 866.881.1799

6 7866.881.1799
comfort grip
brake lever
handlebar locking
coupler
brake line
adjustment knob
suspension
quick-release
drive chain
front wheel
race bearings
kick stand
rear wheel
rockboard
propulsion
technology™
height adjustment clamp
downpipe
ELEMENTS
Soft comfort grips
Threaded nylon handlebar locking coupler
Two-finger aluminum alloy brake lever with adjustment
Locking internal slide height adjuster
Steel power drive chain
Dual-motion propulsion system featuring unique power factory
Rear 200 mm urethane wheel with performance band brakes
Spring-enhanced rear trailing arm suspension
Dual-mode quick-release
Spring-loaded, full-size kickstand
Dual-mode locking and folding mechanism
Precision race bearings with ultra-fluid motion
Front 200 mm urethane wheel with rigid nylon spokes
Ultra-strong steel box frame and front wheel fork
Steel-braided brake line
Non-slip textured rockboard deck

8 9www.rockboard.com 866.881.1799
DUAL SCOOTER MODE
INSTRUCTIONS
By now you have no doubt realized that the ROCKBOARD
SCOOTER ™ is unlike any other scooter on two wheels.
The biggest difference between your new
ROCKBOARD SCOOTER™ and all others is the
fact that yours is actually 2 scooters in 1!
That’s right. Not only can you shred the pavement in “Rockboarding”
mode, but with a few simple steps, you can transform your
ROCKBOARD SCOOTER™ into a low-profile kick scooter machine.
The following instructions illustrate how to:
• First, unfold your ROCKBOARD SCOOTER™ and secure
into “Rockboarding” mode.
• Second, convert your ride from “Rockboarding” mode to a
kick scooter.
• Third, fold up your ROCKBOARD SCOOTER™ for easy
transport and storage.
UNFOLD AND GET YOUR ROCK ON
1. Take your folded scooter out of the
packaging and place on level surface.
3. Align notch with orange arrow and turn
knob clockwise until fully tightened.
5. Rotate handlebars to position them parallel
with the the ground. Align nylon coupler
with threads on right-side handlebar.
2. Turn the adjustment knob counter-clockwise
until front wheel and handlebars can rotate
forward freely.
4. With scooter upright and one hand on down-
pipe, use other hand to pull up on front of
rockboard and allow to slowly roll forward.
6. Spin nylon coupler towards rear of scooter
until handlebars are fully tightened.

10 11866.881.1799
UNFOLD AND GET YOUR ROCK ON (cont.) ROCKBOARDING-TO-KICK CONVERSION
7. Release height adjustment
clamp to allow free up and
down motion for handlebars.
10. To start riding, first make sure rockboard is in
the down position in the rear, place one foot
over rear tire and push forward with the other.
12. Once the front has been completely pushed
down, use rear leg and body weight to push the
back of the rockboard down. Repeat steps 11-12.
8. Slide handlebars to desired height
and secure height adjustment
clamp, making sure handlebars do
not move up or down.
9. If adjustment clamp requires
calibration, spin nut clockwise
to tighten and counter-
clockwise to loosen.
11. Once a desired speed has been reached, lean
forward with body weight and front leg to push
the front of the rockboard down.
13. To brake while riding, slowly squeeze brake
handle on left handlebar, make sure not to
squeeze too hard.
1. To transform your rockboard to kick scooter,
stand behind upright scooter with one hand on
downpipe and rear of rockboard in up position.
3. While quick-release is pulled out, use right knee
to gently push down on rear of rockboard. Allow
scooter to roll forward while pushing down.
5. Align notch with blue arrow and turn adjust-
ment knob clockwise until fully tightened.
2. With other hand, pull out quick-release comp-
letely. ENSURE THAT YOUR HANDSARE FREE OF
INTERNALMECHANISMS WHILE PULLING RELEASE.
4. The rockboard will lower until it comes to rest
on the frame. While holding scooter upright,
turn the knob counter-clockwise to separate joint.
6. Place foot flat on the rockboard and push
forward with the other. Continue kicking
with the other foot and enjoy the ride.
WARNING: Brake pad & components will get hot from continuous use! Do not touch after braking!

12 13www.rockboard.com 866.881.1799
BRAKE ADJUSTMENTS
FOLD ‘N GO
1. Release height adjustment clamp.
3. Loosen nylon handlebar coupler until handle-
bars separate. Rotate handlebars down and
to the side of the downpipe.
5. Rotate front yoke and downpipe backwards
until parallel to the ground. Locate notch in
joint and tighten completely with knob.
2. Slide handlebars down and secure height
adjustment clamp.
1. For minor brake adjustment, use this method. First rotate the
brake adjuster jam nut counter-clockwise to release cable. Next,
rotate brake cable adjuster clockwise to increase cable length,
or counter-clockwise to shorten cable length. Lastly, tighten
brake adjuster jam nut to lock brake cable at desired length.
2. For extended brake adjustment, use this method. First, loosen
rear brake cable nut using an 8 mm wrench (not included). Next,
pull cable end towards rear of scooter to shorten cable length, or
push cable end towards front of scooter to increase cable length.
Lastly, tighten rear brake cable nut once desired length is found.
4. With scooter upright and one hand on down-
pipe, use other hand to loosen adjustment
knob to fully separate the joint.
6. Grab centre of downpipe and be sure to lift
with your legs. All done!

14 15
www.rockboard.com 866.881.1799
LEGAL
Read the Owner’s Manual
The ROCKBOARD SCOOTER™ is designed for riders 8 years old and up
Do not exceed 90 kg (200 lb.) weight limit
Always inspect your scooter before every use
Always wear a helmet, elbow pads, knee pads and athletic shoes
Wear gloves, long pants and long sleeves for extra protection
Operate only on level, dry pavement that is free of debris
Never ride at night, in the rain or in icy conditions
Inspect your environment, avoid bumpy surfaces
Be sure to always ride in legal, designated areas
Avoid excessive speeds
Young children must only ride under adult supervision
Watch out for pedestrians, bicyclists, automobiles, other
“Rockboarders” and neighborhood animals
Replace worn or broken parts with only genuine ROCKBOARD™
parts immediately
No modifications should be made other than specified by
manufacturer’s instructions
MAINTENANCE
Wheels and Bearings
With proper usage of the ROCKBOARD SCOOTER™, the wheels
and wheel bearings are maintenance free. Inspect your ROCKBOARD
SCOOTER™ before every use. Periodically look at the wheels for
wear and tear, check the axles, be sure all bolts and fasteners are tight,
brakes are adjusted and inspect the bearings for loose parts.
If you do feel you need to replace a wheel or wheel bearing, use only
genuine ROCKBOARD™ parts. Using any replacements that were
not made for the ROCKBOARD SCOOTER™ could compromise the
scooter’s safety. Normal wear such as worn bearings, tires and wheels
are not covered by the ROCKBOARD™ Limited Warranty.
Cleaning
As long as you’re having fun, your ROCKBOARD SCOOTER™
will get a little grimy. To get heads turning again, wipe down the
handlebars, frame, rockboard and wheels with a wet cloth. If your
ROCKBOARD™ is extra dirty, you can use a small amount of dish
soap. Don’t use any industrial cleaners, alcohol or ammonia-based
cleaners. They could really take a toll on your scooter’s finish.

LIMITED WARRANTY
The manufacturer warrants this product to be free of manufacturing
defects for a period of 90 days from the date of purchase. This Limited
Warranty is the only warranty for ROCKBOARD SCOOTER™.
The Limited Warranty does not cover normal wear and tear, lack of
maintenance, improper storage or use of this product, or any damage or
failure caused by improper assembly.
This Limited Warranty will be voided if this product is ever modified in
any way, used in any manner other than recreational use, or used in any
form as a rental.
If you have any problems with your ROCKBOARD SCOOTER™,
please DO NOT return to the place of purchase. Be sure to keep your
original sales receipt.
If you need assistance, or have any questions regarding parts, accessories
or warranty related issues, please call us at 866-881-1799 and one of our
Service Representatives will be happy to help you.
Specifications are subject to change without notice.
NOTES
16 17
www.rockboard.com 866.881.1799

ROCKBOARD SCOOTER™
P.O. BOX 616
GREENWOOD, IN 46142
www.rockboard.com
866.881.1799
TM
Table of contents