RCA RP3730 User manual

EN

EN
WARNING:TO PREVENT FIRE OR ELECTRICAL
SHOCK HAZARD, DO NOT EXPOSETHIS PRODUCT
TO RAIN OR MOISTURE.
SEE MARKING ON BOTTOM / BACK OF PRODUCT
CAUTION
RISK OF ELECTRIC SHOCK
DO NOT OPEN
THE EXCLAMATION
POINT WITHIN THE
TRIANGLE IS A
WARNING SIGN
ALERTING YOU OF
IMPORTANT
INSTRUCTIONS
ACCOMPANYING
THE PRODUCT.
THE LIGHTNING
FLASH AND ARROW-
HEAD WITHIN THE
TRIANGLE IS A
WARNING SIGN
ALERTING YOU OF
"DANGEROUS
VOLTAGE" INSIDE
THE PRODUCT.
CAUTION: TO REDUCE THE
RISK OF ELECTRIC SHOCK,
DO NOT REMOVE COVER
(OR BACK). NO USER-
SERVICEABLE PARTS IN-
SIDE. REFER SERVICING
TO QUALIFIED SERVICE
PERSONNEL.
FCC Information
This device complies with Part 15 of the FCC Rules.
Operation is subject to the following two
conditions: (1) This device may not cause harmful
interference, and (2) this device must accept any
interference received, including interference that
may cause undesired operation.
In accordance with FCC requirements, changes or
modifications not expressly approved by Thomson
Inc. could void the user’s authority to operate this
product.
This device generates and uses radio frequency
(RF) energy, and if not installed and used properly,
this equipment may cause interference to radio
and television reception.
If this equipment does cause interference to radio
or television reception (which you can determine
by unplugging the unit), try to correct the
interference by one or more of the following
measures.
• Re-orient the receiving antenna (that is, the
antenna for the radio or television that is
“receiving” the interference).
• Move the unit away from the equipment that is
receiving interference.
• Plug the unit into a different wall outlet so that
the unit and the equipment receiving interference
are on different branch circuits.
If these measures do not eliminate the
interference, please consult your dealer or an
experienced radio/television technician for
additional suggestions. Also, the Federal
Communications Commission has prepared a
helpful booklet, “How To Identify and Resolve
Radio TV Interference Problems.” This booklet is
available from the U.S. Government Printing
Office, Washington, DC 20402. Please specify stock
number 004-000-00345-4 when ordering copies.
This Class B digital apparatus complies with
Canadian ICES-003.
Cet appareil numérique de la class B est
conforme à la norme du NMB-003 du Canada.

EN
FCC Information
Service Information
This product should be serviced only by those
specially trained in appropriate servicing
techniques. For instructions on how to obtain
service, refer to the warranty included in this
Guide.
CAUTION: FOR CONTINUED PROTECTION
AGAINST RISK OF FIRE, REPLACE ONLY WITH SAME
TYPE FUSE.
For Your Safety
The AC power plug is polarized
(one blade is wider than the
other) and only fits into AC
power outlets one way. If the
plug will not go into the outlet
completely, turn the plug over
and try to insert it the other way. If it still does
not fit, contact a qualified electrician to change
the outlet, or use a different one. Do not attempt
to bypass this safety feature.
CAUTION: TO PREVENT ELECTRIC
SHOCK, MATCH WIDE BLADE OF
PLUG TO WIDE SLOT, FULLY INSERT.
Technical Specification
Product: Clock Radio with CD player
Brand: RCA
Model: RP3730
Electrical Consumption
Power Supply: 120V~60Hz
Power Consumption: 11 Watts
IMPORTER
Comercializadora Thomson de México, S.A. de
C.V.
Álvaro Obregón No. 151. Piso 13.
Col. Roma. Delegación Cuauhtémoc
C.P. 06700. México, D.F.
Telefono: 52-55-11-020360
RFC: CTM-980723-KS5
For Your Records
In the event that service should be required, you
may need both the model number. In the space
below, record the date and place of purchase:
Date of Purchase:
Place of Purchase:
1

EN
1
Table of Contents
FCC information
Battery Back-Up Operation .......... 2
General Controls ........................... 3
Front view ........................................... 3
Bottom view ....................................... 3
Top view .............................................. 4
Side view ............................................. 4
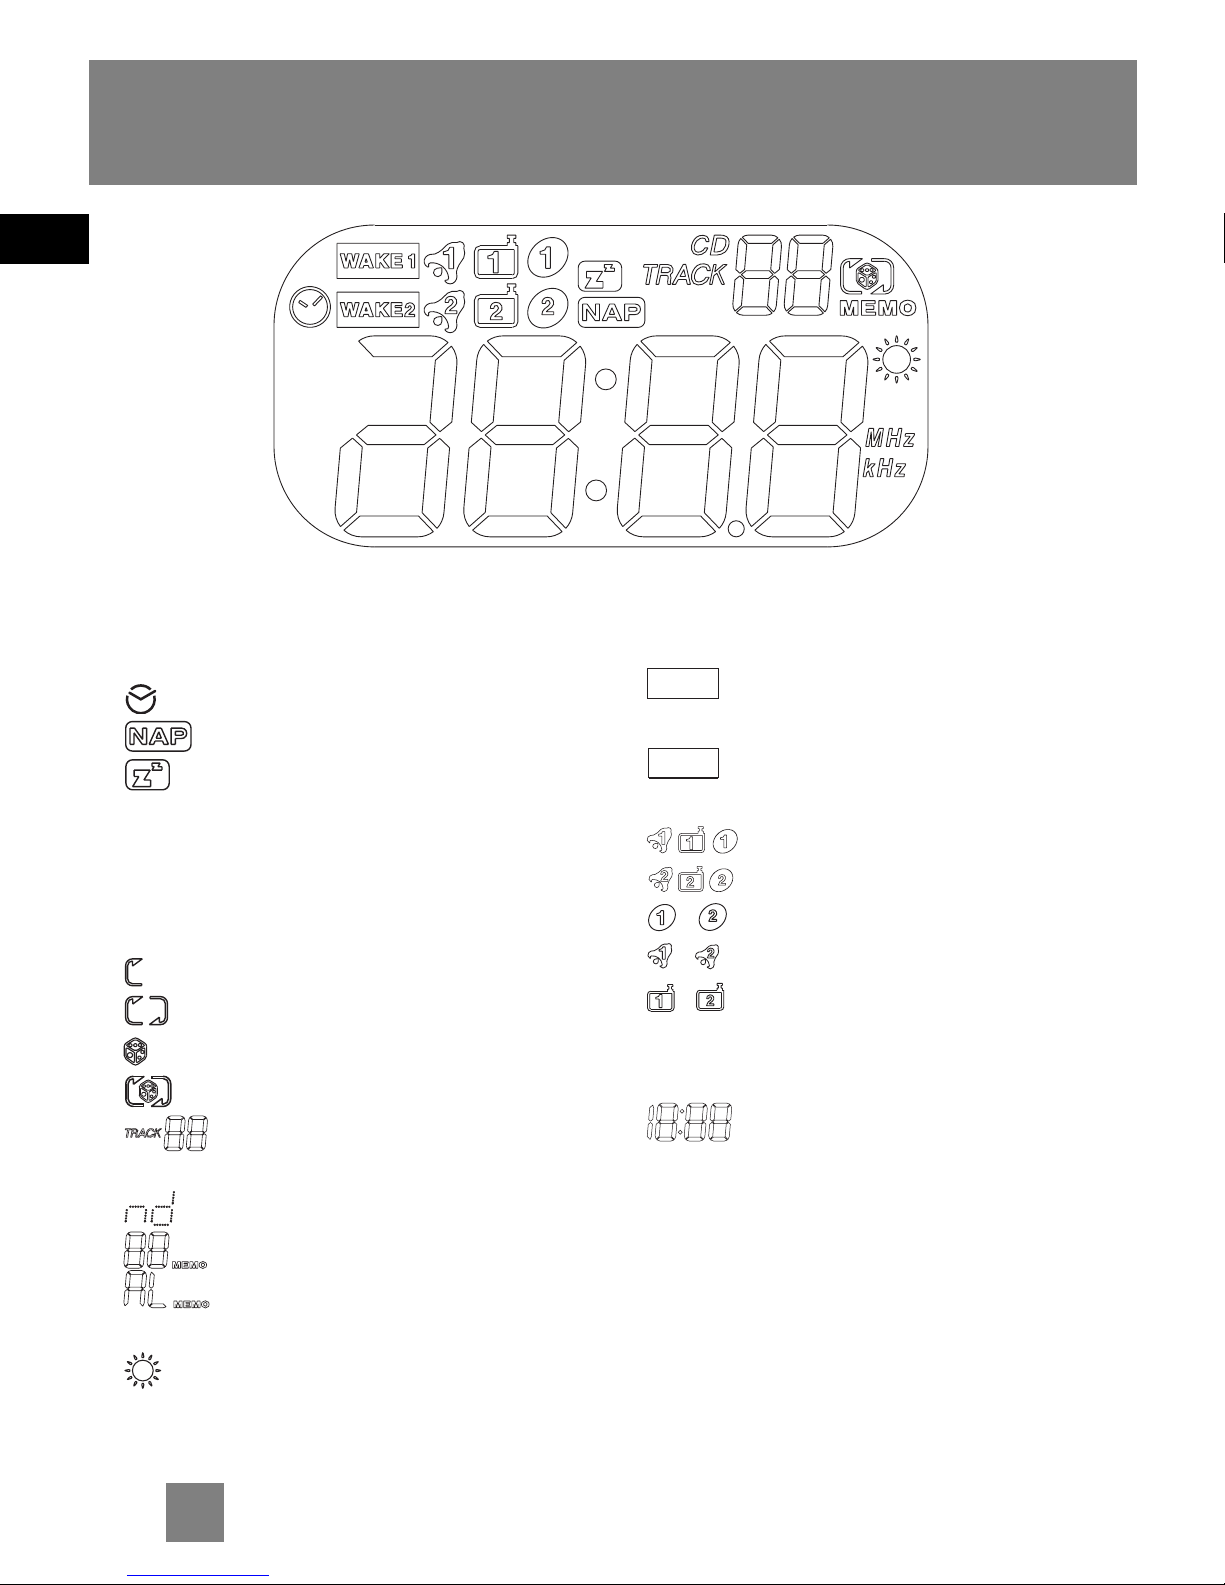
The Display .................................... 5
Clock Display ....................................... 5
Wake 1 and Wake 2 Display ............. 5
Before You Begin .......................... 6
Automatic Time Set ........................... 6
Daylight Saving .................................. 6
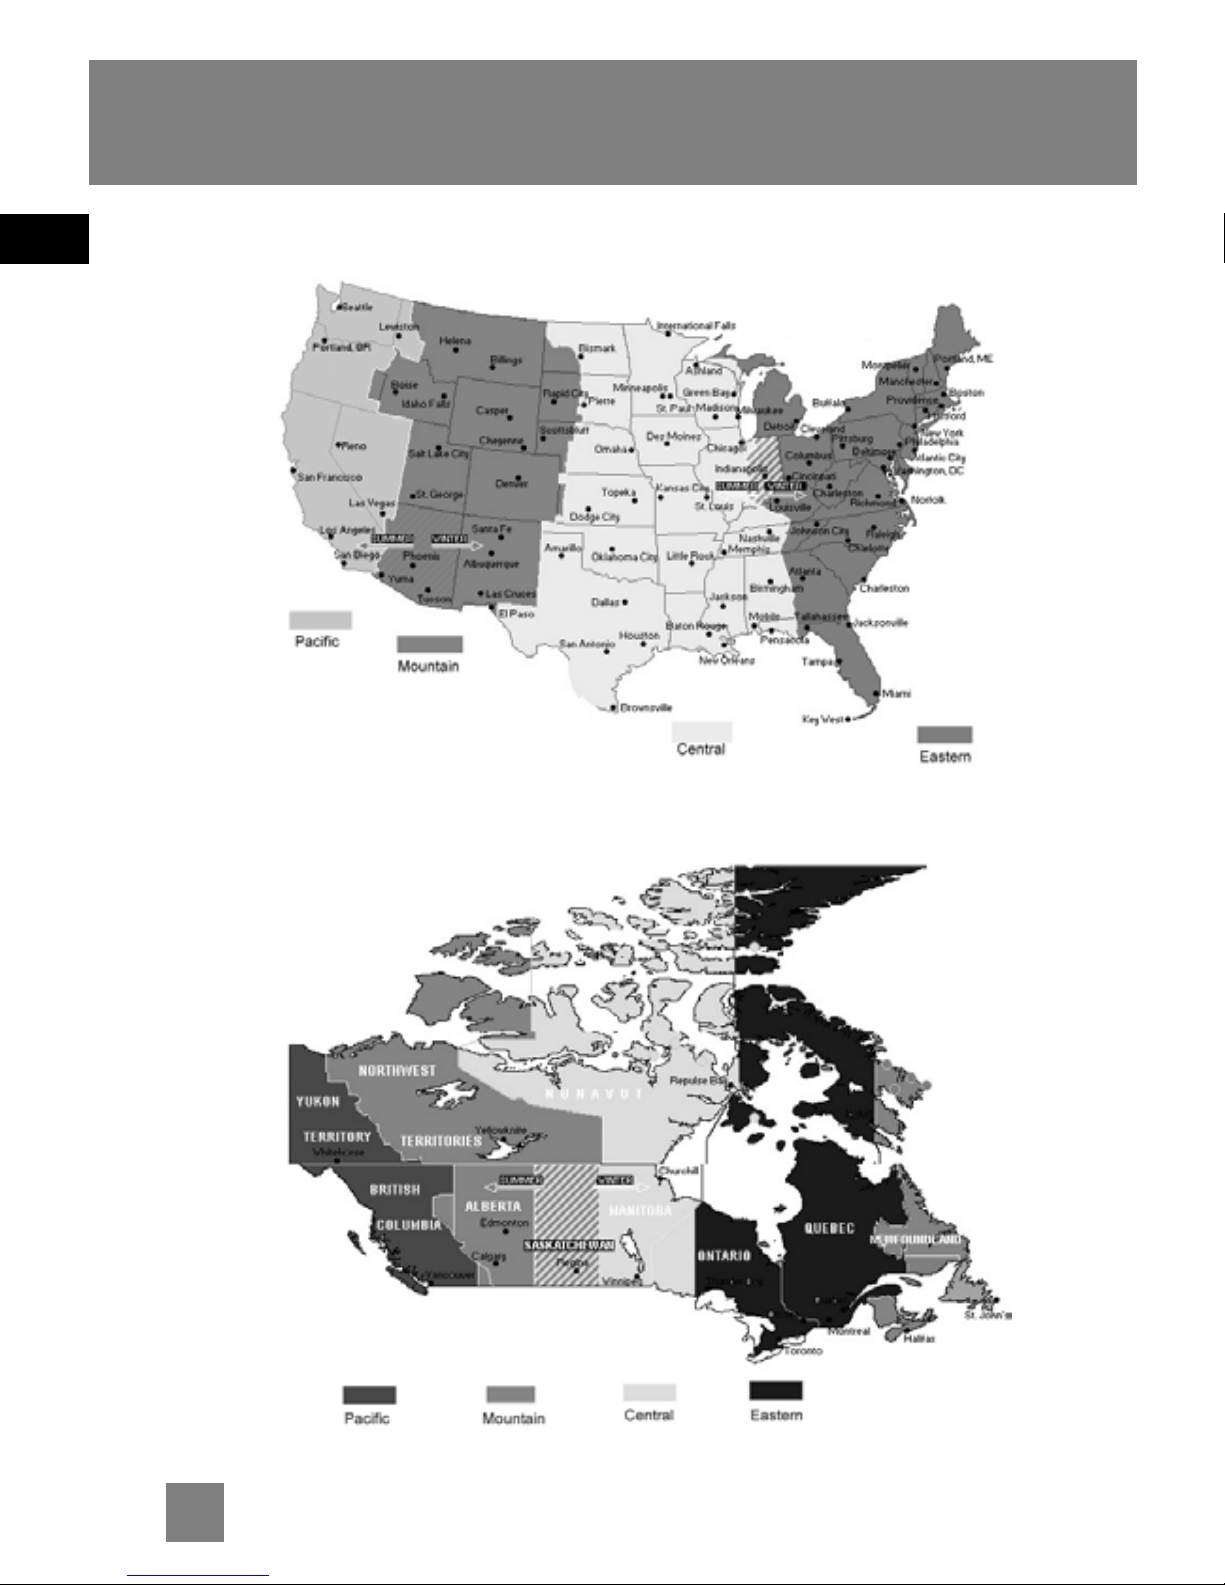
Setting Time Zone .............................. 6
U.S. Time Zone (Figure 1) .................. 7
Canadian Time Zone (Figure 2) ........ 7
Setting the Clock .......................... 8
Setting Clock ....................................... 8
Operating Wake Timer ................. 9
Setting the Wake Time ...................... 9
Selectng Wake Mode ......................... 9
Waking to CD ..................................... 9
Waking to Radio .............................. 10
Waking to Alarm Tone .................... 11
Turning off Alarm ............................ 11
Operating the Radio ................... 12
Tuning the Stations .......................... 12
Automatic Radio Station Search ..... 12
Setting the Preset Radio Stations ... 13
Selecting the Preset Radio
Stations .............................................. 13
Overwriting the Preset Radio
Stations .............................................. 13
Deleting the Preset Radio Stations 13
Operating the CD Player ............ 14
Listening to Compact Disc ............... 14
Selecting Play Mode ........................ 14
Alarm Settings ............................ 15
Setting Sleep Time ........................... 15
Sleep to Radio .................................. 15
Sleep to CD ....................................... 15
Viewing Remaining Time ................ 15
Nap Mode ......................................... 16
Stopping the Nap Alarm ................. 16
Cancelling the Nap Alarm ............... 16
Snooze ............................................... 16
Brightness .......................................... 16
Care and Maintenance ............... 17
U.S. Limited Warranty ................ 18
Canadian Limited Warranty ....... 20

EN
The descriptions and characteristics in this owner’s manual are for the purpose of general reference only and not as
a guarantee. In order to provide you with the highest quality product, we may make changes or modifications
without prior notice. The English version serves as the final reference on all product and operational details should
any discrepancies arise in other languages.
Battery Back-Up Operation
This clock radio is equipped with a
memory holding system that can be
powered with 2 “AA” batteries
(included). The power failure protection
circuit will not operate unless battery is
installed.
When normal household power is
interrupted, or the AC line cord is
unplugged, the batteries will power the
clock radio to keep track of time and
alarm settings programmed into
memory. When the battery backup
functions, the digital display will not
light, however, the function of alarm still
occurs during the power interruption if
the remaining battery power is
adequate. Normal operation will resume
after AC power is restored so you will
not have to reset the time or the alarm.
Install batteries as follow:
1. Unlock the battery compartment door
(located at the bottom of the radio) by
sliding the tab away from the door.
2. Open the battery compartment door.
3. Insert 2 “AA” batteries with polarities
matching indications.
4. Replace the compartment door and
slide the tab to lock battery
compartment.
2

EN
WAKE UP CD TRACK / RADIO - sets the
wake up radio station or CD track.
CD mode - selects repeat 1 / repeat all /
shuffle / repeat shuffle in CD mode.
- skips / searches backward.
- starts / pauses CD playback.
- skips / searches forward.
- stops CD playback.
OFF - turns off the radio / alarm / CD
RECALL - recalls available preset radio
stations.
MEMO - sets and stores preset memory
in radio mode.
RADIO /BAND- turns on the radio /
changes radio band.
OPEN / CLOSE - opens / closes
the CD compartment.
General Controls
3
Front view Bottom view
TIME ZONE - Slide to select different
time zone.
DAYLIGHT SAVING TIME - Press to turn
on / off the Daylight Saving function.
CD/TRACK/RADIO
OPEN / CLOSE

EN
4
SNOOZE - turns off the alarm
momentarily.
NAP - sets the alarm to sound after a
specific period of time. (Alarm tone only)
- activates SLEEP function.
/ - change time / radio frequency /
CD track
TURNING KNOB - Rotate until the
indicator points to your selected mode.
The options are as follow (left to right):
WAKE TIME 1 - adjusts wake time 1.
WAKE TIME 2 - adjusts wake time 2.
CLOCK - adjusts clock time.
LOCK - no adjustment can be made
when in lock mode.
WAKE MODE 1 - change WAKE 1 mode.
WAKE MODE 2 - change WAKE 2 mode.
BRIGHTNESS - adjusts the brightness
level.
Top view Side view
VOLUME - adjusts the volume.
General Controls
VOL
1
T
IM
E
2
C
L
O
C
K
L
O
C
K
1
M
OD
E
2
B
R
IG
H
T
N
E
S
S
WA
KE
WA
KE
TURNING
KNOB

EN
5
The Display
Clock Display
AM
FM
MHz/kHz
CD
Wake 1 and Wake 2 Display
WAKE 1
WAKE 2
//
//
/
/
/
AM
PM
In clock setting mode.
Nap activated.
Sleep activated.
In AM radio band.
In FM radio band.
Radio frequency unit.
In CD mode.
Repeats the current track.
Repeats the whole disc.
Plays tracks randomly.
Plays random track repeatedly.
In CD mode, displays track
number.
No disc detected.
In radio mode, displays
memory recall number.
Displays when the alarm radio
station is set.
Daylight saving.
In wake 1 time setting
mode.
In wake 2 time setting
mode.
Wake 1 source.
Wake 2 source.
Wake to CD.
Wake to alarm tone.
Wake to radio.
AM time indicator.
PM time indicator.
Wake or clock time.
FM
AM

EN
Automatic Time Set
You do not have to set the clock time as
a built-in automatic time set system is
equipped in this clock powered by 2 X
AA batteries (included). All you have to
do is to plug this clock for power and
current time will be shown automati-
cally.
Daylight Saving
You can press and hold DAYLIGHT
SAVING TIME at the bottom of
the unit to turn on / off the Daylight
Saving function in areas observing / not
observing such time change.
Setting Time Zone
Before plugging in for power, follow
the steps below to select time zone.
You may slide the time
zone selector at the
bottom of the clock to
Eastern (1), Central (2),
mountain (3) or Pacific
(4).
WARNING: Please avoid playing with
these buttons after entering the
Clock/Alarm set mode.
Refer to Figure 1 for U.S. Time Zone
details.
Refer to Figure 2 for Canadian Time
Zone details.
Before You Begin
6

EN
7
Canadian Time Zone (Figure 2)
U.S. Time Zone (Figure 1)
Before You Begin

EN
This unit has a built-in automatic time
set system that automatically generates
the correct clock time once the unit is
plugged in. You are not required to set
the clock manually, however, in case
the memory holding batteries are
accidentally removed, you may set the
clock manually with following
procedures:
Setting Clock
1. Be sure Time Zone and Daylight Saving
Time is adjusted before operating the
clock.
2. Rotate the TURNING KNOB to the
CLOCK position, the clock setting icon
is displayed.
3. Press or to set the time. Press and
hold the respective buttons
to fast reverse or fast forward clock
time.
4. Rotate the TURNING KNOB to the
LOCK position to save the clock time.
Note:Note:
Note:Note:
Note:
The clock is in 12 hour
format. The AM and PM
indicators will light to
show am and pm time
respectively.
Setting the Clock
8
Note:Note:
Note:Note:
Note:
Please make sure the
TURNING KNOBTURNING KNOB
TURNING KNOB position is
set to LOCK after making
changes.

EN
9
Operating the Wake Timer
Setting the Wake Time
1. Rotate the TURNING KNOB to the
WAKE TIME 1 or WAKE TIME 2 position
until
WAKE 1
or
WAKE 2
icon shows on the
display.
2. Press or to set the wake time. The
time decrements or increments will fol-
low by a faster rate when you press and
hold either or .
3. Rotate the TURNING KNOB to the
LOCK position to save the wake time
setting.
Selecting Wake Mode
To change to another wake mode (e.g.
from CD to radio):
1. Rotate the TURNING KNOB to the
WAKE MODE 1 or WAKE MODE 2 position
2. Press or to scroll through wake
options.
v
v
v
.
Waking to CD
When the waking to CD is selected, /
icon will light.
1. Set the wake time.
2. Rotate the TURNING KNOB to the
WAKE MODE 1 or WAKE MODE 2 posi-
tion, press or to select waking up
by CD, / will light accordingly.
3. Press to turn on the CD.
4. Rotate VOLUME to adjust to your
desired wake up volume.
5. Press OFF to stop the CD playback.
You can select your CD wake up track by
the following procedures.
1. In CD mode, while pressing WAKE UP
CD TRACK / RADIO, press or to
select your desired CD wake up track.
2. Release WAKE UP CD TRACK / RADIO,
and the CD wake up track is set.
3. To reset the CD wake up track, follow
the above procedures and set the CD
wake up track to 1.
Note:Note:
Note:Note:
Note:
If the CD compartment is
empty, the alarm tone will
sound instead even the
WAKE TO CD mode is
selected.
Attention:Attention:
Attention:
When the AC power is
disconnected, the unit will
enter DC backup mode, all
wake mode will be
reverted to alarm tone.

EN
Waking to RADIO
When the waking to radio is selected,
/ icon will light.
1. Set the wake time.
2. Rotate the TURNING KNOB to the
WAKE MODE 1 or WAKE MODE 2 posi-
tion, press or to select waking up
by RADIO, / will light accordingly.
3. Press RADIO/BAND to turn on the ra-
dio.
4. Rotate VOLUME to adjust to your
desired wake up volume.
5. Press OFF to turn off the radio.
You can select your wake up radio
station by the following procedures.
1. Press RADIO/BAND to turn on the ra-
dio and select the band.
2. Press or to tune to your desired
radio station.
3. Press and hold WAKE UP CD TRACK /
RADIO to store the current radio sta-
tion as the wake up radio station.
will show on the display.
Operating the Wake Timer
Note:Note:
Note:Note:
Note:
“AL” refers to the Alarm
Station. If no WAKE
STATION is set, the wake
up radio station will stay at
your last listening radio station.
You can cancel your wake up radio
station by the following procedures.
1. Press RADIO ON/BAND to turn on the
radio.
2. Press RECALL repeatedly to select the
wake up radio station.
3. Press and hold MEMO/SET to cancel the
wake up radio station.
10
Note:Note:
Note:Note:
Note:
Please make sure the
TURNING KNOBTURNING KNOB
TURNING KNOB position is
set to LOCK after making
changes.

EN
11
Tip:Tip:
Tip:Tip:
Tip:
If you set the SLEEP
function with low volume
level before going to bed,
we advise using Waking to
Alarm Tone mode to wake you up
since the volume will automatically
increase.
Turning off Alarm
1. Silence the alarm momentarily
Press SNOOZE. The alarm will sound
again when the snooze period is over.
(see “Snooze” section).
2. Stop the alarm
Press OFF and the alarm will be on again
the following day at the same time.
3. Disable the alarm permanently
1. Rotate the TURNING KNOB to the
WAKE MODE 1 or WAKE MODE 2 posi-
tion.
2. Press or until all wake indicator
disappear.
Waking to Alarm Tone
When waking to alarm tone is selected,
/ icon will light.
You cannot adjust the alarm tone with
volume.
Operating the Wake Timer
Note:Note:
Note:Note:
Note:
The unit equips with GRAD-GRAD-
GRAD-GRAD-
GRAD-
U-WAKEU-WAKE
U-WAKEU-WAKE
U-WAKE feature, the
alarm tone volume will
increase gradually to its
maximum in about 30 to 45 seconds.

EN
Operating the Radio
12
Antennas
FM antenna - The power cord acts as
your FM antenna. It picks up moderate
to strong radio stations and eliminates
the need for an external antenna in
most strong signal areas. Be sure the
power cord is stretched to its full length.
Do not coil or bunch the cord together.
Changing position of the power cord
may improve reception.
AM Antenna - A built-in ferrite rod
antenna eliminates the need for an
outside antenna for AM reception.
Rotating the unit slightly may improve
reception of distant AM stations.
Tuning the Stations
1. Press RADIO/BAND (located on the
front of the radio) to turn on the radio.
2. Press RADIO/BAND repeatedly to select
the desired broadcast band.
3. Press or to tune to your desired
radio station.
4. Rotate VOLUME to adjust to your
desired listening level.
Automatic Radio Station
Search
1. Press RADIO /BAND (located on the
front of the radio) to turn on the radio.
2. Press and hold or for 2 seconds, it
will automatically search a radio station
for you.

EN Setting the Preset Radio
Stations
1. Press RADIO/BAND to turn on the ra-
dio.
2. Press RADIO/BAND to change the
broadcast band.
3. Press or to tune to your desired
radio station.
4. If you want to memorize this radio sta-
tion, press MEMO once, and then press
RECALL repeatedly to choose the ra-
dio station number you want to record
in.
5. Press MEMO again to confirm.
6. If you set the radio station in the AL
location, it will be the wake up radio
station of the alarm.
Selecting the Preset Radio
Stations
1. Press RADIO/BAND to turn on the ra-
dio.
2. Press RECALL repeatedly to select your
desired preset radio station.
Overwriting the Preset Radio
Stations
1. Press RADIO/BAND to turn on the ra-
dio.
2. Press or to tune to your desired
preset radio station.
3. Press MEMO once and then press RE-
CALL repeatedly to choose the radio
station number you want to overwrite.
4. Press MEMO again to confirm.
Deleting the Preset Radio
Stations
1. Press RECALL repeatedly to select your
preset radio station you want to delete.
2. Press and hold MEMO for 3 seconds to
delete the selected preset radio station.
13
Note:Note:
Note:Note:
Note:
This unit can store up to 11
preset radio stations, while
ALAL
ALAL
AL location is for the wake
up radio station.
Operating the Radio

EN
Operating the CD Player
14
Listening to Compact Disc
1. Open the CD compartment.
2. Insert a disc and close the CD compart-
ment door.
3. Press .
4. Rotate VOLUME to adjust to your de-
sired listening level.
5. Press or to skip backward or
forward the CD track.
6. Press and hold or to search
backward or forward within the CD
track.
7. Press to stop CD playback.
Selecting Play Mode
1. Start CD playback.
2. Press CD MODE to toggle between dif-
ferent play modes.
- repeats the current track.
- repeats the whole disc.
- plays tracks randomly.
- plays random track repeatedly.
CD/TRACK/RADIO

EN Sleep to CD
1. Under sleep mode, press to start
CD playback.
2. CD play mode will be automatically in
Repeat All mode when using Sleep to
CD setting.
3. The unit will turn off automatically once
the sleep time is reached.
Viewing Remaining Time
Press SLEEP to read the remaining
sleep time.
Setting Sleep Time
In sleep mode, the radio and CD will turn
off automatically. To set the sleep time,
simply:
1. Press , then the time display will
exhibit 0:59 and the radio will turn on
(default). While holding , press or
to set the sleep time. The time range
is from 1 minute to 2 hours (default is
0:59).
2. Release and the current time will be
shown again, will show on the
display, and the sleep time is set.
Sleep to Radio
1. Under sleep mode, press RADIO/ BAND
to turn on the radio.
2. Sleep radio station will automatically
switch to the current radio station, you
may select the radio station as usual.
3. Once the sleep time is reached, the ra-
dio will turn off automatically.
You can reset to sleep to a different
radio station, simply:
1. Press RADIO/BAND to select radio
band.
2. Press or to tune to the radio sta-
tion you want to sleep to.
15
Tip:Tip:
Tip:Tip:
Tip:
The unit will enter either CD or
Radio mode after SLEEP is
pressed, depending on the previous
sleep setting.
Tip:Tip:
Tip:Tip:
Tip:
When the sleep mode is
activated again, the sleep
time will be the same as the
one you have set before.
Tip:Tip:
Tip:Tip:
Tip:
If you decide to turn off the
unit sooner, press SNOOZESNOOZE
SNOOZESNOOZE
SNOOZE
or OFFOFF
OFFOFF
OFF.
Alarm Settings

EN
16
Alarm Settings
Nap Mode
For catnaps up to 2 hours without
disturbing the regular alarm settings, the
NAP function wakes you up after a short
period of time. Simply:
1. Press NAP, the NAP indicator will flash.
While the NAP indicator is flashing,
press or to adjust nap time. The
time range is from 10 minutes to 2 hours
at 10 minutes interval (default is 20
minutes).
2. Wait 3 seconds or press NAP again to
confirm, the NAP indicator will show
on the display.
3. Press NAP once to show time left, after
3 seconds, the display will return to
clock time.
Stopping the Nap Alarm
When the NAP alarm sounds, you can
press OFF to stop it.
Cancelling the Nap Alarm
Press and hold NAP for 5 seconds to
cancel the nap setting.
Snooze
This operation allows extra sleep time
after the alarm is on. The alarm will be
off by pressing SNOOZE until the snooze
period is over. Snooze function can be
used repeatedly up to 2 hours. After this,
the alarm will turn off until the next
alarm conditions are met. Set the
“quiet” period as follow:
1. While pressing SNOOZE, press or
to set the “quiet” period (the default
time is 9 minutes) from 1 minute to 30
minutes. Release SNOOZE, then the
“quiet” period is set.
2. The “quiet” period will remain the same
until you change it again.
Brightness
1. Rotate the TURNING KNOB to the
BRIGHTNESS position
2. Press or to set the brightness level.
Tip:Tip:
Tip:Tip:
Tip:
Only alarm tone can be selected
in NAP mode.

EN
Care and Maintenance
Handling Compact Discs
• Do not touch the signal surfaces. Hold by the edges, or by one edge and the hole.
• Do not affix labels or adhesive tape to the label surfaces. Also, do not scratch or damage the
label.
• Discs rotate at high speeds inside the player. Do not use damaged (cracked or warped) discs.
Cleaning Compact Discs
• Dirty discs can cause poor sound quality. Always keep discs clean by wiping them gently with a
soft cloth from the inner edge toward the outer perimeter.
• If a disc becomes dirty, wet a soft cloth in water, wring it out well, wipe the dirt away gently,
and then remove any water drops with a dry cloth.
• Do not use record cleaning sprays or anti-static agents on discs. Also, never clean discs with
benzene, thinner, or other volatile solvents which may cause damage to the disc surface.
CD Lens Care
When your CD lens gets dirty it can also cause the unit to output poor sound quality. To clean the
lens you will need to purchase a CD lens cleaner which can maintain the output sound quality. For
instructions on cleaning the CD lens, refer to the ones accompanying the lens care.
Cleaning the Exterior
Prior to cleaning the exterior, be sure to unplug the power cord from the AC power outlet. Wipe
the exterior with a soft, clean, and slightly water-dampened cloth.
Precautions
• Never open the cabinet under any circumstances. Any repairs or internal adjustments should be
made only by a trained technician.
• Warning: Never operate this product with the cabinet removed.
• The CD player of this unit uses a laser to read the music on the disc. The laser mechanism
corresponds to the cartridge and stylus of a record player. Although this product incorporates a
laser pick-up lens, it is completely safe when operated according to directions.
• Discs rotate at high speed inside the player. Do not use damaged, warped or cracked discs.
• Do not touch the pick-up lens which is located inside the disc compartment. Also, to keep dust
from collecting on the pick-up lens, do not leave the compartment door open for an extended
period of time.
17
Table of contents
Other RCA Clock Radio manuals