RCA T13208 User manual

TV/VCR
User’s Guide
Changing Entertainment. Again.

This symbol indicates
"dangerous voltage" inside
the product that presents a
risk of electric shock or
personal injury.
WARNING
To reduce the risk of fire or
electric shock, do not expose
this product to rain or moisture.
To reduce the risk of electric shock, do not remove
cover (or back). No user serviceable parts inside.
Refer servicing to qualified service personnel.
This symbol indicates
important instructions
accompanying the product.
WARNING
RISK OF ELECTRIC SHOCK
DO NOT OPEN
Caution: To prevent electric shock, match wide blade of
plug to wide slot, fully insert.
Attention: Pour éviter les chocs électriques, introduire
la lame la plus large de la fiche dans la borne
correspondante de la prise et pousser jusqú au fond.
Refer to the identification/rating label located on the back panel of your
product for its proper operating voltage.
FCC Regulations state that unauthorized changes or modifications to this
equipment may void the user’s authority to operate it.
If fixed (non-moving) images are left on the screen for long periods,
they may be permanently imprinted on the picture tube. Such
images include network logos, phone numbers, and video games.
This damage is not covered by your warranty. Extended viewing of
channels displaying these images should be avoided.
Cable TV Installer: This reminder is provided to call your attention to
Article 820-40 of the National Electrical Code (Section 54 of the Canadian
Electrical Code, Part 1) which provides guidelines for proper grounding and,
in particular, specifies that the cable ground shall be connected to the
grounding system of the building as close to the point of cable entry as
practical.
Product Registration
Please fill out the product registration card and return it immediately. Returning the card allows us to contact
you if needed.
Keep your sales receipt to obtain warranty parts and service and for proof of purchase. Attach it here and record
the serial and model numbers in case you need them. The numbers are located on the back of the television.
Model No.__________________________________________________________________________________________
Serial No. __________________________________________________________________________________________
Purchase Date:______________________________________________________________________________________
Dealer/Address/Phone: ______________________________________________________________________________
Important Information

Introduction
1
Key Features Overview
Your TV/VCR is equipped with features that will add to your TV/VCR viewing experience. The
following information summarizes a few of these features. Chapter 2 provides more information
about the rest of the TV/VCR’s features and how to use them.
V-Chip: Parental Controls
Description: You can block programs and movies by content, age-based
ratings, and/or movie ratings.
Requirements:
• Set up the Parental Controls menu in the TV/VCR’s main menu (Chapter 2
has details).
• The broadcasters must use the rating system when they send the program to
your TV/VCR in order for your TV/VCR to block the program.
V-CHIP RATING LIMIT
1 2 3 4 5 6 7
Rating Status D L S V FV
TV-MA Vi w V V V
TV-MA V LSV TV-G V
TV-14 V DLSV TV-Y7 VFV
TV-PG V DLSV TV-Y V
Pr ss MENU to xit

(This page intentionally left blank)

3
Table of Contents
Introduction
Key Features Overview .................................................................................................... 1
V-Chip: Parental Controls ........................................................................................... 1
Chapter 1: Connections & Setup
Things to Consider Before You Connect .........................................................................6
Protect Against Power Surges ................................................................................... 6
Protect Components from Overheating ................................................................... 6
Position Cables Properly to Avoid Audio Interference ............................................ 6
Important Stand and Base Safety Information ........................................................ 6
Use Indirect Light .......................................................................................................6
Connection Pictures ................................................................................................... 6
Choose Your Connection .................................................................................................. 7
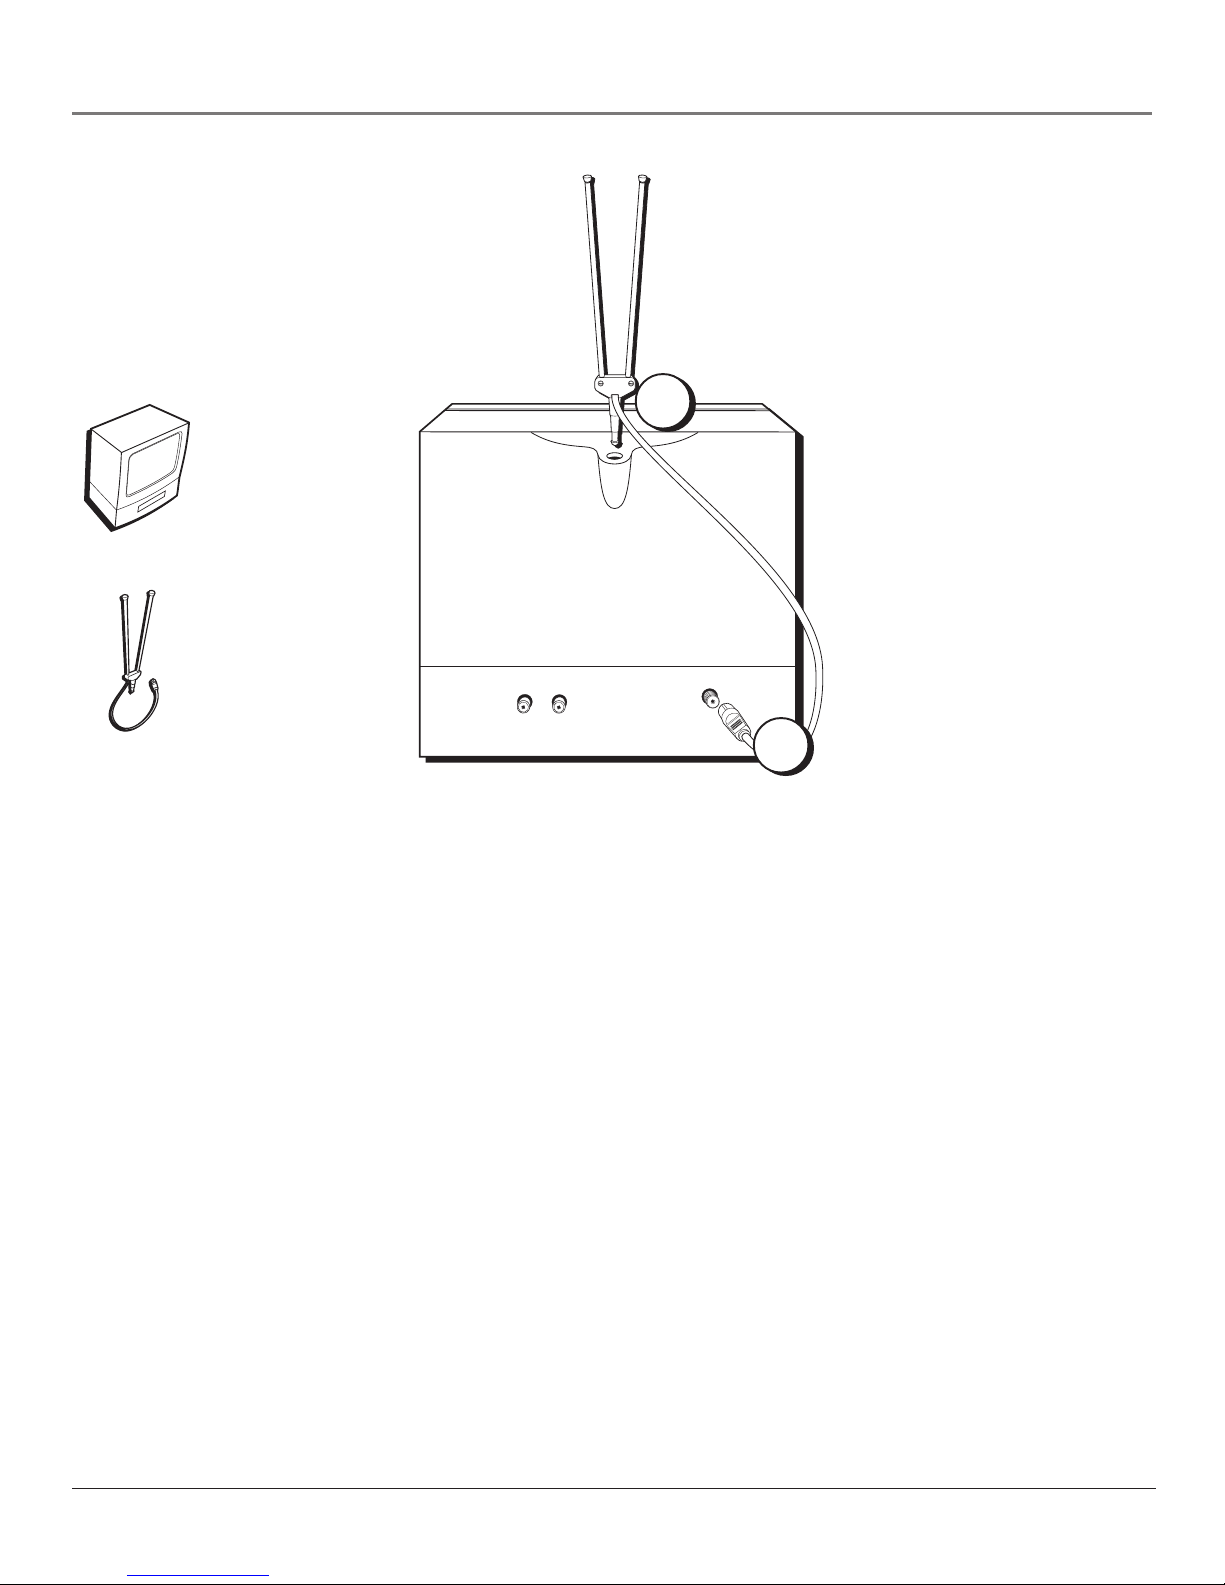
Connection: TV/VCR + Antenna....................................................................................... 8
Connection: TV/VCR + Cable Box ................................................................................... 9
Set the Menu Language (Escoja un idioma/Choisissez une langue) ..................... 10
Initial Setup ..................................................................................................................... 10
Adding or Removing Channels ................................................................................ 11
Setting the Signal Type (optional)........................................................................... 11
Complete Auto Channel Search .............................................................................. 11
VCR Basics ....................................................................................................................... 12
Playing a Tape........................................................................................................... 12
Automatic Rewind ................................................................................................... 12
Basic Recording ........................................................................................................ 12
Checking the Safety Tab .......................................................................................... 12
The Buttons on the Remote Control ............................................................................. 13
Chapter 2: Using the TV/VCR’s Features
Parental Controls and V-Chip ......................................................................................... 16
How V-Chip Works ...................................................................................................16
V-Chip TV Rating Limit ............................................................................................. 17
Blocking Specific Content Themes .......................................................................... 19
Viewing Specific Content Themes ........................................................................... 20
V-Chip Movie Rating Limit ....................................................................................... 20
V-Chip Unrated Program Block ............................................................................... 21
Front Panel Block ..................................................................................................... 22
Lock/Unlock Parental Controls ................................................................................ 22
Recording Features ......................................................................................................... 23
Recording Speeds ..................................................................................................... 23
Recording Pause ....................................................................................................... 23
Types of Recording ................................................................................................... 23
Express Recording (XPR) .......................................................................................... 24
Timer Recording ....................................................................................................... 25
Picture Search Options ................................................................................................... 27
Tracking ........................................................................................................................... 29
Time Counter .................................................................................................................. 29

Table of Contents
4
Chapter 3: Using the TV/VCR’s Menu System
How to Use Your TV/VCR’s Menu System..................................................................... 32
Screen Menu ................................................................................................................... 32
Time Menu ...................................................................................................................... 33
Additional Setup Features in the Menu........................................................................ 34
Chapter 4: Other Information
Troubleshooting .............................................................................................................. 36
Care and Cleaning .......................................................................................................... 40
Front Panel ...................................................................................................................... 41
RCA TV/VCR Limited Warranty ...................................................................................... 42
Index ................................................................................................................................ 45

Connections & Setup
Chapter Overview:
•Things to Consider Before You Connect
•Choose Your Connection
•Connections
•Plug in the TV/VCR
•Put Batteries in the Remote
•Turn on the TV/VCR
•Initial Setup
•VCR Basics
•Buttons on the Remote Control
5
Chapter 1
Changing Entertainment. Again.

6Chapter 1
Connections & Setup
Things to Consider Before You Connect
Protect Against Power Surges
•Connect all components before you plug any of their power cords into the wall outlet.
•Turn off the TV/VCR and/or component before you connect or disconnect any cables.
•Make sure all antennas and cables are properly grounded. Refer to the Important
Safeguards sheet packed with your TV/VCR.
Protect Components from Overheating
•Don’t block ventilation holes on any of the components. Arrange the components so that
air can circulate freely.
•Don’t stack components.
•When you place components in a stand, make sure you allow adequate ventilation.
•If you connect an audio receiver or amplifier, place it on the top shelf so the heated air
from it won’t flow around other components.
Position Cables Properly to Avoid Audio Interference
•Insert each cable firmly into the designated jack.
•If you place components above the TV/VCR, route all cables down the side of the back of
the TV/VCR instead of straight down the middle of the back of the TV/VCR.
•If your antenna uses 300-ohm twin lead cables, do not coil the cables. Also, keep the twin
lead cables away from audio/video cables.
Important Stand and Base Safety Information
Choose the location for your TV/VCR carefully. Place the TV/VCR on a stand or base that is of
adequate size and strength to prevent the TV/VCR from being accidentally tipped over, pushed
off, or pulled off. This could cause personal injury and/or damage the TV/VCR. Refer to the
Important Safeguards sheet packed with your TV/VCR.
Use Indirect Light
Don’t place the TV/VCR where sunlight or room lighting will be directed toward the screen.
Use soft or indirect lighting.
Connection Pictures
Audio/video cables are usually bundled together. For better visibility, the connection pictures in
this book show each cable separately (audio left, audio right, and video).

Chapter 1 7
Connections & Setup
TV/VCR
Components
TV/VCR + Antenna page 8
Audio/Video cables Coaxial cable
Cables
Needed
Connection
Title
Choose Your Connection
There are several ways to connect your TV/VCR. Please use the following chart to determine
which connection is best for you. Proceed to the appropriate page and connect your TV/VCR.
Cables Needed to Connect Components to Your TV/VCR
The pictures below show the cables needed for the connections represented in this book.
Notes: Audio/Video cables (A/V cables for short) are usually sold as a bundled set, but
the connection pictures in this book show each cable separately for better visibility.
TV/VCR + Cable Box page 9
Coaxial
Audio/video
TV/VCR
Cable Box
Go to...
Antenna

8Chapter 1
Connections & Setup
IN FROM
ANTENNA
VIDEOAUDIO
INPUT
TV/VCR back panel
TV/VCR
Antenna
Do not connect a dipole antenna if you plan to
connect a different type of indoor or outdoor
antenna or cable system. This connection may
require additional accessories not provided.
Connection: TV/VCR + Antenna
1. Insert your antenna into your TV/VCR
Insert the antenna base into the pocketed slot on the back of your TV/VCR until it locks
into place.
2. Connect the cable to your TV/VCR
Connect the cable from the antenna adapter to the IN FROM ANTENNA or IN FROM ANT jack
on the back of the TV/VCR.
Go to page 10
1
2

Chapter 1 9
Connections & Setup
TV/VCR
Cable
Box
Connection: TV/VCR + Cable Box
1. Connect the cable box to TV/VCR
Connect a coaxial cable to the TV OUT Jack on the cable box and to the IN FROM ANTENNA
jack on the TV/VCR.
2. Connect the cable line to your cable box
Connect the coaxial cable feed to CABLE IN Jack on the cable box.
Go to page 10
CABLE BOX
TV/VCR back panel
IN FROM
ANTENNA
VIDEO
AUDIO
INPUT
From Cable Line
CABLE IN TV OUT
2
1

10 Chapter 1
Connections & Setup
TV/VCR MAIN MENU
1 Scr n
2 Tim
3 Tim r R cordings
4 Par ntal Controls
5 S tup
0 Exit
SETUP
1 Auto Chann l S arch
2 Add/R mov Chann ls
3 S t Auto R p at
4 Auto Play: ON
5 Signal Typ : CABLE
0 Exit
Plug in the TV/VCR
Plug the end of the power cord into the wall outlet. Match the wide blade of the plug with the
wide slot in the outlet. Insert the plug completely into the outlet.
Put Batteries in the Remote
1. Remove the battery compartment cover on the remote.
2. Insert new batteries. Match the polarities (+ and -) on the batteries with the
diagram on the remote.
3. Put the battery compartment cover back on the remote.
Turn on the TV/VCR
Press POWER on front of the TV/VCR or press TV or VCR on the remote. The
indicator in the POWER button on the front of the TV/VCR will light when the
TV/VCR is on.
Set the Menu Language (Escoja un idioma/Choisissez
une langue)
Your TV menu language is set to English. If you need to set your TV/VCR to a
different language, follow these steps:
1. Press Menu on the remote to display the TV/VCR MAIN MENU.
2. Press 1 to select the SCREEN menu.
3. Press 3 to choose between English, Spanish and French.
Initial Setup
There are several preferences to choose from that customize your TV/VCR, such
as setting channels and signal type. To complete the initial setup press MENU to
access the TV/VCR MAIN MENU, then press 5 to select Setup. Complete the
following steps to setup your TV correctly.

Chapter 1 11
Connections & Setup
AUTO CHANNEL SEARCH
Now scanning chann l 14
Pr ss any k y to canc l
ADD REMOVE CHANNELS
Chann l 10
is pr s ntly ADDED
Pr ss CLEAR to r mov
Pr ss MENU to xit
Complete Auto Channel Search
The Auto Channel Search allows the TV/VCR to search for all channels viewable
through your antenna or cable TV system. This is sometimes called “auto
programming.”
1. Press MENU on the remote to display the TV/VCR MAIN MENU.
2. Press 5 to display the SETUP menu.
3. Press 1 to start Auto Channel Search.
Allow the TV/VCR to search for all channels. Pressing any buttons during
the Auto Channel Search will stop the search and only some channels will
be in the TV/VCR’s memory. When the search is complete the TV/VCR will
automatically tune to the first channel in the channel memory list.
Adding or Removing Channels
You might want to add or remove channels if some of them are not active, have
weak signals, or you do not want them in your channel memory. A channel that
has been removed can still be selected by pressing the remote control’s number
buttons.
1. Press MENU on the remote to display the TV/VCR MAIN MENU.
2. Press 5 to display the SETUP menu.
3. Press 2 to display the ADD/REMOVE CHANNELS screen. Follow the on-
screen directions to add or remove a channel.
4. You can add or remove more channels by entering the channel number or
pressing CHAN up or down.
Setting the Signal Type (optional)
The TV/VCR automatically selects the signal type (cable or antenna) for you
during the Auto Channel Search. If you want to change the signal type, follow
the directions below.
1. Press MENU on the remote to display the TV/VCR MAIN MENU.
2. Press 5 to display the SETUP menu.
3. Press 5 to choose between the ANTENNA and CABLE.
After changing the signal type, you might need to re-enter the channel
number you are trying to receive. You might also need to run the Auto
Channel Search again.
SETUP
1 Auto Chann l S arch
2 Add/R mov Chann ls
3 S t Auto R p at
4 Auto Play: ON
5 Signal Typ : CABLE
0 Exit

12 Chapter 1
Connections & Setup
PLAY
AUDIO IN
REW F FWD
PAUSE
POWER
CH CH
VOL- VOL+
REC
VIDEO IN
WAKE UP TIMER
STOP
EJECT
VCR Basics
Now that you’ve finished the initial setup, you can watch TV. You can also begin using your
VCR. In order to begin, you must first understand some basic concepts.
Playing a Tape
1. Insert a tape in the TV/VCR.
If the Auto Play feature is set to ON, the tape automatically begins playback
(if the safety tab on the cassette is removed). See Chapter 3 for more details
on Auto Play.
•Press F.FWD or REW (FF or REW on the remote) to position the tape.
•Press PLAY (if necessary) to begin tape play.
•Press PAUSE for stop action.
•Press TRACKING up or down (TRACKING + or - on the remote control)
to remove any streaks from the picture, if necessary.
•Press STOP to stop tape play.
•Press EJECT on the TV/VCR to eject the tape. You can also press and
hold the stop button the on the remote control for three seconds.
Automatic Rewind
The TV/VCR automatically rewinds the tape when it reaches the end of the
cassette during playback. While rewinding, you can press the OFF button on the
remote and the TV/VCR will eject the tape and turn off after rewinding.
Basic Recording
1. Set the tape speed by pressing the SPEED button on the remote. See
Chapter 2 for more details on tape speed.
2. Press the RECORD button to begin recording.
3. Press STOP when you want to stop recording.
If you want to pause the recording for a short time (such as during a
commercial), press PAUSE instead of STOP.
Checking the Safety Tab
No matter which recording option you use, make sure there is a tape in the
TV/VCR with its safety tab in place. You cannot record on a tape with the safety
tab removed. If the safety tab is removed and you want to record on it, simply
cover the hole with adhesive tape.

Chapter 1 13
Connections & Setup
S
K
I
P
S
P
E
E
D
OFF
REW PLAY FF
REC STOP PAUSE
DISPLAY SLEEP
MUTE PREV
123
456
78 9
0
TRACK F.ADV
CLEAR MENU RESET
-
TV VCR
+
C
H
A
N
V
O
L
C
H
A
N
V
O
L
S
E
A
R
C
H
The Buttons on the Remote Control
Your backlit remote has a light button ( ) that glows in the dark. Press this
button to light the CH ^/vand VOL </> buttons. The remote buttons remain lit
when they are pressed within a few seconds of each other. If a button is not
pressed within approximately seven seconds, the light turns off to conserve
battery power.
0-9 (Number buttons) Enter channel numbers and time settings directly
through the remote control.
To enter a two-digit channel, press the two digits. To enter a three-digit channel,
press and hold the first digit for two seconds until two dashes appear to the
right of the number, then add the second two. Example: to tune to channel 123,
press and hold 1 for two seconds, press 2, then press 3.
CH (up and down) buttons Scan up or down through stored channels. Press
once to change the channel up or down; press and hold to continue changing
channels.
CLEAR Removes any menu or display from the screen and returns you to
TV viewing.
DISPLAY Displays TV/VCR’s current status. Displays time counter when a tape
is inserted. Press again to remove display.
F. ADV (Frame Advance) Advances the tape one frame at a time when the
tape is in PAUSE mode. Also fast forwards the tape through a commercial when
a tape is playing.
FF (Fast Forward) Fast forwards the tape when the TV/VCR is stopped. Also
searches the picture in forward motion during playback.
MENU Displays the TV/VCR’s Main menu.
MUTE Lowers the TV/VCR volume to its minimum level. Press again to restore
volume.
OFF Turns the TV/VCR off.
PAUSE Pauses the tape during playback. Also pauses the tape during
recording to prevent recording of unwanted scenes.
PLAY Plays a tape.
PREV (Previous channel) Switches between the last two channels selected.
REC (Record) Starts TV/VCR recording. Used for express recording.
RESET Resets video functions to factory settings. Also used to reset time for
wake-up timer and alarm.
REW (Rewind) Rewinds the tape when the TV/VCR is stopped. Also searches
the picture in reverse during playback.

14 Chapter 1
Connections & Setup
SKIP/SEARCH Operates Commercial Skip during TV viewing. (This only works when there is
no tape in the TV/VCR). Displays INDEX, ZERO, and BLANK search screens when tape is
inserted in the TV/VCR. Operates Commercial Scan by advancing tape 60 seconds during
playback.
SLEEP Sets TV/VCR to automatically turn off in 30, 60, 90, or 120 minutes
SPEED (Tape Speed) Selects a recording speed (SLP, SP, or LP).
STOP Stops functions such as record, play, rewind, fast forward, and pause.
TRACK - and + (Tracking down and up) Allows the manual reduction of streaks which may
appear on the picture during regular or slow-motion playback. Reduces picture “jitter”during
stop-action (paused) playback.
TV Turns on the TV/VCR.
VCR Turns on the TV/VCR.
VOL (up and down) buttons Decrease or increase the TV/VCR volume.

Using the TV/VCR’s
Features
Chapter Overview:
•Parental Controls and V-Chip
•Recording Features
•Picture Search Options
Chapter 2
Changing Entertainment. Again.
15

Using the TV/VCR’s Features
16 Chapter 2
Parental Controls and V-Chip
The Parental Controls menu allows you to program your TV/VCR so that
children cannot see certain programs, channels, or use the front panel controls.
The first three choices in the Parental Controls menu involve software inside
your TV/VCR (referred to as V-Chip) which allows you to block TV programs
and movies based on violence, sex, or other content you may believe children
should not view. In other words, it lets you program your TV/VCR so it won’t
display certain programs.
Once you block programs, you or other adults can unblock programs by
entering a password.
By default, the software inside your TV is turned “off,”so if you don’t want to
use this feature, you can just ignore it.
How V-Chip Works
When turned “on,”the V-Chip software reads a code that most broadcasters
send with programs. That code tells the software the program’s age-based rating
(TV-MA, TV-14, etc.) and content themes [(Violence (V), Adult Language (L),
etc.)]. If you have blocked the rating and/or content themes that the program
contains, you will receive the message, “This channel is not approved for
viewing,”when you tune to that particular channel.
Broadcasters are not required to provide content themes, so programs received
with no content themes will only be blocked if you block their age-based rating.
You can also block out programs that have been given a rating of “Not Rated,”
and programs that are considered “unrated”because no code has been sent by
the broadcaster. The TV age-based ratings and content themes you can block
are listed in the following table.
TV/VCR MAIN MENU
1 Scr n
2 Tim
3 Tim r R cordings
4 Par ntal Controls
5 S tup
0 Exit
PARENTAL CONTROLS
1 V-Chip Rating Limit
2 V-Chip Movi Rating Limit
3 Unrat d Programs: Block
4 Lock Par ntal Controls
0 Exit

Using the TV/VCR’s Features
Chapter 2 17
Mature Audience Only. Specifically designed to be viewed by adults and may be unsuitable for children
under 17. It contains one or more of the following content themes: crude indecent language (L), explicit
sexual activity (S), or graphic violence (V).
Parents Strongly Cautioned. Contains some material that many parents would find unsuitable for children
under 14. Parents are strongly urged to exercise greater care in monitoring this program and are cautioned
against letting children under the age of 14 watch unattended. This program contains one or more of the
following content themes: intensely suggestive dialogue (D), strong coarse language (L), intense sexual
situations (S), or intense violence (V).
Parental Guidance Suggested. Contains material that parents may find unsuitable for younger children. Many
parents may want to watch it with their younger children. The program contains one or more of the following
content themes: some suggestive dialogue (D), infrequent coarse language (L), some sexual situations (S), or
moderate violence (V).
General Audience. Most parents would find this program suitable for all ages. It contains
little or no sexual dialogue (D) or situations (S), no strong language (L), and little
or no violence (V).
Directed to Children 7 years and older. Designed for children ages 7 and above. It may be more
appropriate for children who have acquired the developmental skills needed to distinguish between make-
believe and reality. Themes and elements in this program may include mild fantasy violence (FV) or comedic
violence, or may frighten children under the age of 7.
All Children. Themes and elements in this program are designed for a young audience, including children
from ages 2-6. It is not expected to frighten younger children.
TV-Y
Age-Based
Rating Description and Content Themes for Age-Based Ratings
TV-MA
TV-14
TV-PG
TV-G
TV-Y7
TV/VCR MAIN MENU
1 Scr n
2 Tim
3 Tim r R cordings
4 Par ntal Controls
5 S tup
0 Exit
PARENTAL CONTROLS
1 V-Chip Rating Limit
2 V-Chip Movi Rating Limit
3 Unrat d Programs: Block
4 Lock Par ntal Controls
0 Exit
V-CHIP RATING LIMIT
1 2 3 4 5 6 7
Rating Status D L S V FV
TV-MA Vi w V V V
TV-MA V LSV TV-G V
TV-14 V DLSV TV-Y7 VFV
TV-PG V DLSV TV-Y V
Pr ss MENU to xit
V-Chip Rating Limit
The V-Chip Rating Limit lets you decide which TV programs can and cannot be
viewed.
To set TV programming limits:
1. Press MENU on the remote to display the TV/VCR MAIN MENU.
2. Select Parental Controls (press 4).
3. Select the V-Chip Rating Limit (press 1).
4. Use the number buttons 1-7 to change the status of TV program rating.
The following sections give you more details about how to change the status of
TV program limits.

Using the TV/VCR’s Features
18 Chapter 2
V-CHIP RATING LIMIT
1 2 3 4 5 6 7
Rating Status D L S V FV
TV-MA Vi w V V V
TV-MA V LSV TV-G V
TV-14 V DLSV TV-Y7 VFV
TV-PG V DLSV TV-Y V
Pr ss MENU to xit
Rating Settings Area
Lets you see the current block/view state of age-based ratings and
associated content. The View (V) settings are coded in green, and the
Block (B) settings are coded in red.
Rating Field
Lets you select from a
list of age-based ratings
you can block or view.
Rating Status Field
Lets you select whether the status of the age-based rating limit to
the left is View or Block.
Content Themes
Lists the content themes you
can block or view.
Content Status Fields
Lets you select which
content themes to view for
the selected rating, and
whether the status of the
content theme is currently
View (V) or Block (B).
V-CHIP RATING LIMIT
1 2 3 4 5 6 7
Rating Status D L S V FV
TV-PG Block B B B B
TV-MA B LSV TV-G V
TV-14 B DLSV TV-Y7 VFV
TV-PG B DLSV TV-Y V
Pr ss MENU to xit
Content
status fields
Rating
status field
Rating
field
Tip
When you change the status of a rating to
Block, the system will automatically block
higher ratings and all corresponding
content themes.
The V-Chip Rating Limit Screen
The following is an example of where items are located within the Rating Limit screen.
Blocking Age-Based Ratings
You can automatically block all program ratings above a specified age-based
rating level. For example, if you only want your child to watch programs that
have a TV-G rating and lower (in other words, you want the child to watch
TV-G, TV-Y7, and TV-Y), then you need to block out other programming with
higher ratings.
To block programs with higher ratings:
1. First, determine the lowest level rating you don’t want the child to watch
(see chart of age-based ratings on next page).
2. Continuously press 1 on the remote to scroll through the age-based ratings.
Keep scrolling until the rating corresponding with the lowest rating you do
not want the child to watch appears on the screen.
In the example discussed above, you would press 1 until TV-PG appears,
since the highest rating you want the child to watch is TV-G.
Other manuals for T13208
1
Table of contents
Other RCA TV VCR Combo manuals