RCA T13080 User manual

TV/VCR combination
user's guide

Important Information
To reduce the risk of electric shock, do not remove
RISK OF ELECTRIC cover (or back). No user serviceable parts inside.
SHOCK DO NOT OPEN Refer servicing to qualified service personnel.
This symbol indicates
"dangerous voltage" inside
the product that presents a
risk of electric shock or
personal injury.
This symbol indicates
important instructions
accompanying the
product. - ]
WARNING
To reduce the risk of fire or shock
hazard, do not expose this product to
rain or moisture.
CAUTION: To reduce the risk of electric shock, match wide
blade of plug to wide slot, fully insert.
ATTENTION: Pour 0viter les chocs 01ectriques, introduire la
lame la plus large de la fiche dans la borne correspondante de la
prise et pousser jusqt_ au fond.
Cautions
Refer to the identification/rating label located on the back panel of your product for its
proper operating voltage.
FCC Regulations state that unauthorized changes or modifications to this equipment
may void the user's authority to operate it.
Cable TV Installer
This reminder is provided to call your attention to Article 820-40 of the National
Electrical Code (Section 54 of the Canadian Electrical Code, Part 1) which provides
guidelines for proper grounding and, in particular, specifies that the cable ground shall
be connected to the grounding system of the building as close to the point of cable entry
as practical.
Product Registration
Please fill out the product registration card and return it immediately.
Returning this card allows us to contact you if needed.
Keep your sales receipt to obtain warranty parts and service and for proof of
purchase. Attach it here and record the serial and model numbers in case you
need them. The numbers are located on the back of the product.
Model No. T13080BC
Serial No.
Purchase Date:
Dealer/Address/Phone:

Setting Up the TV/VCR ............................................... 3
Startup .............................................................................................................................. 3
Check Accessories With TV/VCR Combination ........................................................ 3
Insert Batteries in Remote .............................................................................................. 3
Connect the Supplied Antenna, a Home Antenna, or Cable-TV System ............... 4
Place the TV/VCR Where You Want to Operate It .................................................... 4
Power the TV/VCR ........................................................................................................ 4
Power the TV/VCR Using the AC Cord ............................................................. 4
Power the TV/VCR Using the DC Cord ............................................................. 5
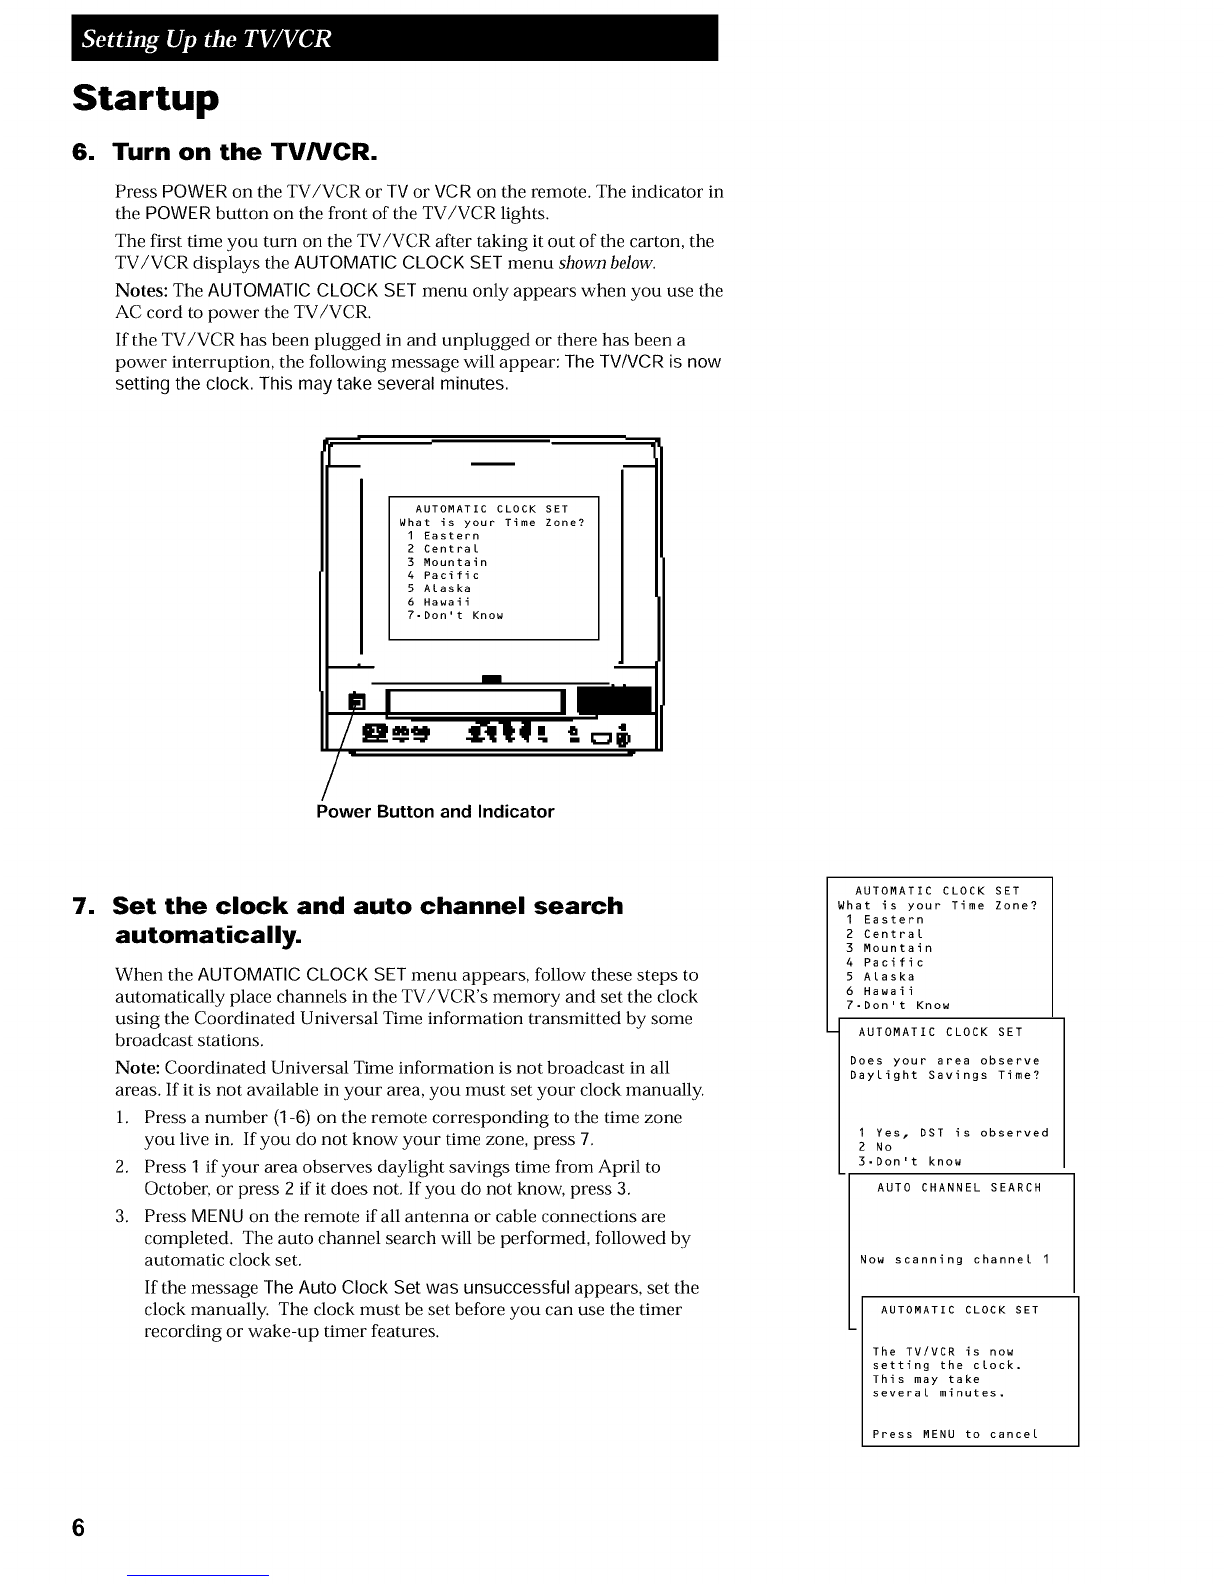
Turn on the TV/VCR ..................................................................................................... 6
Set the Clock and Auto Channel Search Automatically. ........................................... 6
Set the Clock Manually .......................................................................................... 7
Add or Remove Channels From the TV/VCR's Memory ........................................ 7
Select a Language/Escoja un Idioma/Choisissez une Langue ............................... 8
Select a Channel and Adjust the Volume .................................................................... 8
Using the Remote Control .......................................... 9
Remote Buttons ............................................................................................................... 9
Using the TV/VCR Features ...................................... 11
To Use the TV/VCR Features ..................................................................................... 11
On-Screen Displays .............................................................................................. 11
To Call Up On-Screen Displays .................................................................. 11
Adjust the Video ................................................................................................... 11
To Select the Picture Mode .......................................................................... 11
To Adjust the Video ...................................................................................... 11
To Reset Picture Controls to the Factory Setting ...................................... 12
Channel Labeling .................................................................................................. 12
To Label the Channel .................................................................................... 12
To Clear a Channel Name ............................................................................ 12
Commercial Skip ................................................................................................... 12
Closed Captions .................................................................................................... 13
To View Closed Captions ............................................................................. 13
Alert Sound ............................................................................................................ 13
Program Guard ..................................................................................................... 14
Wake-Up Timer ..................................................................................................... 14
To Set the Wake-Up Timer ........................................................................... 14
To Cancel the Wake-Up Timer .................................................................... 14
Sleep Timer ............................................................................................................ 15
Playing a Tape .......................................................... 16
To Play a Tape ................................................................................................................ 16
Dew-Detection System ......................................................................................... 16
To Use the Playback Features ...................................................................................... 17
Pause ....................................................................................................................... 17
Frame Advance ..................................................................................................... 17
Picture Search ........................................................................................................ 17
Slow Motion .......................................................................................................... 17
continued on next page

Tracking .................................................................................................................. 18
Automatic Tracking ...................................................................................... 18
Manual Tracking ........................................................................................... 18
Time Counter ......................................................................................................... 18
Auto Play Feature ................................................................................................. 19
Auto Repeat Feature ............................................................................................. 19
Commercial Scan .................................................................................................. 19
Index Search .......................................................................................................... 20
To Select Scan and Play Index Playback .................................................... 20
To Select a Specific Index Number for Index Playback ........................... 20
Zero Search ............................................................................................................ 21
Blank Search .......................................................................................................... 21
Recording a Program ................................................ 22
Recording Features ....................................................................................................... 22
Recording Speeds ................................................................................................. 22
Special Effects During Playback ................................................................. 22
Recording Pause ................................................................................................... 22
Types of Recordings ..................................................................................................... 23
Basic Recording ..................................................................................................... 23
Express Recording ................................................................................................ 24
Stopping an Express Recording in Progress ............................................. 24
Recording While You're Away (Timer Recording) .......................................... 25
To Set a Timer Recording ............................................................................. 25
To Check or Clear Timer Recordings ......................................................... 26
To Stop a Timer Recording .......................................................................... 26
To Copy and Edit Tapes ....................................................................................... 27
Location of Controls ................................................. 28
Front Panel ............................................................................................................. 28
Back Panel .............................................................................................................. 29
Hooking Up the TV/VCR ............................................ 29
Choosing a Hookup ............................................................................................. 29
Connect Supplied Antenna, Antenna, or Cable
System Without a Cable Box ....................................................................... 30
Connect a Cable System With a Cable box ....................................................... 31
Connect a VCR or Camcorder for Copying Tapes ........................................... 32
References ................................................................ 33
Clean the TV/VCR ....................................................................................................... 33
Replace Fuse in DC Power Cord ................................................................................ 33
Trouble Checks .............................................................................................................. 34
Limited Warranty ......................................................................................................... 36
Index ............................................................................................................................... 37
2

Startup
1. Check accessories with TV/VCR combination.
Contact your dealer if any items are missing.
] STOP PAUSE
SLEEP
Remote
(Stock No. 239118)
_÷
AC Cord
(Stock No. 242616)
DC Cord
(Stock No. 237311)
2"AAA" Batteries
-0
Dipole Antenna
(Stock No. 220958)
Antenna Adapter
(300-75 ohm)
(Stock No. 220957)
2. Insert batteries in remote.
continued on next page
3

Startup
.Connect the supplied antenna, a home an-
tenna, or cable-TV system.
Connect the supplied antenna, a home antenna, or cable-TV system.
Details are on pages 30-31.
.Place the TVNCR where you want to
operate it.
Place the TV/VCR in a location where it is safe to operate.
Power the TVNCR.
You can use the AC power cord to power the TV/VCR from standard
household power or the included DC power cord to power your TV/VCR
from a 12-volt car, truck, or RV battery.
Note: Both cords use the same connector on the back of the TV/VCR.
Remove one cord before using the other.
Caution
Take precautions that any stand or
furniture the TV/VCR is placed on is
properly located and of adequate size
and strength to prevent the TV/VCR
from accidentally being tipped over,
pulled off, or pushed off. This could
cause damage to the TV/VCR or
personal injury.
Power the TV/VCR Using the AC Cord
Back of TV/VCR
4
1. Attach the square end of the AC power cord completely into the connec-
tor on the back of your TV/VCR. Be sure to insert the plug completely.
2. Plug the other end of the AC power cord into a wall outlet. Match the
wide blade of the plug with the wide slot in the outlet.

Startup
Power the TV/VCR Using the DC Cord
Back of TV/VCR
Insert Plug
Completely1st
DC Power Cord
12-Volt Cig
Lighter Socket 2nd
1. Attach the square end of the DC power cord completely into the
connector on the back of your TV/VCR. Be sure to insert the plug
completely.
2. Turn on the vehicle's engine.
3. Plug the round end of the DC power cord into the cigarette lighter
socket of a car, truck, boat, or RV having a 12-volt battery.
f
Important Notes
• There is a safety fuse in the plug of the
DC power cord. Details for replacing the
fuse are on page 33.
The DC power cord is designed for
use only in cars with negative (-)
ground (negative terminal of car
battery is connected to car chassis).
• The DC power cord should never be
used in cars with a positive (+)
ground.
If you are unable to identify the
negative (-) or positive (+) polarity of
your car, consult your car owner's
manual or check with a service station
before use.
Cautions for DC Cord
Operation from 12-Volt Battery
1. Use of an improper DC power cord or
similar adapter may result in damage
to your TV/VCR.
2. Avoid using the TV/VCR in a car
unless the engine is turned on and
running. Doing so will drain the car
battery which may cause the car not to
start properly.
3. Do not put the TV on the dashboard or
leave it in a car parked in direct
sunlight since the temperature inside
the car may damage the TV/VCR.
4. If taking the TV/VCR from a cold car
to a warm room, do not attempt to
plug it in if there is any sign of
condensation. This could damage the
TV/VCR.
continued on next page
5

Startup
6. Turn on the TV/VCR.
Press POWER on the TV/VCR or IV or VCR on the remote. The indicator in
the POWER button on the front of the TV/VCR lights.
The first time you turn on the TV/VCR after taking it out of the carton, the
TV/VCR displays the AUTOMATIC CLOCK SET menu shown below.
Notes: The AUTOMATIC CLOCK SET menu only appears when you use the
AC cord to power the TV/VCR.
If the TV/VCR has been plugged in and unplugged or there has been a
power interruption, the following message will appear: The TV/VCR is now
setting the clock. This may take several minutes.
AUTOMATIC CLOCK SET
What is your Time Zone?
1 Eastern
2 Central
3 Mountain
4 Pacific
5 Alaska
6 Hawaii
7-Don't Know
Power Button and Indicator
.Set the clock and auto channel search
automatically.
When the AUTOMATIC CLOCK SET menu appears, follow these steps to
automatically place channels in the TV/VCR's memory and set the clock
using the Coordinated Universal Time information transmitted by some
broadcast stations.
Note: Coordinated Universal Time information is not broadcast in all
areas. If it is not available in your area, you must set your clock manually.
1. Press a number (1-6) on the remote corresponding to the time zone
you live in. If you do not know your time zone, press 7.
2. Press 1 if your area observes daylight savings time from April to
October, or press 2if it does not. If you do not know, press 3.
3. Press MENU on the remote if all antenna or cable connections are
completed. The auto channel search will be performed, followed by
automatic clock set.
If the message The Auto Clock Set was unsuccessful appears, set the
clock manually. The clock must be set before you can use the timer
recording or wake-up timer features.
AUTOMATIC CLOCK SET
What is your Time Zone?
I Eastern
2 Central
3 Mountain
4 Pacific
5 Alaska
6 Hawaii
7.Don't Know
AUTOMATIC CLOCK SET
Does your area observe
Daylight Savings Time?
I Yes. DST is observed
2 No
3.Don't know
AUTO CHANNEL SEARCH
Now scanning channel I
AUTOMATIC CLOCK SET
The TVIVCR is now
setting the clock.
This may take
several minutes.
Press MENU to cancel
6

Startup
Set the clock manually.
If the AUTOMATIC CLOCK SET was unsuccessful or you want to manu-
ally set the clock:
1. Press MENU on the remote to display the TV/VCR MAIN MENU.
2. Press 3 to display the TIME menu.
3. Press 1 to display the SET CLOCK screen.
4. Use the number buttons on the remote to enter the time including AM
or PM, month, day, and year. The day of the week automatically
appears after you enter the year.
• Press 0 before single-digit numbers. Press 1 for AM or 2for PM.
Example: press O,then 5, then O,then 7, then 2for a time of
5:07PM.
• Press CLEAR on the remote at any time to change incorrect entries.
5. Press MENU on the remote to start the clock.
Press DISPLAY on the remote to display the time and date.
TV/VCR MAIN MENU
Timer Recordings
Picture Quality
Time
TIME
Set clock
SET CLOCK
\J/
Time 7j\:-- --
(hour:minute)
Date --/--/--
SET CLOCK
Time 05:07 AM
Date 11/18/98 Wednesday
Press CLEAR to correct
Press MENU to set
.Add or remove channels from the TVNCR's
memory.
You may want to add or remove channels if some of them are not active,
have weak signals, or you do not want them in your channel memory.
1. Press MENU on the remote to display the TV/VCR MAIN MENU.
2. Press 5 to display the SETUP menu.
3. Press 2to display the ADD/REMOVE CHANNELS screen.
4. Follow the directions on the screen to add or remove a channel.
5. Add or remove more channels by entering the channel number or
pressing CHAN up or down.
TV/VCR MAIN MENU
1 Timer Recordings
2 Picture Quality
3 Time
4 Closed Captioning
5 Setup
SETUP
1 Auto channel search
2 Add/Remove channels
ADD/REMOVE CHANNELS
Channel 10
is presently ADDED
Press CLEAR to remove
Press MENU to exit
continued on next page
7

Startup
9. Select a language. (Escoja un idioma./
Choisissez une langue.)
This feature lets you select English, Spanish, or French as the language for
your on-screen displays.
1. Press MENU on remote to see the TV/VCR MAINMENU.
2. Press 6 to display the LANGUAGE/IDIOMA/LANGUEmenu. The bullet
(-) indicates the language selected.
3. Press I to display the menus in English.
Press 2 to display the menus in Spanish.
Press 3 to display the menus in French.
TV/VCR MAIN MENU
1Timer Recordings
2 Picture Quality I
3 Time I
4 Closed Captioning I
5 Setup
6 Language/ dioma/Langue
LANGUAGE/IDIOMAiLANGUE
Select a Language.
Escoja un idioma.
Choisissez une lanque.
leEnglish
2 Espa_ol
3 Francais
10. Select a channel and adjust the volume.
Select a Channel
To select a channel, press CHAN up or down or two number buttons on the
remote.
Example: Press 0 then 2 for channel 2. The channel number is displayed.
For cable channels over 99, press and hold I until
1- - appears, and then press two more numbers.
Example: Press and hold 1, then press O,then press 2, for channel 102.
CH 02
Adjust the Volume
Press VOL < or >. The volume display appears.
Volume ..I ............
8

Remote Buttons
The backlit remote has a light button (O) that glows in the dark. Press the O button to
light the CHAN up and down, VOL < and >, DISPLAY, SLEEP, MUTE, and PREV CH
buttons. The light turns off about five seconds after the last button is pressed.
CHAN (Channel) Up or Down
Selects next higher or lower channel in channel memory.
Adjusts some menu items.
CLEAR
Allows you to change menu entries or clear a timer recording.
Resets time counter to 0:00:00 when it is displayed.
DISPLAY
Displays TV/VCR's current status. Removes displays.
Displays time counter when a tape is inserted.
Advances to next program during program review.
FF (Fast Forward)
Fast forwards the tape when the TV/VCR is stopped.
Searches the picture in forward motion during playback.
F. ADV (Frame Advance)
Advances the tape one video frame at a time when the tape is paused.
Used for slow-motion playback.
MENU
Displays the TV/VCR MAIN MENU.
MUTE
Reduces volume to its minimum level.
Numbers (0 through 9)
Select a channel up to 99 by pressing two numbers.
Select a cable channel over 99 by pressing and holding 1 until 1- - appears on the
screen. Then press the other two numbers.
OFF
Turns off the TV/VCR.
PAUSE
Pauses the tape during playback.
Pauses recording to prevent recording of unwanted scenes.
PLAY
Plays a tape.
PREV CH (Previous Channel)
Switches between the last two selected channels.
Select one channel and then select the other using the number buttons. Press
PREV CH to switch between the two channels.
s
/
/OFF TV VCR
REW PLAY
REC STOP
)ISPLAY
MUTE
CLEAR
sKID
&
MENU
-TRACK +
PAUSE
SLEEP
PREV CH
RESET
F.ADV
continued on next page 9

Remote Buttons
REC (Record)
Starts TV/VCR recording.
Used for express recording.
RESET
Resets time for wake-up timer (alarm).
Resets picture controls to factory defaults.
Clears channel labels.
REW (Rewind)
Rewinds the tape when the VCR is stopped.
Searches the picture in reverse motion during playback.
SKIP/SEARCH
When a tape is stopped in the VCR, displays INDEX, ZERO, and BLANK search
screens.
When a tape is playing in the VCR, advances tape about 30 seconds during
playback. (See "Commercial Scan" description on page 19.)
When there is no tape in the VCR, initiates the Commercial Skip function. (See
"Commercial Skip" description on page 12.)
SLEEP
Sets TV/VCR to automatically turn off in 30, 60, 90, or 120 minutes.
SPEED (Tape Speed)
Selects a recording speed (SP or SLP).
STOP
Stops functions such as record, playback, rewind, fast forward, and pause.
TRACK +or-
Lets you manually reduce the streaks that may appear in the picture during
playback.
TV
Turns on the TV/VCR.
Sets the remote to control the TV.
VCR
Turns on the TV/VCR.
Sets the remote to control the VCR.
VOL (Volume) < or >
Raises and lowers the sound.
Adjusts some menu items.
/-
/OFF
REW
REC
ISPLAY
MUTE
CLEAR
TV VCR
PLAY
STOP
MENU
-TRACK +
FF
PAUSE
SLEEP
PREVCH
RESET
F.ADV
10

To Use the TV/VCR Features
On-Screen Displays
When you change channels, adjust the volume, or use a VCR feature, on-screen
displays appear to let you know the status of the TV/VCR.
To Call Up On.Screen Displays
1. Press DISPLAYto display the channel number, function, time counter
(iftape is in), date, time, and tape speed.
If you do not press DISPLAYagain, these displays will time out.
2. Press DISPLAYagain:
• No tape inTV/VCR: Displays removed.
• Tape in TV/VCR: Time counter remains on screen and will not time
out. Press DISPLAYagain to remove the time counter.
CH 02 RECORD
Adjust the Video
Use the PICTURE QUALITYmenu to adjust the picture to your personal
preference. The TV/VCR will remember the settings you select.
To Select the Picture Mode
You can select one of three PICTURE MODES i Normal, Theater, or Game.
The bullet (-) indicates the picture mode selected.
1. Press MENU to display the TV/VCRMAINMENU.
2. Press 2 to display the PICTURE QUALITYmenu.
3. Press I to display the SELECT PICTURE MODEmenu.
4. Press 1, 2, or 3 to SELECT PICTURE MODE (Normal, Theater, or Game).
TV/VCR MAIN MENU
1 Timer Recordings
2 Picture Quality
PICTURE QUALITY
1 Select Picture Mode
2 Adjust Picture Quality
3 Reset Picture Quality
SELECT PICTURE MODE
1,Normal Mode
2 Theater Mode
3 Game Mode
O Exit
To Adjust the Video
The TV/VCR can memorize adjustments for each of the three modes --
Normal, Theater, or Game mode.
1. Press MENU to display the TV/VCR MAINMENU.
2. Press 2 to display the PICTURE QUALITYmenu.
3. Press 2 to display the ADJUST PICTURE QUALITYmenu.
4. Press 1, 2, or 3 to select which Mode to adjust.
5. Press CHAN up and down to select the control you want to adjust.
• Select Color to adjust color intensity.
• Select Tint to adjust for natural flesh tones.
• Select Contr (contrast) to adjust picture contrast.
• Select Brite (brightness) to adjust picture brightness.
• Select Sharp to adjust picture sharpness.
6. Press VOL < or > to adjust the control selected.
TV/VCR MAIN MENU
1 Timer Recordings
2 Picture Quality
PICTURE QUALITY
1 Select Picture Mode
2 Adjust Picture Quality
3 Reset Picture Quality
ADJUST PICTURE QUALITY
1 Adjust Normal Mode
2 Adjust Theater Mode
3 Adjust Game Mode
ADJUST NORMAL MODE
PICTURE QUALITY
Color -. ..... I ......... +
Tint ...... I .........
Contr ...... I .........
Brite ...... I .........
Sharp ...... I .........
Use CH and VOL to adjust
Press MENU to exit
continued on next page
11

To Reset Picture Controls to the Factory Setting
Press the remote's RESET button, or press 3 in step 3 of "To Adjust the Video"
to reset the picture controls to the levels set at the factory.
RESET PICTURE CONTROLS
All picture controls
have been reset to
factory defaults.
Press MENU to continue
Channel Labeling
You can label up to twenty-two channels with the station name (such as ABC,
NBC, CBS, etc.) for easier identification. Labels can be up to four characters.
To Label the Channel
1. Press MENU to display the TV/VCR MAIN MENU.
2. Press 5 to display the SETUP menu.
3. Press 7 to display the LABEL CHANNELS screen.
4. Press CHAN up or down or 0-9 to change the channel number if necessary.
Then, press VOL < or > to move the cursor to the Channel Label column.
5. Press CHAN up or down, and then VOL < or > to select each letter of the
station name.
6. Press MENU to save the channel name.
To Clear a Channel Name
While in the channel label column, press RESET to remove all characters.
TV/VCR MAIN MENU
1 Timer Recordings
2 Picture Quality
3 Time
4 Closed Captioning
5 Setup
SETUP
1 Auto channel search
2 Add/Remove channels
3 Auto play
4 Auto repeat
5 Alert sound
6 Signal type: CABLE
7 Label Channels
LABEL CHANNELS
Channel
#
8
Channel
Label
LABEL CHANNELS
Channel Channel
# Label
10 ABC
Press Chan up!dn or 0-9
to change # or letter
Press Vol < or > to move
MENU-save CLEAR-Reset
Commercial Skip
Commercial Skip is an on-screen timer that allows you to bypass commercials.
When a commercial comes on, you can activate the Commercial Skip timer to
run from 30 seconds to 59 minutes. While the timer is counting down, you are
free to watch other channels. After the timer runs out, the TV/VCR automati-
cally changes back to your original channel.
Besides using Commercial Skip to switch back to the current station after a
block of commercials, you can also use it as a reminder that a favorite program
is about to start.
Note: The Commercial Skip timer cannot be activated if a tape is loaded in the
TV/VCR and Program Guard is turned on.
1. Press SKIP/SEARCH repeatedly until the desired amount of time is
displayed. Each press increases the time in 30 second increments up to 4
minutes. After 4 minutes, each press increases the timer by 1 minute until
59 minutes is reached.
2. To cancel Commercial Skip, press CLEAR on the remote. The TV will not
change channels.
Skip 0:30
12

Closed Captions
Closed captioning displays the sound of a program as words on the TV screen.
It is useful for the deaf, hearing impaired, or anyone who wants to watch a
program without sound. If you have turned closed captioning on and it does
not appear on the screen, it is not available on the channel you are watching.
Check your TV program listings for CC (closed caption) broadcasts. This TV/
VCR also supports two text modes used to display text sent from a TV station
or cable company.
To View Closed Captions
1. Press MENU to display TV/VCR MAIN MENU.
2. Press 4 to display the CLOSED CAPTIONING menu.
3. Press 1 to display the CC DISPLAY menu. The bullet (o) indicates the CC
Display selected.
• Press 1 to select closed captions On. Closed captions are displayed on
the screen.
• Press 2 to select closed captions Off. No closed captions are displayed
on the screen.
• Press 3 to select closed captions On when TV is muted. Closed
captions are displayed on the screen only when the TV is muted.
4. When the CLOSED CAPTIONING menu appears, press 2 to display the CC
MODE menu and select the caption mode. The bullet (o) indicates the
mode selected.
• Press 1 or 2 to select Caption 1 or 2. Captions appear on the screen if
they are broadcast.
• Press 3 or 4 to select Text 1 or 2. Text information appears on the
screen if it is broadcast.
TV/VCR MAIN MENU
1 Timer Recordings
2 Picture Quality
3 Time
4 Closed Captioning
CLOSED CAPTIONING
1 CC Display
2 CC Mode
CO DISPLAY
leOn
2 Off
3 On when TV is muted
CC MODE
Choose a closed
captioning mode:
1,Caption 1
2 Caption 2
3 Text 1
4 Text 2
Alert Sound
Turn on the alert sound feature to have a warning sound tell you that you have
entered an improper function.
1. Press MENU to display TV/VCR MAIN MENU.
2. Press 5 to display the SETUP menu.
3. Press 5 to display the ALERT SOUND menu.
4. Press 1 or 2 to select Alert sound: OFF or ON. The bullet (-) indicates the
one selected.
• Select OFF if you do not want the TV/VCR to sound a short warning.
• Select ON if you want the TV/VCR to sound a short warning.
TV/VCR MAIN MENU
1Timer Recordings
2 Picture Quality
3 Time
4 Closed Captioning
5 Setup
SETUP
1 Auto channel search
2 Add/Remove channels
3 Auto play
4 Auto repeat
5 Alert sound
ALERT SOUND
Choose an
alert sound mode:
1 Alert sound OFF
2-Alert sound ON
O Exit
continued on next page
13

Program Guard
Activate this feature to allow TV operations but not any VCR functions You can
guard against someone changing the channel during your timer recording
1 Hold down STOP on the remote for six seconds to activate or deactivate
Program Guard regardless of whether the power is turned on or off
•The message Program Guard is ON or Program Guard is OFF flashes on
the screen
• If you press any VCR function buttons while Program Guard is on an
onscreen display appears
• You must enter your timer program before you turn on Program Guard
• Program Guard must be turned off before you can stop a timer record
ing in progress
• Commercial Skip cannot be activated ifa tape is loaded in the TV/VCR
and Program Guard is turned on
Wake.Up Timer
The timer turns the TV/VCR on at the desired time to the channel you select in
the menu. You can set it to wake you up in the morning or remind you that a
favorite program is about to start. The TV/VCR will turn on for an hour and then
automatically turn off.
To Set the Wake.Up Timer
1 Press MENU to display the TV/VCR MAINMENU
2 Press 3 to display the TIMEmenu
3 Press 3 to display the WAKEUP TIMERmenu
4 Use the number buttons on the remote to enter the channel number and time
• After you enter the time press 1 for AM or 2 for PM Example: press 0
then 5 then 0 then 7 then 2 for a time of 5:07PM
• Press CLEAR to correct an entry or press RESET to cancel the timer
5 Press MENU to set the timer
• If set the wakeup timer turns on the TV/VCR every day The WAKEUP
indicator on the front of your TV/VCR lights to show the timer has been
set (This indicator turns off during WakeUp mode )
6 After the timer turns on your TV/VCR you can turn offthe set using the
remote s OFF button or the TV/VCR s POWER button If you do not turn off
your TV/VCR it turns off after one hour If you do not want the TV to turn
off, cancel the wake-up timer as describedbelow.
TV/VCR MAIN MENU
1 Timer Recordings
2 Picture Quality
3 Time
TIME
Set clock
Sleep timer
Wake-up timer
WAKE-UP TIMER
\l/
Channel/7 (
Time --.
WAKE-UP TIMER
Channel 12
Time 05:07 AM
Press CLEAR to correct
Press RESET for :
Press MENU to set
To Cancel the Wake.Up Timer
Follow steps 13 above press RESET to cancel the timer and press MENU
to exit
The timer is canceled if MENUis pressed before step 4 above is completed
14

Sleep Timer
The sleep timer automatically turns the TV/VCR off after 30, 60, 90, or 120
minutes.
1. Repeatedly press SLEEP. Each press of the SLEEP button changes the
amount of time as shown below.
Sleep Timer 0:00 Press SLEEP Amt. of Time
Twice 30 Min.
Three Times 1 Hr.
Four Times 90 Min.
Five Times 2 Hrs.
Six Times Timer Off
•If the sleep timer has already been set, the remaining time before the
TV/VCR turns off is displayed on the screen.
2. To cancel the sleep timer, repeatedly press SLEEP until 0:00 is displayed on
the screen.
You can also set the sleep timer from the TV/VCRMAINMENU.
• Display the TIME menu and press 2. Follow the directions on the screen.
Press SLEEP or CHAN up or down to change the amount of time. Press
MENUto exit.
TV/VCR MAIN MENU
1 Timer Recordings
2 Picture Quality
3 Time
TIME
1 Set clock
2 Sleep timer
3 Wake-up timer
4 Set Time Zone
5 Set DST
0 Exit
15

To Play a Tape
'Safety Tab
1. Insert a tape in the TV/VCR.
The TV/VCR automatically turns on. The tape automatically begins
playback if the safety tab on the cassette is removed and the Auto Play
feature is turned on.
2. Press PLAY, if necessary.
PLAY, the time counter, and tape speed appear on the screen.
3. If necessary, press TRACK + or - on the remote or CH up or down on the
TV/VCR while the tape is playing to remove any streaks from the picture.
Details are on page 18.
4. Press STOP on the remote or STOP/EJECT on the TV/VCR to stop play-
back.
5. Press REW to rewind the tape. If the TV/VCR is playing a tape when the
REW button is pressed, the TV/VCR searches backwards through the tape.
If the REW button is pressed while the tape is stopped, the tape will rewind
to its beginning.
• After the tape reaches its end, it automatically rewinds back to the
beginning.
• Pressing the remote's OFF button while the tape is rewinding will not
stop the tape. The TV/VCR will turn off, but the tape continues to
rewind to its beginning.
6. While the tape is playing, press FF to search forward. While the tape is
stopped, press FF to fast forward to another area of the tape.
7. Press STOP/EJECT on the front of the TV/VCR to eject the tape once it is
completely rewound.
You can eject a cassette with the power turned off.
Dew-Detection System
To prevent damage to your tapes, this unit is equipped with a dew-detection
system. When moisture condensation is detected inside the TV/VCR, DEW
appears on the TV screen for two seconds. VCR functions do not operate until
the dew condition passes. If you insert a tape, it is ejected.
Press DISPLAY to check the dew condition. To avoid this problem, do not move
the unit directly from a cold to warm place. TV functions are not affected.
16

To Use the Playback Features
Pause, frame advance, picture search, and slow motion work well when you play
back tapes recorded using SLP recording speed.
Pause
This feature pauses the tape in action and allows you to examine the details of
the scene.
1. Press PAUSE on the remote during playback to pause the action.
The TV/VCR will automatically switch from pause to stop after a few
minutes to prevent tape wear.
2. Press PAUSE or PLAY to return to playback.
Frame Advance
Frame advance lets you view one frame at a time while in the pause mode.
1. Press PAUSE during playback to pause the action.
2. Press F. ADV each time you want to move to the next frame of the scene.
Press and hold F. ADV to slowly advance frame-by-frame.
3. Press PAUSE or PLAY to return to playback.
Picture Search
You can visually search a picture during playback. Sound is turned off during
picture search.
1. During playback, press FF to search forward or REW to search in reverse.
2. Press PLAY to return to normal playback.
Slow Motion
You can view the picture in slow motion during play. Sound is turned off during
slow-motion playback.
1. Press F. ADV during playback to begin slow motion.
2. Use TRACK + or -to remove most of the streaks from the picture.
3. Press F. ADV or PLAY to return to playback.
The TV/VCR will automatically switch from slow-motion playback to stop
after a few minutes to prevent tape wear.
continued on next page
17

To Use the Playback Features
Tracking
The TV/VCR has automatic and manual tracking. Tracking is used when playing
a tape. It has no effect during recording.
Automatic Tracking
The automatic tracking adjusts the picture when you play a tape recorded on
another VCR. Automatic tracking is turned on whenever a tape is inserted or the
TV/VCR's power is turned on.
Manual Tracking
Occasionally, you may need to manually adjust tracking on a tape recorded on a
different VCR or camcorder.
• When streaks or snow appear in the picture during normal playback or slow
motion, press TRACK + or - on the remote or CH up or down on the TV/
VCR for the best possible picture.
• To turn automatic tracking back on, simultaneously press and hold both of
the CH buttons on the front of the TV/VCR for two seconds.
Time Counter
The time counter helps locate the beginning or end of programs you taped. The
time counter automatically resets to 0:00:00 whenever a tape is inserted or you
can press CLEAR when the time counter is displayed.
For example, if a 30-minute program is recorded at the beginning of the tape and
you want to record another program after it, you:
1. Insert the pre-recorded tape.
2. Press DISPLAY twice to display the time counter.
O:OO:OO
Hour_
Minutes
Seconds
Press FF to fast forward the tape until the time counter reads 0:30:00.
This is the approximate end of the program and you can begin recording at
this spot. (You will want to verify this by playing the tape so your recording
begins at the desired spot.)
18
This manual suits for next models
1
Table of contents
Other RCA TV VCR Combo manuals