RCP CONTOUR NEXT ONE User manual

CONTOUR® NEXT ONE Glucose Meter
CONTOUR® NEXT ONE
Glucose Meter

CONTOUR® NEXT ONE Glucose Meter
PAGE 2 REMOTE CARE PARTNERS V1.0
TABLE OF CONTENTS
INTRODUCTION ............................................................... 4
NOTES ON SAFETY ........................................................... 5
QUICKSTART .................................................................... 6
INTENDED USE.................................................................. 7
HOW IT WORKS ............................................................... 7
CONTENTS OF YOUR KIT.................................................. 8
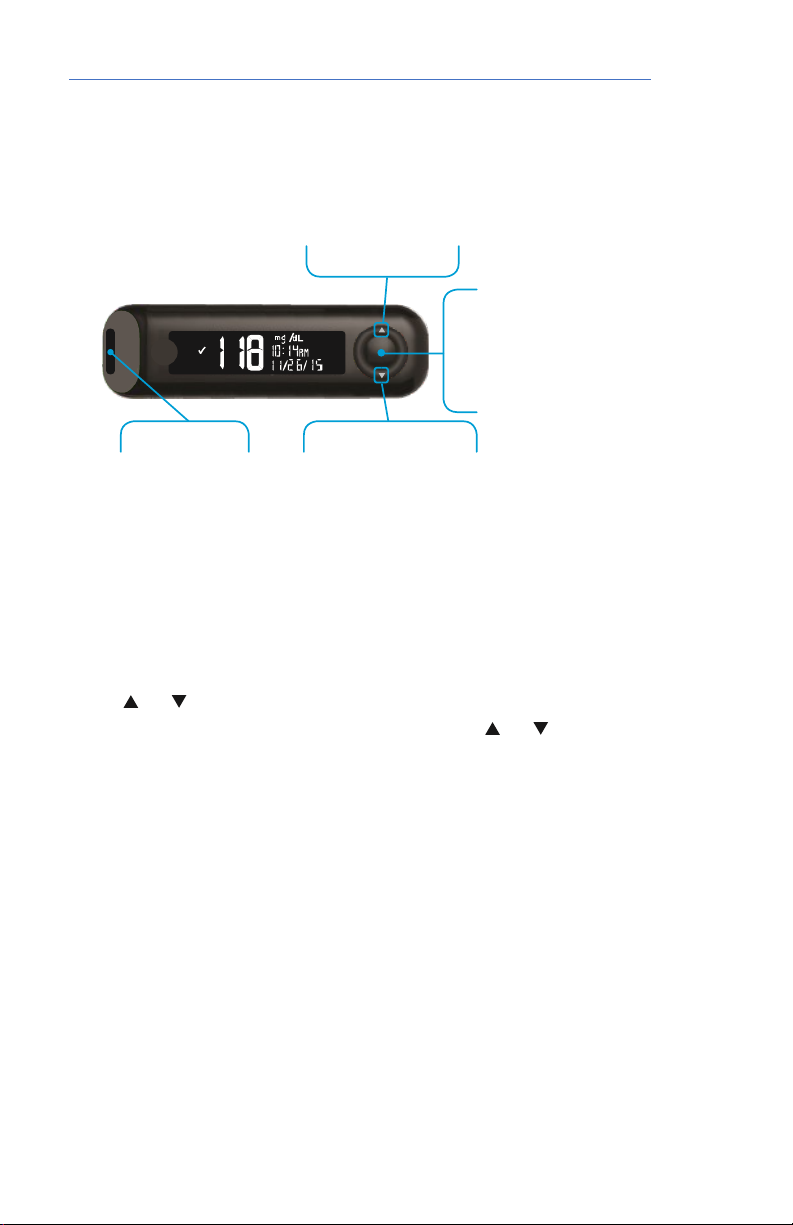
PRODUCT OVERVIEW ..................................................... 9
The Blood Glucose Meter........................................... 9
Up/Down Scroll Buttons .............................................. 9
Your Contour next ONE meter Screen .................... 10
Initial Setup from the Meter...................................... 11
View Pre-Set Target .................................................. 12
Set the Date .............................................................. 13
GETTING READY TO TEST ............................................... 14
Insert a test strip into the meter ............................... 16
Get the Blood Drop: Fingertip Testing ..................... 17
Apply More Blood..................................................... 18
Eject and Dispose of the Used Lancet.................... 18
UNDERSTANDING THE RESULTS ..................................... 19
LO or HI Results .......................................................... 19
CARE AND STORAGE.................................................... 20
CLEANING AND DISINFECTION .................................... 21
For more information ................................................ 21
Cleaning Your Meter ................................................ 22
Disinfecting Your Meter ............................................ 23
Cleaning and Disinfecting Your Lancing Device... 23

USER GUIDE
V1.0 REMOTE CARE PARTNERS PAGE 3
BATTERIES....................................................................... 24
Replace the Batteries............................................... 25
ERROR DETECTION DISPLAYS........................................ 27
CONTROL SOLUTION .................................................... 29
Quality Control.......................................................... 29
Control Solution Testing ............................................ 30
LOGBOOK ..................................................................... 33
Review the Logbook ................................................ 33
SETTINGS ........................................................................ 34
Access Settings ......................................................... 34
Change the Time...................................................... 35
Change the Date ..................................................... 35
TECHNICAL INFORMATION: USER ACCURACY ........... 37
TECHNICAL INFORMATION: PRECISION....................... 38
SYMPTOMS OF HIGH OR LOW BLOOD GLUCOSE....... 40
SPECIFICATIONS............................................................ 41
SYMBOLS USED.............................................................. 42
REFERENCES .................................................................. 43
WARRANTY.................................................................... 44
CONTACT INFORMATION AND NOTICES..................... 47
FCC Compliance Statement................................... 47

CONTOUR® NEXT ONE Glucose Meter
PAGE 4 REMOTE CARE PARTNERS V1.0
INTRODUCTION
This Blood Glucose Meter is provided by Remote
Care Partners (RCP) for use exclusively with the
health monitoring program from your provider.
Please read this manual carefully and keep it
handy for future reference.
CAUTION: Your Contour
next ONE meter works
ONLY with Contour next
test strips and Contour
next control solution

USER GUIDE
V1.0 REMOTE CARE PARTNERS PAGE 5
NOTES ON SAFETY
Please read this section carefully to familiarize
yourself with the features and operations before
using the unit.
1. Do not allow other people to use your blood
glucose meter. The meter is specifically
assigned to you and you only. Allowing
other people to use your meter can mislead
your provider.
2. All parts of the kit are considered
biohazardous and can potentially transmit
infectious diseases, even after cleaning and
disinfected all parts.
3. Do not place the device in liquid or put it
where it could fall into the liquid.
4. Use of this device is only for the intended
use described in this manual.
5. Only use CONTOUR® NEXT testing strips
supplied by RCP.
6. Do not allow the device to contact
surfaces that are too hot to touch.
7. Do not use the device where aerosol sprays
are in use.
8. Do not use the device if it is not working
correctly or if it is damaged.
9. Read the entire manual before using the
product to test your blood glucose.

CONTOUR® NEXT ONE Glucose Meter
PAGE 6 REMOTE CARE PARTNERS V1.0
QUICKSTART
Prepare: Wash your hands with soap and water. Dry
thoroughly.
Gather supplies: Lancing device, lancet, tissue (for
blotting blood from your finger after the puncture).
Prepare the lancing device: Unscrew the cap, push
the lancet firmly into the device, remove the rounded
end of the lancet by turning (save this piece), screw
the cap back on, and adjust the puncture depth
(usually 3).
Prepare the meter: Insert a test strip into the meter.
Push the strip into the meter until it stops, and the
meter beeps.
Perform the test: Place the lancet device on the
finger you wish to use and press the release button.
Place a drop of blood into the absorbent hole of the
test strip. Use a tissue to absorb any extra blood from
your finger. The reading will display in the LCD window
within 5 seconds.
Cleanup up: Unscrew the lancet device cap, eject
the lancet into a sharps container or stab the lancet

USER GUIDE
V1.0 REMOTE CARE PARTNERS PAGE 7
into the rounded end piece that was saved. Pull out
the testing strip from the meter and throw it away.
INTENDED USE
The Contour®Next ONE blood glucose monitoring
system is intended to be used for the quantitative
measurement of glucose in fresh capillary whole
blood drawn from the fingertips. The Contour next
ONE blood glucose monitoring system is intended to
be used by a single person and should not be shared.
The Contour next ONE blood glucose monitoring
system is intended for self-testing outside the body (in
vitro diagnostic use) by people with diabetes at
home as an aid in monitoring the effectiveness of a
diabetes control program.
The Contour next ONE blood glucose monitoring
system should not be used for the diagnosis of or
screening for diabetes or for neonatal use. The
Contour®Next test strips are for use with the
Contour®Next ONE blood glucose meter to
quantitatively measure glucose in fresh capillary
whole blood drawn from the fingertips or palm.
The system is intended for in vitro diagnostic use only.
HOW IT WORKS
The test is based on the measurement of electrical
current generated by the reaction of glucose with the
reagent of the strip. The meter measures the current
and displays the corresponding blood glucose level.
The strength of the current produced by the reaction
depends on the amount of glucose in the blood
sample.

CONTOUR® NEXT ONE Glucose Meter
PAGE 8 REMOTE CARE PARTNERS V1.0
CONTENTS OF YOUR KIT
▪A Meter
▪Storage Bag
▪Lancing Device
▪Sterile lancet (Optional)
NOTES:
▪The Lancing Device can be used several
times; however,the lancet must be
changed after each use.
▪Sterile lancets are not included in the
standard kit

USER GUIDE
V1.0 REMOTE CARE PARTNERS PAGE 9
PRODUCT OVERVIEW
The Blood Glucose Meter
Up/Down Scroll Buttons
Using the Meter Buttons
Press and hold the OK button until the meter turns On.
Press and hold the OK button until the meter turns Off.
The or buttons on the meter allow you to scroll
through the options. You can hold the or button
to scroll continuously through a list.
Press the OK button to accept a selection.
To exit from the Logbook or the last Settings screen
and return to Home, press the OK button.
NOTE: The meter screen dims after 30 seconds of
inactivity. Press any button to bring up the screen.

CONTOUR® NEXT ONE Glucose Meter
PAGE 10 REMOTE CARE PARTNERS V1.0
Your Contour next ONE meter Screen
Test Strip Port
Time
Test Result in Target
Meal
Marker
Date

USER GUIDE
V1.0 REMOTE CARE PARTNERS PAGE 11
Your Contour Next test strip
Initial Setup from the Meter
Press and hold the OK button for 2 seconds until the
meter turns on. The screen displays the Power On Self
Test.
All symbols on the screen and the white strip port
briefly light up. It is very important to verify that 8.8.8
displays fully and that the white light from the test strip
port is visible.
If there are missing characters or if the strip portlight is
a color other than white, contact RCP Customer
Support at 855-477-7000. This may affect the way you
see your results.
Grey Square
End:
Insert this end into the test strip
port
Sample Tip:
Blood sample pulled in
here
OK Button

CONTOUR® NEXT ONE Glucose Meter
PAGE 12 REMOTE CARE PARTNERS V1.0
View Pre-Set Target
The meter displays a pre-set Overall Target
Range.
To move to the next
screen, press the OK
button. Continue to Set
the Time.
Set the Time
The hour is blinking
To change the hour, press the or button on
the outer ring.
To set the hour and
move to minutes,
press the OK button
To change the
minutes, press the or
button on the outer
ring, then press the OK button. For a 12-hour
format, select AM or PM, press the or button,
then press the OK button.
Continue to Set the Date

USER GUIDE
V1.0 REMOTE CARE PARTNERS PAGE 13
Set the Date
The year is blinking
1. To change the year, press the or button, then
press the OK button.
2. To change the month, press the or button, then
press the OK button.
3. To change the day, press the or button, then
press the OK button.
The meter briefly displays your saved settings, then
beeps and turns OFF.
Setup is complete. You are ready to test your blood.

CONTOUR® NEXT ONE Glucose Meter
PAGE 14 REMOTE CARE PARTNERS V1.0
GETTING READY TO TEST
Ensure that you have the materials you need before
you begin testing:
•Contour next ONE meter.
•Contour next test strips.
•Lancing device and lancets from your kit, if
provided.
1. Remove the endcap from the lancing device.
2. Loosen the round
protective cap on a
lancet by rotating the cap
¼ turn, but do not remove
the cap.
3. Insert the lancet
firmly into the lancing
device until the lancet
comes to a complete
stop.
4. Twist off the round
protective lancet cap.
Save the cap for
disposing of the used
lancet.

USER GUIDE
V1.0 REMOTE CARE PARTNERS PAGE 15
5. Replace the
endcap.
6. Rotate the endcap
dial to adjust the puncture
depth.
The amount of pressure
applied to the puncture
site also affects puncture
depth.

CONTOUR® NEXT ONE Glucose Meter
PAGE 16 REMOTE CARE PARTNERS V1.0
Insert a test strip into the meter
1. With clean, dry hands, remove
a single test strip from its vial. Do
not bend, cut, or modify the test
strips in any way.
2. Tightly close the bottle lid
immediately after you have
removed the test strip.
3. Hold the test strip with the gray
square end face toward the meter.
4. Insert the grey square end firmly into the
test strip port until the meter beeps.
The screen displays
the blinking blood
drop indicating it is
ready to test a
blood drop.
NOTE: After you insert the test strip, apply blood to the
test strip within 3 minutes, or the meter turns off. To
restart the test, remove the test strip and reinsert it into
the meter.

USER GUIDE
V1.0 REMOTE CARE PARTNERS PAGE 17
Get the Blood Drop: Fingertip Testing
1. Press the lancing device
firmly against the puncture
site and press the release
button.
2. Stroke your hand and
figure toward the puncture
to form a drop of blood. Do
not squeeze around the
puncture site.
3. Test immediately after
you have formed a small,
round blood drop, as shown.
4. Immediately touch the
tip of the test strip to the
drop of blood. The blood is
drawn into the test strip
through the tip.
5. Hold the tip of the test
strip in the blood drop until
the meter beeps.
CAUTION: Do not press the
test strip's tip against the skin
or place the blood on top of
the test strip. These actions
could lead to inaccurate
results or errors.

CONTOUR® NEXT ONE Glucose Meter
PAGE 18 REMOTE CARE PARTNERS V1.0
Apply More Blood
1. If the meter beeps
twice and the screen
displays a blinking
blood drop, the test
strip does not have
enough blood.
2. Apply more blood
to the test strip within
60 seconds.
3. If the screen displays an E1 error message,
remove the strip and start with a new strip.
Eject and Dispose of the Used Lancet
Do not use your fingers to remove the lancet
from the lancing device.
The lancing device usually provided with your kit
has an automatic lancet ejection feature.

USER GUIDE
V1.0 REMOTE CARE PARTNERS PAGE 19
UNDERSTANDING THE RESULTS
LO or HI Results
If the meter beeps twice and displays the LO screen,
your blood sugar reading is under 20 mg/dL. Follow
medical advice immediately. Contact your health
care professional.
If the meter beeps once and displays the HI screen,
your blood sugar reading is over 600 mg/dL:
1. Wash and dry your hands well.
2. Retest with a new strip.
If results are still over 600 mg/dL, follow medical
advice immediately.
Reference value:
Time of day
People without
diabetes
Before breakfast
(fasting)
<100 mg/dL
Two hours after meals
<140 mg/dL
Source: American Diabetes Association.
Standards of Medical Care in Diabetes-
2012.Diabetes Care 2012,35(Suppl.1)S11-S63.
Please work with your doctor to determine a
target range that works best for you.

CONTOUR® NEXT ONE Glucose Meter
PAGE 20 REMOTE CARE PARTNERS V1.0
CARE AND STORAGE
Caring for your meter:
Store the meter in the carrying case provided
whenever possible.
Wash and dry hands well before handling to keep
the meter and test strips free of water, oils, and
other contaminants.
Handle the meter carefully to avoid damaging the
electronics or causing other malfunctions.
Avoid exposing your meter and test strips to
excessive humidity, heat, cold, dust, or dirt.
Clean and disinfect your meter as recommended
in the next section.
The cleaning and disinfecting directions should
not cause any damage or degradation to the
external case, buttons, or display. Your Contour
next ONE meter has been tested for 260 cycles
of cleaning and disinfection (equivalent to one
cycle per week for five years). This device has
been demonstrated to withstand five years of
cleaning and disinfection without damage. If
your device malfunctions for any reason or you
notice any changes in the external meter case
or display, call RCP Customer Care Customer
Service at 1-855-477-7000.for assistance.
Table of contents
Other RCP Blood Glucose Meter manuals
Popular Blood Glucose Meter manuals by other brands

Abbott
Abbott FreeStyle Freedom Lite owner's booklet

Bayer HealthCare
Bayer HealthCare Ascensia Contour Blood Glucose Meter user guide

pts Diagnostics
pts Diagnostics CardioCheck PA user guide

SMS
SMS SureEdge -4240 owner's manual

Roche
Roche Accu-Chek Mobile user manual

Arkray
Arkray Glucocard Vital Quick reference guide