manuals.online logo
Brands
  1. Home
  2. •
  3. Brands
  4. •
  5. RDP
  6. •
  7. Lawn And Garden Equipment
  8. •
  9. RDP Rain Water Hub User manual

RDP Rain Water Hub User manual

CONGRATULATIONS!
You are less than an hour away from years of easy and effective rainwater harvesting with the Rain Water Hub.
PLEASE DONÕT GET TOO EXCITED AND FORGET TO FIRST READ THESE INSTRUCTIONS AND
WATCH THE VIDEOS AT www.rainwaterhub.com
Thanks for purchasing the Rainwater Hub. If you have any questions please
contact us at: 1-888-214-HUBS (4827) or email us at [email protected].
IMPORTANT SAFETY INSTRUCTIONS Ð SAVE THESE INSTRUCTIONS Ð PLEASE
READ ENTIRE INSTRUCTIONS PRIOR TO USE
–RDP Garden Products is not responsible for damage or injury caused by incorrect assembly or use.
WARNING:
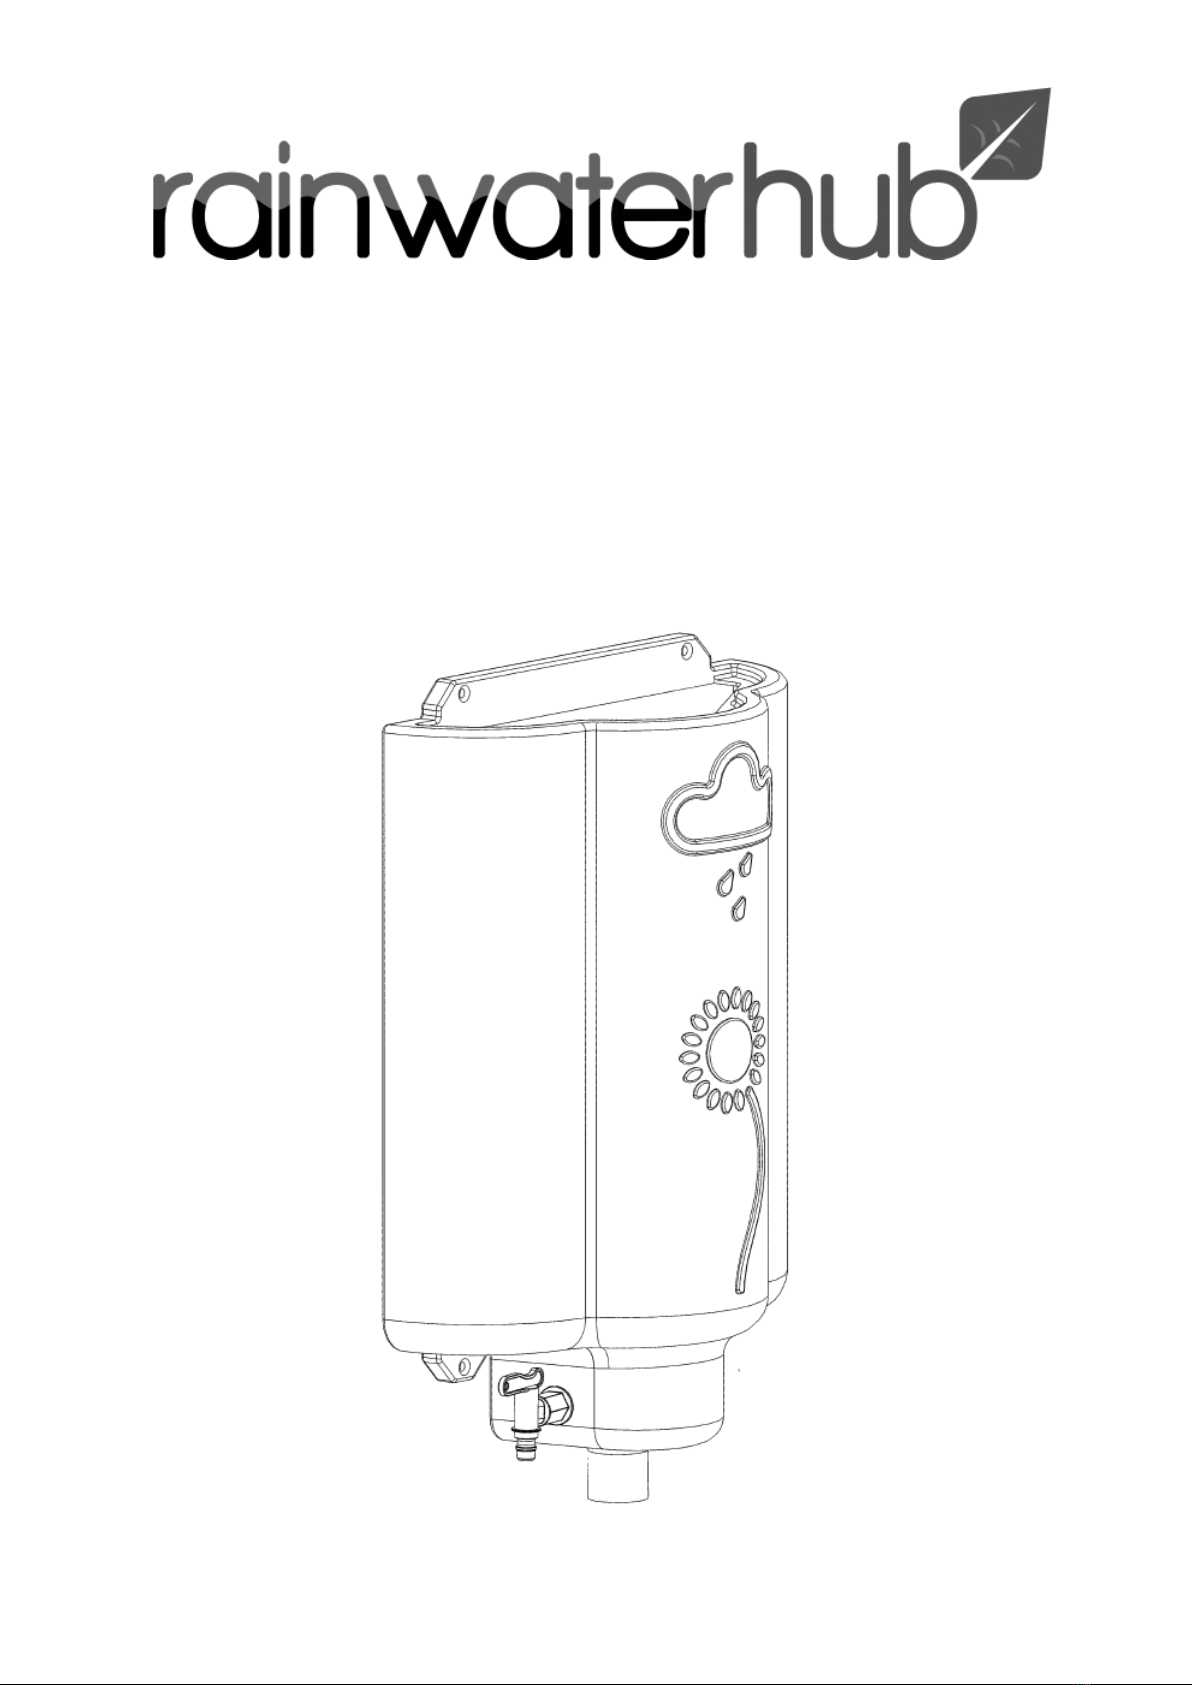
Water collected via the Rainwater Hub from roof runoff is a potential water contamination
hazard. Do not let people or animals drink water collected from roof runoff. Water
collected from roof runoff is non-potable and should only ever be used for outdoor
watering, irrigating and other outside uses.
WARNING:
Electrical Hazard. If a downspout contains electrical cables of any sort, there is a potential
danger from electrocution or fire during installation. Do not proceed without consulting
with a qualified electrician or contractor.
WARNING:
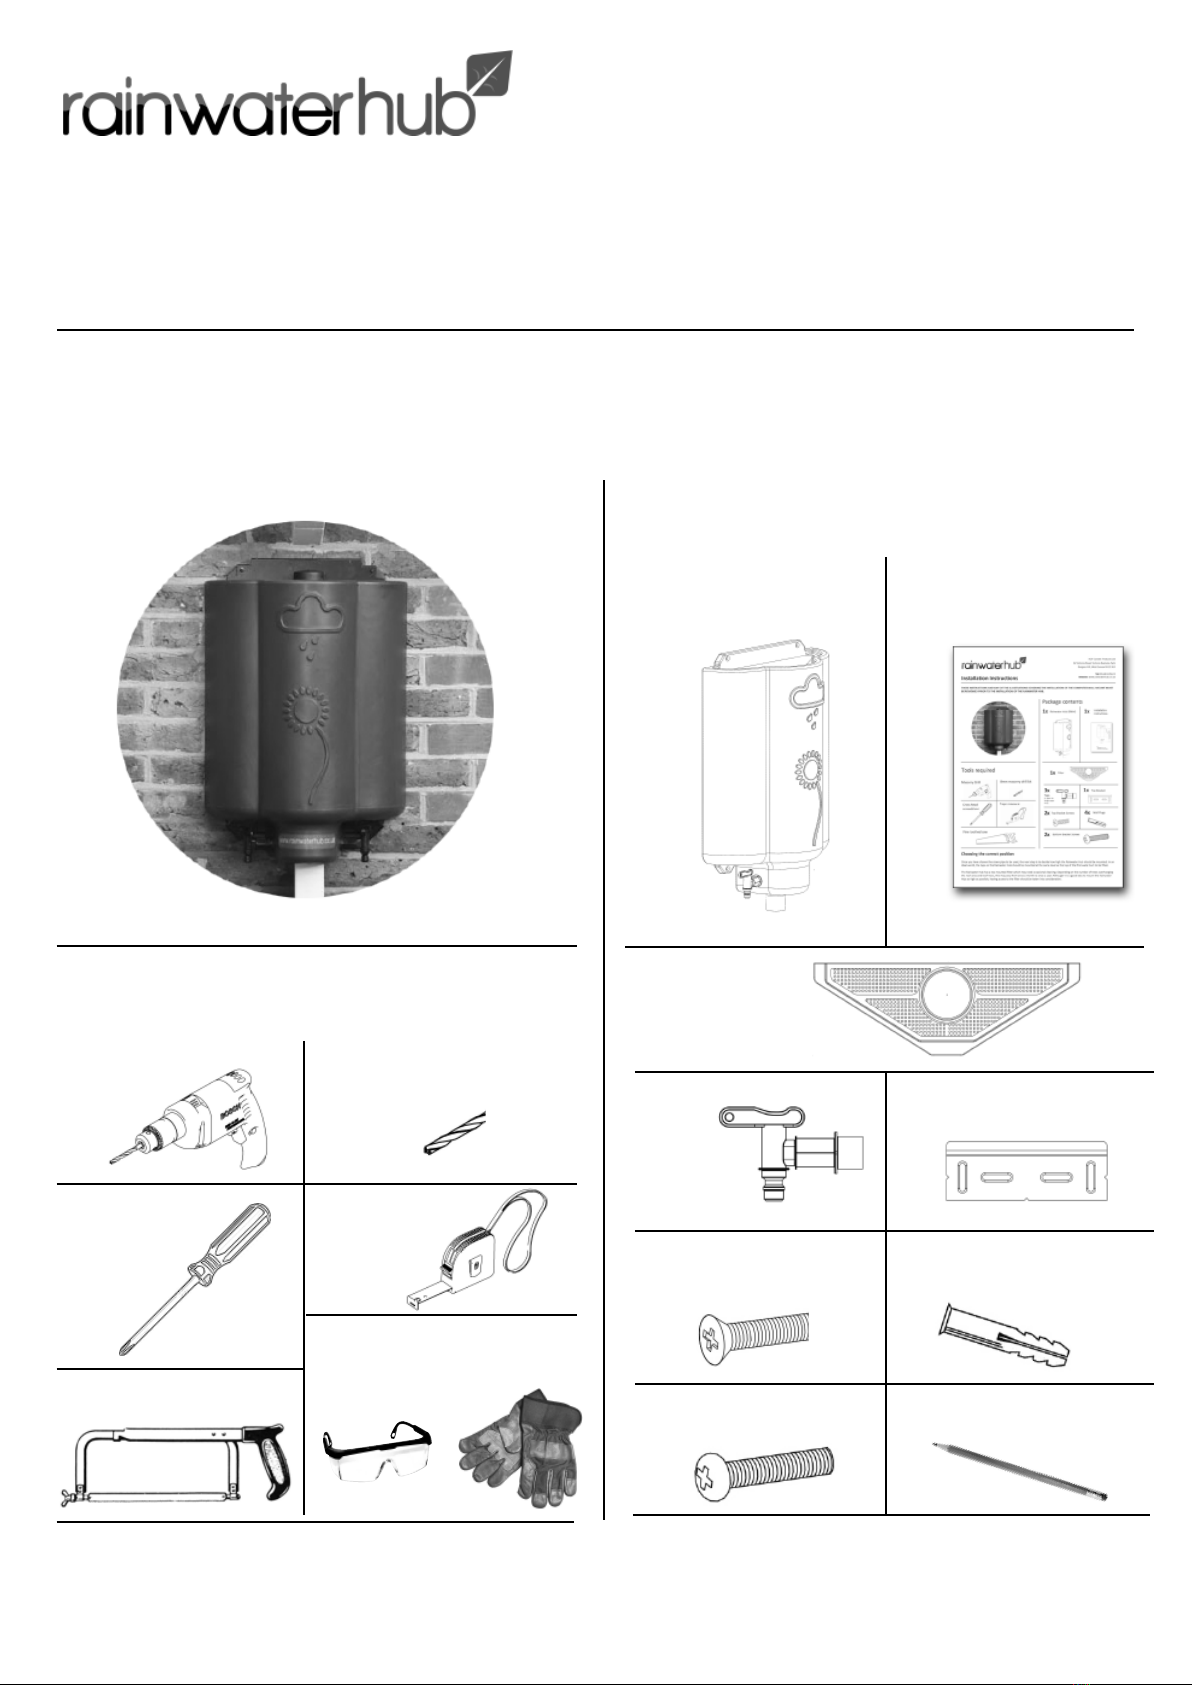
Downspout edges may be sharp. Wear protective gloves when cutting or handling
downspouts. To prevent eye injury, always wear safety glasses when cutting or handling
downspouts.
RDP Garden Products is not responsible for any damages or injuries caused as a result of or
by improper installation.
WARNING:
This product contains small items that could be a choking hazard if swallowed.
WARNING:
Avoid potential personal injuries and property damage!
Do not use this product for any purpose not explicitly specified.
The wall must be capable of supporting a sheer weight of 90lbs.
If you do not understand these instructions, or have doubts about the safety of the
installation, assembly or use of this product, contact us at info@www.rainwaterhub.com,
or call a qualified contractor.
Supplied Parts and Hardware
PLEASE OPEN THE RAINWATER HUB FROM THE END INDICATED.
BEFORE STARTING ASSEMBLY, PLEASE VERIFY ALL PARTS ARE INCLUDED AND UNDAMAGED. IF ANY PARTS ARE MISSING OR
DAMAGED, CONTACT US AT 1-888-214-HUBS (4827) OR AT [email protected] NEVER USE DAMAGED PARTS!
THESE INSTRUCTIONS AND ANY OF THE ILLUSTRATIONS COVERING THE INSTALLATION OF THE RAINWATER HUB MUST BE
REVIEWED PRIOR TO THE INSTALLATION.
www.rainwaterhub.com
1-888-214-HUBS (4827)
Tools required
Package contents
Drill, masonry if necessary.
Tape measure
Hack saw, or tin snips.
Cross head
screwdriver
5/16th drill bit, again
masonry is required.
1x 1x
2x
2x
4x
1x
3x
1x
Please read through all instructions before beginning the installation of your Rainwater Hub.
If improperly installed and/or maintained there is potential for damage to your home or person.
Filter
Rainwater Hub (RWH)
Faucets
(1 spare )
Installation
Instructions
Top Bracket
Top Bracket Screws Wall Plugs
Lower Bracket Screws Pencil
1x
Safety Equipment
(Eye Protections, Gloves)
7. Re-hang RWH and mark drill holes for bottom bracket.
REMOVE RWH and drill pilot holes (wood siding) or holes for
masonry wall plugs.
8. Insert wall plugs if used. Re-hang RWH. Do not screw in
lower bracket yet.
Installing the RWH
4. Drill in the centre of the pencil lines and insert the wall
plugs (masonry wall).
5. Through the VERTICAL SLOTS. Attach to the wall with wall
plugs and COUNTERSUNK screws. Do not fully tighten yet.
3. Position the top bracket 1Ó below the downspout and mark the
holes to be drilled in the VERTICAL SLOTS using the pencil provided.
6. Holding the RWH at slightly less than 90 degrees, clip top bracket
of RWH onto the mounting bracket on wall. Allow RWH to pivot
down so that is flush with wall. Check alignment and adjust if
necessary. Remove RWH tighten top screws fully.
1
2
3
5
6
78
4
1. Measure a 27 1/2" length of downspout and remove. 2. With the section removed, you are now ready to attach the
mounting bracket.
Choosing the Right Height:
Select downspout and determine height to mount RWH. Bottom of RWH should be above top of first rain barrel. Higher RWH
ismounted further and faster rainwater will flow. Keep in mind access filter and disconnect hoses if required.
12. Now secure the lower bracket of the RWH using the two
round-head or domed screws.
9. Measure and cut the lower section of downspout. 10. Insert RWH into downspout by angling both forward until
they meet and then lowering them back together until flush
with wall.
11. Re-fit lower downspout section.
Installing the Rainwater Hub
10
11
12
9
14. Attach hose connectors, and insert filter. The installation
is now complete.
13. Screw in faucets with o-rings. Ensure secure and tight fit,
but do not over-tighten.
13
14
LIMITED TEN YEAR WARRANTY
RDP Garden Products warrants to the original purchaser that its Rainwater Hub product is
free from defects in materials and workmanship appearing under normal use within ten (10)
years after the date of purchase. This warrant does not cover damage to Rainwater Hub
products caused by abuse, acts of God, your failure to follow product instructions,
mishandling or unauthorized repair.
THIS WARRANTY IS IN LIEU OF ALL OTHER EXPRESS WARRANTIES, AND ANY IMPLIED
WARRANTIES, INCLUDING BUT NOT LIMITED TO ANY IMPLIED WARRANTY OF
MERCHANTABILITY OR FITNESS FOR PARTICULAR PURPOSE, ARTE LIMITED TO THE
DURATION OF THIS WARRANTY.
Some states do not allow limitations on how long an implied warranty lasts and/or the
exclusion or limitation of incidental or consequential damages, so the above limitation and/or
limitation and/or the above exclusion may not apply to you. This warranty gives you specific
legal rights, and you may have other rights which vary from state to state. As its sole
responsibility and your sole remedy for any warranted defect, RDP Garden Products will
replace any Rainwater Hub containing a warranted defect, free of charge, with proof of
purchase and notification within a reasonable period of time (but no longer than 6 months)
following the discovery of such defect. For warranty service, email [email protected]

Popular Lawn And Garden Equipment manuals by other brands

Perel GIK01N user manual

Perel

Perel GIK01N user manual

Stihl GHE 150 instruction manual

Stihl

Stihl GHE 150 instruction manual

DynaTrap DT1100 Frequent Asked Questions

DynaTrap

DynaTrap DT1100 Frequent Asked Questions

Westfalia 53 33 31 instruction manual

Westfalia

Westfalia 53 33 31 instruction manual

Gardena C 1060 Profi user manual

Gardena

Gardena C 1060 Profi user manual

Toro 54610 Operator's manual

Toro

Toro 54610 Operator's manual

Oypla GARDEN 4107 user manual

Oypla GARDEN

Oypla GARDEN 4107 user manual

Nakayama NS5500 owner's manual

Nakayama

Nakayama NS5500 owner's manual

Connected Essentials CEP-20 user manual

Connected Essentials

Connected Essentials CEP-20 user manual

Gravely Pro-Turn 100 Operator's manual

Gravely

Gravely Pro-Turn 100 Operator's manual

Zenport INDUSTRIES LEP-858 user manual

Zenport INDUSTRIES

Zenport INDUSTRIES LEP-858 user manual

ILESTO BENNI BOY Assembly instructions

ILESTO

ILESTO BENNI BOY Assembly instructions

Westfalia GM941 instruction manual

Westfalia

Westfalia GM941 instruction manual

Husqvarna AUTOMOWER 105 Operator's manual

Husqvarna

Husqvarna AUTOMOWER 105 Operator's manual

Meec tools 725-021 operating instructions

Meec tools

Meec tools 725-021 operating instructions

DANA 4360-130 parts list

DANA

DANA 4360-130 parts list

Ward GIL-39007A owner's guide

Ward

Ward GIL-39007A owner's guide

RioOutdoors 4P-DC installation instructions

RioOutdoors

RioOutdoors 4P-DC installation instructions

manuals.online logo
manuals.online logoBrands
  • About & Mission
  • Contact us
  • Privacy Policy
  • Terms and Conditions

Copyright 2025 Manuals.Online. All Rights Reserved.