manuals.online logo
Brands
  1. Home
  2. •
  3. Brands
  4. •
  5. Ready2Talk
  6. •
  7. Amplifier
  8. •
  9. Ready2Talk PA 64 User manual

Ready2Talk PA 64 User manual

PA 64
Installation & Operation Manual
The PA for ALL applications!
IMPORTANT!
Please read all these key points to ensure the proper
connection and designed use of your PA 64. If you
have ANY questions, please call 1 888 724-5351
before proceeding!
•Basically, the PA 64 is an amplifier that is connected between the
stereo’s output and the vehicles speakers!
•DO NOT connect the vehicles speaker wires to the stereo’s
output as well as the PA 64. Remember point one… the PA 64
goes between the stereo and the speakers!
•The PA 64 is an amplifier and is NOT designed to be used with
ANY other amplifiers (e.g. being connected between the stereo
and amplifier). If done, the PA 64 will not function and it may
damage the PA 64 and / or the additional amplifiers. If you need
more amplification than the PA 64 offers, we have other PA
options to suit. Please just give us a call.
•The PA 64 is intended to be installed by a professional installer,
service mechanic, vehicle dealer or manufacturer. Do not
attempt to install this unit without confirming compatibility to
your vehicle with the manufacturer or dealer. Failure to do so
may cause damage to the PA 64, your vehicles electrical system
or void your vehicle warranty.
•Always make sure your power wires are fused at the source of
the power to protect the wires from shorts!
•Only use with Ready2Talk microphones… use of any others may
cause damage.
Now with the important warnings out of the way…
The PA 64 is designed to be the best unit for all applications, offering
a real amplifier with 4x50Watts (peak), solid state mic / stereo
switching and variable muting for both the rear RCA input and the
front 3.5mm AUX input.
It also allows the use of two microphones, hand or headset, wired or
wireless; and is the perfect PA system for Sightseeing, Shuttle,
Transit, School Bus, Church Busses, Retirement Homes, People
Movers, Boats, Trolleys, Snow Cats and Horse Carriages. Did we
forget anything? Oh yes… also an easy replacement for older PA
systems in Highway Coaches.
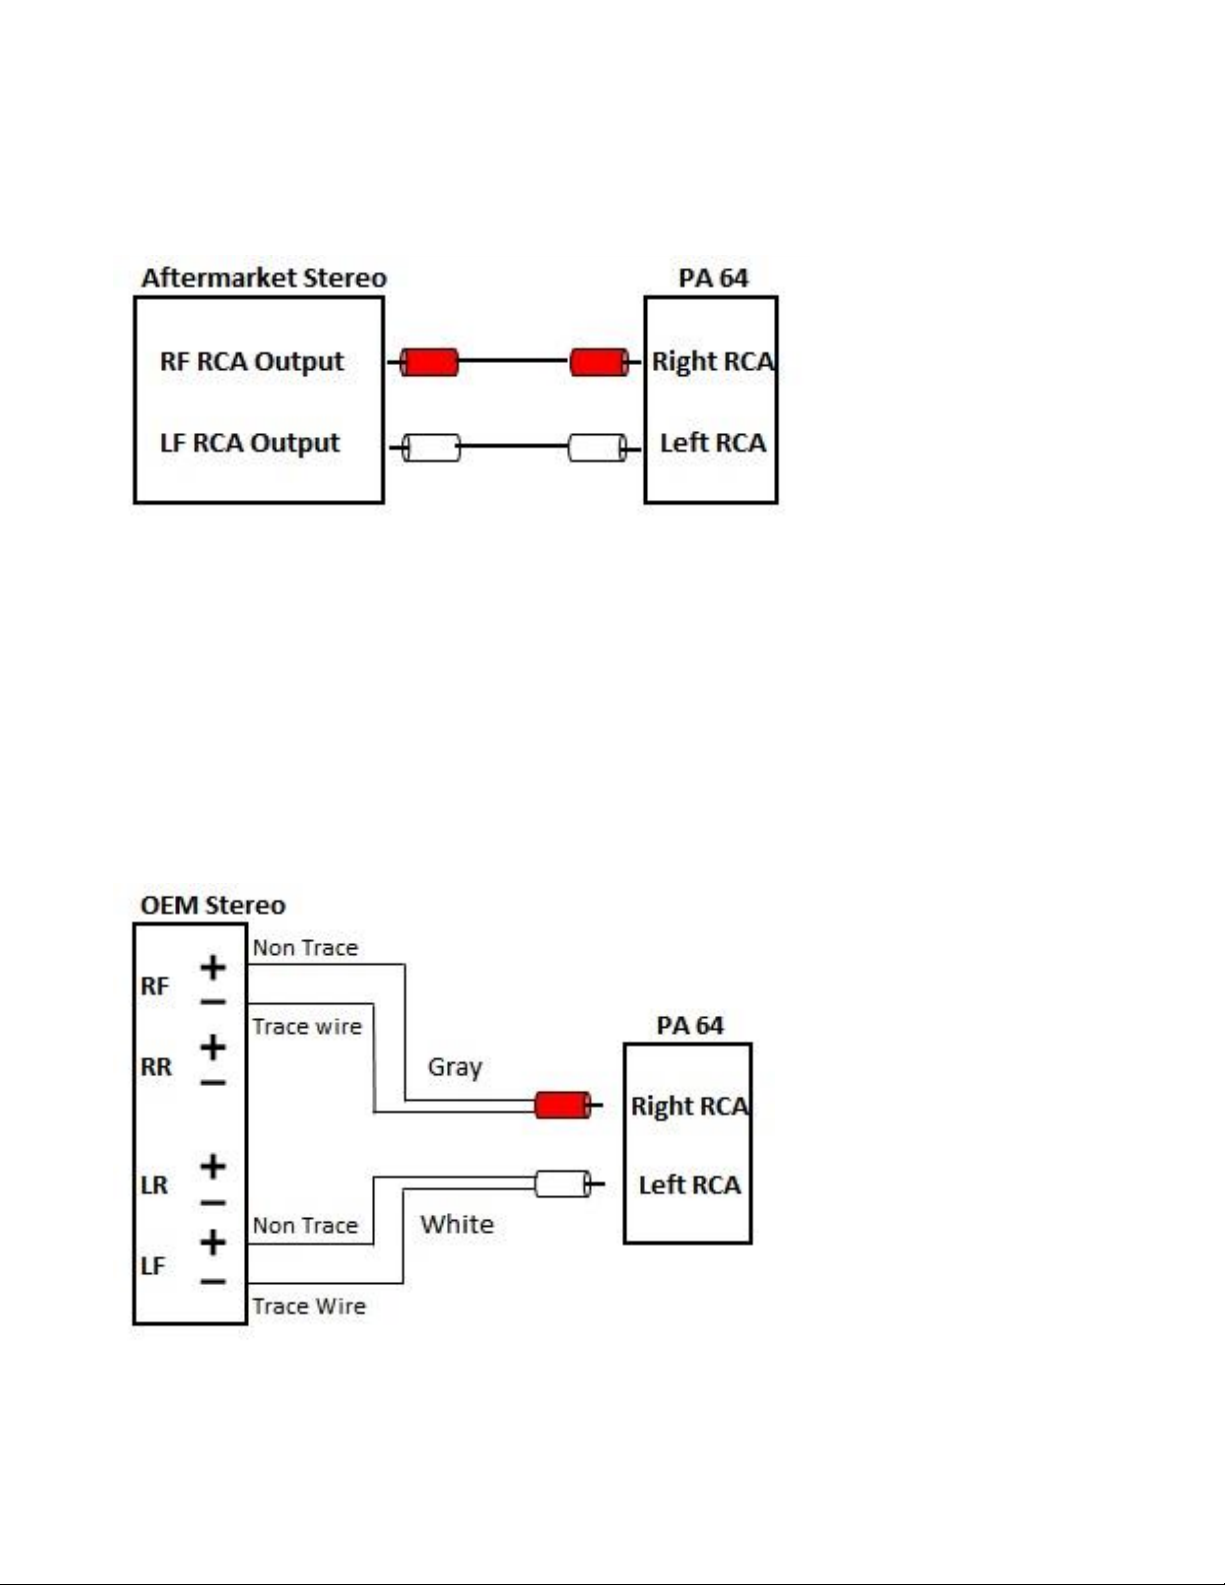
Use the PA 64 as a standalone PA system or in conjunction with your
factory (OEM) stereo or any aftermarket stereo / DVD player or
automated tour system by using the internal High / Low impedance
selector. Don’t forget you can connect your MP3 player though the
front AUX input.
The PA 64 can be mounted on any flat surface vertical or horizontal
and includes an optional front decal so the printing will always be the
right way around. We try to think of everything.
Want to hide it away? There is an optional RMK (Remote Mounting
Kit) and a RME (Rear Mic Extension) for a second mic when using a
step on guide.
Easy to connect, easy to use and is better sounding than any other PA
you’ve heard before. Finally, you too can sound like a radio DJ.
*sound effects and annoying side kick not included.
Stereo Connection Options
Diagram 1 –Connection to Aftermarket Stereo RCA Output
Note: Set Input Switch on PA 64 to “Low”
Note: When using RCA cables the stereo’s speaker wires are not
connected to the PA 64 or the speakers.
Diagram 2 - Connection to OEM Factory Stereo Speaker Wires
Use RCA to speaker wire pig tails included in the box.
Note: Set Input Switch on PA 64 to “High”
Note: Rear speaker wires from the stereo are not connected
PA 64 Multi Pin Plug Wiring Code
12V + Battery Yellow
12V + Switched Red
12V –Ground Black
Right Front + Gray
Right Front - Gray / Black
Left Front + White
Left Front - White / Black
Right Rear + Purple
Right Rear - Purple / Black
Left Rear + Green
Left Rear - Green / Black
Additional Wiring Info
Yellow 12V + Constant power - 10 Amp fuse in the plug base
Red 12V + Accessory power –Internal automatic re-settable fuse
Note: Never increase the value of the fuse as damage may occur.
Note: The 4 x 50 Watt amplifier inside the PA 64 is designed to
accommodate a 4 –8 Ohm floating speaker load.
Note: DO NOT EXCEED a 4 –8 Ohm speaker load! If speaker load
is outside intended range, the PA 64 will blow the 10A power fuse
after a short time.
Note: The PA 64 amplifier uses a floating output. Please ensure
your speakers are not common grounded or connected to the vehicle
ground as damage will occur to the PA 64 and repairs / replacement
will not be covered by warranty.
Note: All “Speaker Connection Options” are based on the use of 4
Ohm speakers and these diagrams will offer a load range from 4 –8
Ohm to the PA 64 amplifier. If in doubt… please call 1 888 724-5351
Speaker Connection Options - Based on 4 Ohm Speakers
Normal 4 Speaker Option
Cutaway Bus 6 Speaker Option Using Drivers Speakers
Cutaway Bus 8 Speaker Option with Door Speakers
Bus 8 Speaker Option
Bus 10 Speaker Option
Bus 12 Speaker Option
Bus 16 Speaker Option
Testing your PA 64
1. Connect your microphone to the “Mic 1” on the front of the PA
64 and / or “Mic 2” on the back.
2. Turn on the vehicle, then the PA 64 power switch (the power
light will come on), turn on the microphone and talk in to the
mic. Adjust the mic volume with the “Volume” control on the
front of the PA 64 to your desired volume.
3. Turn off the mic and turn on the stereo, adjust the radio volume
as normal to desired level.
4. Turn the “Audio Mute” control on the front of the PA 64 to half
way / 50%. (nothing will happen yet)
5. Turn back on the mic and the radio volume will mute to 50% of
what you just set. Turn the mic off and the radio will come back
up to full volume automatically.
6. You can adjust the amount of muting by turning the “Audio
Mute” control on the front of the PA 64. Full left = no muting,
full right = 100% muting.
7. When playing music from your MP3 player through the front
“AUX input”, the muting will function the same as listed above in
point #5.
Note: With the mic switch in the OFF position the front controls on
the PA 64 will not function. This is normal.
Note: When connecting your MP3 player into the front “AUX input”
the sound will blend together with the stereo. It’s recommended to
turn off the stereo when using the “AUX input” so they don’t compete.
Options - Making the PA 64 “the PA system for ALL applications”
Optional Front Decal Depending on your vehicle, it may be best to mount the
PA 64 either vertically or upside down. We have included an additional front
label that is reversed which allows the printing to show the correct way.
RMK (Remote Mount Kit) A small flush mounted plate with a 4 pin mic and
3.5mm AUX input socket and cables that connect to the front mic and AUX
sockets allowing you to hide your PA 64 for a custom look. Available in two
versions RMK (5ft.) & RMK-15 (15ft.)
RME (Rear Mic Extension) A small flush mounted plate with a 4 pin mic socket
and 15 ft. cable that connects to the back of the PA 64 and offers a second mic
input when you want to have a step on guide.
Hand Microphones
HM BT2 Digital wireless headset that offers over 30 ft. range and 12 hrs.
continuous operation between charges, but charges fully in 6 hrs.
PHM 6C Standard Push to Talk hand mic (PTT) with rubber curly cord
HM 2C Durable singers style hand mic with 12 ft. mic cable
Headset Microphones
HS BT2 Digital Wireless Headset that offers over 30 ft. range with 8 hrs.
continuous operation between charges, but charges fully in 4 hrs.
HS 30M Lightweight but durable condenser headset microphone with inline
On/Off switch with the wire and boom on LEFT side
HS 40M Same as HS 30M except with switch wire and boom on RIGHT side
Gooseneck Microphone
GN 17R 17” Condenser gooseneck mic with a dual function (latching and
momentary on) dash mounted rocker switch
GN 17F 17” Condenser gooseneck mic with a durable foot switch
PA 64 Spec Sheet
High Level Input 12VPP (peak to peak)
Low Level Input 450mV
AUX Input 400mV
Microphone Input 100mV
Current Drain (Max)
12V Constant Power (Yellow Wire) 10Amp
12V Switched Power (Red Wire) 250mA
Total Current Drain at Normal Volumes 2.5Amp
Power Output (Using 4 Ohm Speakers) 4 x 50 Watts (peak power)
4 x 22 Watts (continuous)
Case Measurements (Including Flange) H 1-5/8” x W 5-5/8” x D 4-1/8”
H 42mm x W 143mm x D 105mm
Front Panel Measurements (Without Flange) H 1-5/8” x W 4-5/8” x D 4-1/8”
H 42mm x W 118mm x D 105mm
For more information
find us at
www.ready2talkpa.com
or give us a call at
1 888 724-5351
Double E Products Ltd.
Box 16118 / 1199 Lynn Valley Rd
North Vancouver BC V7J 3S9 Canada
1 888 724-5351
www.ready2talkpa.com [email protected]

Other manuals for PA 64

6

Other Ready2Talk Amplifier manuals

Ready2Talk PA 64 User manual

Ready2Talk

Ready2Talk PA 64 User manual

Ready2Talk PA 5AV Manual

Ready2Talk

Ready2Talk PA 5AV Manual

Ready2Talk PA 64 User manual

Ready2Talk

Ready2Talk PA 64 User manual

Ready2Talk PA 64 User manual

Ready2Talk

Ready2Talk PA 64 User manual

Ready2Talk PA 64 User manual

Ready2Talk

Ready2Talk PA 64 User manual

Popular Amplifier manuals by other brands

Boss Audio Systems CE2800D user manual

Boss Audio Systems

Boss Audio Systems CE2800D user manual

Monacor 21.0680 manual

Monacor

Monacor 21.0680 manual

Adastra LA-Series user manual

Adastra

Adastra LA-Series user manual

Stagg 40 BA USA user guide

Stagg

Stagg 40 BA USA user guide

JBL 6233 Installation and service manual

JBL

JBL 6233 Installation and service manual

Bantam Stealth manual

Bantam

Bantam Stealth manual

Philips TDA8591J datasheet

Philips

Philips TDA8591J datasheet

Onkyo TX-DS838 Service manual

Onkyo

Onkyo TX-DS838 Service manual

Peavey TNT 150 Wedge user guide

Peavey

Peavey TNT 150 Wedge user guide

Akai AM-59 Service manual

Akai

Akai AM-59 Service manual

JL Audio StealthMod SMS-P-987C-BASE installation guide

JL Audio

JL Audio StealthMod SMS-P-987C-BASE installation guide

Gemini PVX-125 instruction manual

Gemini

Gemini PVX-125 instruction manual

B&K 5 Series II user manual

B&K

B&K 5 Series II user manual

Drawmer D-Clock-R DMS-6 owner's manual

Drawmer

Drawmer D-Clock-R DMS-6 owner's manual

BRUEL & KJAER 2712 instruction manual

BRUEL & KJAER

BRUEL & KJAER 2712 instruction manual

Stillwater Designs Kicker Impulse 356xi manual

Stillwater Designs

Stillwater Designs Kicker Impulse 356xi manual

Fostex AP3060 owner's manual

Fostex

Fostex AP3060 owner's manual

AUSTRALIAN MONITOR AMIS1202P operating manual

AUSTRALIAN MONITOR

AUSTRALIAN MONITOR AMIS1202P operating manual

manuals.online logo
manuals.online logoBrands
  • About & Mission
  • Contact us
  • Privacy Policy
  • Terms and Conditions

Copyright 2025 Manuals.Online. All Rights Reserved.