2-SHELF BASE ASSEMBLY INSTRUCTIONS
STEP ONE:
Place item #3 base support on your work surface (label facing
up). Place a locking cam in each hole marked "Z"—see parts
diagram on page 1.
STEP TWO:
Place item #4 shelf on your work surface (label facing up). Install
item #2 studs into the two holes marked "X"—see diagram. The
studs must be screwed in approximately 1/2" until the black
shoulder meets the shelf. Next, install item #1 locking cams into
the four holes marked "Z". Be sure to check the direction of the
arrows on each locking cam—see diagram on page 1.
STEP THREE:
Attach item #3 base support (finished edge facing out) to
item #4 shelf and proceed to tighten the locking cams, turning
a full 180 degrees with the assembly tool or screwdriver.
STEP FOUR:
Place item #5 side panel on your work surface with the label
facing up. Install item #1 locking cams into
the two holes marked "Z". Turn the panel over, and install item #2 studs into the six holes marked "X".
Place this panel aside.
STEP FIVE:
Place item #6 shelf on your work surface with the label facing up. Install item #1 locking cams into the four holes
marked "Z". Remove item #6 shelf and place item #5 with label down on your work surface. Attach item #6 shelf
(locking cams facing down) to the two center studs of item #5 panel. Attach item #4 (base assembly) to item #5
panel and tighten the locking cams. Be sure to check the direction of the arrows on each locking cam—see
diagram on page 1.
STEP SIX:
Place item #7 lower right panel on your work surface with the label facing up.
Install item #1 locking cams into the four holes marked "Z". Turn the panel over
and insert item #2 studs into the four holes marked "X". Attach item #7 panel
into items #5 and #6 (previously assembled in step five). Tighten the locking
cams. Be sure to check the direction of the arrows on each locking cam—see
diagram on page 1.
STEP SEVEN:
Place an item #8 shelf on your work surface with the label facing up. Install item #2
studs into the four holes marked "X". Place item #8 shelf onto the top of the
completed unit. Tighten the locking cams. Be sure to check the direction of the
arrows on each locking cam—see diagram on page 1. Place item #2 studs into the
four "Y" holes in item #8.
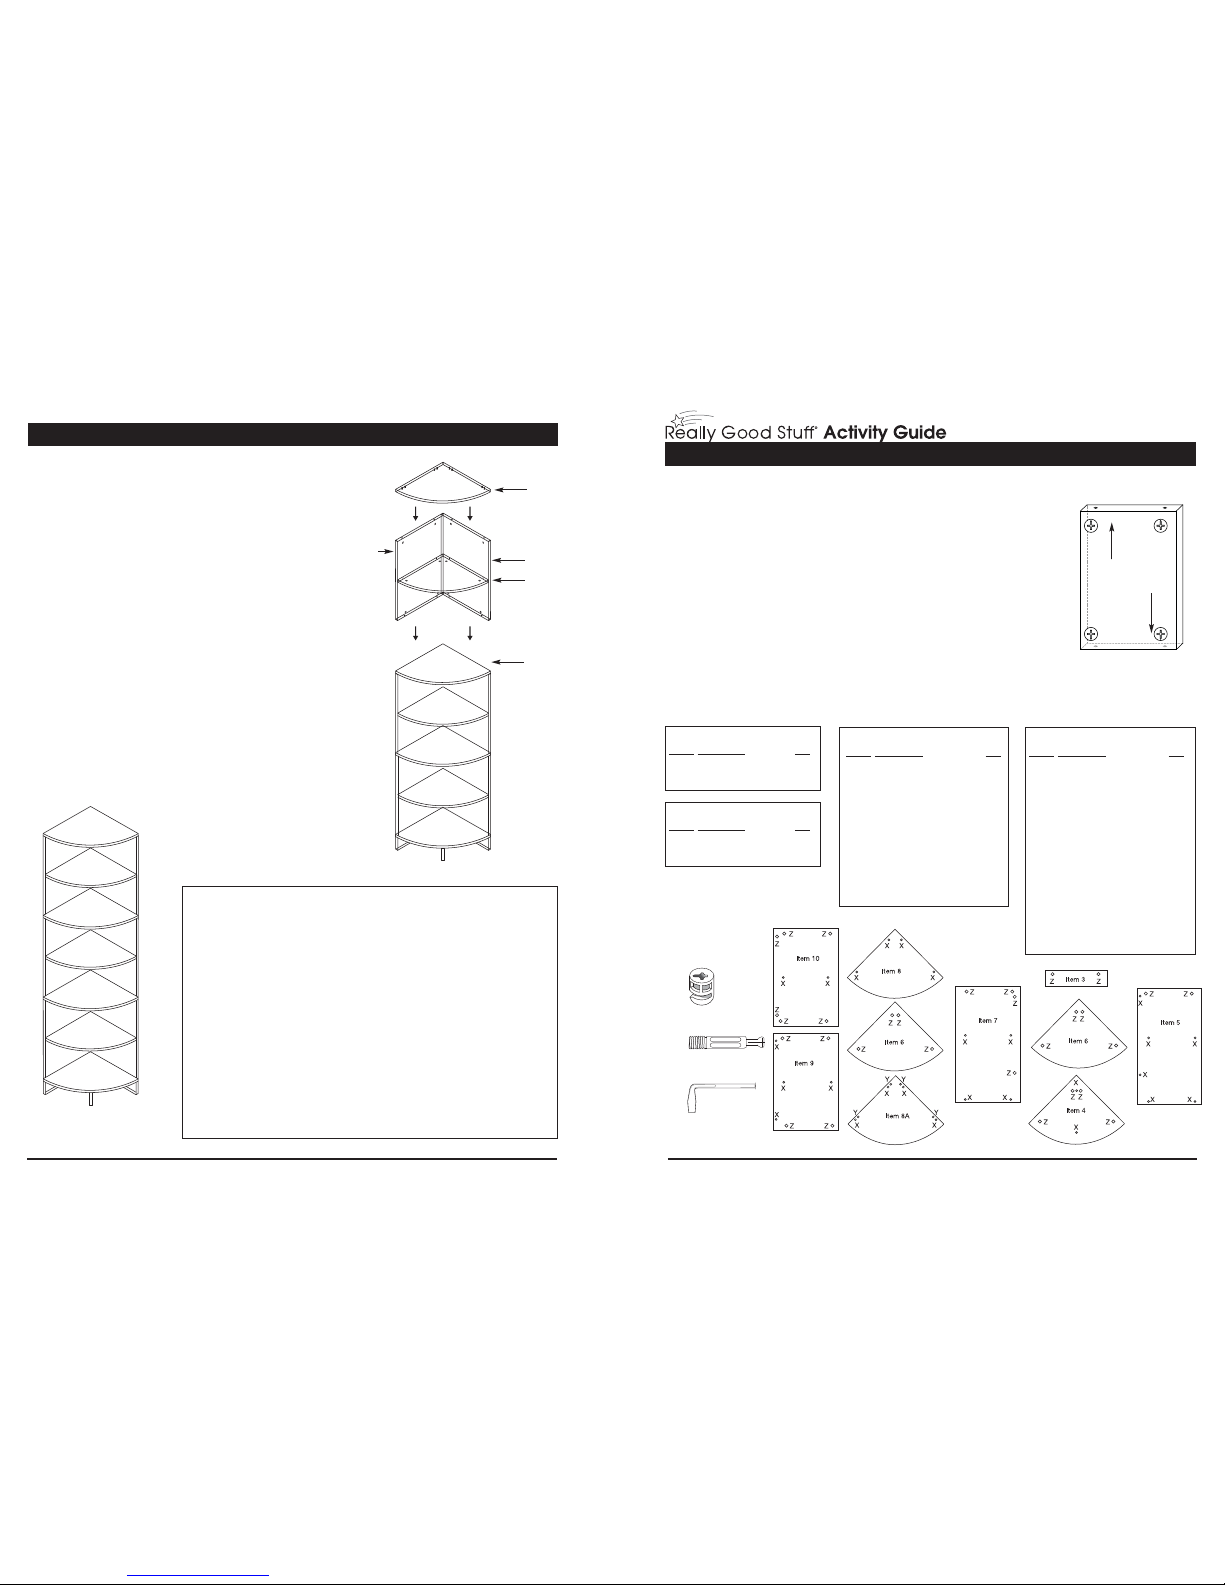
STORE MORE BINDER NOOK™INSTRUCTIONS - 2, 4 and 6-Shelf Units
Item 8
Item 7
Item 6
Item 4
Item 3
Item 5
4-SHELF ASSEMBLY INSTRUCTIONS
Your 4-Shelf Unit is made up of a Store More Binder Nook™
2-Shelf Base Unit and a 2-Shelf Add-On Unit. Assemble the
2-Shelf Base according to it’s instructions through Step
Seven, substituting Item #8A for #8 in Step Seven. Set
aside #8, then follow these instructions:
STEP EIGHT:
Place item #9 left upper panel on your work surface with
the item number label facing up. Install item #1 locking cams
in the four holes marked "Z". Turn the panel over and install
item #2 studs into the four holes marked "X". Place this
panel aside.
STEP NINE:
Place item #6 shelf on your work surface with the label facing
up. Install item #1 locking cams into the four holes marked "Z".
Place item #9 back on the work surface with label side down.
Attach item #6 shelf (locking cams facing down) to the studs
of item #9 left upper panel. Tighten the two locking cams. Be
sure to check the direction of the arrows on each locking
cam—see diagram on page 1.
STEP TEN:
Place item #10 panel on your work surface with the item
number label facing up. Install item #1 locking cams into the six holes marked "Z". Turn the panel over
and insert item #2 studs into the two holes marked "X". Attach item #10 panel to items #9 and #6
(previously assembled in step nine). Tighten the locking cams. Be sure to check the direction of the
arrows on each locking cam—see diagram on page 1.
STEP ELEVEN:
Place item #8A shelf on your work surface with the label facing up.
Install item #2 studs into the four holes marked "X". Place item #8
shelf onto the top of the completed unit. Tighten the four locking cams.
Be sure to check the direction of the arrows on each locking cam—see
diagram on page 1.
STEP TWELVE:
Place the upper section onto the lower section and tighten the four
locking cams. Be sure to check the direction of the arrows on each locking
cam—see diagram on page 1.
STORE MORE BINDER NOOK™INSTRUCTIONS - 2, 4 and 6-Shelf Units
Item 8
Item 10
Item 6
Item 9
Completed
4-Shelf Unit
Completed
2-Shelf Base Unit
Completed
2-Shelf Base Unit
Item 8A
Helping Teachers Make A Difference®© 2007 Really Good Stuff®1-800-366-1920 www.reallygoodstuff.com Made in Guangzhou, China Helping Teachers Make A Difference®© 2007 Really Good Stuff®1-800-366-1920 www.reallygoodstuff.com Made in Guangzhou, China 3
2