REARO MAGNETIK User manual

Magnetic wall panel maintenance & installation guide

MAGNETIC WALL PANELS FITTING
INSTRUCTIONS
Please read the following information carefully before
you begin installing your Magnetik wall panels.
GETTING STARTED
Safety equipment required:
• Safety goggles
• Gloves
• Ear protection
• Hard hat
Tools & materials required:
• Pencil
• Spirit level
• Measuring tape
• Jig saw / hand saw / circular saw
• Folding saw horses
• Pair of clamps
• Grab adhesive
• Colour matched sealant
• Slip feathers
• Magnetic wall panels
• Silicone sealant
• Timber
• Screws
• Rawl plugs
• Cloths & solvent
Optional extras
• Extrusions
• Button x (for removable)
• Button x markers
• Dry wipe markers
• Dry wipe cleaning solution
• Microbre cloth for cleaning
PANEL PREPARATION
• Panels should be stored at and left for a minimum
of 48 hours in the environment they are to be installed
in. This is to ensure the panels climatise to their
environment, preventing any unwanted movement
once installed.
• Each panel should be checked to make sure the
protective lm has not been broken and that panels
are not damaged. Any damages to the decorative
face must be reported immediately. Rearo cannot be
held responsible for panels not being checked prior to
installation.
• Check through the lists to the left to make sure you
have everything you need to install the wall panels.
WALL PREPARATION
• Rearo MagnetiK wall panels can be installed onto
plasterboard, timber frame, metal frame and tiles.
• It is essential that walls are completely dry before
installing the panels and any source of dampness is
treated.
• There is no need to make good the surface to be
covered.
• Wherever possible, remove existing wall coverings
such as wall paper and fabrics.
• If installing on top of tiles, make sure the tiles are
scored with a sharp knife and sanded to allow for an
abrasive surface for the adhesive to effectively bond
to.
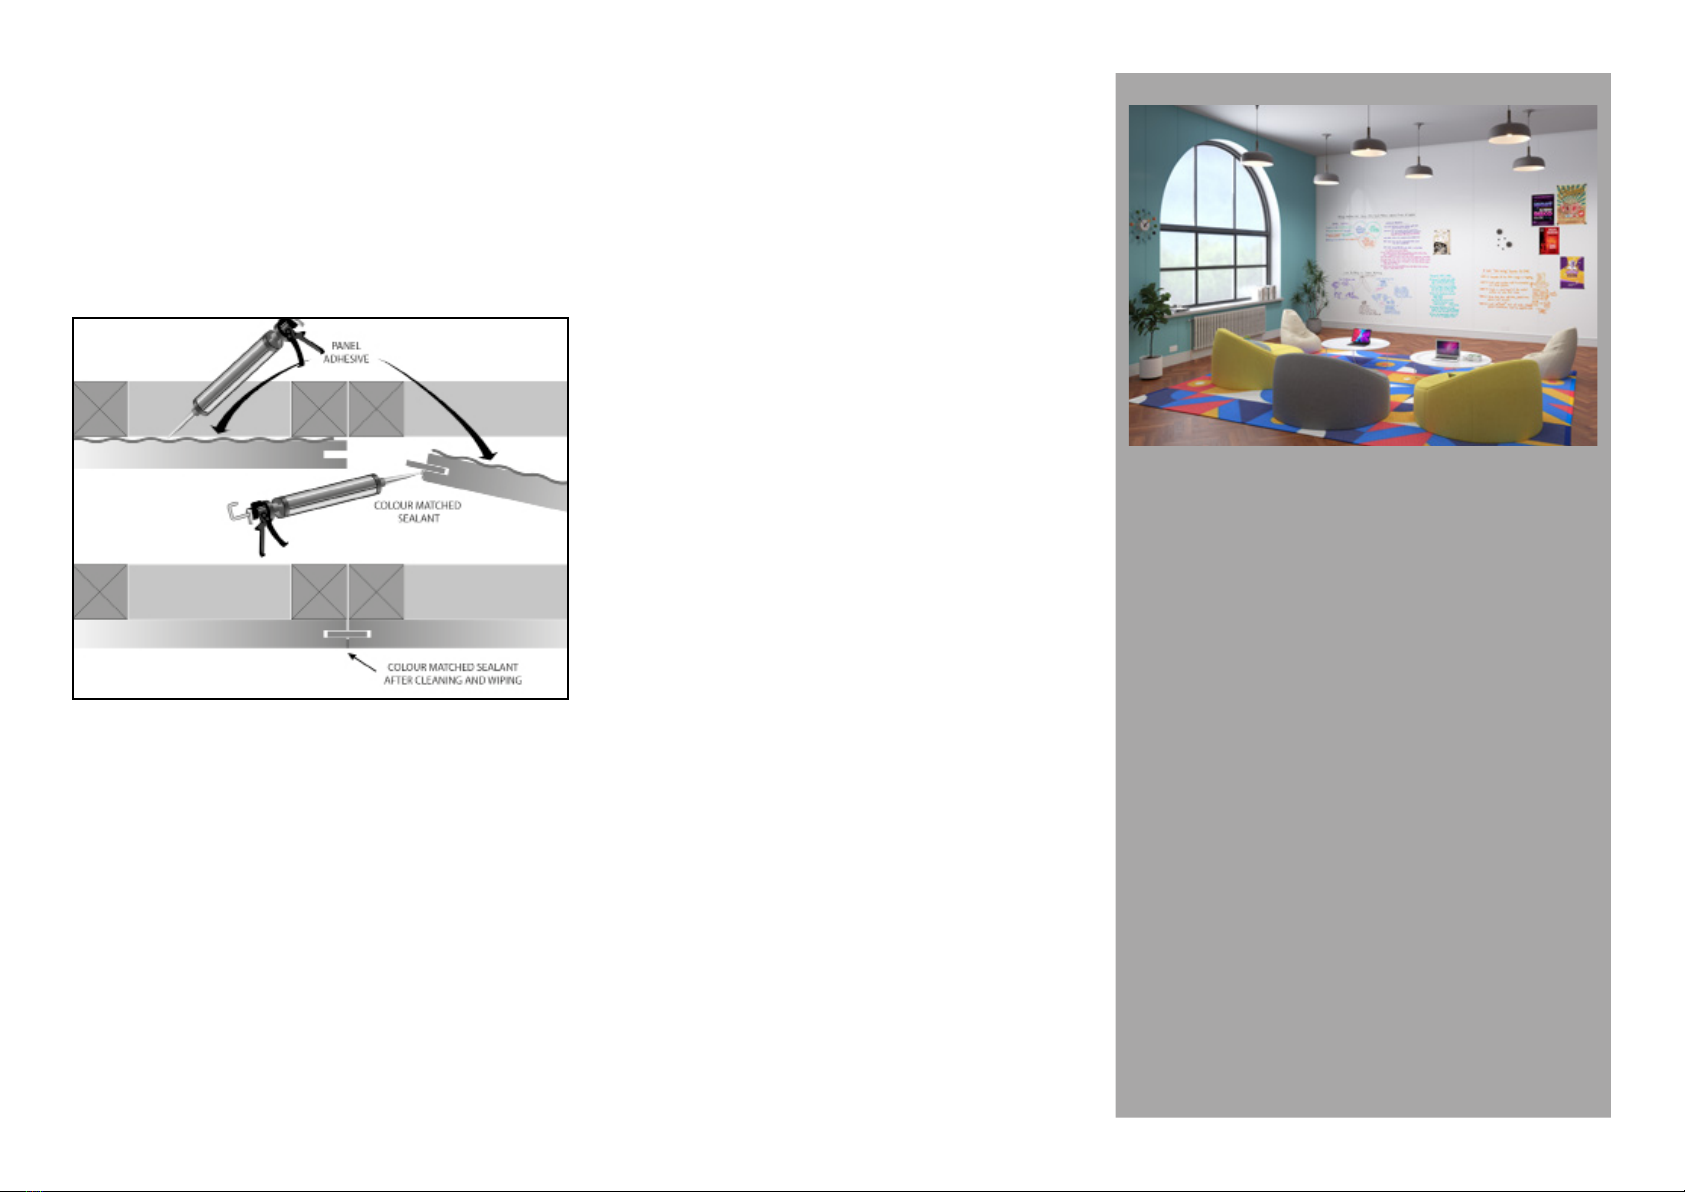
• If installing onto a timber frame, you can use panel
adhesive as well as button x clips to ensure panels
are secured properly in place.
• We do not recommend xing panels to masonry or
cement surfaces.
CALCULATING PANEL QUANTITIES
• Panels should not be exposed to moisture or water,
direct sunlight, hot air currents or direct exposure to
heat exceeding 70ºC.
To estimate the total number of panels required:
• Measure the total linear metrage of the walls.
• Divide this by 1.2m (width of the panel).
• Round up to the nearest whole number for total panel
quantity.
This method utilises all panel offcuts, so take care when
cutting panels as the offcut will be next to be installed.
CUTTING & FITTING
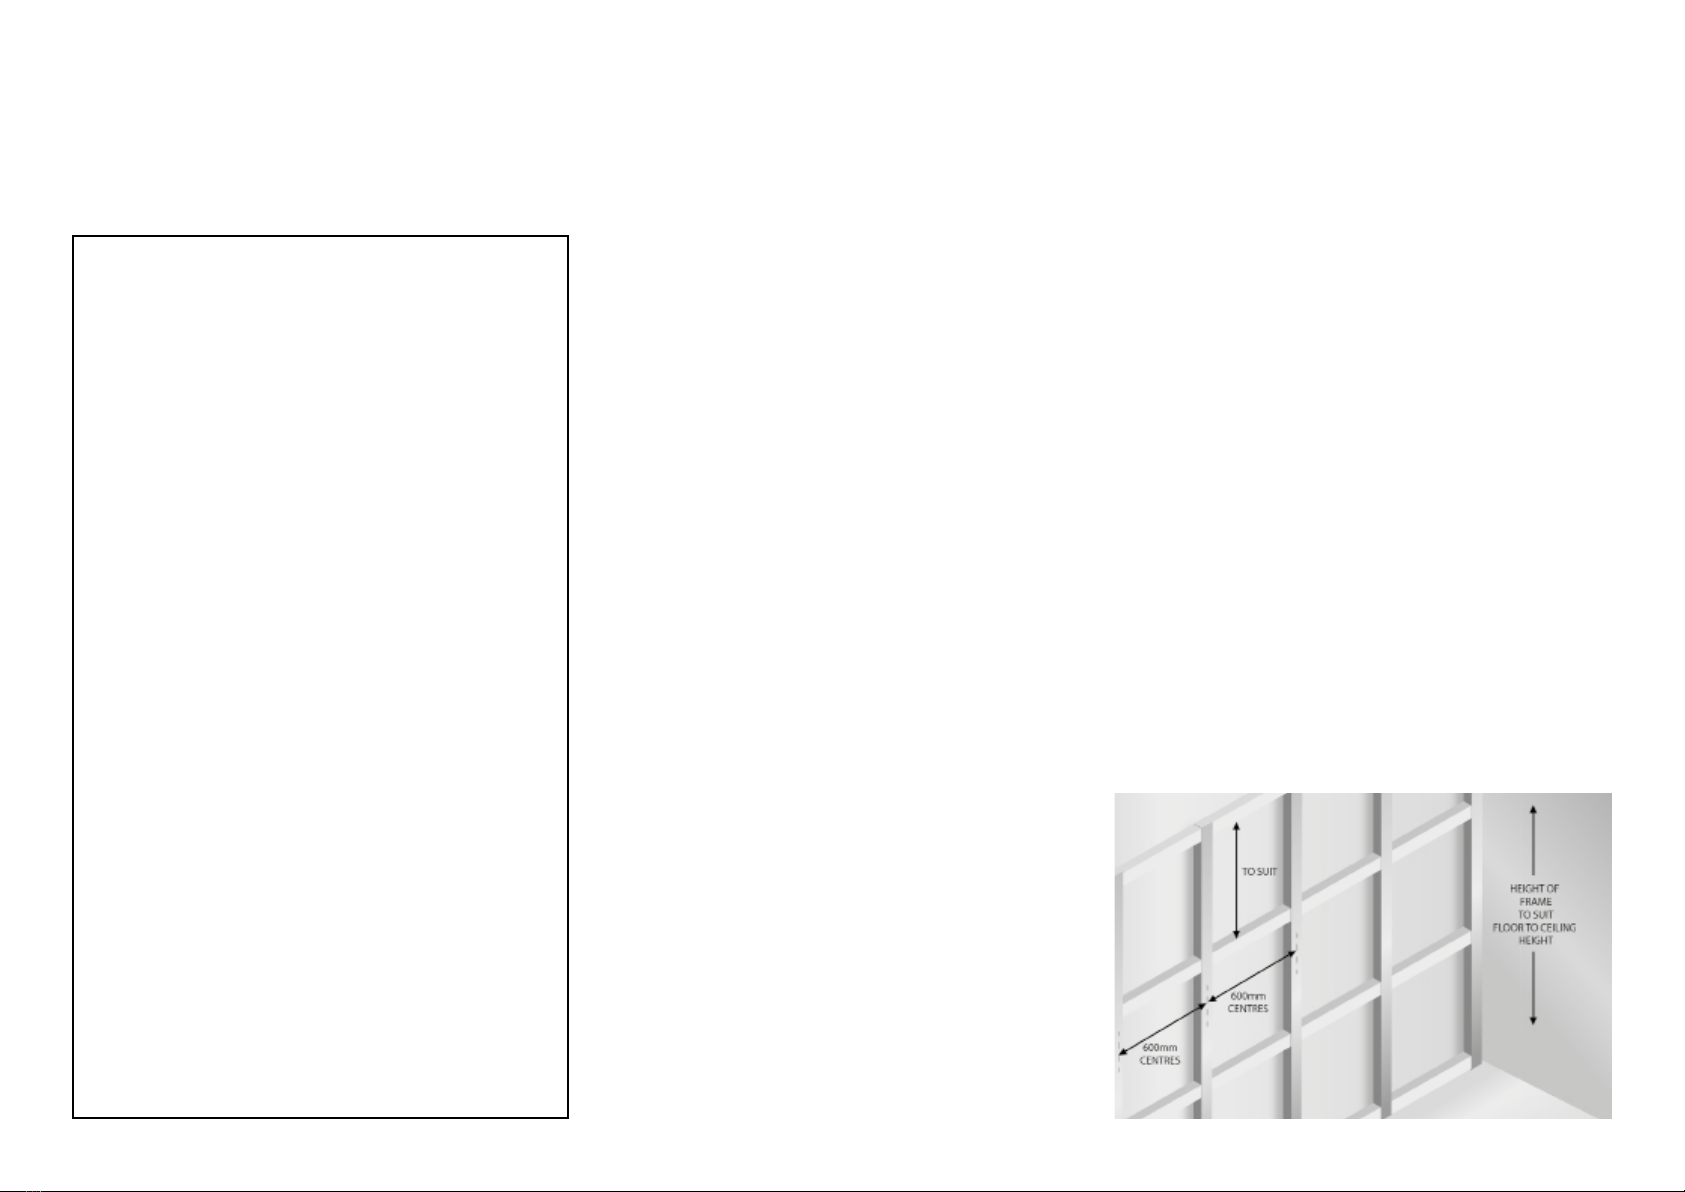
Fitting to a Timber Frame
• The timber frame should be installed with vertical
timbers at 600mm centres to provide xing points for
clips and adhesives, as well as horizontal timbers at
600mm - 900mm centres, packed out to a true, at
and plumb surface. (see g.1)
Fig. 1

• Always ensure timbers are installed at the top and
bottom of the panels. Additional timbers must be
used where heavy items such as cabinetry are to be
xed, to ensure adequate support is provided. Using
the panel alone may not be sufcient enough.
• Fixing using panel adhesive is recommended,
and ensures panels will be xed in place and non-
removeable.
• Fixing using button x clips allows panels to be
removeable.
Cutting Panels
• When cutting panels, careful thought must be given
to the type of saw that will be used, as well as the
panel orientation, to prevent the decorative face from
chipping.
• When using a jig saw / circular saw with an upward
cutting blade, panels should be cut from the back,
with the decorative face pointing towards the oor.
See g. 2
For best results:
• The protective lm should be removed from the
cutting line only and where possible apply masking
tape along the line of cut.
• The recommended method for cutting is by clamping
a straight edge to the panel and using a circular/ track
saw. See g. 2
CUTTING APERTURES
• Although wall panels have a highly durable nish,
care should be taken when cutting apertures or
inspection hatches. Internal corners of apertures and
cut outs MUST always be smoothly radiused to as
large as possible, with a 5mm minimum radius. This
radius should be increased as the side lengths of the
aperture are increased.
• Place the panel face up. Using masking tape, a pencil
and measuring tape, mark out the cut out area.
• When measuring distance from walls, allowances
should be made for the thickness of aluminium
proles and the space between walls and proles.
• Ensure your tting overlaps the aperture cut out.
• Ensure wooden blocks are placed below your drilling
areas to prevent ‘burst out’. See g. 3
•
•
•
•
•
•
•
•
•
• Drill holes at each of the four corners, large enough to
t your jig saw blade.
• Using a jig saw with a downward cutting blade, slowly
cut around perimeter of the shape, taking care to cut
through each of the drill holes. See g. 4
INSTALLING PANELS
• Measure the height from the oor to the ceiling at
300mm intervals and mark these accordingly on the
panel.
• Draw cutting line and cut to suit.
• Panels should always be dry tted, to ensure the size
and t is as required.
• Once you are happy with the panel size, x the rst
panel in place, using whichever method suits your
install (panel adhesive or button x clips).
If installing using button x clips, please scan the QR code
below.
Fig. 2
Fig. 3
Fig. 4

FURTHER GUIDANCE
Should you have any further queries relating
to the installation of Rearo magnetik
wall panels, please get in touch with our
commercial business support team.
E: commercial@rearo.co.uk
T: 0141 440 0800
Available during the following hours:
8:00am - 4:30pm (Monday to Thursday)
8:00am - 3:30pm (Friday)
Closed (Saturday & Sunday)
The same process is required for the remaining panels:
• Measure the oor to ceiling size again at 300mm
centres from the end of the rst panel installed and
mark up accordingly on the second panel.
• Cut to size and dry t this panel in place, prior to nal
install, ensuring the slip feather has been tted in the
groove to provide a tight join. See g. 5
• When tting this second panel in situ, apply a bead
of colour matched sealant along the length of the
grooved edge, so when the panels are joined tightly
together, the excess sealant will squeeze out.
• Wipe off this excess sealant and wipe panel clean
with a damp cloth - this sealant will set within 15
minutes, so if excess sealant is left on longer than
this, a solvent will be required to remove it.
Fig. 5

Rearo Magnetic boards are suitable for marking with whiteboard markers (not permanent markers). Should you have accidentally used a permanent marker, Rearo
can provide you with a permanent marker removal cleaner – this will not completely remove the marker ink, however it will help reduce its visibility.
We recommend trying new pens on a small corner or offcut of the panel, and cleaning off to ensure these will not permanently stain. Rearo can also provide a
whiteboard cleaner which should be used regularly to maintain the panels in a good, clean condition.
How to clean Magnetic panels
Use Rearo’s peelable board eraser, which can be ordered from [email protected]
We recommend using our own Magnetic Board cleaner. Alternatively, we suggest cleaning periodically using a soft cloth, mild dishwashing detergent and warm water.
To avoid leaving marks, always remove the detergent, rinse and dry well. If using a detergent or a solvent you are unfamiliar with, we advise rst testing it on a small, less
visible portion of the surface.
Do not use detergents that contain strong acids or bases, such as descalers with formic acid and aminosulphonic acid, drain cleaner, hydrochloric acid, products used for
cleaning silver, oven cleaner or bleaches.
Do not use abrasive pads or scouring powders and cleansers, as they may permanently dull or scratch the laminate surface, making it susceptible to staining. Harsh
chemicals such as oven cleaner, toilet cleaner, drain cleaner, and acid and alkali chemicals will etch and discolour the decorative surface.
Rags, sponges, paper towels and all cleaning utensils must always be clean and non-abrasive.
When using organic solvents, wear protective gloves, air out the environment and comply with ordinary practices for safety and hygiene (request the safety data sheet for the
solvent from the supplier).
Do not polish or wax the panels.
Rearo offer the following recommended accessories:
• Whiteboard pens
• Peelable board eraser
• Whiteboard cleaner
• Microbre cloths for cleaning
• Permanent marker pen removal cleaner
There is no guarantee that Rearo Magnetic panels can be cleaned to be completely free of residue or markings – this is because the use and quality of
marker pen is beyond our control. Please check the recommendations by the manufacturer of the marker pen before use.
Additional copies of this document can be found online at www.rearocommercial.co.uk
Please tear here and apply to panel post installation
Magnetic Wall Panels aftercare sheet
PLEASE ADHERE TO THE FOLLOWING GUIDES TO ENSURE OUR PRODUCT GUARANTEE
Remove this page and use magnets provided to inform end users how to clean and maintain Magnetic wall panels. Failure to do so will void warranty of these panels.

29 Loanbank Quadrant, Govan, Glasgow, G51 3HZ
E: [email protected] T: 0141 440 0800
www.rearocommercial.co.uk
Table of contents
Popular Indoor Furnishing manuals by other brands

Croydex
Croydex PA155941 Instruction leaflet

Mocka
Mocka Hudson Assembly instructions

Thermo Scientific
Thermo Scientific FISHER HAMILTON MAX/WALL installation manual

Mercado Medic
Mercado Medic REAL 2000 Series Instructions for use and maintenance

Hülsta
Hülsta hs.480 Important product information

Coaster
Coaster 202311Q Assembly instructions