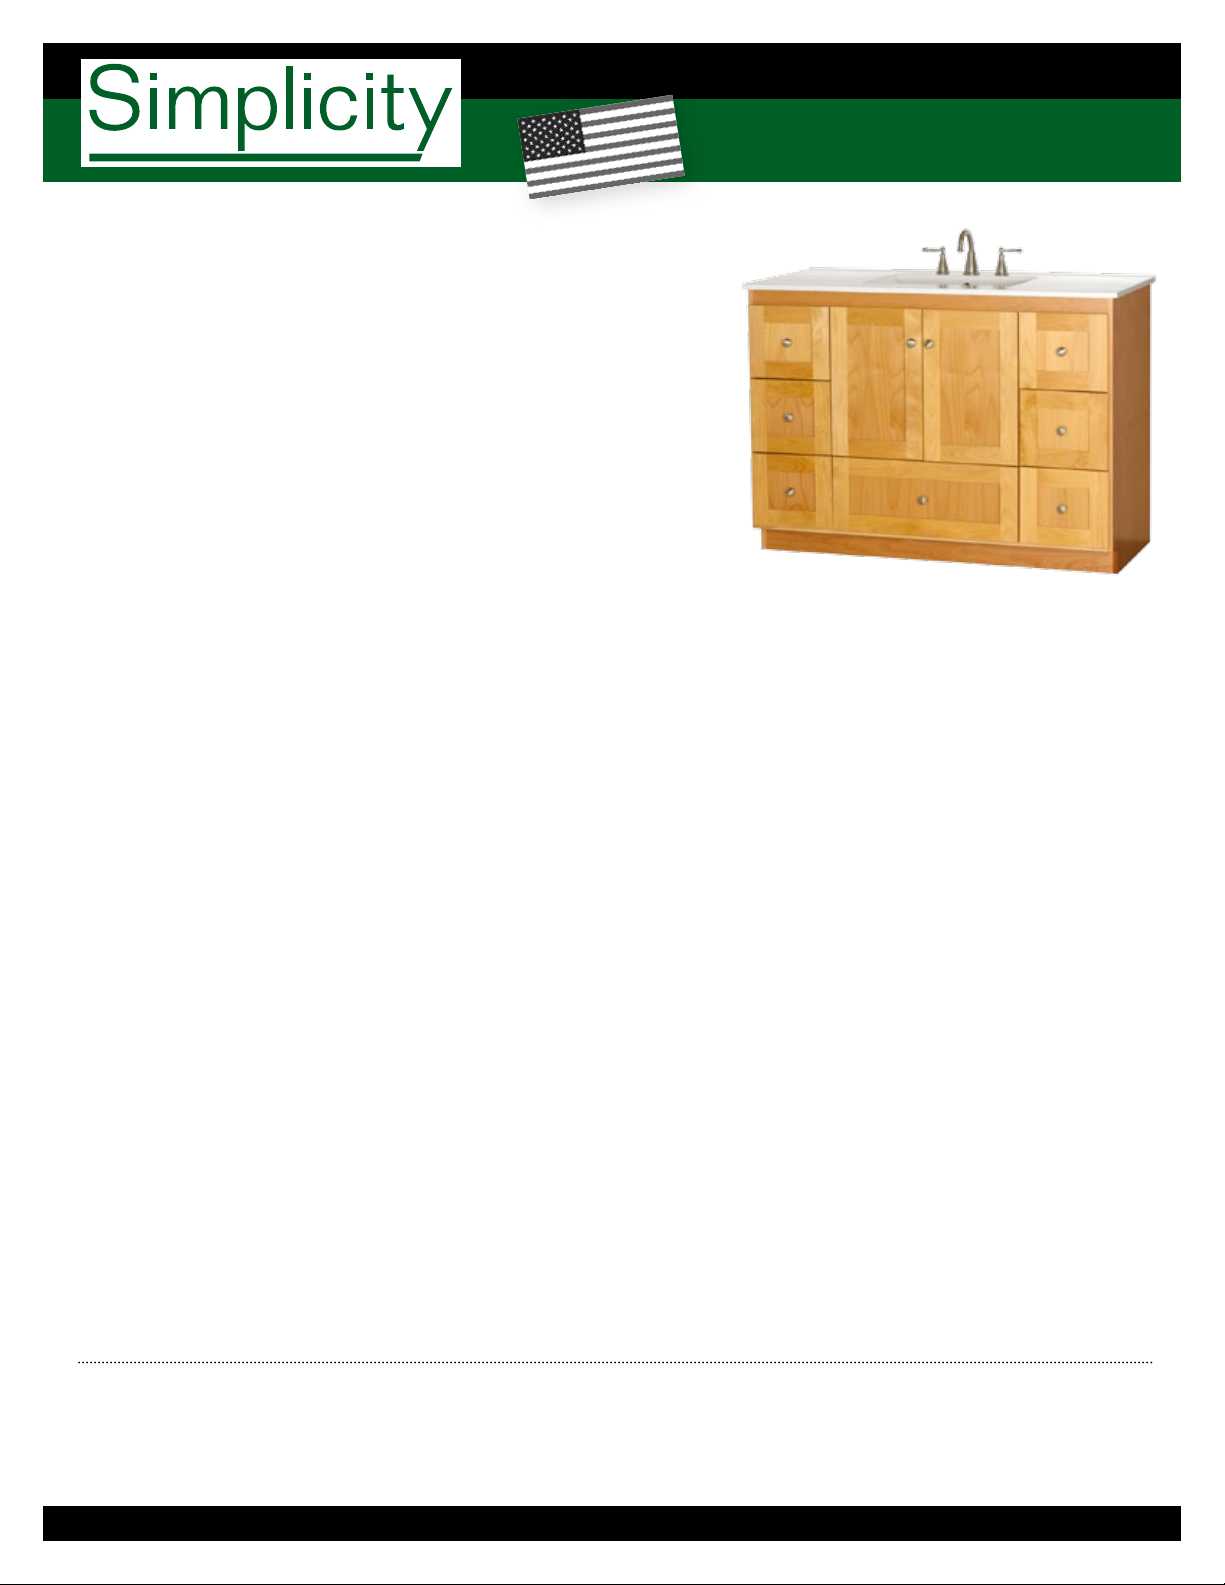
STRASSER WOODENWORKS Simplicity Manual

www.simplicitybystrasser.com (800) 445-0494 Crafted for You in the USA
C
rafted for you in the
U
SA
Information:
Simplicity Installation and Setup
Installing Vanities ............................... 1
Installing Medicine Cabinets ................ 2
Installing Overjohns & Cubbies ............ 4
Installing Wall Mirrors ........................ 5
Removing and Installing Doors ............ 6
Adjusting Door Face Alignment ............ 7
Removing and Re-installing Drawers ..... 8
Adjusting Drawer Faces ...................... 8
Installing Vanities with China Tops ........ 9
Trimming with Filler & Scribe Molding ... 10
Thank you for purchasing Simplicity by STRASSER WOODENWORKS Products for your bath.
If you have questions, don't hesitate to call our Customer Service
Toll Free 1-800-445-0494, 7am-4pm Pacific Coast Time.
Crafted for you in the USA
Simplicity Installation and Setup
by STRASSER WOODENWORKS

www.simplicitybystrasser.com (800) 445-0494 Crafted for You in the USA
- 1 -
C
rafted for you in the
U
SA
Information:
Simplicity Installation and Setup
CAUTION! Remove Doors and Drawers
Always remove drawers and doors from your cabinets
during installation (see pages 6 and 8) and store them
away from the work area. This will make your cabinets
lighter, easier to move and position, and safer to handle.
Drawers and doors open unexpectedly and unbalance
the cabinet while you are moving it, causing personal
injury or damage to your cabinet. Plus, drawer and door
faces will be protected from damage during installation if
stored away from your project.
Damage caused during installation is not covered by
warranty.
Re-install Doors and Drawers
Once your cabinets are in their final positions and secured, re-install and adjust doors and drawers according to directions
on pages 6 - 8.
Installing Vanities
The key to a good installation of a vanity ensemble is to understand that walls and floors are never exactly level, plumb,
or square.
Securing a vanity or ensemble to your walls is important. However, forcing a square cabinet to fit against not-so-square
walls will distort the cabinet frame and cause drawer and door hardware to mis-align and bind. While our hardware is
fully adjustable to compensate for this visually, the drawers may not open and close smoothly. Never close gaps by overly
tightening the securing screws. Always use shims between the cabinet and wall and floor where gaps exist before tightening
securing screws.
Place your cabinet into approximate position.
If you are installing an ensemble of more than one piece, clamp components together making
sure that they are accurately mated and the top edges are exactly aligned. Drill pilot holes and
screw components together. We recommend four screws per pairing.
Place the vanity or ensemble into it’s exact final position and level. Use shimming underneath
where necessary.
We recommend screwing to wall studs in at least two positions along the back and one in the side, if the side is against a
wall. Shim where necessary at securing points between wall and cabinet if the wall is not exactly straight or plumb.
Installing Vanities
by STRASSER WOODENWORKS

www.simplicitybystrasser.com (800) 445-0494 Crafted for You in the USA
- 2 -
C
rafted for you in the
U
SA
Information:
Simplicity Installation and Setup
Installing Medicine Cabinets
Installing Simplicity Medicine Cabinets
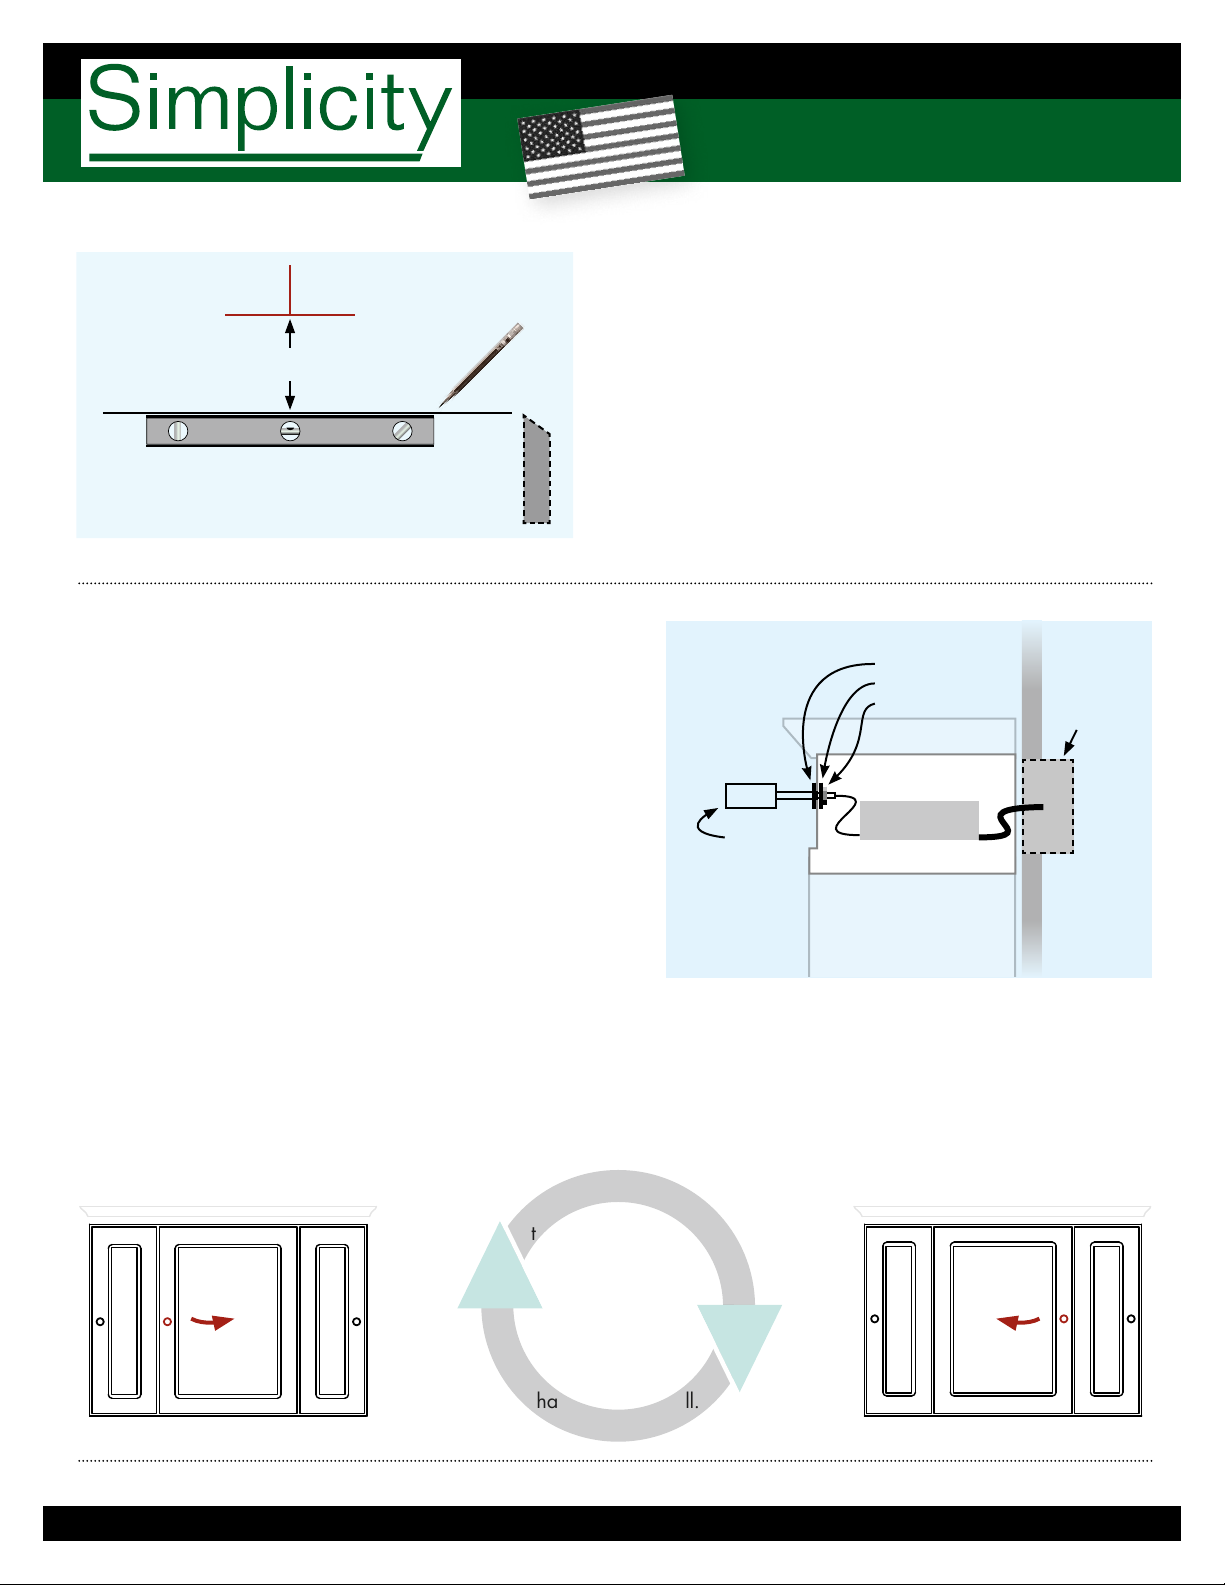
1. Determine the desired location of the Medicine Cabinet
Box (before Lightbox or Crown is installed) and mark the
wall at top center of the Cabinet Box. See Figure 1.
2. Measure “X” on your Medicine Cabinet. See Figure 2.
On wall, mark where top
center of the Medicine Cabi-
net Box will be.
Figure 1.
CAUTION! Remove Doors
Always remove the doors from your medicine cabinet during
installation (see page 6) and store them away from the work area. This
will make your cabinet lighter, easier to move and position, and safer to
handle. Doors open unexpectedly and unbalance the cabinet while you
are moving it, causing personal injury or damage to your cabinet. Plus,
door faces will be protected from damage during installation If stored
away from your project.
Damage caused during installation is not covered by warranty.
X"
Wall
Wall
Mounting
Bar
Cabinet
Mounting
Bar
Medicine
Cabinet
Box
Lightbox
Crown
without
lighting
Crown
LED
Lightbar
Figure 2.
by STRASSER WOODENWORKS
www.simplicitybystrasser.com (800) 445-0494 Crafted for You in the USA
- 3 -
C
rafted for you in the
U
SA
Information:
Simplicity Installation and Setup
To change
the door swing from
left-opening to
right-opening
or vice versa,
simple rotate the
cabinet body
180 degrees and
hang on your wall.
Changing Door Swing
3. Measure down X" and make a level horizontal line.
The top edge of the Wall Mounting Bar will be at
this line. See Figure 3.
4. Appropriately and securely attach the Wall Mounting
Bar to the wall. If you are not familiar with types
of screws, load, or how to do this for your specific
application; ask a professional. Do not bend the
Wall Mounting Bar even if wall is not flat. Shim
where necessary.
5. Place Medicine Cabinet against the wall and slide
down until the Medicine Cabinet Mounting Bar
mates with the Wall Mounting Bar.
X"
Figure 3.
Wall Mounting Bar
Electrical
You are either installing your Medicine Cabinet with Lights or
without. If without, simply secure the Crown to the cabinet top.
1. If your Medicine Cabinet has LED lighting, have your
electrician install a junction box with a switched power
source such that it will be somewhere behind the Lightbox
once your Medicine Cabinet is installed.
2. Attach the LED Lightbar to the Lightbox with supplied trim
pieces, backing plates & nuts. See figure 3. Have your
electrician connect the supplied pigtail connector to the
switched power wires in the pre-installed electrical junction
box. Plug the pigtail connector into the LED driver, then the
small LED supply lead from the lights into the driver.
3. Finally, secure the Crown Molding to the top of the cabinet.
Figure 3.
Wall
Lightbox
LED
Lightbar
Electric
Junction
Box
Trim
Backer
Nut
Re-install Doors and Drawers
Once your cabinets are in their final positions and secured, re-install and adjust doors and drawers according to directions
on pages 6 - 8.
by STRASSER WOODENWORKS

www.simplicitybystrasser.com (800) 445-0494 Crafted for You in the USA
- 4 -
C
rafted for you in the
U
SA
Information:
Simplicity Installation and Setup
Installing Overjohns & Cubbies
X"
Wall
Wall
Mounting
Bar
Cabinet
Mounting
Bar
Cabinet
Box
Optional Crown
Figure 2.
On wall, mark where top
center of the Cabinet Box
will be.
Figure 1.
Installing Simplicity Overjohn or Cubby
1. Determine the desired location of the Cabinet Box before Crown is installed)
and mark the wall at top center of the Cabinet Box. See Figure 1.
2. Measure “X” on your Cabinet. See Figure 2.
3. Measure down X" and make a level horizontal line. The top edge of the Wall
Mounting Bar will be at this line. See Figure 3.
4. Appropriately and securely attach the Wall Mounting Bar to the wall. If you
are not familiar with types of screws, load, or how to do this for your specific
application; ask a professional. Do not bend the Wall Mounting Bar even if
wall is not flat. Shim where necessary.
5. Place Cabinet against the wall and slide down until the Cabinet Mounting Bar
mates with the Wall Mounting Bar.
6 Finally, secure the Optional Crown, if you chose to use one, to the cabinet top.
X"
Figure 3.
Wall Mounting Bar
Changing door swing on Cubbies see next page.
by STRASSER WOODENWORKS
www.simplicitybystrasser.com (800) 445-0494 Crafted for You in the USA
- 5 -
C
rafted for you in the
U
SA
Information:
Simplicity Installation and Setup
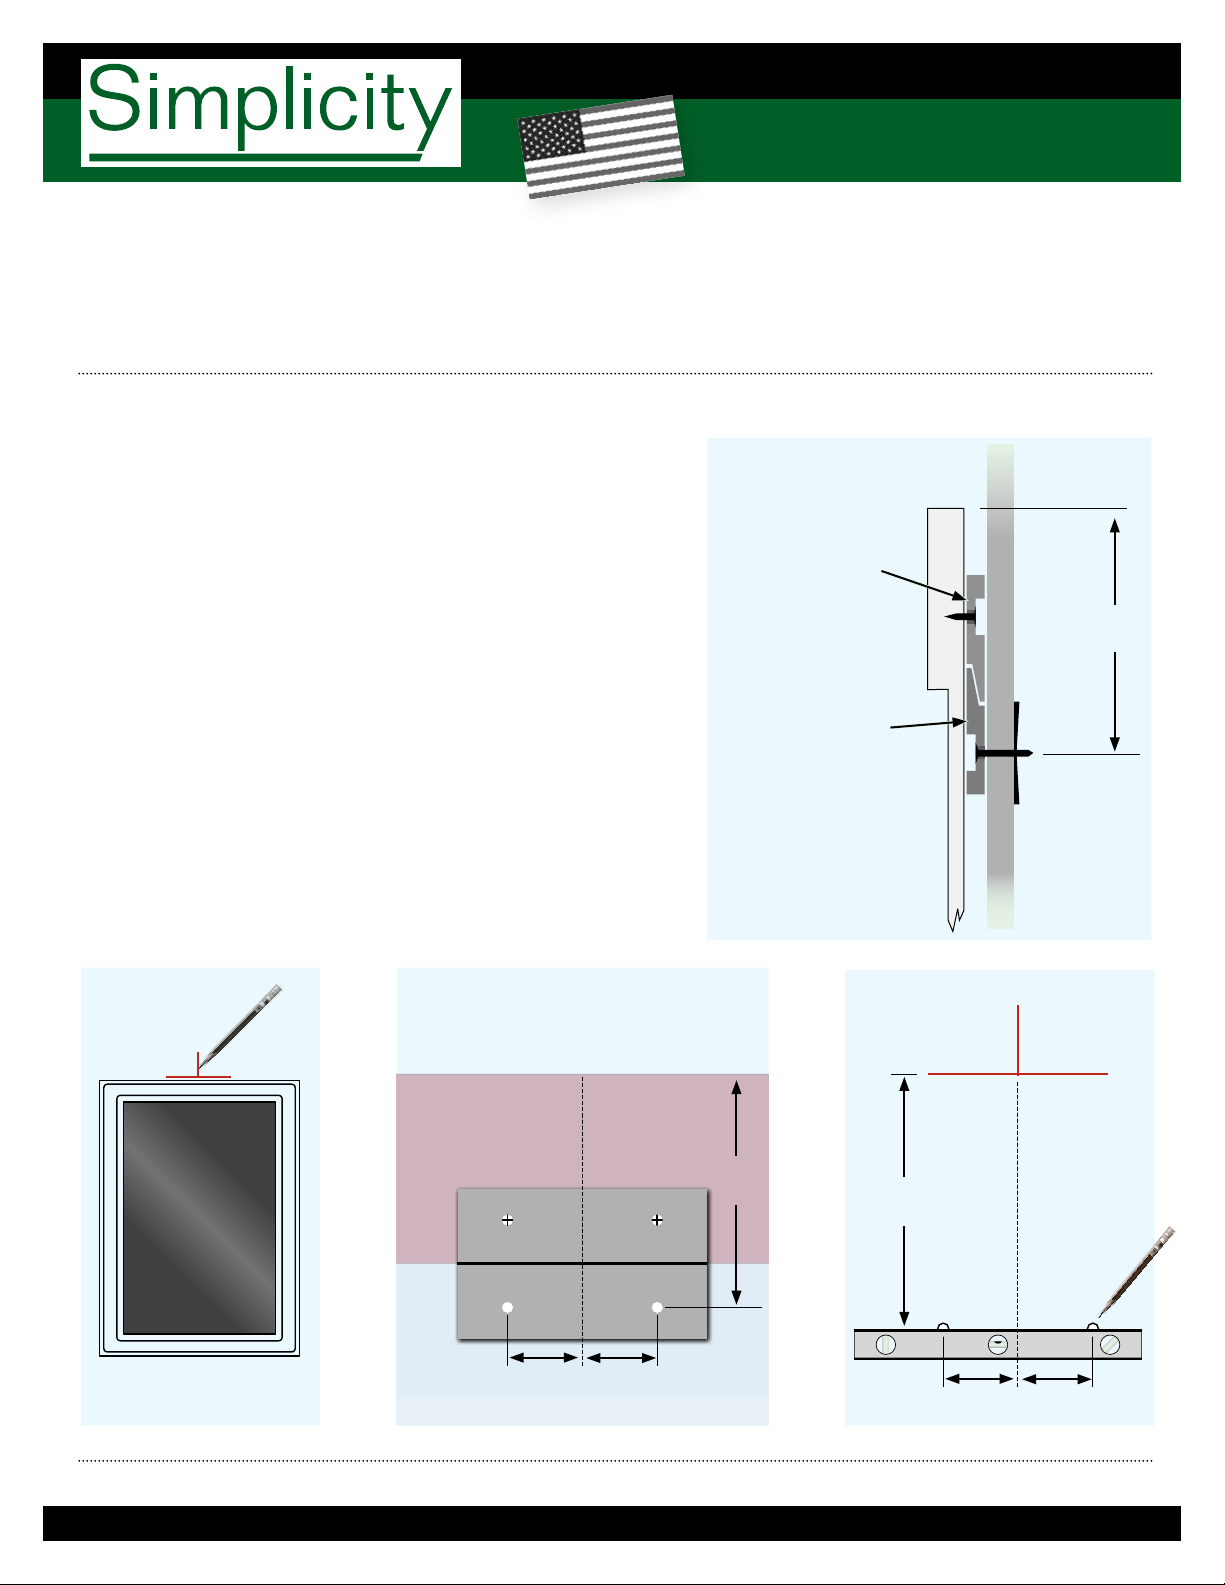
Installing Mirrors with Included Cleat
Our Mirror mounting system is easy to use, convenient, and very
strong.
1. Determine the desired location of the Mirror and mark the wall,
with a pencil, at top center of the mirror. See Figure 2.
2. Measure “X” on your mirror. See Figures 1 & 3.
3. Measure down “X” on your wall from the mark designating
mirror top center. Using a level, mark the positions of the
cleat mounting holes as shown in Figure 3.
4. Appropriately and securely attach Cleat half B to the wall. If
you are not familiar with types of screws, load, or how to do
this for your specific application; ask a professional. Do not
bend the Wall Mounting Bar even if wall is not flat. Shim where
necessary.
1½" 1½"
X"
Figure 4.
1½" 1½"
X"
Back of Mirror
Frame
Figure 3.
Cleat half (A)
Cleat half (B)
Back of
Mirror
Figure 2.
Installing Mirrors
Cleat half (A)
attached to
mirror frame
Wall
Mirror
Cleat half
(B) screws
to wall
X"
Figure 1.
Changing door swing on Cubbies
To change the door swing from left-opening to right-opening or vice versa, simple rotate the cabinet body 180 degrees
and hang on your wall.
by STRASSER WOODENWORKS
www.simplicitybystrasser.com (800) 445-0494 Crafted for You in the USA
- 6 -
C
rafted for you in the
U
SA
Information:
Simplicity Installation and Setup
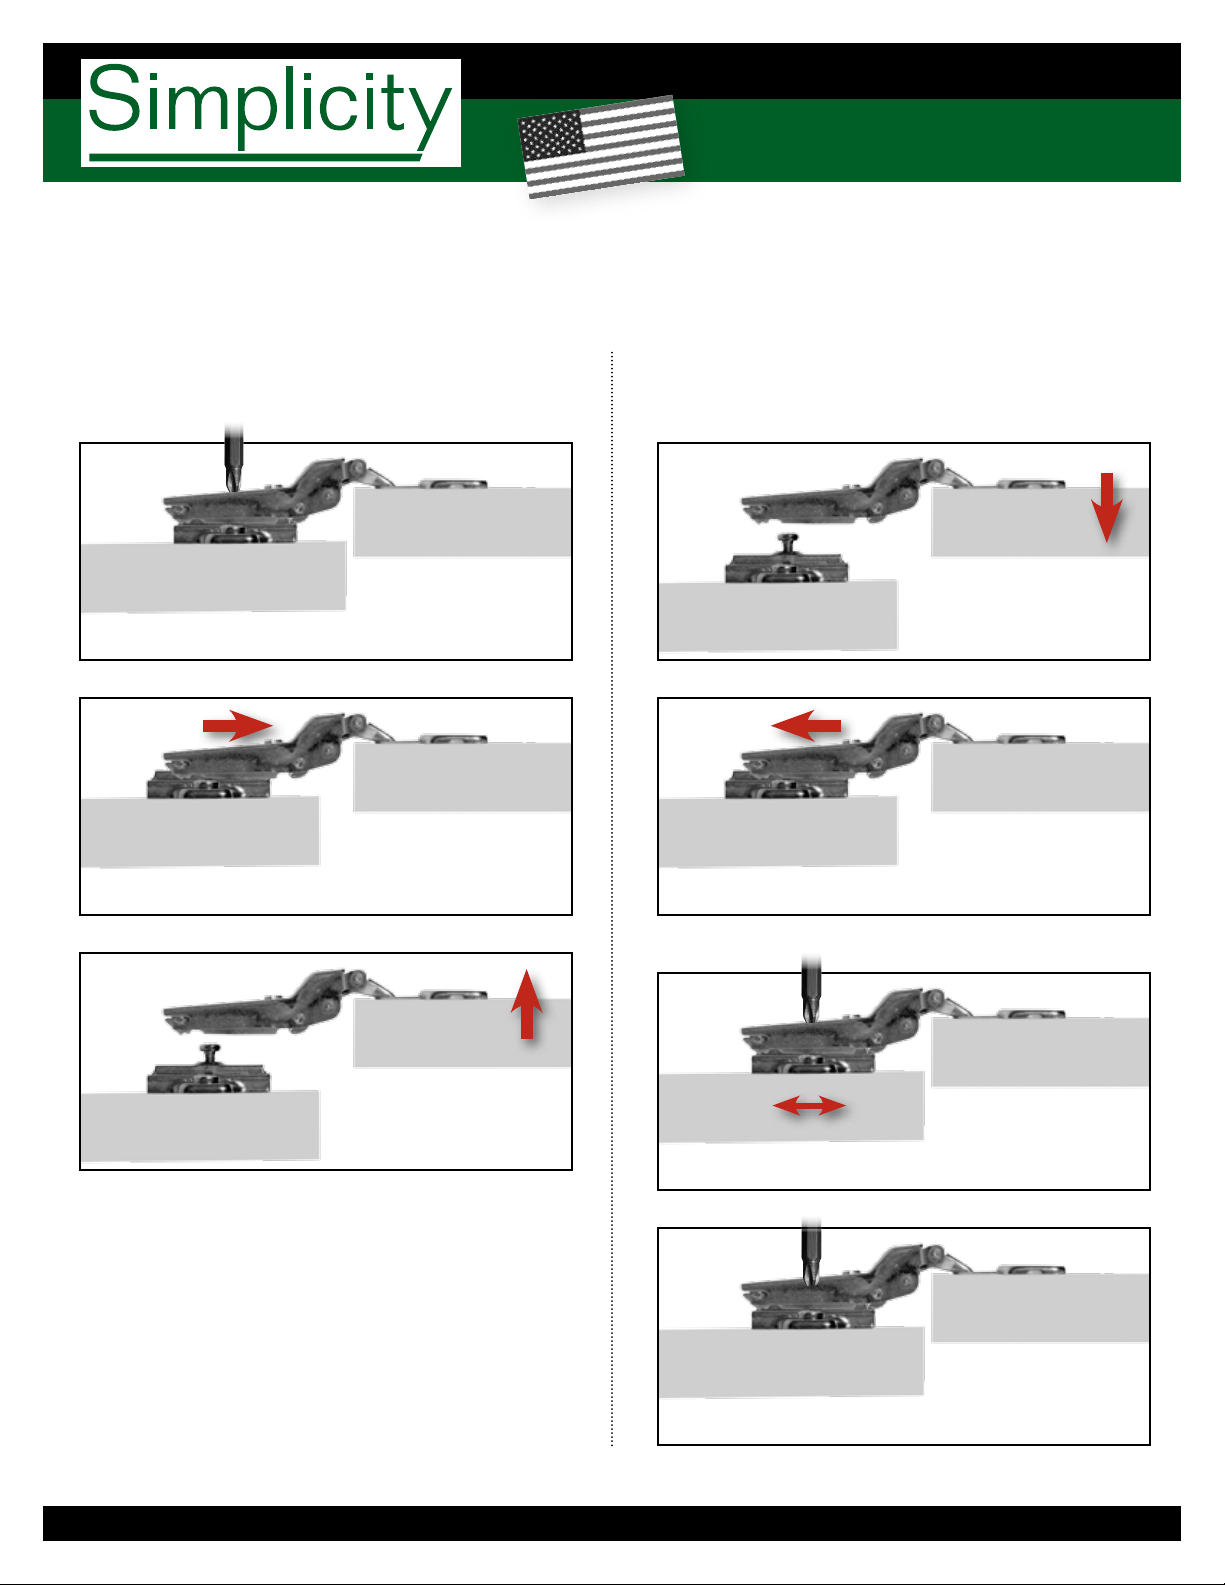
Removing and Re-installing Doors with 6-way Adjustable Hinges
To remove doors, loosen screw indicated on both hinges of a door
at least 2 full turns. Slide door outward as shown and disengage.
To re-install doors, simply reverse the removal process. Tighten screws
part way, adjust door position, and tighten the screws securely.
Working with Doors
by STRASSER WOODENWORKS

www.simplicitybystrasser.com (800) 445-0494 Crafted for You in the USA
- 7 -
C
rafted for you in the
U
SA
Information:
Simplicity Installation and Setup
Adjusting door up & down
Loosen indicated screws on
both hinges to adjust door up/
down. Never adjust one hinge on
a door without also adjusting the
other hinge on that door.
Note: you may need to tap
hinge hardware up or down as it
may have adhered to the cabinet
finish.
Adjusting door left & right
Simply turn indicated screw to
adjust door left/right.
Adjusting door in & out
Loosen indicated screw ½
turn and adjust door in/out. Then
tighten.
Note: as the
door corner at the
hinge moves in
one direction, the
diagonally opposite
corner moves in the
other direction.
Adjusting Door Face Alignment
by STRASSER WOODENWORKS
www.simplicitybystrasser.com (800) 445-0494 Crafted for You in the USA
- 8 -
C
rafted for you in the
U
SA
Information:
Simplicity Installation and Setup
Removing and Re-installing Drawers
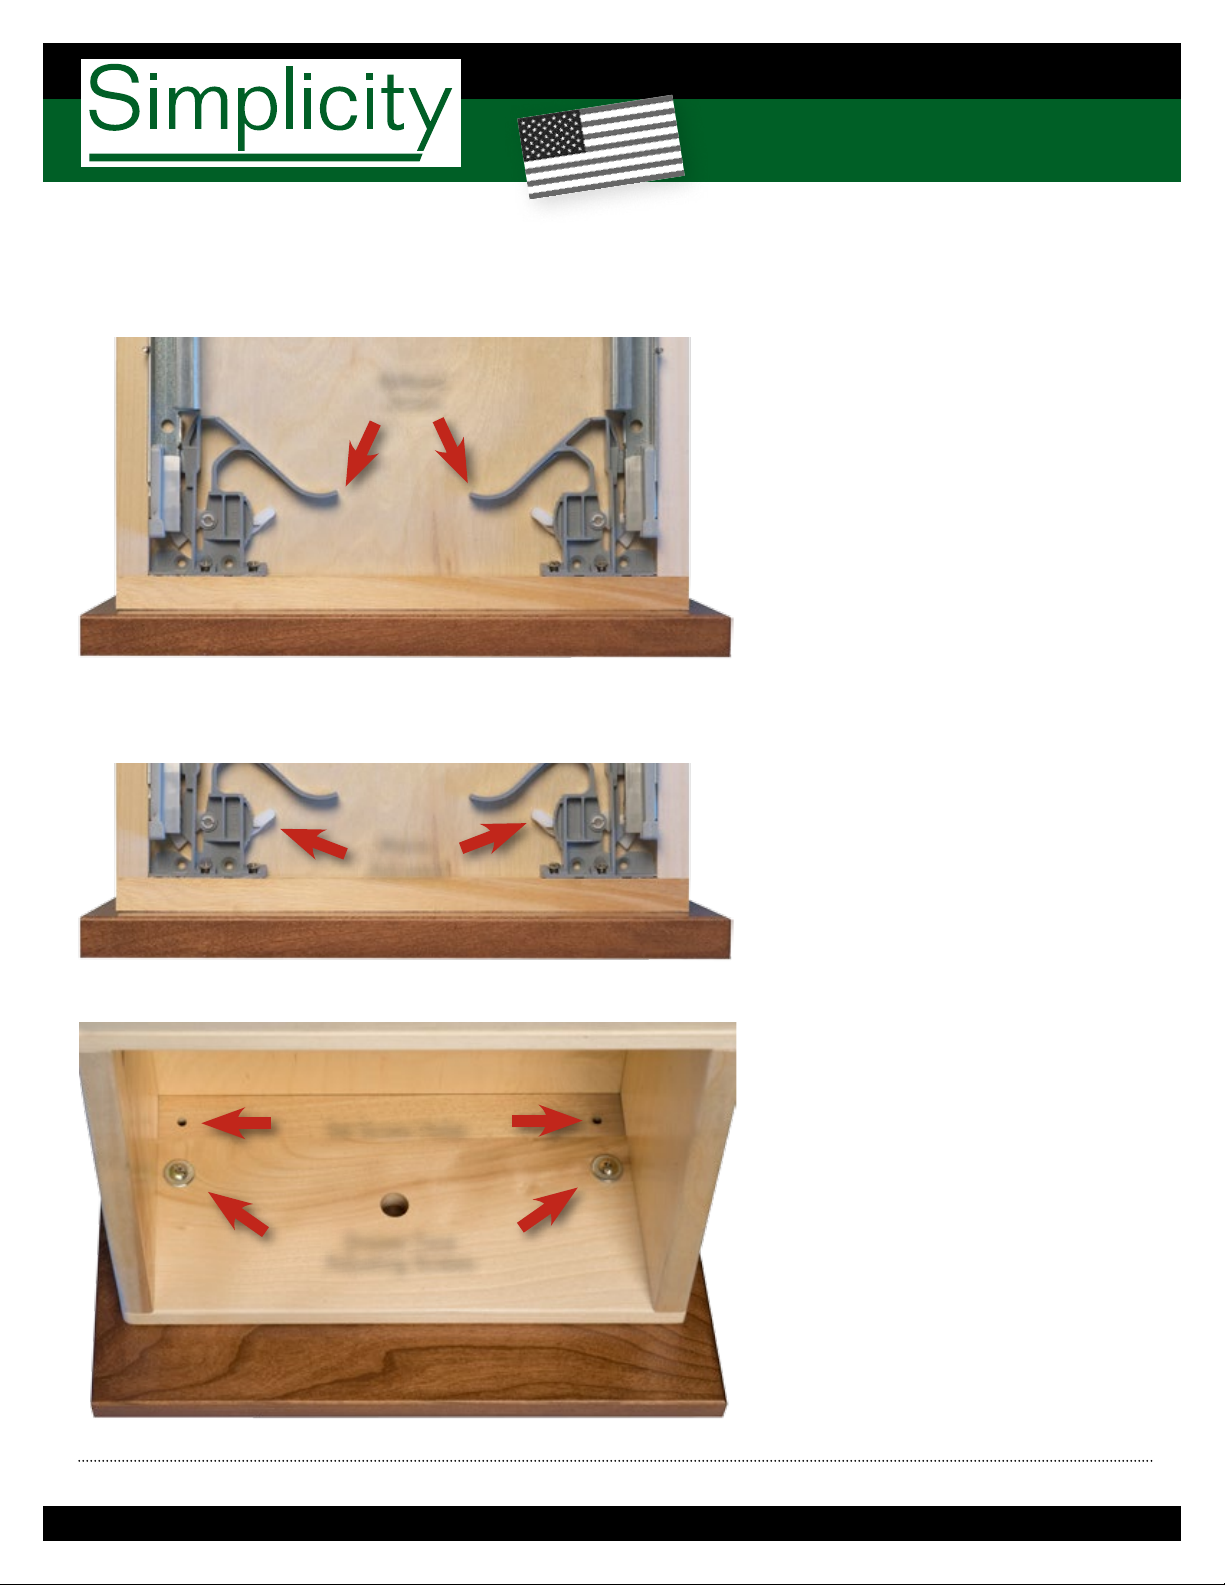
Adjusting Drawer Face Alignment
To remove a drawer, open the drawer,
reach under it and pull the release levers
toward the drawer front. The drawer is
now released from the glides and you can
toward you and upward to remove.
To replace, simply set the drawer box
onto the rails and push closed. Drawer will
automatically re-engage with the glides.
To adjust drawer face alignment begin
by setting the micro adjusters to their
middle position as shown. This will allow
you to later fine-tune the face position.
Then, loosen the two indicated screws
inside the drawer box slightly and move
the face to the desired position. Once you
are satisfied, tighten all of these screws on
all drawers.
Finally, screw the provided set screws
into the small holes beneath the adjusting
screws to secure the faces to the drawer
boxes.
Fine tune with the micro adjusters. Each
one will raise or lower one side of drawer
front.
Micro
Adjusters
Drawer Face
Adjusting Screws
Set Screw Holes
Release
Levers
Working with Drawers
by STRASSER WOODENWORKS
www.simplicitybystrasser.com (800) 445-0494 Crafted for You in the USA
- 9 -
C
rafted for you in the
U
SA
Information:
Simplicity Installation and Setup
CAUTION! Remove Doors and Drawers
Always remove drawers and doors from your cabinets during
installation (see pages 6 and 8) and store them away from the work area.
This will make your cabinets lighter, easier to move and position, and
safer to handle. Drawers and doors open unexpectedly and unbalance
the cabinet while you are moving it, causing personal injury or damage to
your cabinet. Plus, drawer and door faces will be protected from damage
during installation if stored away from your project.
Also, store your china top away from your workspace. This will make
the area safer and will assure that your top is not damaged while installing
the vanity base.
Damage caused during installation is not covered by warranty.
Re-install Doors and Drawers
Once your cabinets are in their final positions and secured, re-install and adjust doors and drawers according to directions
on pages 6 - 8.
Installing Vanity Base
Follow the instructions on page 1, " Installing Vanities".
Installing Vanities with China Tops
Installing Vanity Top
Install faucet and drain according to manufacturers instructions into the vanity top before installing the top onto the vanity.
Set top unto the vanity and check for fit and clearance of faucets, drain and plumbing inside the vanity. Remove top and set
safely aside.
Using clear bath caulking/adhesive place 1" long beads on the top edge of the vanity: one in the middle of the back and
each side; and approximately every 12" along the front. Place the top on the vanity and position snugly against the wall and
center left to right. Clean any excess caulking from the vanity side panels under the top. Then, run a bead of caulking along
the back of the top at the wall to seal that contact.
Let the caulk set overnight and proceed to connect the water supply lines and drain. Make faucet spigot and handle
adjustments, etc. Turn on the water supply and check for leaks at all fittings. Fill the basin with water and then drain while
checking for leaks.
IMPORTANT Check inside and around the vanity on the floor for water from leaks the next day and also in about a week.
A slow leak can accumulate water under the vanity and will cause damage to the vanity. Without follow up checks you may
never notice this until there is a problem. Damage from leaks is not covered by the warranty.
by STRASSER WOODENWORKS

www.simplicitybystrasser.com (800) 445-0494 Crafted for You in the USA
- 10 -
C
rafted for you in the
U
SA
Information:
Simplicity Installation and Setup
Filler and Scribe Molding
by STRASSER WOODENWORKS
Filler
cut two lengths:
for front and for
toekick Scribe
fills small gaps along walls
or floor
6"
36"
¾"
Cut Filler or Scribe to length and secure in
place with adhesive or fasteners of your choice.
Fillers are commonly ripped (cut) to the width
desired by installer. Note that the space to fill
may be wider or narrower at the top than at the
bottom and requires a cut to fit.
¾"
¼"
48"
Filler
Matching cabinet material used
to trim out or fill in gaps
between cabinets and/or
walls. Both sides & one
edge finished.
Scribe
Used to trim out small gaps
between cabinet & wall,
and/or floor.
Scribe is rounded on
one edge for a
softer look.
Drawings not to scale
Other manuals for Simplicity
1
Table of contents
Other STRASSER WOODENWORKS Indoor Furnishing manuals

Popular Indoor Furnishing manuals by other brands

OYPLA Home
OYPLA Home 3663 user manual

pakoworld
pakoworld 248-000006 Assembly instruction

Mercers Furniture
Mercers Furniture Corona 2 Assembly instructions

Ashley
Ashley Signature Design 108735 Assembly instructions

Amart Furniture
Amart Furniture LOCKLYN 72737 Assembly instruction

Dawn
Dawn Vanity AACS-6001 installation guide


