Redi-Chek Roast Alert/3 ET-8C User manual

w
INSTRUCTION MANUAL MODEL E?.TC
REDI CHEK@ROASTALERT/3
Introduction
Congratulations
on
yourpurchase
oftheRedi
Chek@RoastAlerV3,anelectronictimer
and
programmable
thermometer.Thereisnoneedtoworryaboutunderorovercookedfoodsagain
TheRedi
Chek@RoastAlert3 hasthree
distinctalert
signals
thatwam
you
when
foodis
almost
done,
isdoneandthen
overdone.
Components
l. I - electronicunit
withLCD
2. I - detachable
stainless
steel
probe
sensor
3.
l -AAAbattery
Fertures
LCD
(Liquid
Crystal
Display)
-
Displays
allicons,temperature
andtime.
SeeLCDdiagramfordetailedinformation.
BatteryCompartment
- HoldsI AAA batiery
Stand
- Standunitontabletoporunclip
andre-cliponback
ofunit tomake
hanging
bracket.
Magnet
- Stickunit
toanymetalsurface.
Buttons
l. START/STOP
- Startsorstopstemperature
alertwamingandtimer.
2. HR-Setshouroftimer.
3. MIN - Setsminutesoftimer.PressMIN & SECtogetherresetstimertozero.
4. SEC
- Setssecondsoftimer.PressMIN & SECtogeth€rresetstimertozero.
5. MEMORY
- Locksinyourprogramm€d
temperatures.
6. +MEAT
- Selectsmeattype.
7. TASTE
- Selects
thetaste
lev€I.
Swltches
8. POWERON/OFF
-Tumsunit
onoroff.
9. ALERTON/OFF
- Switchesalertmode
onoroff
10.
ocloF
- Switchestemperaturedisplay
toCelsiusorFahrenheit.
LCD
l. Meattype r
2rPre-alertalarmicon
3.Alertalarmtemperature 2
4.Timer
5.Probe
sensortemperature
6.Donenesslevelmedium
selected 3
7.Overcookedicon
*PGMis
pr€set
rt l58oF.
Usercrn
progrrm
toindividurl's
preferred
temperature.
See
"Progrrm
your
own
done
temperrture
setting".
Temperaturesensing
& timerfeatures:
A. Preset
USDAdonenessranges
for I5different
meattypes.
B. Set
your
ownspecific
donenessrangesformeattype.
C. Pre-alert
alarm.
D. Alertalarm
E. Overcookalarm.
F. 20
hourCountdown/count
up
timer.
G. ChangefromCelsiustoFahrenheit.
MAGNET
Eed,Lamb
Verl&Ribt Por* Turkey,
chlck€n&
Duck
tlam,
Ground
Beet Porlt
L.nbVeal
Croutrd
Turk.y,
Chi<ken PGM
Done t70eF 180'F 150'F r65'F 't58'Fi
Well 170"F
Medlum 160"F
Mediufr
Rale 145'F
Rar€ 140'F

Typical cooking with the preset USDA doneness,
pre-alert. Atert & Overcook alarm
features:
SlidePOWER srvitchto ON.
PressMEAT + button to changethe meat icon. VEAL for example.
Press
- TASTE button to changethe doneness.
MED (l 60" F) for example.
Slide
ALERT button
toON.
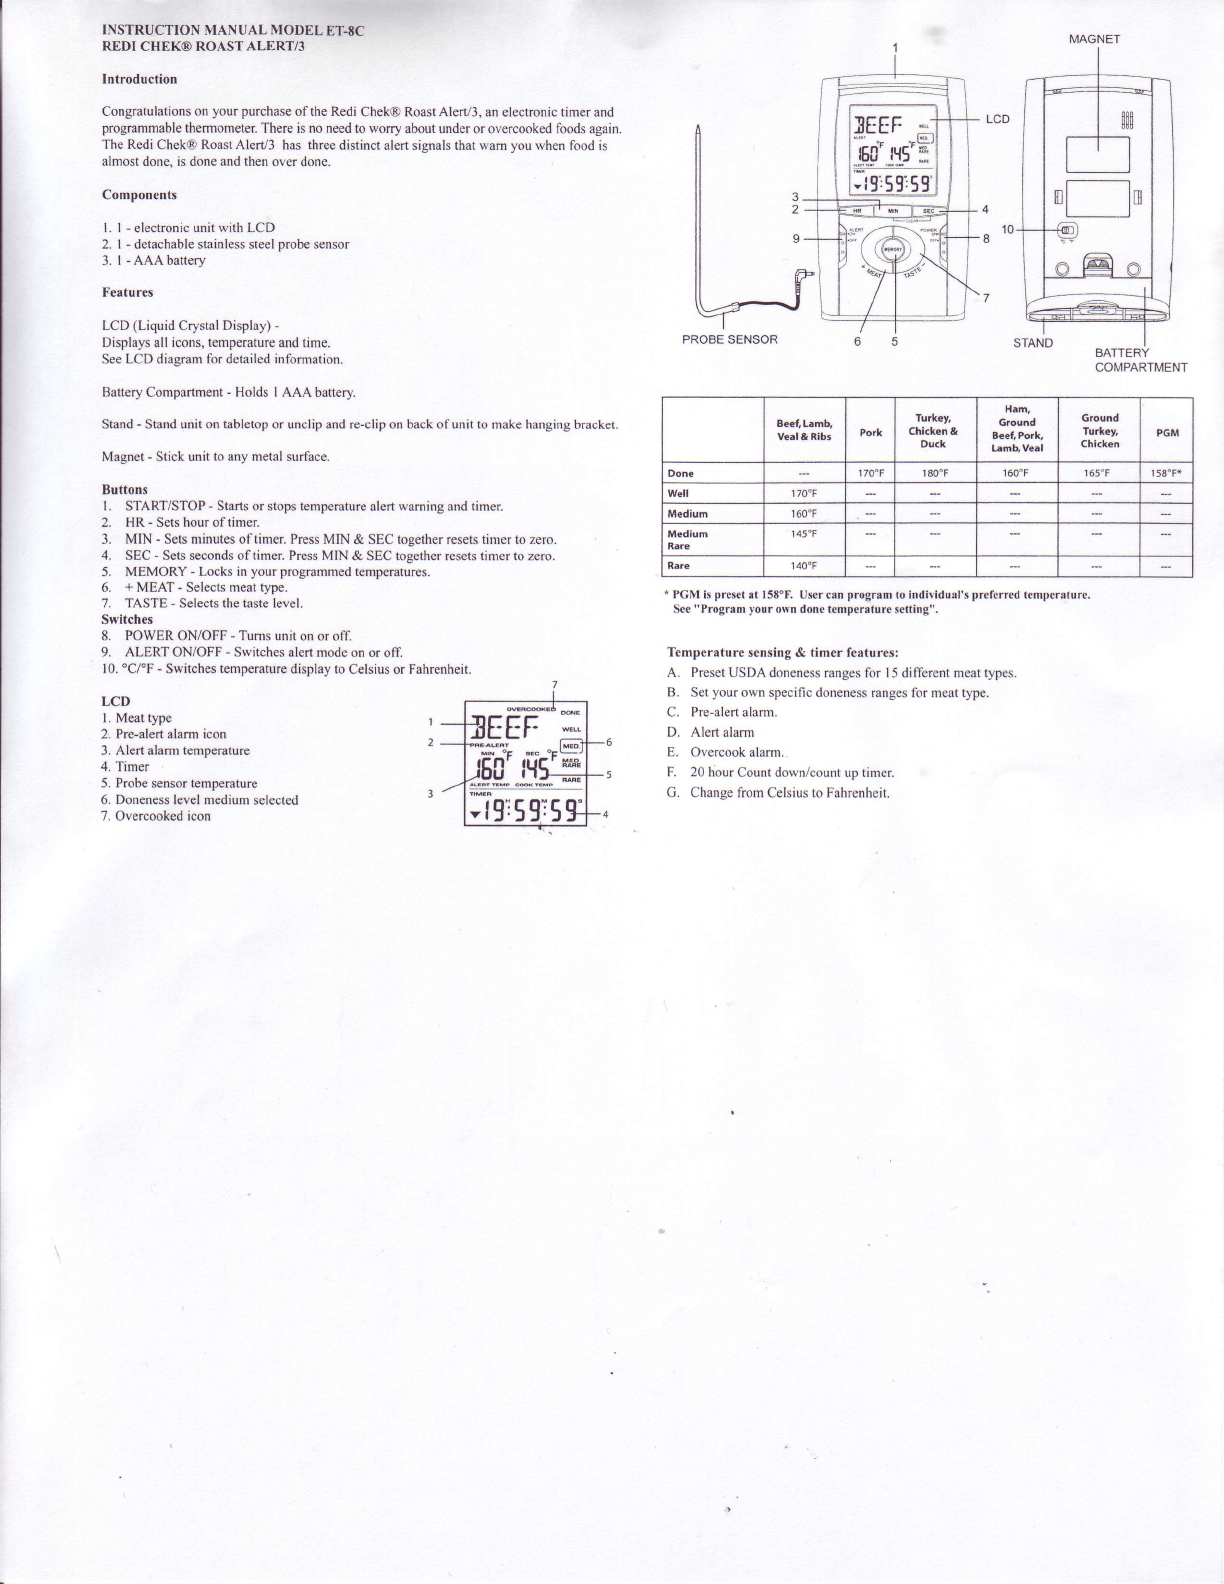
Example:VEAL, MED. (160'F) selected.
I. Pre-heat
oven to desiredtempemture.
2. Wipe the metal probewith damp cloth to be
certainit is cleanafter previous use.
3. Attach probewire to electronic unit.
4. Insert probeinto centerofmeat. Avoid touching
bone or heavy fat areas.
Make surethe probetip is insertedinto the meal (Picture
5)
atleast
I
".
5. Putthe
meatintotheoven.
6. Theprobe
wire will be heldin place
bythe
ovendoor.
(Picture
5)
7. The electronic unit must be placedoutsidetheoven on a nearbysurface.
8. Cookthemeat. The follorving
rvill happenastheintemalmeattemperature
rises:
COOK TEMP reaches
l40o F theRARE iconwill flash.
COOK TEMP reaches145"F(start
of RARE range)the
Pre-Alertalam rvill beep
(Long
Beep),PRE-ALERT iconwill flash,
RARE icon
stops,MED. RARE iconflashes.
COOK TEMP reaches160' F (start
of MEDIUM rang€)theAlert alarm
will beep
(Short
Beep),
ALERT iconwill flash,MED.RARE iconstops,MED. Iconflashes.
COOK TEMP reachesl70o F (start
of WELL range)theOvercook
alam will beep
(Continuous
Beep),OVERCOOK & ALERT iconwill flash,MED. Iconstops,
WELL iconflashes.
TheOvercooktimer startsto countupso
you know how longthefoodhas
beenovercookingfor
The START/STOP button can bepressed
to stopthe beepingsound.
Set your own specific donenessranges for meat type.
Example:To changeMED. Doneness
ALERT TEMP fromUSDA temp l60oF toyour
specific temp of I65" F.
PressMEAT + button to changethe meat icon to VEAL.
Press
- TASTE button to changethe donenessto MED.
SlideALERT button to ON.
Press
andhold MEMORY button.
PressMEAT + button5 times
soblinking 165
isdisplayedabove
ALERT TEMP.
Press
MEMORY button againto lock in new temp.
Pre-Alertalarmwill beepwhen
COOK TEMP reaches155"F.
TheAlert alarmwill beepwhen
COOK TEMP reaches
165.F.
TheOvercookalarmwill beep
when
COOK TEMP reaches
175"F.
Program your o\yndonetemperature setting.
Example:SetPGM (Program)
to 173"F.
PressMEAT + button to changethe meat icon to PGM.
SlideALERT buttontoON.
Press
andhold MEMORY button.
Press
MEAT + or TASTE - button soblinking 173 is displayedaboveALERT TEMP.
PressMEMORY button againto confim temperature
set.
20hourCountdown/Countup timer.
Count up: Just
press
largeSTAM/STOP on top of unit.
Count
down:PressHR to set
hours,MIN to setminutesor SECto setseconds.Press
START/STOPbutton to slart countdown. When time reaches0:00:00 alert alarm beepsand
TIMES UP icon flashes
HELPFUL HINTS
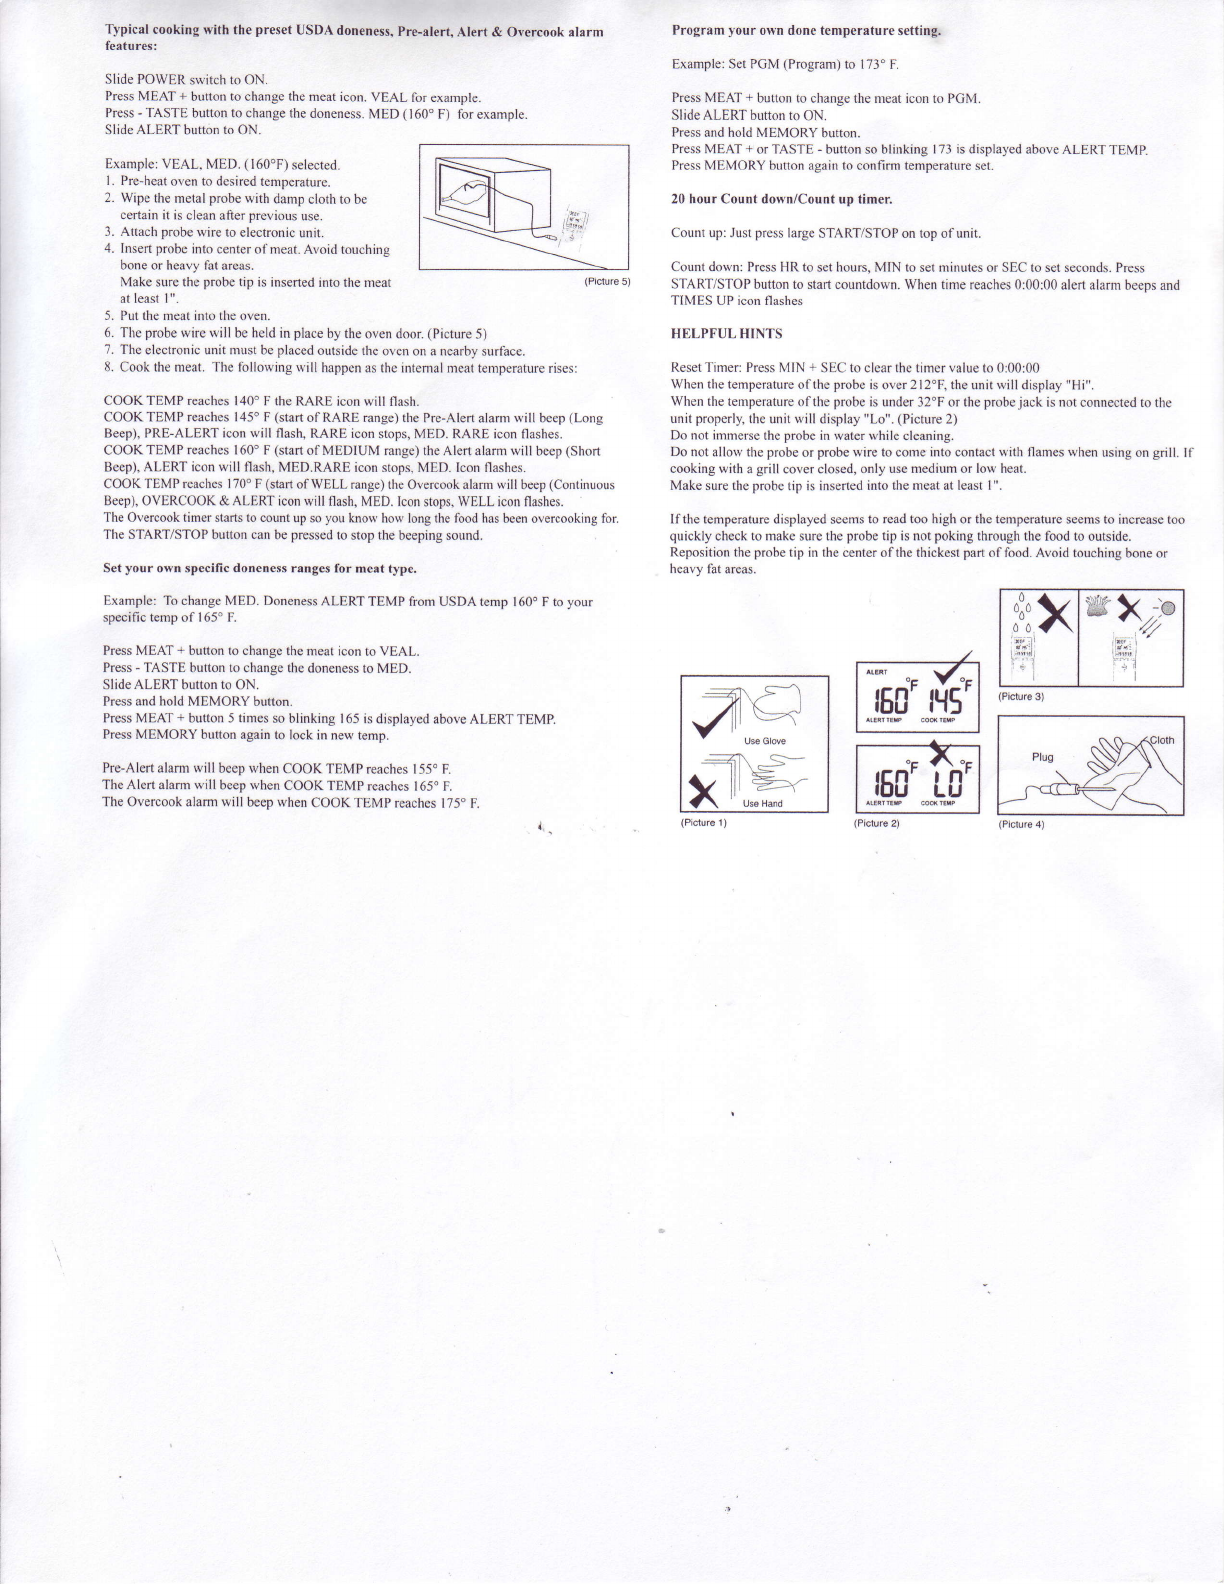
ResetTimer:PressMIN + SECto clearthetimervalueto 0:00:00
Whenthetemperature
ofthe probe
isover
212'F,
theunit will display
"Hi".
When thetemperature
ofthe probe is under 32oFor the probejack is not connectedto the
unitproperly,
theunitwill display
"Lo". (Picture
2)
Do notimmerse
the
probe
inwaterwhile cleaning.
Do notallowtheprobe
or probewiretocomeintocontactwith flameswhen
usingongrill. lf
cooking with agrill cover closed,only usemedium or low heat.
Make suretheprobetip is inserted
into themeat at leastI".
lfthe temperaturedisplayedseems
to readtoo high or the temperatureseems
to increase
too
quickly checkto make surethe probe tip is not poking throughthe food to outside.
Reposition
the
probe
tip in the
centerofthe thickest
part
offood. Avoidtouchingboneor
heavy fat areas.
:\ > \
)t'{ l
-/ tY
Yr' _'
-lll >
1z lll
>=\'
7\ ' u""n"na
(Pidure
1)
7*3"1
If50'
ft{s'
I
t*"*'-**"1
r--;1r.;r
It50'
r0
I
l**"*"*^*"1
"p
x
0"0
0
0 0.
I;'l
(Picture
3)

F.,W _@IG-
i
I
Cautions: *
Always wear a heat resistant glove to touch the stainless steel probe *nsor or wire during or
just after cooking. Do not touch with bare hands. (picture I)
Keep thestainless
steelprobesensormd wire away from childrm.
Clean the stainless steel probe and dry thoroughly after each and every use. (picture 4)
Do not usetheunit in the rain. It is not waterproof. (picture 3)
Do not exposethe plug ofthe stainless
steel
probeor theplug in hole
ofthe unit to water or any liquid. This will result in a bad connectionard faulty readings.
Do not expose
theunit to direct heator surface.
(picture 3)
Do not usestainless
steelprobe in microwave oven.
Do not usethestainless
steel
probesensorabove410 oF.
Doing sowill detedorate
thewire.
Cleaning
Always wear aheat
resistant
glove to touch the stainless
steel
probe sensor
or wire during
orjust after cooking. Do not touch with barehands.
Keep thestainless
steelprobesensorandwire away fiom children.
Wash the metal probe tip with hot soapy water and dry thoroughly. Do not immerse the probe
in waterwhile cleaning.
Wipe theelectronic unit with damp cloth. Do not immerseeither in water.
LIMITED NINETY DAY WARRANTY
Maverick IndustriesInc. wanants the Redi Chek@Rmst Alerv3 to be freeofdefects in parts,
materialsandworkmanship for aperiod of 90 d8ys,from dsteof purchN. Shoutdany repaire
or
sewicing underthis waruty be required, contactMaverick CustomerSewice by mail or phore for
instructions
onhowtopack
and
shiptheRediChek@
RoastAlert/3to Mavdck,s National
Swice
Centerlocated
asfollows:
Maverick CustomerService
94MayfieldAve.
EdisonNJ08837
Telephone:
(732)
417-9666
Hours:Weekdays
8:30AM- 4:30PM
Do not sendmy partsor Foduct to Mavtrick without calling md obtaining a RetumAuthoriatim
Numbermd instructions.
This wamnty is VOID if imtructions for usearenot followed; for accidentaldamagc;for
commercial use;for damageincured while in tnnsit; or if theRedi Cheko RoastAlert/3 hasbeen
tamperedwith.
This wamnty givesyou sp*i{ic legal righs andyou may alsohaveother dghts which vary ftom
stateto state.
www.maverickhousewiles.com
Printedin China