RedPort Halo Pro User manual

1
Halo Pro Long Range
Wi-Fi Extender System
Quick Start Guide

2
Contents
Introduction to the Halo Pro Wi-Fi Extender System..........3
Safety...................................................................................4
Product Specications........................................................5
Physical Setup....................................................................7
Operating Halo Pro Using the Halo Wi-Fi App..................10
Operating Halo Pro Using a Mac or PC............................13
Using Halo Pro with Captive Portal Mac and PC..............16
Product Warranty Information...........................................17
Product Support Information............................................18

3
Introduction to the Halo Pro Wi-Fi Extender System
Thank you for your recent purchase of a RedPort Halo Pro
Long Range Wi-Fi Extender System. Halo Pro keeps you
connected to remote 2.4GHz and 5GHz Wi-Fi sources at
long distances. This Quick Start Guide will cover a basic
overview and set of procedures to start operating your
RedPort Halo Pro system.
About This Quick Start Guide
This Quick Start Guide is for anyone who intends to setup
and operate a RedPort Halo Pro Long Range Wi-Fi Extender
System. It, however, cannot cover all topics and advanced
features. For questions or topics that are not covered in this
manual please contact your RedPort dealer or RedPort at

4
Shock Hazard
The Optimizer is a sealed device and is not meant
to be opened for repair in the eld by operators or
technicians. The enclosure must remain in place
at all times on the router to maintain the warranty
terms. Make sure the system is correctly ground-
ed and power is o when installing, conguring
and connecting components.
Passive PoE Port(s)
The Optimizer is equipped with Passive PoE
ports that supply 16V of power on the 802.3af
mode B pinout. This is particularly hazardous if
connected to a device equipped with a gigabit
(1000mbps) NIC, owing to the location of the
pins. RedPort strongly advises against connect-
ing any non PoE networking equipment to the
Optimizer and does not warranty any resultant
damage.
Component Damage Warning
Hard wiring the Halo Pro Extender and associ-
ated equipment into the vessel electrical system
should be accomplished by a certied electrician.
Proposition 65
This product contains chemicals which are
known to the State of California to cause can-
cer and birth defects or other reproductive harm.
For more information go to www.P65Warnings.
ca.gov.
WARNING
SHOCK
HAZARD
Safety

5
Product Specications
Optimizer
Compliance
Regulatory FCC, CE, RoHS
Hardware
Router Dimension, L x W x H 4 9/16” x 3 3/8” x 1”
Router Weight 0.4 lbs or 0.18 kg
Chipset MT7620A for 2T2R 300Mbps
Reset and WPS button 1 button
RAM 256 MB
Flash 32 MB
Local Storage 4 GB
WAN Port 1
LAN Port 1
USB 1
RJ-11 Port 1
Power Supply and Consumption
DC input Voltage 12V 4A DC
Power Adapter (Included) 110-220V AC to 12V 4A DC
Power Consumption Voltage: 9 – 36V ±5%
Environmental Conditions
Operating Temp 32° F to +122° F (0° C to +50° C)
Storage Temp 14° F to +149° F (-10° C to +65° C)
Humidity 5% - 98% non-condensing
Interfaces
Router Integrated Optimizer DHCP/NAT router
Additional Interfaces WAN, LAN
WiFi
WiFi 802.11b/g, 802.11n

6
Extender Antenna
Compliance
Regulatory CE, FCC, IC, EAC, ROHS
Hardware
Height 22 in or 55.88 cm
Diameter 2 in or 5.08 cm
Weight 2 lbs or 0.91 kg
RAM 64 MB
Flash 16 MB
Power Supply and Consumption
PoE In Passive PoE
PoE in input Voltage 10-30 V
Number of DC inputs 1 (PoE-IN)
Max power consumption 5 W
FAN Count Passive
Environmental Conditions
Tested Ambient Temperature -40°F to 158°F (-40°C to 70°C)
Ingress Protection Rating IP65
Wireless Specications
Wireless 5 GHz/2.4 GHz standards 802.11 a/b/g/n
Provided Cable
Cable 10m or 33’ Oil and UV resistant

7
Physical Setup
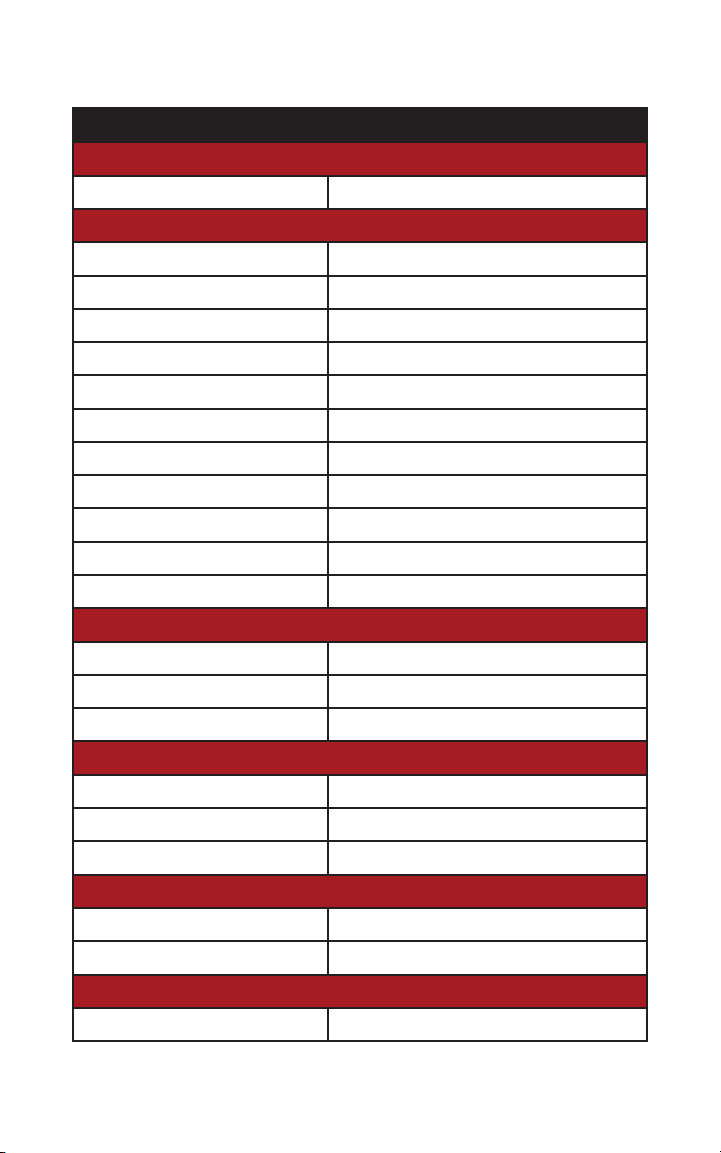
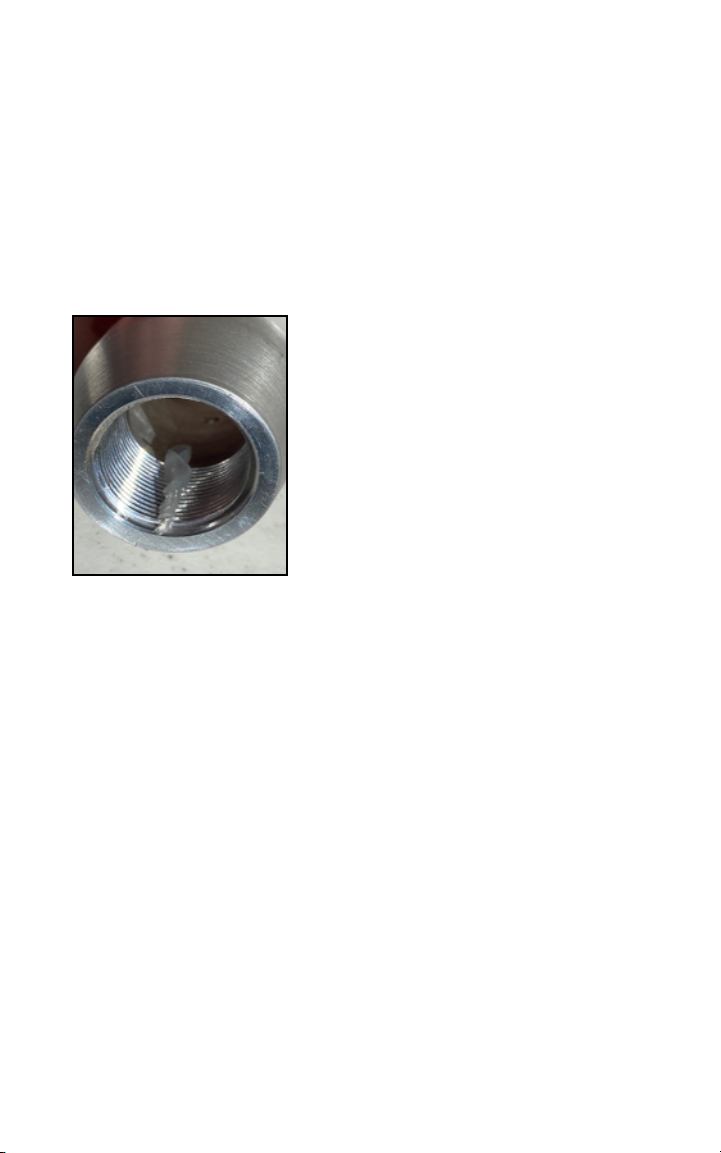
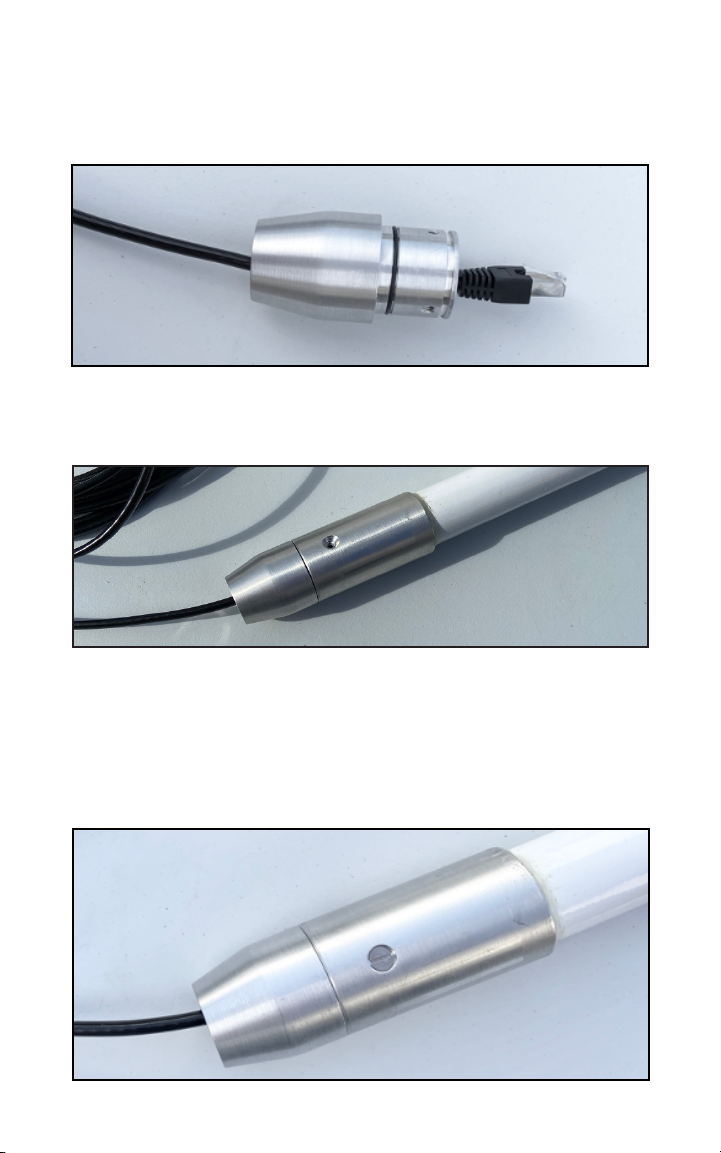
Step 1. Thread the base mount coupling to the 1” 14 TPI
mount of your choice (not included). RedPort recommends
using a marine grade plastic mount with a side or bottom
pass through. We recommend running a bead of lubricant
(provided) along the inside of the base mount coupling
threading before installing onto a metal mount to prevent
galvanic corrosion.
Note: The antenna unit must be
mounted vertically in order to max-
imize line-of-sight exposure to
available Wi-Fi sources.
Vehicle Mounting: When mounting Halo Pro on a vehicle,
make sure there is no large obstruction blocking its view to
remote Wi-Fi sources. Run Ethernet into the cabin of the
vehicle and plug it into a power source. Recommended Ac-
cessory: 12V 4A Car Charger (sold separately).
Building Mounting: When mounting Halo Pro on a building,
make sure that there is no obstruction blocking its view of
the remote Wi-Fi source. Run Ethernet cable from the Ex-
tender to Optimizer.
Vessel Mounting: Halo Pro can be installed in many dif-
ferent locations on board. For best results, mount the Wi-
Fi Extender 15-25 feet above the water line. This will in-
crease the chances of capturing Wi-Fi via line-of-site. Do
not mount near radar equipment, as radar will negatively
impact the antenna unit’s performance.

8
Step 3. Connect the Ethernet base mount coupling to the
base of the Halo Pro Extender and line the screw holes up
Step 4. Attach the base coupling to the Extender base us-
ing the three provided screws and a athead screwdriver
(not provided). Note: If desired, before installing the base
coupling to the Extender base, dab a small bead of the pro-
vided lubricant to the screws to prevent galvanic corrosion.
Step 2. Pass the supplied 10m ethernet cable through the
base mount coupling and plug the male RJ-45 Ethernet
connector to the female RJ-45 port of the Wi-Fi Extender.

9
Step 5. Plug the other end of the Wi-Fi Extender ethernet
cable into the LAN port on the Optimizer. Plug the provided
barrel connector into the Power Port on the back of the
Optimizer.
Halo Pro can be powered in two ways:
1. 12V 4A DC Wall Mount Charger (included), with 10M
Ethernet cable run to the Extender, or:
2. 12V 4A DC Car Charger (sold separately) with 10M Eth-
ernet cable run to the Extender.
Note: The Halo Pro Extender is a part of a system and not
intended for separate use. The only way to power the unit is
through the provided 10M Ethernet cable, plugged into the
LAN Port on the Optimizer, the Optimizer unit being pow-
ered by one of the 12V 4A barrel connectors listed above.

10
Operating Halo Pro Using the Halo Wi-Fi App
The Halo Wi-Fi App allows control of your Halo system
from your phone or tablet. Available on the Apple App
Store & Google Play Store. Use of the Halo Wi-Fi App is the
RECOMMENDED way to setup and use your Halo Pro Long
Range Wi-Fi Extender.
iOS Halo Wi-Fi App Installation and Setup
Step 1. Download the Halo App - For iOS (iPad, iPhone,
iPod Touch with iOS 10.3 or later), search for “Halo WiFi” in
the Apple App Store.
Step 2.Assemble and plug your RedPort Halo into an
Optimizer Reference the diagrams previous diagrams for
assembly, then power on all equipment.
Step 3. Connect to the Optimizer - Navigate to Settings on
your mobile device and click <Wi-Fi>. Find the Optimizer
which will be displayed as wXa-213-XXXX. Click <”wXa-
213-XXXX”>.
NOTE: This is making the connection between your
smartphone or tablet device and the Optimizer.

11
Step 4. Open Halo Wi-Fi App - Click <Halo WiFi App> icon
on your device.
Step 5. Congure Halo Wi-Fi - There are two ways to con-
gure the Halo Wi-Fi. 1. You can click <Press Here to Search
for Networks> or 2. You can click <WiFi> at the bottom of
the Halo Wi-Fi App “Home” page.
NOTE: This is making the connection between the Halo/
Optimizer and the Wi-Fi network you are boosting.

12
Step 6. Select Wi-Fi Source - Connect to the Wi-Fi network
of your choice by clicking <”network name”>. If required,
enter the password for the selected network, then click
<Join>.
Optionally, you can click <Rescan> to force a new search
and you can sort found networks by Wi-Fi strength; Open
Wi-Fi; Closed Wi-Fi (password protected); A-Z (alphabeti-
cally); or Z-A (reverse alphabetically).

13
Once you are connected, your home screen will appear like
this:
Operating Halo Pro Using a Mac or PC
NOTE: Using the Halo App is the recommended process
for installation and setup (see page 10). However, setup us-
ing a computer and a web browser is easy using Halo Pro’s
simple user interface.
Step 1. Connect your computer to Optimizer Wi-Fi named
<“wXa-213-XXXX”> or <“wXa-203-XXXX”> and open your
internet browser.
Step 2. Type in 192.168.10.1 and login using:
username: admin
password: webxaccess

14
Step 3. Click on the <Connect> button on the main page
under the section titled “Enable Halo Pro WiFi Extender
Setup”.
Step 4. You will be redirected to 192.168.89.1 to access
the Halo Pro Extender Portal You will be brought to the
dashboard, where you will see a list of the available Wi-Fi
sources in your area.

15
Step 5. Click on the Wi-Fi you intend to connect to. In this
case, we are going to connect to the third in the list. Click
on it and if it is password protected, a password eld will
appear below the name of the Wi-Fi source. Fill this in and
click <Connect>.
Step 6. When you are connected, the Wi-Fi source will
show up at the top of the list under “Current connection”
with the status bar below the Wi-Fi name (SSID) showing
the strength of the connection.

16
Step 4. If there is a captive portal, the Halo Pro will detect it
and allow you to choose whether you would like to <Login>
or <disconnect> to the Captive Portal.
Step 5. Upon clicking <Login>, a new tab or window will
open with the captive portal, prompting you to login to ac-
cess the page. This could ask for a password, username
and password, or an email address. Once you login to the
captive portal, you will be connected to the Wi-Fi source,
and the Halo Pro will conrm the connection as pictured
below.
Using Halo Pro with Captive Portal Mac and PC
Step 1. Connect your computer to Optimizer Wi-Fi named
<“wXa-213-XXXX”> and open your internet browser.
Step 2. Open your browser of choice and type in
192.168.89.1 to access the Halo Pro Dashboard.
Step 3. Click on the Wi-Fi source of your choice and click
<Connect>.

17
Product Warranty Information
RedPort hardware carries a Limited 1-year manufacturer
warranty against defects from the date of sale. This limited
hardware warranty covers defects in materials and work-
manship in your RedPort-branded hardware products.
What is not covered by this limited hardware warranty?
This limited hardware warranty does not cover:
• Software, including without limitation, the operating
system and software added to the RedPort-branded
hardware products through our factory-integration sys-
tem, third-party software or the reloading of software
• Non-RedPort-branded products and accessories
• Problems that result, directly or indirectly, from:
• External causes such as accident, abuse, misuse,
water ingress, or problems with electrical power.
• Servicing not authorized by RedPort.
• Usage that is not in accordance with product in-
structions.
• Failure to follow the product instructions or failure to
perform preventive maintenance.
• Using accessories, parts or components not sup-
plied by RedPort.
• Products with missing or altered service tags or se-
rial numbers
• Products for which RedPort has not received pay-
ment
• Normal wear and tear

18
Product Support Information
RedPort agrees to provide initial customer assistance, up
to thirty (30) minutes at no charge. It is recommended that
a customer has reasonable knowledge of basic computer
and software setup procedures for the initial installation.
RedPort Company Information
For product orders, support or returns, please contact:
Phone: +1-865-379-8723
Web: redportglobal.com
RedPort Address
RedPort
3224 Wrights Ferry Road
Louisville, TN 37777
United States of America
Support Type Description Details
Remote Email
Support
Customer may con-
tact their RedPort
dealer or support@
redportglobal.com to
report an issue.
1 year included in
RedPort hardware
purchase
Remote Live
Technical Support
Customer may con-
tact their RedPort
dealer or support@
redportglobal.com to
report an issue.
Up to 30 minutes of
free phone support
included during war-
ranty period. Addi-
tional time available
for purchase.
Table of contents
Other RedPort Extender manuals
Popular Extender manuals by other brands

Gefen
Gefen GTB-UHD600-HBT user manual

Franklin Electric
Franklin Electric E-Tech GD Series Use and installation manual

TP-Link
TP-Link TL-WA820RE user guide

Key Digital
Key Digital FATCAT Series operating instructions

GAI-Tronics
GAI-Tronics LE200-RM RACK-MOUNT PAGE/PARTY manual

Quancom
Quancom ISA user guide