manuals.online logo
Brands
  1. Home
  2. •
  3. Brands
  4. •
  5. REED
  6. •
  7. Water Pump
  8. •
  9. REED Bear Hug PESMPA 04329 User manual

REED Bear Hug PESMPA 04329 User manual

Bear Hug™PE Squeeze Tool System
Manual Hydraulic Pump PESMPA #04329 Operator’s Manual
1120-54339
Manual Hydraulic Pump PESMPA is used in conjunction with
PES8BT Base Tool. Read and follow #54343 instructions for
the PES8BT also.
PUMP INFORMATION
• The manual hydraulic pump PESMPA is a 2-stage hand pump
that provides high volume at low pressure (less than 1400 psi)
and low volume at high pressure. The operator will feel handle
resistance around 1400 psi, followed by a sudden release of
resistance.
• The PESMPA has a 3-position pump valve. The positions
are Release, Neutral, and Squeeze. The neutral position holds
hydraulic pressure.
• The PESMPA has an internal pressure relief valve that will
exhaust oil back into the reservoir beyond 10,000 psi.
• The PESMPA has a reservoir cap at the rear that is used for
relling the reservoir. The reservoir cap must be cracked open
in order to bleed the system.
• Maintain the PESMPA with a medium grade (AW46)* hydraulic
uid as needed. Oil reservoir should be ½ - ¾ full, with the tool
in the fully closed position.
SQUEEZE PROCEDURE:
WARNING:
• Avoid binding the tool. Keep the squeeze bars parallel to each
other to avoid tool damage.
• Do not build pressure in the release mode. If pressure or
pumping effort builds, stop pumping immediately and relieve
excess pressure.
PART 1: SQUEEZING PE PIPE
1. Connect pump couplers to the tool.
Hand thread until the gap
between mating couplers is closed.
2. Adjust pump lever to the release
position.
3. Pump using the handle until the tool
is open sufciently for the pipe.
Do not overextend.
4. Follow your company policy concern-
ing static electric discharge at this stage of the procedure.
NOTE: Reed strongly recom-
mends use of the PEGR7 Static
Grounding Device #04621 with
PE Squeeze Tools. The threaded
connection for the PEGR7 on the
PES8BT tool is on the top squeeze
bar. Use a grounding accessory
as a precaution against static
build-up. Dissipate the charge and
minimize the possibility of ignition.
Additional information on static electricity is available in the PPI
Handbook of Polyethylene Pipe 2nd Edition.
5. Remove latch pin and swing out bottom squeeze bar.
6. Mount the tool onto the pipe. Slightly lift latch end of bottom
squeeze bar and close; insert latch pin.
CAUTION: Center the pipe along the width of the bars and
square the pipe relative to the cylinder rods.
Phone: 800-666-3691 or +1-814-452-3691
reedsales@reedmfgco.com
www.reedmfgco.com
Reed Manufacturing
1425 West 8th Street
Erie, PA 16502 USA
PES8BT shown
with PESMPA
Modular system
1120-54339
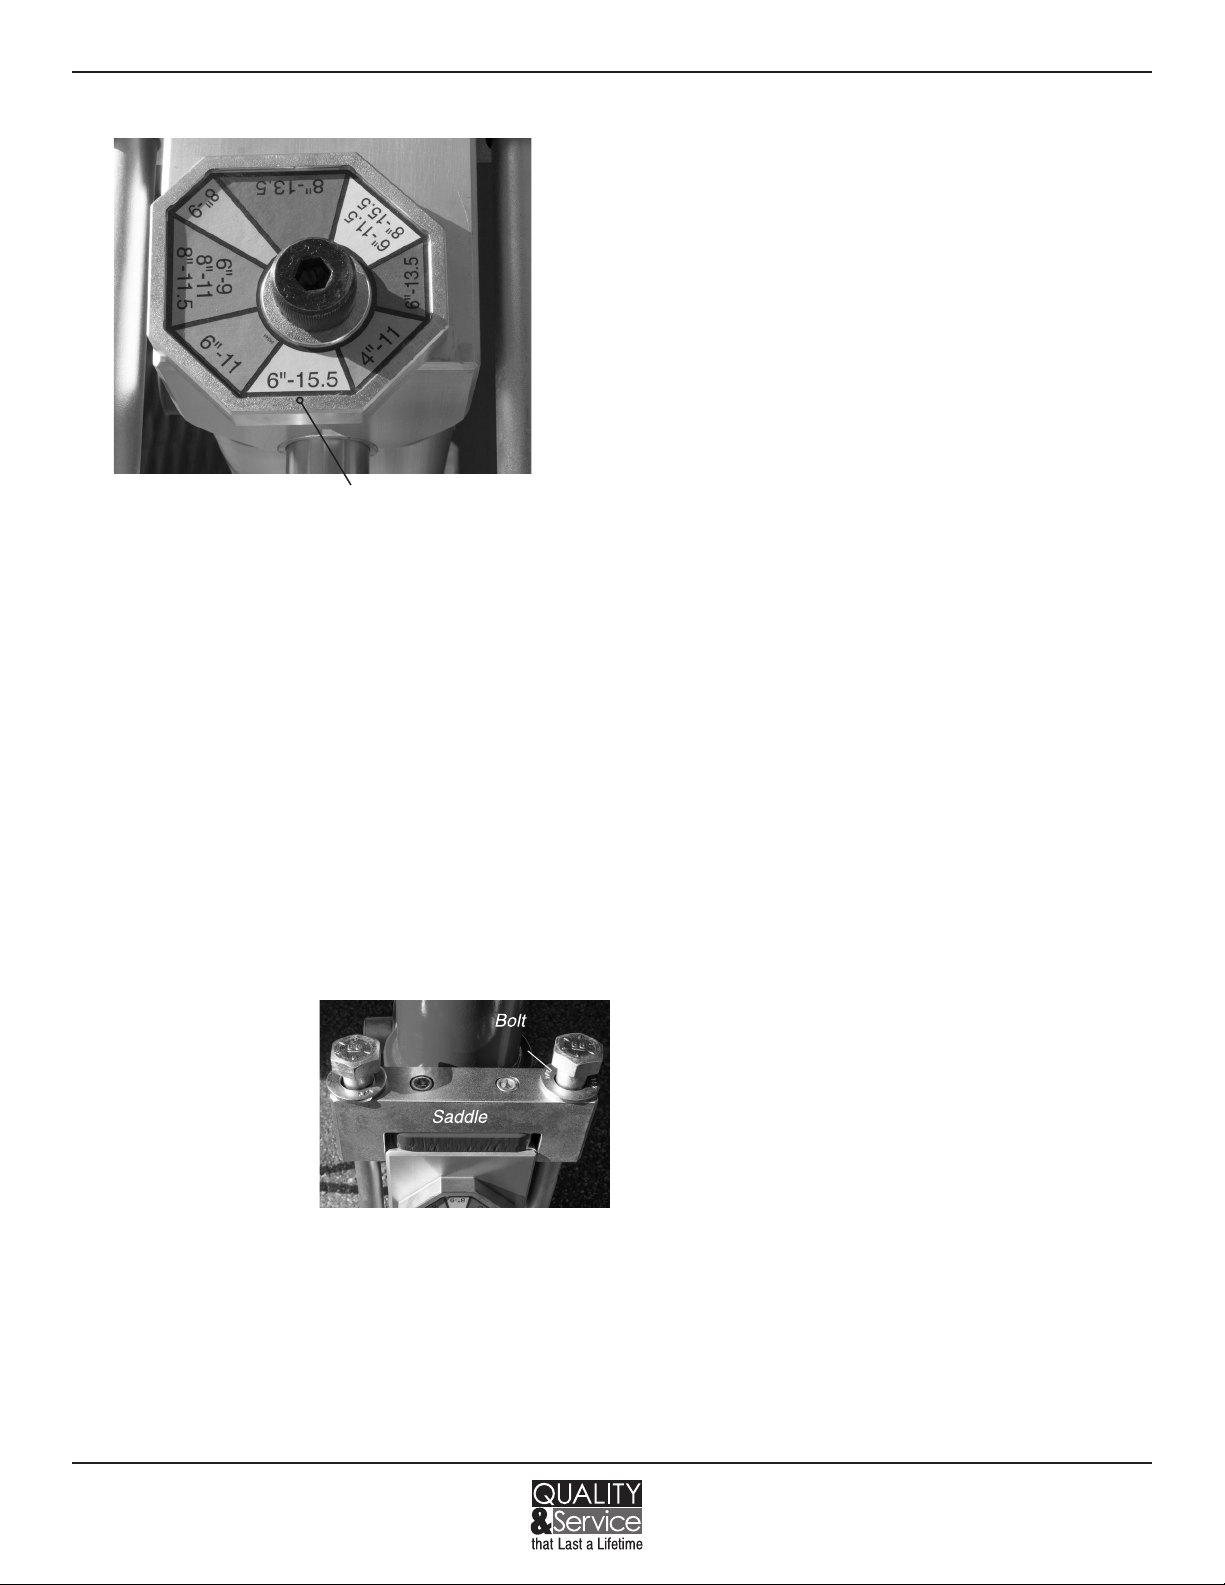
7. Select both pipe stops based on pipe diameter and SDR.
Position both pipe stops so that the corresponding at
is facing the bottom squeeze bar. Stops must match one
another.
8. Adjust the pump lever to the squeeze position. Pump
using handle to raise pressure. As the squeeze bars move
closer together and the 4 saddle bolts begin to rise,
continually hand thread in the saddle bolts. Recommended
squeeze rate to avoid pipe damage is 2.0 inches/min.
Pump until pipe stops are contacted or 10,000 psig is
reached. If 10,000 psig is reached wait for the pipe to relax
(10-15 min.) and pump back up to pressure.
CAUTION: Stop pumping when pipe stops contact bottom
squeeze bar, further pumping will cause tool damage.
NOTE: Pipe stops don’t need to contact bottom squeeze bar in
order to satisfactorily control ow.
9. IMPORTANT: Ensure all
4 saddle bolts are hand
tight and the saddle
bolt heads are in contact
with the top saddle
clamps.
PART 2: DISCONNECTING
HYDRAULICS DURING
SQUEEZE (optional)
1. Quickly adjust the pump
valve to the neutral position.
NOTE: Adjusting the pump lever under pressure may take
more effort – this is normal.
2. Slowly move the pump valve to the squeeze position, until all
pressure is on the saddle bolts. Pressure gauge should read
zero (0).
3. The hydraulics can now be disconnected.
Phone: 800-666-3691 or +1-814-452-3691
reedsales@reedmfgco.com
www.reedmfgco.com
Reed Manufacturing
1425 West 8th Street
Erie, PA 16502 USA
This stop position (at bottom) is set to squeeze 6” 15.5 DR
pipe. Stops on both sides of tool must match for proper use.
And, desired setting must be in this bottom orientation.
PART 3: RELEASING PE PIPE
1. Reconnect hydraulics and adjust the pump lever to the
squeeze position. Pump to raise pressure until the saddle
bolts are loose enough to rotate.
2. IMPORTANT: Loosen and fully disengage threads on the
4 saddle bolts before releasing pipe.
3. Quickly adjust the pump valve to the neutral position.
NOTE: Adjusting the pump lever under pressure may take
more effort – this is normal.
4. Slowly and carefully move the pump valve to the release
position, while carefully watching the squeeze bars for
movement. Move lever back to neutral as necessary to
maintain desired release rate. The recommended release rate
to avoid pipe damage is 0.5 inches/min.
5. When the squeeze bars no longer open due to pipe pressure,
move the pump lever to the release position. Pump until there
is enough room around the pipe to remove the tool.
6. Remove the latch pin and swing bottom squeeze bar clear of
the pipe. Remove the tool from the pipe.
PART 4: CARE AND MAINTENANCE
1. Wipe down and clean the tool.
2. Store in a dry place with tool in the closed position.
*SDS sheets are on le with Reed Manufacturing and can be
found online at www.reedmfgco.com. For the Bear Hug™ series,
REED uses an SDS for AW Hydraulic Oil ISO 46.

Other REED Water Pump manuals

REED B50HPSC User manual

REED

REED B50HPSC User manual

REED EHTP500 User manual

REED

REED EHTP500 User manual

REED B50HPG User manual

REED

REED B50HPG User manual

REED ROCK MASTER A30HP User manual

REED

REED ROCK MASTER A30HP User manual

REED B20HP User manual

REED

REED B20HP User manual

REED EHTP500 User manual

REED

REED EHTP500 User manual

Popular Water Pump manuals by other brands

Gardena 4000/5 Operator's manual

Gardena

Gardena 4000/5 Operator's manual

Sondermann MAGSON MAS Type 4 operating manual

Sondermann

Sondermann MAGSON MAS Type 4 operating manual

Eaton Compressor 5HP manual

Eaton Compressor

Eaton Compressor 5HP manual

Trotec TGP 1005 E Original instructions

Trotec

Trotec TGP 1005 E Original instructions

Power-flo PFS411HTCE Series Installation, service & parts manual

Power-flo

Power-flo PFS411HTCE Series Installation, service & parts manual

Marco 162 001 1B Instructions for use

Marco

Marco 162 001 1B Instructions for use

Pentair Myers CMP Series Operating instructions and service manual

Pentair

Pentair Myers CMP Series Operating instructions and service manual

Lincoln 84852 Operating instructions and service manual

Lincoln

Lincoln 84852 Operating instructions and service manual

DAB FEKALIFT 100-A Instruction for installation and maintenance

DAB

DAB FEKALIFT 100-A Instruction for installation and maintenance

Bayrol Flockmatic Operation manual

Bayrol

Bayrol Flockmatic Operation manual

Zoeller 105-0010 installation instructions

Zoeller

Zoeller 105-0010 installation instructions

Westinghouse WH50SS owner's manual

Westinghouse

Westinghouse WH50SS owner's manual

Coleman 90403E owner's manual

Coleman

Coleman 90403E owner's manual

Alemite 9916-A Service guide

Alemite

Alemite 9916-A Service guide

HEIL N4H3 Product specifications

HEIL

HEIL N4H3 Product specifications

Intex Krystal Clear 601 owner's manual

Intex

Intex Krystal Clear 601 owner's manual

Ulvac CRYO-U Series instruction manual

Ulvac

Ulvac CRYO-U Series instruction manual

Ingersoll-Rand ARO LM2350E-B Series Operator's manual

Ingersoll-Rand

Ingersoll-Rand ARO LM2350E-B Series Operator's manual

manuals.online logo
manuals.online logoBrands
  • About & Mission
  • Contact us
  • Privacy Policy
  • Terms and Conditions

Copyright 2025 Manuals.Online. All Rights Reserved.