Reef Factory kH keeper User manual

Thank you for purchasing our device
kH keeper
KH Keeper Manual / 136

!"#$%&'()%"*+ ,+
-.#+(%"#/"#0*+ ,+
!"0#122."3+1"&+$/4%512+%6+#7/+4/10'$."3+8/19/$*+ :+
;$/<1$1)%"+%6+#7/+$/13/"#*+ =+
>%"?3'$1)%"+1"&+%</$1)%"+%6+#7/+&/5.(/*+ @+
A/0($.<)%"+%6+#7/+&/5.(/+6'"()%"0*+ B@+
>12.8$1)%"+<$%(/&'$/*+ BC+
D$$%$+0.3"12.01)%"+1"&+.$$/3'21$.)/0+&'$."3+#7/+%</$1)%"*+ ,,+
E&&.)%"12+6'"()%"0*+ ,,+
F/(7".(12+<$%82/40+1"&+F$%'82/07%%#+3'.&/*+ ,G+
KH Keeper Manual / 236

!* !"#$%&'()%"*+
Before setting up and using the device please read this entire user manual carefully.
In chapters of instruction there may be differences between what is presented on the screen of the
device and graphics in the manual. The manual includes information about the device functions,
which contains the software version number 0.5.3. The software version information is always in
the lower right corner of the screen under the product serial number. If the software version is
older, proceed with device software update to get access to the latest features.
!!* -.#+(%"#/"#0*+
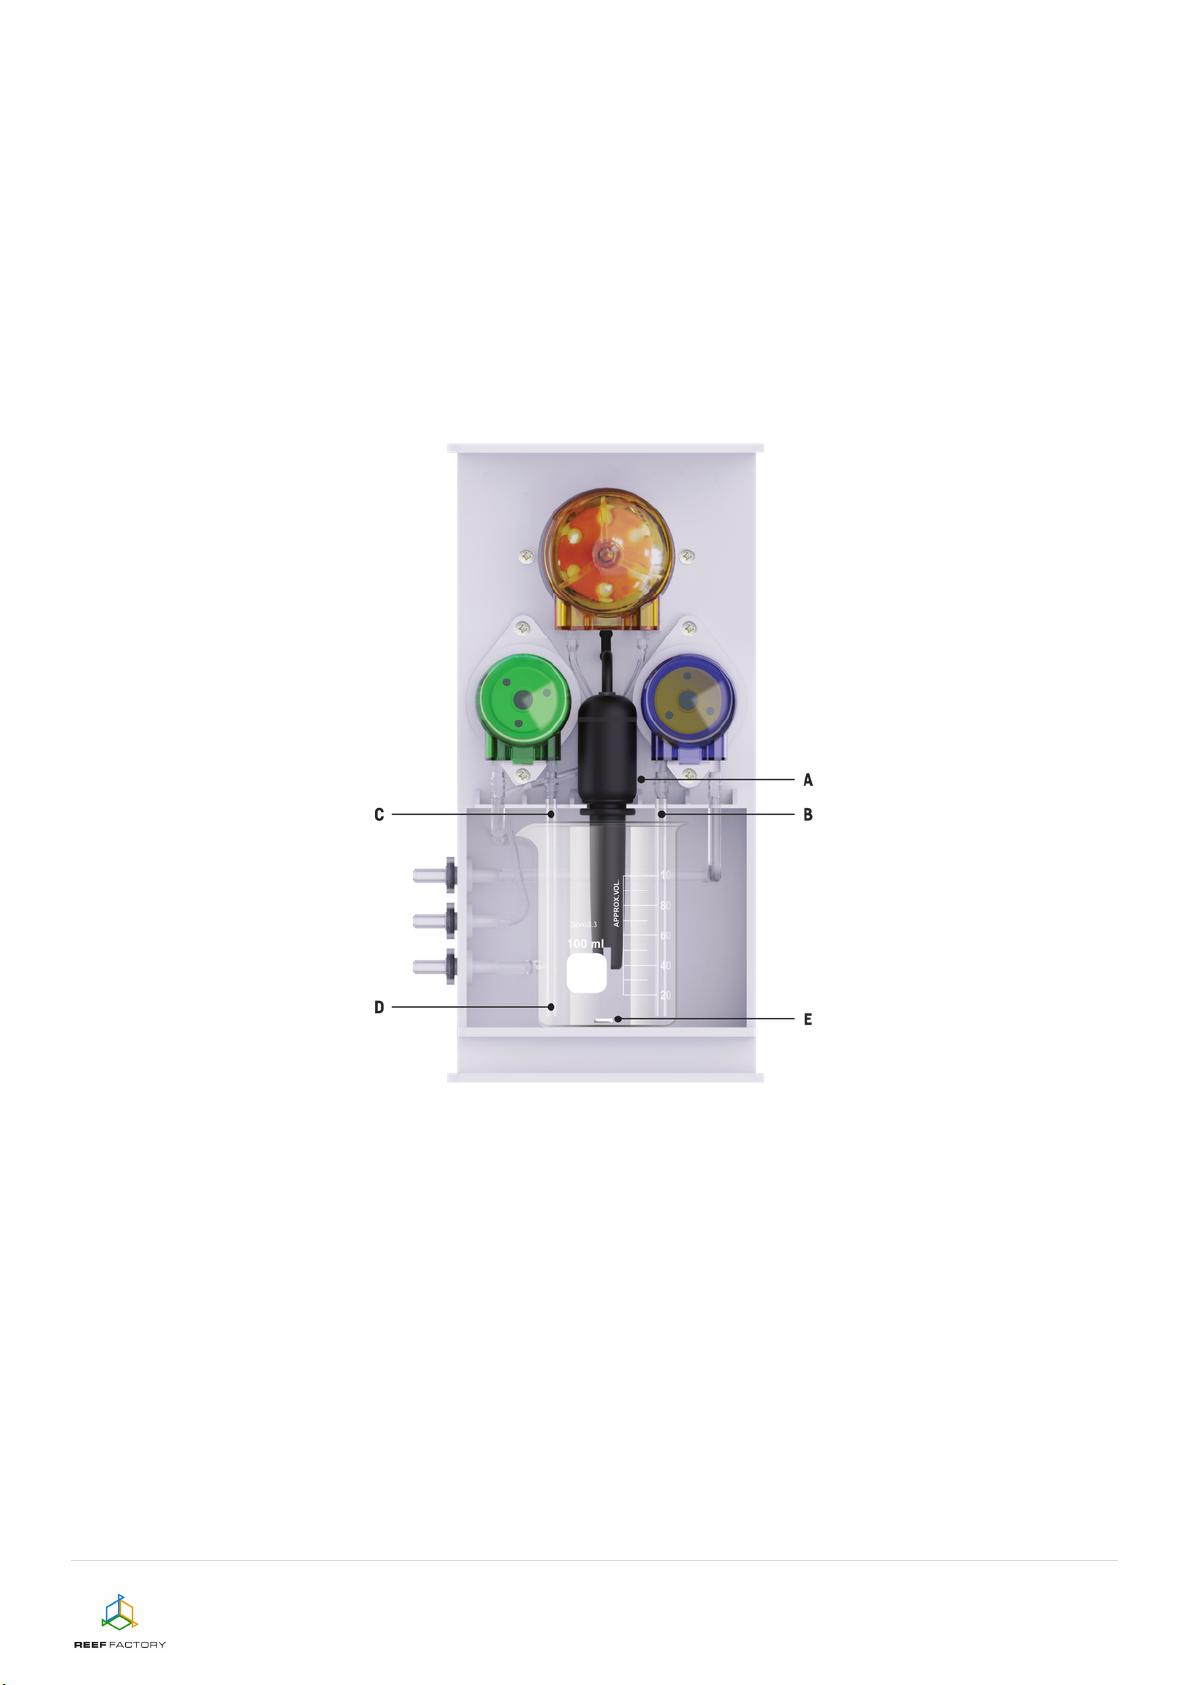
The following items are included with your kH keeper device (see graphic below):
●10ml high measuring cup for calibrating the reagent dosing pump (1),
●two sachets with powder to calibrate the pH4 and pH7 probe (2 and 3),
●a glass beaker for kH measurements installed in the device,
●magnetic stirrer installed in the device,
●connection pipes installed on the pumps inside the device,
●spare connection tubes in a bag (4),
●a magnet used to reset the device (5),
●a set of two hoses (6 and 7) with a diameter of 2 / 5mm for connecting a discharge pump
aquarium water with a water filter (connect to connectors number 4 in the graphic below)
and for connecting a pump that drains the water after measuring without a water filter
(connect to connector number 6 in the graphic below),
●a 1 / 3 mm diameter hose (8) with a plastic tube for taking a reagent (connect to the
connector o number 5 of the graphic below),
●100ml high measuring cup for calibrating the pump collecting water from the aquarium (9),
●12 V / 2 A power adapter (10),
WARNING: It is recommended to use the shortest possible hoses. Hoses with a diameter of
2/5 mm should not be longer than 150 centimeters, while the reagent hose should not be
longer than 75 centimeters. Remember that any change in hose length affects the amount
of liquid dispensed and requires recalibration of the device. Please remember to cut the
silicone hoses to the correct length before calibrating the Aquarium & Reagent pumps.
KH Keeper Manual / 336

!!!* !"0#122."3+1"&+$/4%512+%6+#7/+4/10'$."3+8/19/$*+
If you need to clean the device or disassemble the glass beaker, follow the steps below:
●Gently remove the pH probe (A) from the plastic holder,
●Pull out the connector of the pump that pours water from the aquarium, which is located in
the beaker on the right side, from the plastic holder. Pay attention to the installed tube to not
damage it (B),
KH Keeper Manual / 436

●Pull the connector of the emptying pump out of the plastic holder gently after the test, which
is provided in the beaker to its left. Pay attention to the installed tube to not damage it (C),
●Gently pull out the glass beaker (D), pay attention to the magnetic stirrer (E) which is inside
the glass beaker so do not lose it.
●Please remember to leave the piece of plastic under the glass beaker. The purpose of this
is to ensure the beaker does not move and positions the plastic tubes to the bottom of the
beaker.
When assembling the kit, proceed in the reverse order. When attaching the probe, insert it into the
slot in the holder, lower it as far as possible and press it from below with a rubber cap. Try to keep
the probe mounted as close to the vertical position as possible.
WARNING: It is very important to put the beaker right (to the maximum position) against the
back wall of the device. If it is not adjusted properly, there is a risk that the magnetic stirrer
KH Keeper Manual / 536

will not rotate and the Kh measurement will be incorrect. Each time after mounting the
beaker in the device, test the operation of the magnetic stirrer by selecting the speed of its
rotation in the device functions (stirring function).
!H* ;$/<1$1)%"+%6+#7/+$/13/"#*+
Make sure that you have purchased a dedicated Reef Factory reagent for measurements with the
device. It must be purchased separately because it is not included with the device. If you do not
have a dedicated reagent, the measurement will not be possible (result will be incorrect). The
reagent we offer is condensed and it is necessary to dilute it in RO water in a proportion of 1 to 9.
This means that the preparation of 1 liter of the ready solution for measurements requires mixing
100 ml of the condensed reagent and 900 ml of RO water. Below is a table with calculations on
how to properly prepare a reagent of a specific capacity.
WARNING: Remember to stir the reagent in the container every few days so that its
concentration is even throughout the volume of the container.
KH Keeper Manual / 636

H* >%"?3'$1)%"+1"&+%</$1)%"+%6+#7/+&/5.(/*+
Make sure that the device is installed in a place that allows easy regular maintenance. The device
is also suitable for wall mounting.
WARNING: The device must be placed in an upright position.
To configure the device correctly, follow the instructions below.
1. Please refer to the graphics below to properly connect peripheral devices to the kH keeper.
Pay attention to the marking of individual components so as not to make a mistake when
making connections.
>7/4.(12+0%2')%"+<$/<1$1)%"+#182/+I$/13/"#J
Container size (liter)
Condensed reagent (liter)
RO water (liter)
1
0,1
0,9
2
0,2
1,8
2,5
0,25
2,25
5
0,5
4,5
10
1
9
25
2,5
22,5
KH Keeper Manual / 736

2. Pay particular attention to the proper connection of the hoses, liquids (aquarium water,
reagent) and the water outlet to the waste container.
WARNING: The water filter must be completely submerged in the water, and its
elements must not protrude above the water.
KH Keeper Manual / 836

Water filter
3. There is a magnetic stirrer in the glass beaker, be careful not to lose it.
4. Try to place the reagent container as close to your kH keeper as possible, preferably at the
same height or maximum 20 cm below.
5. Connect the device to the power socket using a dedicated 12V / 2A power supply.
WARNING: the power supply dedicated to the device has a different supply voltage
than our other products and cannot be replaced with another power supply. If you
use a power adapter from our other device, the device may not work properly or be
permanently damaged.+
6. The device requires calibration after installation. This process will be described later in this
manual.
KH Keeper Manual / 936

WARNING: each change of the device installation location, shortening or lengthening
the hoses, connecting additional accessories, such as filters or check valves in the
water or reagent supply circuit in kH, requires recalibration of the device.
7. To perform kH measurements, it is necessary to purchase a reagent.
WARNING: To ensure the highest accuracy of measurements, it is necessary to use
only a dedicated Reef Factory reagent. The use of other than the dedicated one will
result in incorrect measurement.
8. The device can be configured using a web browser on your computer, laptop, tablet or
smartphone. To do this, display the list of Wi-Fi wireless networks available on the selected
device, then search for and connect to the network which name corresponds to the serial
number of the device, according to the formula:
RFKHXXXXXXXXXXXX
Our devices are working in 2,4 GHz technology. To log in, please provide password:
reeffactory
When you are connecting to a Reef Factory device, the connection status may state‘no
internet’. Please ignore it. This appears on a smartphone, tablet, laptop or any other device,
because you are connected to a Reef Factory device WiFi and you have no internet access
through these devices.
WARNING: Be sure you are in range of device WiFi network.
9. Whilst connected to the device WiFi module, open a browser and type in the following:
www.khkeeper.io
If after entering the correct website address, the following message appears on the screen,
it means that the connection with the device has not been established, and the connection
to your home internet network (wired or wireless) is still active.
KH Keeper Manual / 10 36

Try to connect to the device again and repeat the steps above.
NOTE: Our devices communicate without any problems with home networks, where
the configuration is carried out in B/G/N standards, and the channel width is 20Mhz.
Incorrect configuration of the router in MIX mode (variable/mixed channel width
20Mhz/40Mhz) may cause the device to disconnect and reconnect to the router in
random cases.
KH Keeper Manual / 11 36

Set up your device in five easy steps.
Step one - choose the language you want to use while operating the device.
KH Keeper Manual / 12 36

Step two - set the kH range suitable for your tank (by default from 7.00 to 8.00).
By clicking and holding the red dots and moving left or right, you set the minimum and maximum
value of the kH range appropriate for your tank. When the kH level reaches levels below or above
the set range, the device will immediately notify you about it. The range scale automatically
changes and adjusts in size to the range you specify. The measurement is performed with an
accuracy of two decimal places, i.e. up to 0.01 dKh.This can be modified at any time after set up is
complete.
Step three - connect the device to your home Wi-Fi wireless internet network. If the network is
secured, enter the password that protects the home network against unauthorized access.
KH Keeper Manual / 13 36

If the device does not connect to your home Wi-Fi wireless network the first time, you will have to
repeat this step. It largely depends on the type of your network device and its producer. Your
wireless network signal level should be as high as possible. Please note that the device that
KH Keeper connects to must have internet access to communicate with the Smart Reef system.
When KH Keeper has successfully connected to the Wi-Fi wireless network, the IP address
assigned to your device will appear in the upper left corner of the screen. This will inform you that
everything is connecting well.
KH Keeper Manual / 14 36

KH Keeper Manual / 15 36

Step Four - Create a free account on Smart Reef system by clicking the "Create a free account"
button. Remember that you need to connect to the Internet through your home Wi-Fi router to do
this.
WARNING: The password for the account should be sufficiently complex and difficult to
hack.
Connecting the device with a Smart Reef account will enable remote control of the device and
water purity control as well as access to additional functionalities. If you already have a Smart
Reef account, please enter your login details to add another device. If you do not want to manage
your device remotely, you can skip this step, but you will lose a number of additional benefits
regarding this operation, including the ability to update your device.
KH Keeper Manual / 16 36

Step Five - Congratulations, the KH Keeper setup is complete.
WARNING: The first time the device is turned on, it is recommended to place the probe in
the aquarium water (brine) for 30 minutes and then take some test measurements.
KH Keeper Manual / 17 36

H!* A/0($.<)%"+%6+#7/+&/5.(/+6'"()%"0*+
1. After completing the configuration (pressing the "END" button), the current status of the
device will be displayed on the screen. Pay attention to the additional functions of your new
smart kH meter. It will be described later in this manual.
At any moment, you can correct the kH range appropriate for your tank by clicking on the red
dots and moving them left or right to set the minimum and maximum value of the kH range.
The range scale automatically changes and adjusts in size to the range you specify. The
measurement is performed with an accuracy of two decimal places, to 0.01 dKh.
2. In the central part of the screen, is displayed the current kH value from the last
measurement, below there is information about the difference with the measurement in
relation to the previous measurement (+0.20) and the date of the last measurement. After
pressing the button “show more”, the history of measurements is presented, as in the
graphic below. Measurement statuses are also presented:
●OK - the measurement is within the set range, below the range - the measurement
value is outside the measuring range of the device,
●too low - the measurement is below the set range,
●too high - the measurement is above the set range,
●too rapid - the value change is above the set allowable change between
measurements (details will be described further in this manual). In case the change
is too abrupt, the device performs another control measurement - see the
measurement column. When its result is the same, the device considers it correct.
KH Keeper Manual / 18 36

3. History button - displays historical measurements that are no longer published
on the list in the "show more ..." function. This function is available after logging in to your
Smart Reef. If the device is not logged in, this function is not available.
4. There is a drop-down menu icon in the top right corner of the screen.
By selecting this menu, you can change or reconfigure the device. There are also additional
functions, such as support for Wi-Fi wireless networks, the ability to set a password for the
device network so that nobody but you can remotely connect to it, support for your Smart
Reef account, the ability to set the current date and time, change the language and the
function of restoring the device to factory settings. In addition, the icons show the current
connection status with your wireless network and the Smart Reef system.
KH Keeper Manual / 19 36

The symbol means a valid connection, while the symbol means no connection.
H!!* >12.8$1)%"+<$%(/&'$/*+
1. In the lower right corner of the screen you will find the device calibration function .
Performing a calibration is very important as it affects the precision of the measurement.
Remember to perform the calibration process immediately after installing a new device and
always after changing its installation location and changing the installation connection to it
(length of hoses, additional filters or valves, etc.). The calibration process should be
repeated periodically, in accordance with the device prompting "next calibration". Calibration
takes three steps as it is necessary to calibrate the pH probe and the two pumps.
2. The pH probe calibration - for this purpose, uses the pH4 and pH7 testers
included in the kit. You may use liquid or powder solutions by other manufacturers. Sachet
testers are used to prepare ready-made buffer solutions. The contents of the sachet should
be poured into 250 ml of Reverse osmosis water (with a temperature close to 25 ° C),
please do not begin the calibration process until the contents of the sachets have been
KH Keeper Manual / 20 36
Table of contents
Other Reef Factory Aquarium manuals