Reef Factory Thermo control User manual

ver. 2.0.1
Thermo control
User Manual
Dear customer, thank you for your purchase.
English
www.reeffactory.com

Table of Contents
I. Assembly of the device…………………………………………………………………..…………………………….……………3
II. Initial configuration……………………………………………………………………….…………………………….……………5
III. Configuration of the device operation......................................................................................................9
IV. Temperature Calibration…..……………………………………………………………..………………..…………………….10
V. Resetting the device………….……………………………………………………….……..…………………………………….12
VI. Resetting the device… ….………………………………………………….….……….….…………………………………….12
VII. Replacement of fuses…..……………….….…………………………………...…………..………………………………….13
VIII. Updating the device……………………….…………………………………………………..……..………………………….14
IX. Information and Warnings…………..……………..………..………………………………..………………………………..15
X . Warranty conditions………....…….……………………………………………………………..……………………………….17
XI . Technical information…………………….………………………………………………………..……………………………20
IMPORTANT INFORMATION! Please read the entire user manual very carefully before setting
up and using the device. There may be slight differences in the content between what is
presented on the screen of the device and the descriptions in the manual.
Manual Thermo control ©Reef Factory 2023
2

I. Assembly of the device
1. Mount the device
Using the holes on the back of the device, mount it in
a safe place away from water and vapors.
Connect the device to the power supply.
Using the power cord
included in the set, connect the device to the
mains socket. Insert the power cord into a tightly
fitting socket, make sure that the cord is not loose.
2. Install the temperature sensor in the water.
ATTENTION! The sensor must be in a safe place with a constant temperature.
Place it away from water surfaces and heat sources such as heaters.
3. Connect the heating and cooling device as marked.
Manual Thermo control ©Reef Factory 2023
3

Connect the cooling device to the socket marked
with the snowflake and the heater to the socket
marked with the heating symbol.
If more than one heater is used, an appropriately
rated power strip can be used.
The maximum load of the device is 1000
W for the heating socket and 1000 W for
the cooling socket.
Manual Thermo control ©Reef Factory 2023
4

II. Initial configuration
To connect the device to your account using the Smart Reef app, the device
must be connected to power and within range of your home network, and
your phone or tablet. You can download the app from the Play store and the
App store.
1. open the Smart Reef app on your mobile device and log in.
If you do not already have a Smart Reef account,
select “Create a free account”.
Enter the email address you want to use in the Smart Reef application
as well as the password, and then repeat it.
If you don't want to, log in every time you launch the application,
check “Keep me logged in”.
2. Create your aquarium in the Smart Reef app.
If you do not have your aquarium yet, use the option
“Add an aquarium” in the lower left corner of the screen and provide the
necessary information.
If you already have your aquarium in the Smart Reef app,
proceed to the next step.
Manual Thermo control ©Reef Factory 2023
5

3. Add the device to your Smart Reef account
From the list of aquariums or the list of devices
in the lower right corner of the screen,
select “add device.”
Allow the app to use your exact location when
using the app. This allows the app to connect devices
to Wi-Fi networks more easily.
Select from the scrolling list the device you want to add to your
Smart Reef account and press “NEXT”.
Manual Thermo control ©Reef Factory 2023
6

4. Set up a Wi-Fi connection to your home router.
Enter the exact Wi-Fi network name of your home router.
Then enter the password for your home router, if required,
and press “NEXT”.
Pay attention to uppercase and lowercase characters.
NOTE: Special characters may not be supported if the name
or password for your router contains such characters,
change them in your router's settings.
NOTE: Reef Factory devices only support the 2.4 GHz Wi-Fi
network band. If your router generates 2.4 GHz and 5 GHz
bands, indicate the name of the 2.4 GHz network.
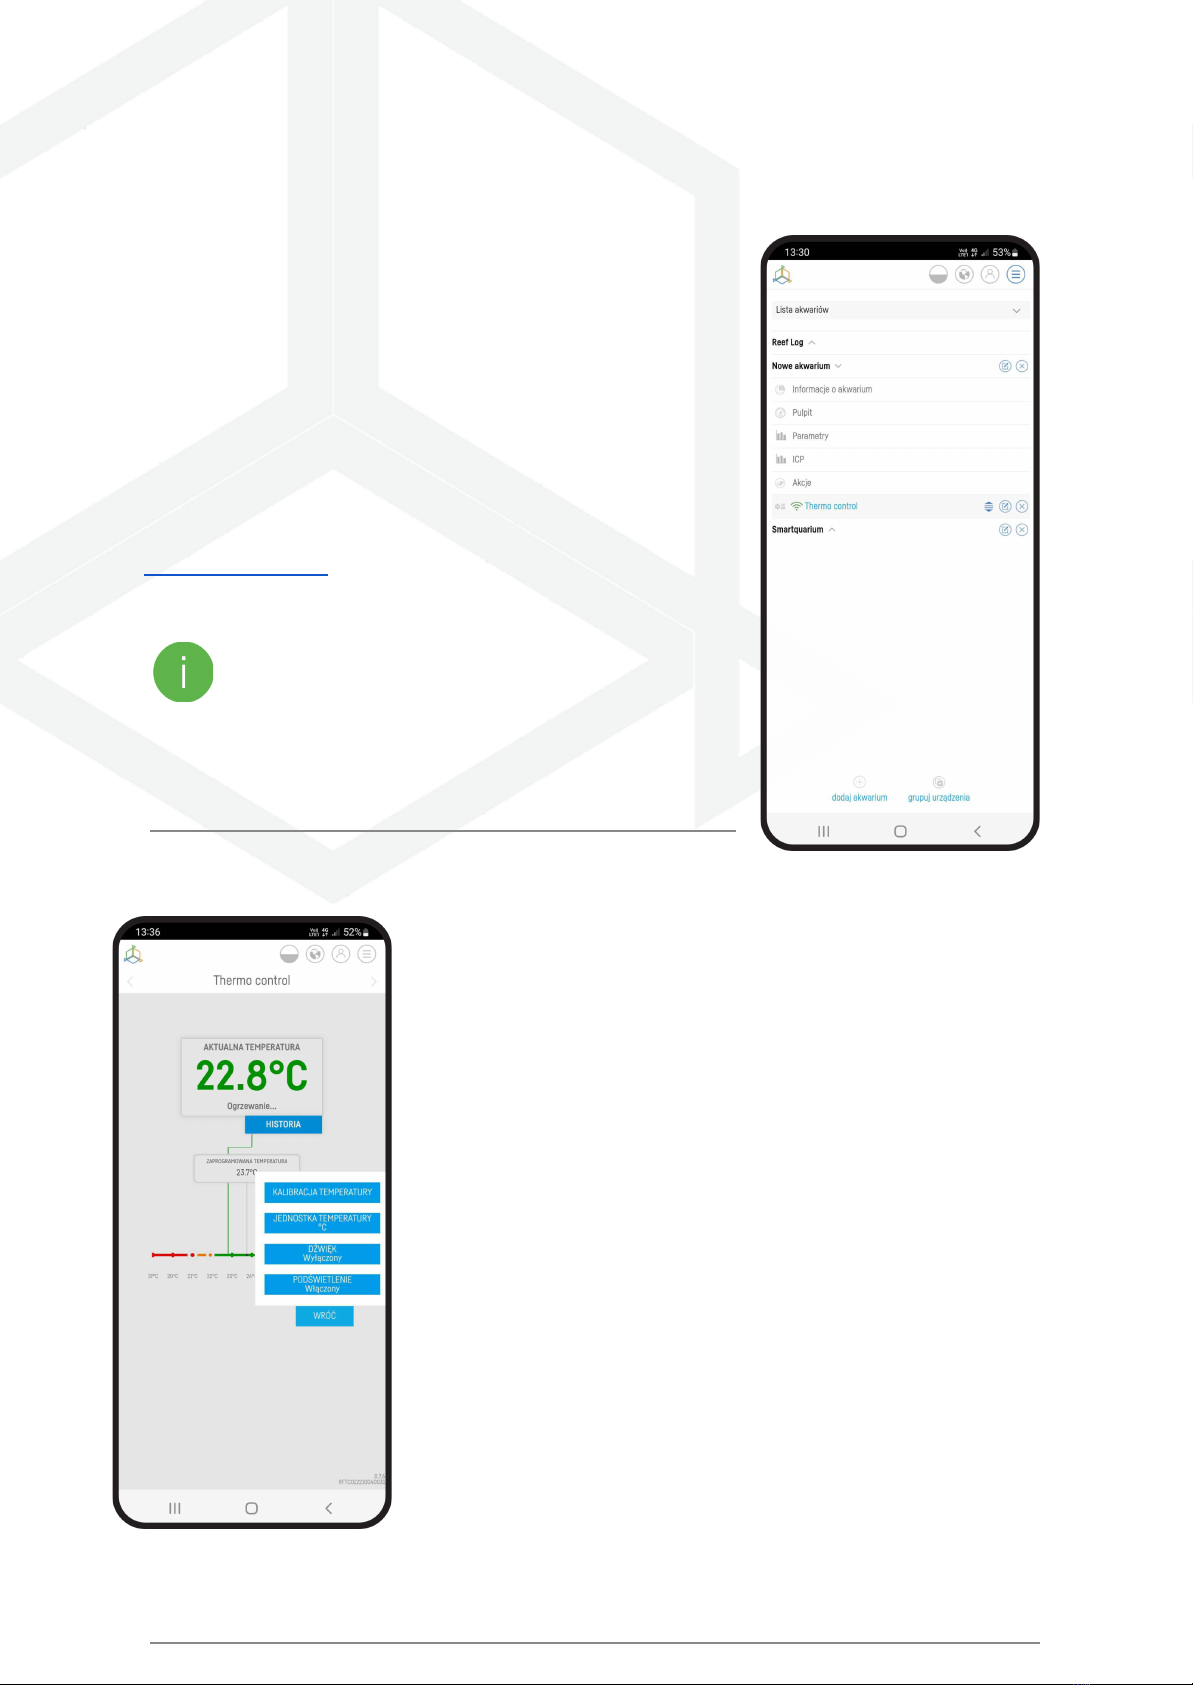
Select “SCANNING” to scan the QR code on
the device, then allow the Smart Reef app to
access the camera while using the app.
After pressing “SCAN”, hover your phone's
camera over the QR code to scan it, or
manually enter the device's serial number
and select “CONNECT”.
You can find the serial number on
the device, on the packaging and as
the generated Wi-Fi network.
The serial number starts with RF, an
abbreviation of the device name, and
a string of digits.
Manual Thermo control ©Reef Factory 2023
7

Allow the Smart Reef app, to temporarily connect
to set up a Wi-Fi network.
Congratulations! The device has been correctly added to your Smart
Reef account and will appear in the list of devices within 60 seconds.
Manual Thermo control ©Reef Factory 2023
8

III. Device operation configuration.
If you have successfully connected to the control panel, you can proceed
to the device configuration.
Set the operating range of the device by moving the orange points on
the temperature scale. The device will start the heating system when
the temperature drops below set point and will start the cooling system
when the temperature rises above the set point.
Set the alarm range of the device by moving the red points on the
temperature scale. The device will sound an alarm and send an e-mail
and push notification to your mobile device when the temperature drops
below or changes above the set range.
(Default is 24 - 26 °C and alarms when the temperature is below 23 °C or above 27 °C)
You can select the unit from Celsius or Fahrenheit.
Set the audible alarm to on or off and proceed to the next step.
ATTENTION! For safety reasons, the audible alarm should always be on to alert you when the
water temperature changes.
Manual Thermo control ©Reef Factory 2023
9

IV. Temperature calibration
Devices for temperature measurement available on the market differ
in sensor design and measurement accuracy, therefore there may be
differences in the measured temperature value on different devices. If
you want the temperature value indicated on the Thermo control
device to be consistent with the indication of another temperature
meter, you can calibrate it.
To calibrate, log into the Smart Reef system in the mobile app or at
www.reeffactory.com. Then select the Thermo control device from the
list of your aquarium by clicking on its name.
During calibration, it is recommended to disconnect the
heating and cooling device by disconnecting the appropriate
plugs from the socket of the Thermo control device.
In the device menu, press the "SETTINGS" button, and then select
"TEMPERATURE CALIBRATION" from the drop-down menu.
Manual Thermo control ©Reef Factory 2023
10

Immerse the sensor in water of known temperature. Wait 60 seconds,
then press "OK".
In the next step, enter the correct water temperature value. Then
accept by clicking "OK".
The calibration process has been successfully completed.
ATTENTION! After calibration, remember to put the
temperature sensor back into the aquarium water
and connect the heating and cooling devices.
After the calibration process, the Thermo control device will indicate
the corrected temperature in the menu, and when you press the
"SETTINGS" button again, information about the value of the
measurement difference after calibration will additionally appear. A
value of -0.2 means that the temperature value you entered is 0.2 units
lower than the value measured before calibration.
Manual Thermo control ©Reef Factory 2023
11

V. Resetting the device
If your device is not working properly, you
want to configure it again or you cannot
connect to it after several attempts, you can
restore it to factory settings by applying the
magnet (included in the set) to the device's
housing in the place marked RESET.
After resetting the device to factory settings,
reconfiguration and calibration is required.
VI. Changing the device access password
For security reasons, it is recommended to change the standard device
access password. The password should be suciently complex to
prevent third parties from connecting to the device. Changing the
password requires a direct connection to the device's WiFi network as
in step 4 of Initial Device Setup.
Once you are connected to the device, expand the list by clicking on the
3 bars in the upper right corner of the screen, then go to the WiFi
network settings.
Enter your current password (default is reeffactory)
then press "OK".
In the next step, enter a new password and press "OK",
then confirm the new password and press "OK".
Congratulations! The password has successfully changed
Manual Thermo control ©Reef Factory 2023
12

VII. Replacing the fuses
There are fuses on the back of the device to
protect the device from damage in the event of
failure of the heating or cooling system. If the
device signals correct operation and the heating
or cooling system does not work, it may mean that
the fuse needs to be replaced with a new one and
that the cooling and heating device has not failed.
To do this, disconnect the Thermo control from
the mains power supply, then remove the fuse
holder from the fuse holder by turning it as
indicated on it, and then replace it with a new one. Remember to do this only when the device is
disconnected from the power supply. Otherwise, replacing the fuse may result in electric shock. To avoid
the risk of permanent damage to the device, always use fuses with the same rating as the one you are
replacing. The fuse on the left is for the heating system, while the fuse on the right is for the cooling
system. These fuses are identical and interchangeable (F5A type tubular glass fuse). The middle fuse is
placed slightly higher and protects the Thermo control device, and its parameters are different from the
others, so it cannot be interchanged with them (tube glass fuse type F400mA). If you do not have enough
knowledge to assess for yourself whether the fuse is operational or whether it needs to be replaced,
contact the nearest electrical service center in your area.
ATTENTION! Disconnect the device from the mains before replacing the fuses.
Manual Thermo control ©Reef Factory 2023
13

VIII. Updating the device
To update, log in to the Smart Reef system in the mobile application or
at www.reeffactory.com.
Then press the "Edit" button next to which there is a red indicator
informing about the available update.
In the next one you will see a message about the availability of a new
version of the software. Press "OK" to update the software.
Note that after some updates, your device may need to be
reconfigured or recalibrated.
After pressing the "OK" button, the device will automatically update.
Do not disconnect the device from the power supply during the update.
If the update doesn't complete within 30 minutes, reset your device.
After the update, check the device settings, in some cases, as
a result of the update, I may change or return to the factory
settings.
Manual Thermo control ©Reef Factory 2023
14

IX. Information and warnings
IMPORTANT INFORMATION! The Thermo control is not completely watertight. Avoid immersion,
splashing and high humidity. Exposure to these factors may cause permanent damage to the
device.
IMPORTANT INFORMATION! The device operates under mains voltage - there is a risk of electric
shock.
IMPORTANT INFORMATION! PACKAGING
The device was protected during transport by packaging. After unpacking the device, please
dispose of the packaging in an environmentally friendly manner. All materials used for
packaging are harmless to the environment and 100% recyclable. Packing materials (polyethylene bags,
foams, bundle wires, etc.) should be kept away from children during unpacking. There is a risk of
swallowing, aspiration and suffocation.
IMPORTANT INFORMATION! WITHDRAWAL FROM OPERATION
The device is marked in accordance with the European Directive 2012/19/EU and the Polish Act
on waste electrical and electronic equipment with the symbol of a crossed-out waste
container. Such marking informs that after the period of its use, this equipment cannot be
placed together with other household waste. The user is obliged to hand it over to the waste electrical and
electronic equipment collection centers. The collectors, including local collection points, shops and
communal units, create an appropriate system enabling the disposal of this equipment. Proper handling of
waste electrical and electronic equipment contributes to avoiding consequences harmful to human health
and the natural environment, resulting from the presence of hazardous components and improper storage
and processing of such equipment.
Manual Thermo control ©Reef Factory 2023
15

1. The manufacturer of the devices described in this manual is:
Reef Factory Sp. z o
. ul. Bydgoska 94
86-032 Niemcz
Poland
Manufacturer's website: www.reeffactory.com
2. The manufacturer declares that the offered products comply with the following standards:
RoHS 2011/65/EU,
RoHS 2015/863,
RED 2014/53/EU.
3. Reef Factory hereby declares that the devices are in compliance with Directive 2014/53/EU.
The full text of the EU declaration of conformity is available at the following internet address:
https://download.reeffactory.com/instructions/thermocontrol/ThermoControlCE.pdf
4. Devices manufactured by Reef Factory are intended only for home use or stores operating in the
aquarium industry , they are not dedicated to industrial applications.
5. The devices are adapted to dispensing liquids that are not hazardous substances, such as corrosive
substances, highly concentrated acids or flammable substances. In case of doubt whether a given
substance can be dosed using our devices, please contact us.
6. FCC Compliance Statement:
This device complies with part 15 of the FCC rules. Operation is subject to the following two conditions: (1)
This device may not cause harmful interference, and (2) this device must accept any interference received
including interference that may cause undesired operation. Any changes or modifications not expressly
approved by Reef Factory could void the user's authority to operate the RF Module and/or the product that
incorporates the RF Module. The user is cautioned to maintain a 20 cm (8 inch) spacing from the product to
ensure compliance with FCC regulations.
This device contains RF Module:
Part Number: ESP12F
FCC ID: 2AHMR-ESP12F
Manual Thermo control ©Reef Factory 2023
16

X. Warranty conditions
Reef Factory Sp. z o. o. does not warrant uninterrupted or error-free operation of this product. The
warranty covers only technical hardware problems that occurred within the warranty period
and under normal conditions of use.
1. Devices manufactured by Reef Factory are covered by a warranty for the period of:
24 months for individual and business customers using consumer products.
12 months for a business customer using demo products.
2. Accessories and spare parts for devices are covered by a 6-month warranty.
3. The proof of the warranty for the product is the bill or invoice of purchase, on which the date of
purchase and the name of the device are legibly marked.
4. Technical defects of the product revealed during the warranty period will be removed free of charge as
soon as possible, not exceeding 14 days from the date of delivery of the device to the Authorized Service
Point.
5. The User has the right to have the product replaced by the Guarantor with a new one, free from defects,
in the event that:
Five repairs requiring replacement of components were made during the warranty period,
and the product still shows defects, the
Authorized Service Center stated in writing that the defect is impossible to removal.
6. The condition for the warranty repair is:
Delivery of the product in the original factory packaging or other packaging protecting the device during
transport to the Authorized Service Point.
Presentation of proof of purchase,
Description of the fault that occurs in the device.
7. The warranty does not cover:
Manual Thermo control ©Reef Factory 2023
17

Normal wear of materials and consumables (e.g. consumables such as probes, sensors, pump heads,
hoses, etc.),
Mechanical damage and defects caused by it,
Damage due to improper use, inconsistent with the manual or storage of the product,
Damages caused by arbitrary repairs and alterations made by the Buyer or unauthorized persons,
Damages resulting from natural wear and tear, such as: scratches, dirt, abrasions, erasure of inscriptions,
etc.
8. Employees of the Authorized Service Center are authorized to assess the causes of defects product.
9. The repair period may be extended in the event of disruptions caused by force majeure circumstances
such as natural disasters, social unrest, etc.
10. The warranty rights do not include the buyer's right to claim lost profits or losses incurred due to
product defects.
11. The warranty period is extended by the time the device is in an authorized service center.
12. In matters not covered by the terms of this guarantee, the relevant provisions of the Civil Code shall
apply.
13. The warranty does not exclude, limit or suspend the buyer's rights under
the provisions on warranty for defects in the sold item.
14. A repaired or replaced product may contain new or refurbished components.
15. Please be advised that the repair or replacement of a product involves a significant risk of losing data
stored in a given product (especially related to its configuration and history of measurements). Therefore,
the Customer accepts that during the repair or replacement of the product, the data may be deleted.
16. The Guarantor is not responsible for the lack of full compliance (compatibility) of the product in
operation
with accessories or devices from other manufacturers used by the Customer. In particular, this applies to
network devices whose configuration may limit the ability to connect and exchange data between the
device and the server.
Manual Thermo control ©Reef Factory 2023
18

17. The customer delivers the device for repair to the Authorized Service Center at his own expense, while
the service, after performing the warranty repair, sends the device back to the customer at his own
expense.
18. The Authorized Service Point may repair/reconstruct the device at the Customer's expense
(post-warranty repair), however, the Customer must accept this cost before repairing it.
19. The Authorized Service Point may refuse to repair or replace a device that, after testing in service
conditions, does not show any defects for the product
in terms of its use (confirmation of the device's full eciency).
20. The Guarantor is not liable for incidental or consequential damages caused by breach of warranty or
conditions or any other theory of law, including but not limited to loss of usability; loss of income; loss of
actual and perceived profits (including loss of profits from contracts); loss of business; loss of
opportunities; impairment of the company's value; loss of reputation.
21. The Guarantor is not liable for direct or indirect damages caused by a defect or failure of the device and
for damages arising during the period of repairs or replacement of the device related to the inability to use
the device.
Manual Thermo control ©Reef Factory 2023
19

XI. Technical information
Device name
Thermo control
Device model
RFTC01
Temperature measurement
accuracy / Temperature
measurement range
+/- 0.1°C / min. -10°C max +85°C
Operating temperature / humidity
10°C – 50°C /0 – 99%
Power consumption
2.5 W
Output power
1000 W
Power supply
100V-230V AC 50-60 Hz
Dimensions (mm)
160x85x50
Weight
690 g
The device is manufactured with different versions of power cords and power sockets, depending on the
country in which it will be used.
Manual Thermo control ©Reef Factory 2023
20
Other manuals for Thermo control
2
This manual suits for next models
1
Table of contents
Other Reef Factory Aquarium manuals
Popular Aquarium manuals by other brands

GHL
GHL Mitras LX7 instruction manual

Sera
Sera UV-C System quick start guide

DOHSE AQUARISTIK
DOHSE AQUARISTIK HOBBY BUBBLE AIR LED operating instructions

Current
Current Aquabetta 7001 instructions

Evolution Aqua
Evolution Aqua eaProSump Series Installation and instruction manual

AQUAMAXX
AQUAMAXX BioMaxx Standard manual