PL
4 5
O instrukcji obsługi
Firma Ferguson wykorzystała wszystkie dostępne jej możliwości, aby zapewnić najbardziej
aktualne informacje o swoich produktach. Firma Ferguson nie udziela gwarancji związanych
z zawartością niniejszej instrukcji obsługi oraz zrzeka się wszelkich domniemanych gwaran-
cji dotyczących wartości rynkowej lub przydatności jej do określonych celów. Zawarte tutaj
informacje służą jako wskazówki pozwalające na użytkowanie i konserwację odtwarzacza.
Firma Ferguson zastrzega sobie prawo do wnoszenia poprawek, zmian lub tłumaczenia In-
strukcji obsługi bez wcześniejszego powiadomienia o takich zmianach. Z tego względu za-
leca się regularne odwiedzanie naszej witryny internetowej w celu uzyskania najnowszych
informacji.
Oznaczenia wykorzystane w odtwarzaczu
Ostrzeżenie: ryzyko porażenia elektrycznego - nie otwierać
Napis ten ostrzega przed otwieraniem obudowy odtwarzacza. Do
otwierania obudowy upoważnieni są wyłącznie autoryzowani pra-
cownicy serwisowi.
Oznaczenie CE
Oznaczenie to informuje, że urządzenie zgodne jest z warunkami dyrektywy
2014/30/EU dotyczącej przestrzegania przez kraje członkowskie przepisów zgod-
ności elektromagnetycznej oraz warunkami dyrektyw 2014/35/EU dotyczącej prze-
strzegania przez kraje członkowskie przepisów niskiego napięcia i bezpieczeństwa
związanego z obsługą urządzeń elektrycznych.
Logo podwójna izolacja
Logo to informuje, że urządzenie jest urządzeniem bezpiecznym pod względem
elektrycznym, o ile wykorzystywany jest zgodnie z zaleceniami określonymi w roz-
dziale dotyczącym bezpieczeństwa.
Bierzmy czynny udział w ochronie środowiska!
Twoje urządzenie jest zbudowane z materiałów, które mogą być poddane ponow-
nemu przetwarzaniu lub recyklingowi. W tym celu należy je dostarczyć do wyzna-
czonego punktu zbiórki.
Logo RoHS
Logo to informuje, że urządzenie zgodne jest z warunkami dyrektywy 2011/65/EU
(potocznie znanej jako Restriction of Hazardous Substances Directive lub RoHS).
Dyrektywa RoHS obejmuje swoim działaniem ograniczenia na etapie produkcji
w wprowadzaniu substancji niebezpiecznych w elektronice.
Piktogram ostrzegający o emisji światła laserowego
Ten odtwarzacz jest produktem z laserem 1 klasy. Użytkowanie urządzenia niezgod-
nie z jego przeznaczeniem może spowodować narażenie na działanie niebezpiecz-
nego promieniowania laserowego. Wiązka lasera jest niebezpieczna dla oczu, nie
próbuj zdemontować obudowy. Naprawę sprzętu pozostaw wykwalikowanemu
personelowi.
1. Podstawowe informacje
1.1. Główne cechy:
• Odtwarzanie płyt DVD-video
• Odtwarzanie plików multimedialnych
1.2. Zawartość pudełka:
• Pilot zdalnego sterowania
• Instrukcja użytkownika
• Odtwarzacz DVD
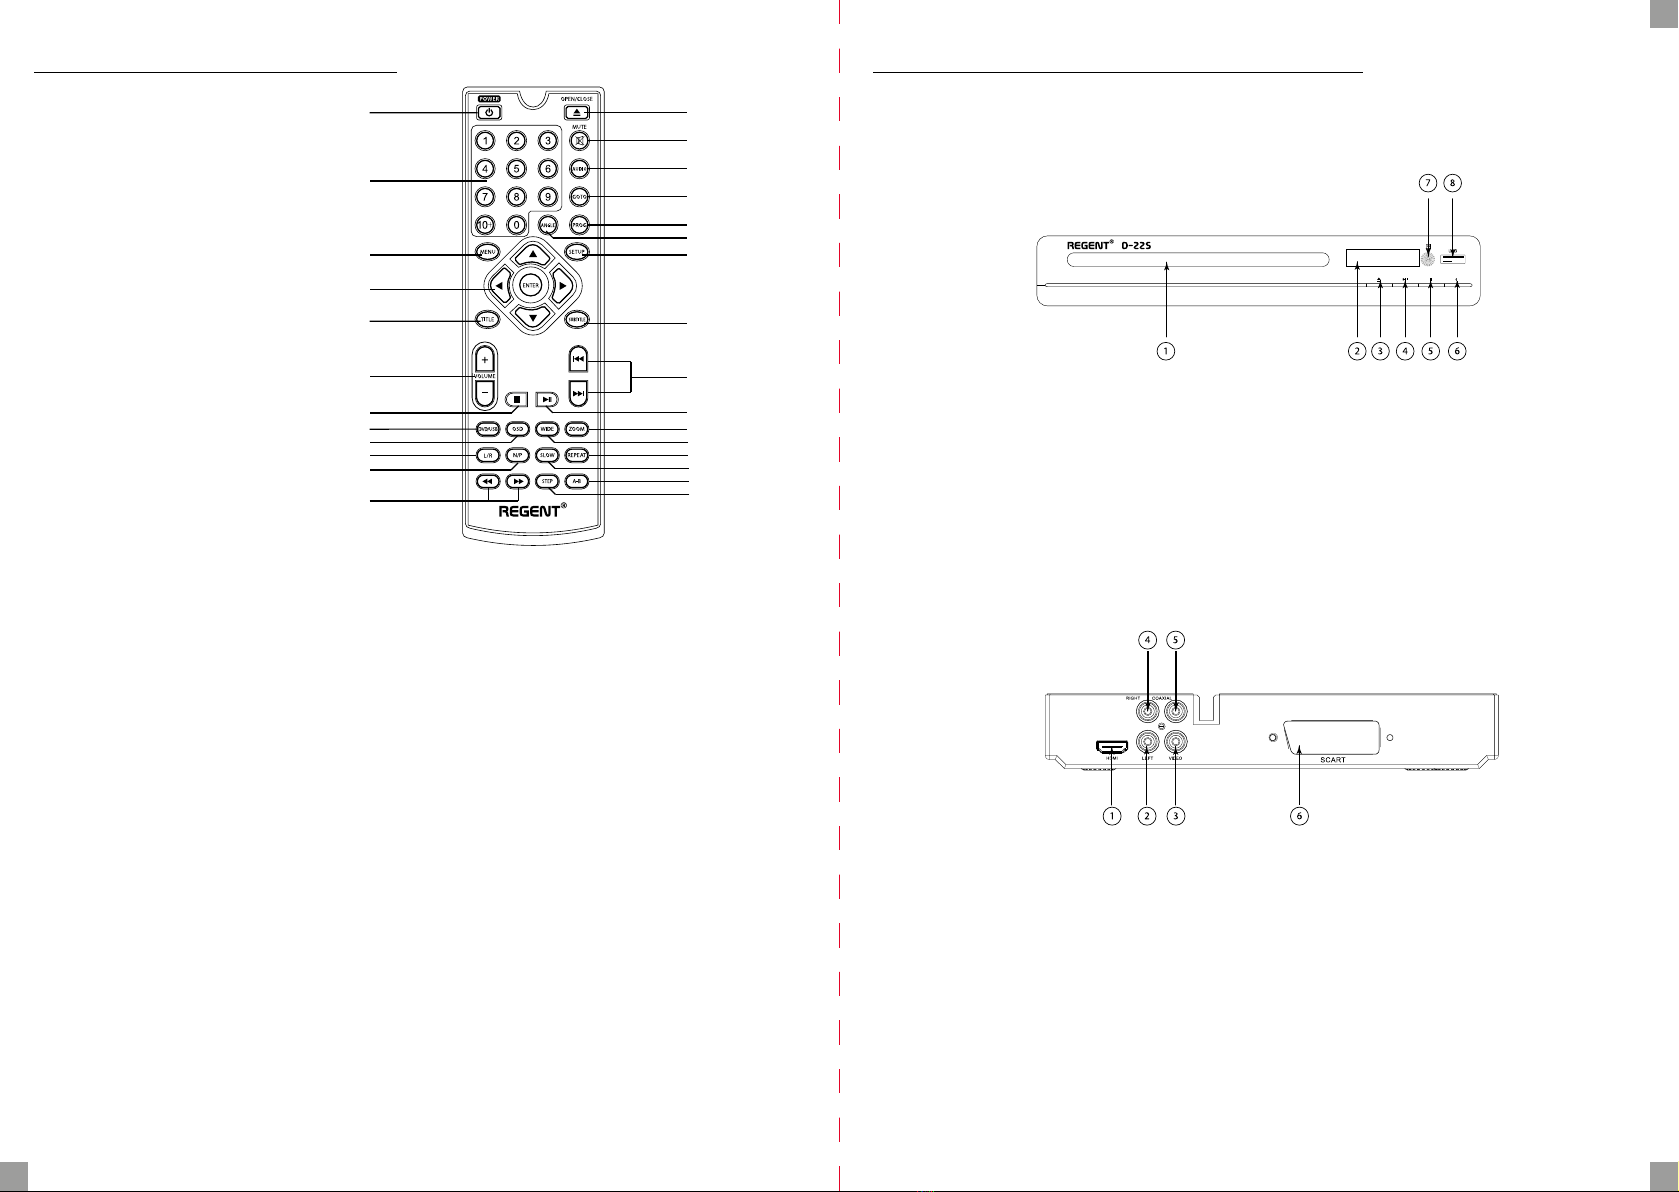
1.3. Ważne wskazówki do obsługi odtwarzacza
Odtwarzacz DVD posiada uproszczony interfejs ekranowy (klawisz menu), pozwalający na
przeglądanie zawartości nośnika (w zakresie obsługiwanych formatów) za pomocą krzyża
nawigacyjnego z poziomu pilota.
UWAGA: Formaty nie obsługiwane przez urządzenie mogą
nie pojawić się w przeglądarce multimediów.
Pod klawiszem SETUP znajdują się ustawienia urządzenia.
UWAGA: Proszę pamiętać, że nowe oprogramowanie może zmie-
nić funkcjonalność odbiornika. Zdjęcia i opisy zamieszczone w instruk-
cji mają charakter poglądowy. Jeśli zauważą Państwo błąd prosimy
o jego zgłoszenie, dołożymy wszelkich starań aby go poprawić.