REI R-475 User manual

Heavy-duty AM/FM Stereo Weather Band Receiver, with
Front-Panel Auxiliary Input
R-4 75
50W X 4

6
REI Audio System REI Audio System
Thank you for purchasing this AM/FM Weather Band Receiver from REI. This
product is designed and tested to withstand temperature and vibration extremes.
Please read the owners manual carefully before attempting to install this unit.
FEATURES:
NOAA Weather Band Receiver
AM/FM Stereo Receiver
Digital Tune and Seek
Automatic Scan of Preset Stations
Preset Up to 30 Radio Stations (18 FM and 12 AM)
Front & Rear Aux Input
RCA pre-amp Output
Volume Select Knob
LED Backlighting
US/Euro Band Switch
CONTROLS AND INDICATORS
SPCIFICATIONS
AUDIO SECTION
Power supply voltage (negative ground) ………………………12V DC (11V-16V)
Nominal Current Consumption……...………………………………..less than 2.5A
Max Current Consumption……...…………………………………….………. …..10A
Speaker impedance …………………….………………………4-8 Ohms per channel
POWER OUTPUT (RMS)
Continuous Output into 4Ω, 20 to 20,000 Hz at 3 % THD ……...………4x1 4 Watts
Maximum Power Output (Volume control Maximum)…………50W×4 (at 1kHz)
FM TUNER
Range ……………………………………………………….. (USA) 87.5 – 107.9 Mhz
(EUR) 87.50 – 108.00 Mhz
Usable sensitivity ……………………………………………..14dBf (2.0uV/75ohms)
50dB quieting sensitivity ………………………………………………34 dBf (50uV)
Signal to noise ratio …………………………………………………..…60dB(Mono)
Stereo separation (@ 1K Hz) ………………………………..………………….35 dB
AM TUNER
Range ………………………………………………………… (USA) 530 – 1710 Khz
(EUR) 522 – 1620 Khz
Sensitivity (20 dB quieting) ………………………………………………… 10 uV
Signal to noise ratio (@ 50 uV) …………………………………………...… 42 dB
WEATHER BAND SECTION
CH.1 162.40 0 MHZ CH.2 162.425MHZ
CH.3 162.45 0 MHZ CH.4 162.475MHZ
CH.5 162.50 0 MHZ CH.6 162.525MHZ
CH.7 162.55 0 MHZ
DIMENSIONS
Chassis (W x H x D) ………………………………….…………178 x 50 x 154 mm
Nosepiece (W x H x D) ……………………………….……… 188 x 58 x 17.5mm
Weight ……………………………………………………………………….…. 1.6 kg
…
1.
Power On/Off Button
2.
Band Selector
3.
Radio Station Tune/Seek Buttons
4.
LCD Display
5.
Radio Status Display Button
6.
Radio Station Scan Button
7.
MODE Select Button
8.
Auto Store Preset Radio Stations Button
9. Front Auxiliary Input Jack
10. Volume/Select Knob
11. Preset Memory/Recall and Weather
Band Select Buttons
12.
US/EURO Band Select Switch
(Not Shown)

2
5
REI Audio System REI Audio System
THE DIGITAL RADIO
(1) Power On/Off Button
Press the Power Button to turn ON or OFF the unit.
(2) Band Selector
Press this button to change radio bands as follows:
FM1—FM2—FM3—AM1—AM2
(3) SEEK Buttons
Under Radio mode, press these buttons momentarily to manually tune to the
desired station moving upward or downward. Press and hold these buttons and
the radio will automatically seek the next available radio station.
(4) LCD Display
Time or Radio display can be changed by press the DISP button.
(5) Display Button
Press this button to change between Time and Mode Information display.
Setting The Time.
Press and hold the display button until the hour display begins to flash.
Rotate Volume/Select Knob to adjust the hour. Press the display button again,
and the minute display will flash. Rotate Volume/Select Knob to adjust the
minute. Press the display button again and hold to exit this menu.
(6) Scan Button
Under radio mode, press this button to scan to the next stations. It will stay at any
available station for 5 seconds and then scan to next available station unless
interrupted by the user.
(7) MODE Button
Press this button to change input mode as follows:
Radio—Weather Band—AUX—Radio
(8) Auto Button
Press and hold this button to auto memorize the next available stations into the
preset memory buttons. This function will erase previous memorized stations and
store the newly searched stations. Press this button momentarily to scan through
the (6) preset stations of the AM/FM band that has been selected. This button
INSTALLING THE RADIO
1. First put the DIN collar in the hole opening, then, use the screwdriver to bend the
tabs outward as shown on the drawing below.
2. Insert the radio in the DIN collar.
3. Affix the rear mounting stud to the rear mounting bracket (option).
4. When removing the radio, release the rear mount first and then insert the
two release keys on either sides of the radio and pull the radio out.
ELECTRICAL CONNECTIONS
Follow this easy wiring diagram to install new or existing Radio and Speakers.
Warning:
**Shorting or grounding any of the speaker wires can damage the radio and is not
covered by warranty.
ACC
+12v+12v
Rear Pre Out

REI Audio System REI Audio System
34
also functions as Weather Band Channel 7 button. Under weather band mode,
pressing this button will select weather band channel 7 (162.550 MHZ).
(9) Auxiliary Input Jack
The unit is equipped with a front panel 3.5mm auxiliary input so you connect
your external portable audio player or portable satellite radio receiver. On the
rear of the unit, there is a pair of RCA inputs to connect an additional auxiliary
source.
(10) Volume/Select Knob
Rotate the knob Clockwise or Counterclockwise to change the volume level.
Press the knob to rotate through the following functions:
VOL---BAS---TRE---BAL---FAD
Upon choosing the function, rotate the knob to adjust the desired setting.
PLEASE NOTE: If the Volume/Select Knob has not been adjusted for 5 seconds
it will automatically revert back to volume function.
Menu Operation
Press and Hold for more than 2 seconds to choose. Once active, rotate the
volume knob and click to select
Seek DIS/LOC
Selects Distance or Local Seek sensitivity setting.
Clock 12/24
Select 12/24 hours clock mode.
NO/SYS/CLK PRI
NO PRI: Factory Default is radio frequency display. Press “DISP” to toggle
between radio frequency or clock display. The display will stay which ever
display mode the user selects.
SYS PRI: When playing RADIO, the frequency is the priority. When playing
AUX, the AUX is the Priority. Press “DISP” to show the clock for 5 seconds
and then return to its original display.
CLK PRI: Under all modes, the clock is the priority.
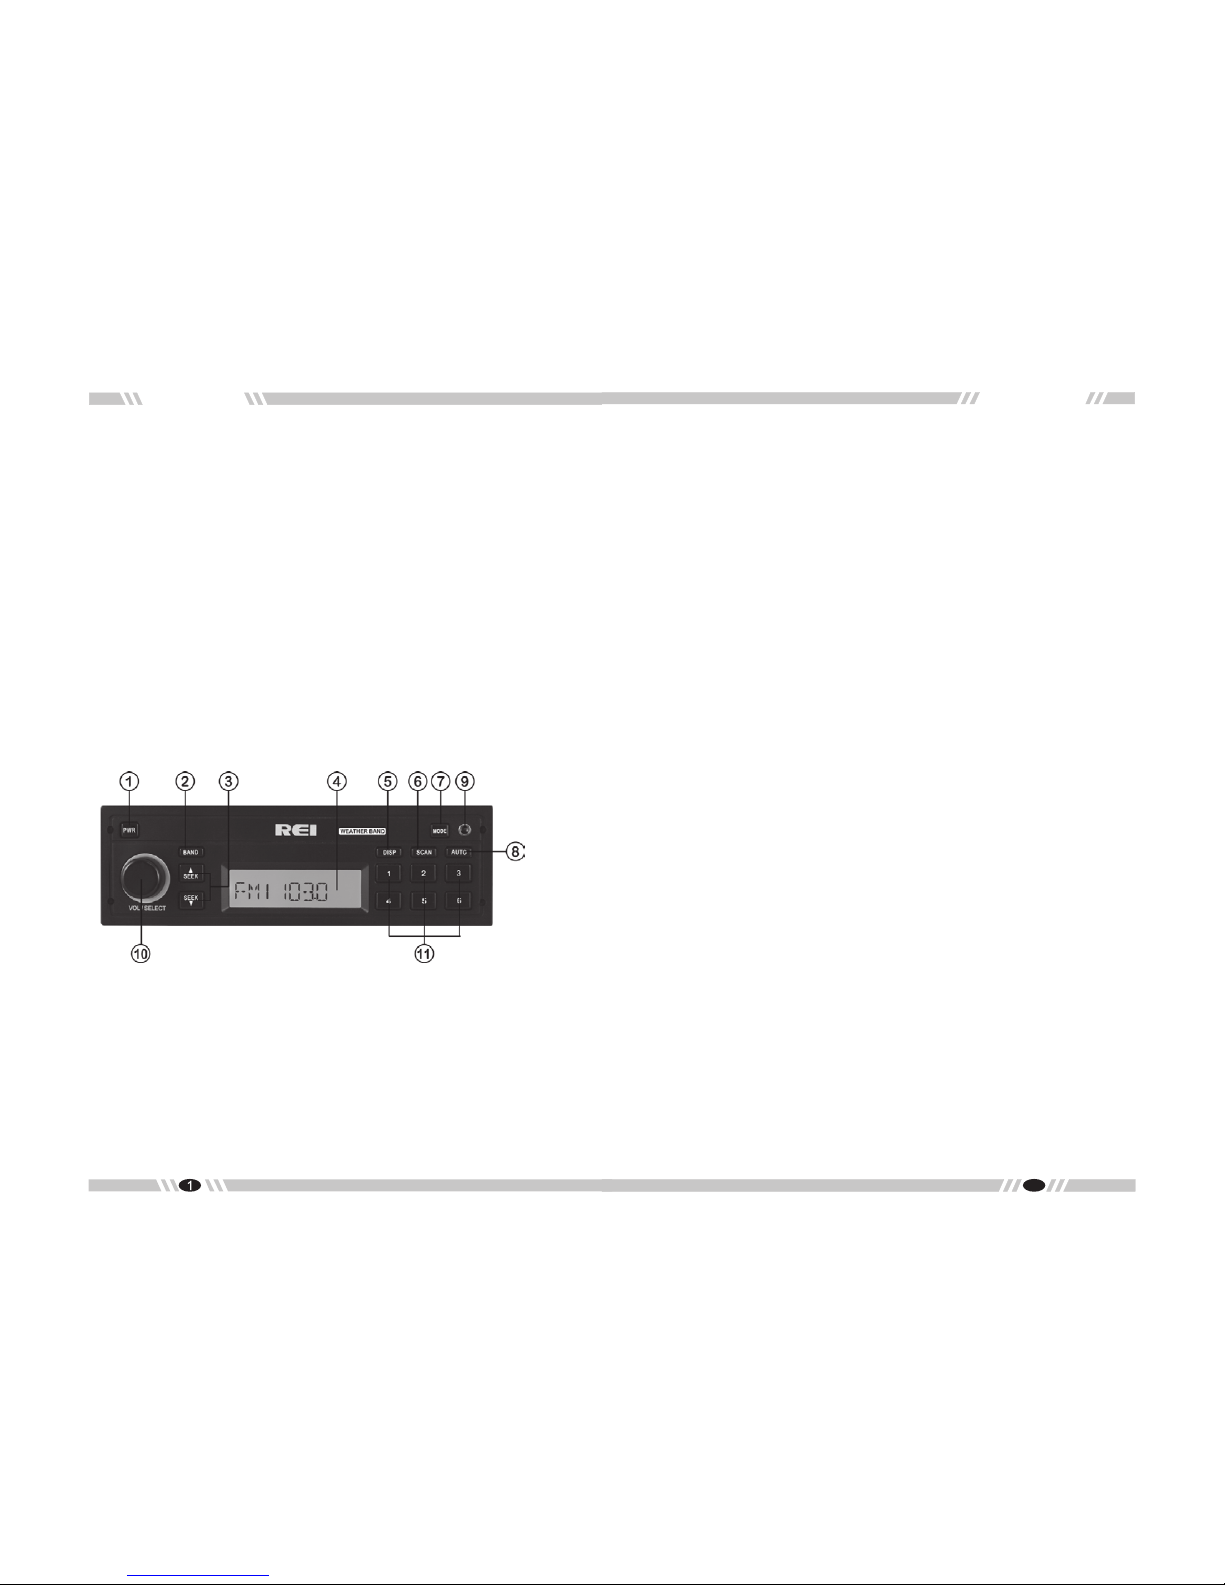
(11) Preset Memory/Recall Buttons
Under Radio Mode
Press these buttons momentarily to select the preset stations.
Press and holding a button will preset the current radio station to the button being
pressed.
Under Weather Band Mode
NOAA National Weather Radio Broadcasts from over 380 Locations throughout
the U.S. on seven VHF/FM frequencies. Tune to receive continuous weather
information 24 hours a day on one of the following frequencies.
Press 1 to select weather band channel 1 - 162.400MHZ
Press 2 to select weather band channel 2 - 162.425MHZ
Press 3 to select weather band channel 3 - 162.450MHZ
Press 4 to select weather band channel 4 - 162.475MHZ
Press 5 to select weather band channel 5 - 162.500MHZ
Press 6 to select weather band channel 6 - 162.525MHZ
**Press AUTO to select weather band channel 7 - 1 6 2 .550 MHZ
(14) US/EURO Band Select Switch
If you wish to take the receiver out of the country, the tuner frequencies and
interval can be switched to the following regions:
USA:
FM: 87.5-107.9 MHz (0.2 MHz step)
AM: 530-1710 kHz (10 kHz step)
Europe:
FM: 87.50-108.00 MHz (0.05 MHz step)
AM: 522-1620 kHz (9 kHz step)
This option also changes the clock display from 12 hr (USA) to 24hr (European).
***For changes to the EURO/USA switch to take affect, the Yellow +12v battery
power must be cycled to reset to the new settings.
NOTE:
For easy viewing at night, the backlighting will always be on when ACC +12V
switched power is applied. Backlighting will only shut off when the switched
ACC +12V power is removed.
Additionally, this unit features ANY KEY POWER ON function. Touching any
key will turn ON the unit. The unit can be turned back OFF with the POWER
button.
Other REI Car Stereo System manuals
Popular Car Stereo System manuals by other brands

Blaupunkt
Blaupunkt Car Multimedia user manual

Discount Car Stereo
Discount Car Stereo IL-CDR30 installation guide

Macrom
Macrom M-DL3100BT user manual

JVC
JVC KD-BT11J Service manual

Boss Audio Systems
Boss Audio Systems ELITE BV755B user manual

Kenwood
Kenwood FM MODULATOR SYSTEM KCA-R70FM instruction manual