Reikel ID716 User manual

Original Instructions
Made in China 2015
ID716
Impact Drill

Original Instructions
Fig.1
Fig. 2 Fig.3
Fig. 4
Tighten
Release
Fig.5 Fig.6
Anticlockwise
Clockwise

Original Instructions
GENERAL SAFETY RULES
WARNING Read all safety warnings and instructions. Failure to follow all the
warnings and instructions may result in electric shock, fire and/or serious injury.
Save all warnings and instructions for future reference.
The term “power tool” in the warnings refers to your mains operated (corded) power tool or
battery operated (cordless) power tool.
1) Work area safety
a) Keep work area clean and well lit. Cluttered or dark areas invite accidents.
b) Do not operate power tools in explosive atmospheres, such as in the
presence of flammable liquids, gases or dust. Power tools create sparks which
may ignite the dust or fumes.
c) Keep children and bystanders away while operating a power tool.
Distractions can cause you to lose control.
2) Electrical safety
a) Power tool plugs must match the outlet. Never modify the plug in any way.
Do not use any adapter plugs with earthed (grounded) power tools. Unmodified
plugs and matching outlets will reduce risk of electric shock.
b) Avoid body contact with earthed or grounded surfaces such as pipes,
radiators, ranges and refrigerators. There is an increased risk of electric shock if
your body is earthed or grounded.
c) Do not expose power tools to rain or wet conditions. Water entering a power
tool will increase the risk of electric shock.
d) Do not abuse the cord. Never use the cord for carrying, pulling or
unplugging the power tool. Keep cord away from heat, oil, sharp edges or
moving parts. Damaged or entangled cords increase the risk of electric shock.
e) When operating a power tool outdoors, use an extension cord suitable for

Original Instructions
outdoor use. Use of a cord suitable for outdoor use reduces the risk of electric
shock.
f) If operating a power tool in a damp location is unavoidable, use a residual
current device (RCD) protected supply. Use of an RCD reduces the risk of electric
shock.
3) Personal safety
a) Stay alert, watch what you are doing and use common sense when
operating a power tool. Do not use a power tool while you are tired or under
the influence of drugs, alcohol or medication. A moment of inattention while
operating power tools may result in serious personal injury.
b) Use personal protective equipment. Always wear eye protection. Protective
equipment such as dust mask, non-skid safety shoes, hard hat, or hearing
protection used for appropriate conditions will reduce personal injuries.
c) Prevent unintentional starting. Ensure the switch is in the off-position before
connecting to power source and /or battery pack, picking up or carrying the
tool. Carrying power tools with your finger on the switch or energising power tools
that have the switch on invites accidents.
d) Remove any adjusting key or wrench before turning the power tool on. A
wrench or a key left attached to a rotating part of the power tool may result in
personal injury.
e) Do not overreach. Keep proper footing and balance at all times. This enables
better control of the power tool in unexpected situations.
f) Dress properly. Do not wear loose clothing or jewellery. Keep your hair,
clothing and gloves away from moving parts. Loose clothes, jewellery or long
hair can be caught in moving parts.
g) If devices are provided for the connection of dust extraction and collection
facilities, ensure these are connected and properly used. Use of dust
collection can reduce dust related hazards.

Original Instructions
4) Power tool use and care
a) Do not force the power tool. Use the correct power for your application.The
correct power tool will do the job better and safer at the rate for which it was
designed.
b) Do not use the power tool if the switch does not turn it on and off. Any power
tool that cannot be controlled with the switch is dangerous and must be repaired.
c) Disconnect the plug from the power source and/or the battery pack from the
power tool before marking any adjustments, changing accessories, or
storing power tools. Such preventive safety measures reduce the risk of starting
the power tool accidentally.
d) Store idle power tools out of the reach of children and do not allow persons
unfamiliar with the power tool or these instructions to operate the power tool.
Power tools are dangerous in the hands of untrained users.
e) Maintain power tools. Check for misalignment or binding of moving parts,
breakage of parts and any other condition that may affect the power tool’s
operation. If damaged, have the power tool repaired before use. Many
accidents are caused by poorly maintained power tools.
f) Keep cutting tools sharp and clean. Properly maintained cutting tools with sharp
cutting edges are less likely to bind and are easier to control.
g) Use the power tool, accessories and tool bits etc. in accordance with these
instructions, taking into account the working conditions and the work to be
performed. Use of the power tool for operations different from intended could
result in a hazardous situation.
5) Service
a) Have your power tool serviced by a qualified repair person using only
identical replacement parts. This will ensure that the safety of the power tool is
maintained.

Original Instructions
EXTRA SAFETY REGULATIONS CONCERNING IMPACT DRILL
Wear ear protectors with impact drills. Exposure to noise can cause hearing
loss.
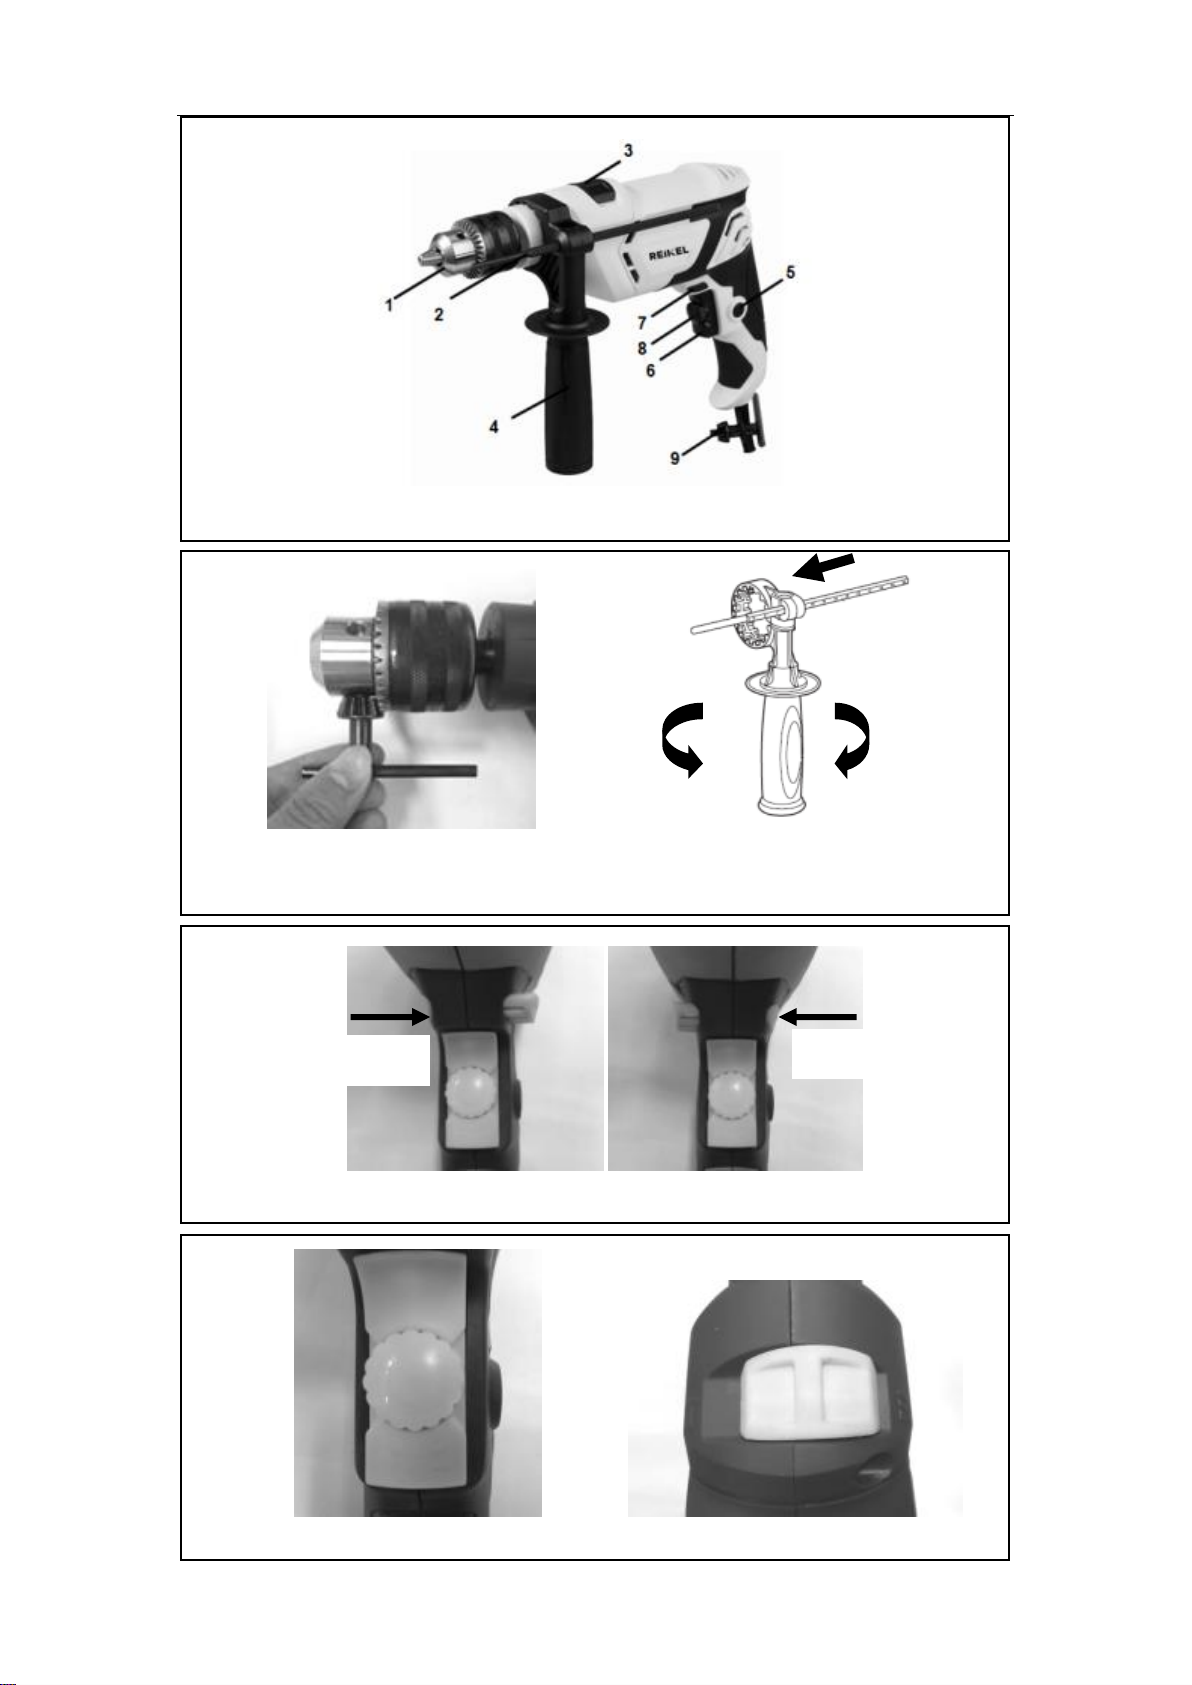
Use auxiliary handles supplied with the tool. Loss of control can cause
personal injury.
Hold power tool by insulated gripping surfaces, when performing an
operation where the cutting accessory may contact hidden wiring or its
own cord. Cutting accessory contacting a “live” wire may make exposed metal
parts of the power tool “live” and could give the operator an electric shock.
If possible, always use clamps or a vice to hold your work.
Always switch off before you put the drill down.
Ensure that the lighting is adequate.
Keep the area free of tripping hazards.
Only use accessory bits in good condition.
Before drilling, check that there is sufficient clearance for the drill bit under the
workpiece.
Do not touch the bit after operation. It will be very hot.
Keep your hands away from under the workpiece.
Never use your hands to remove dust, chips or waste close by the bit.
Rags, cloths, cord, string and the like should never be left around the work area.
Support the work properly.
If you are interrupted when operating the drill, complete the process and switch
off before looking up.
Periodically check that all nuts, bolts and other fixings are properly tightened.
When using the drill, use safety equipment including safety glasses or shield,
hearing protection, and protective clothing including safety gloves. Wear a dust
mask if the drilling operation creates dust.
Children and frail people must not use this tool. Children should be supervised at
all times if they are in the area in which the tool is being used. It is also
imperative that you observe the accident prevention regulations in force in your

Original Instructions
area.
Even when the tool is used as prescribed it is not possible to eliminate all
residual risk factors.
The following hazards may arise in connection with the tool’s construction and
design:
Hand-arm vibration syndrome if its use is not adequately managed.

Original Instructions
IMPACT DRILL
The numbers in the following text refer to the drawing on page 2.
WARNING -To reduce the risk of injury, user must read instruction manual.
Save all warnings and instructions for future reference.
Contents:
1. Machine data
2. Safety symbols
3. Assembly
4. Use
5. Service & Maintenance
Intended use
The machine is designed for impact drilling in brick, concrete and stone as well as for
drilling in wood, metal and plastic with suitable attachments. All other applications are
expressly ruled out. Do not use machine attachments for works other than those for
which they are designed for! All other applications are expressly ruled out.
1. MACHINE DATA
Technical specification:
Type designation
ID716
Impact Drill
Rated voltage
230-240V~ 50Hz
Rated power input
710W
Speed, n0
0-XXXX/min
Max. collet diameter
Max. Φ13mm
Drilling capacity
-- in steel
-- in concrete
13 mm
16mm

Original Instructions
-- in wood
25mm
Level of sound pressure LpA (KpA=3dB(A))
XX dB(A)
Level of sound power LwA (KwA=3dB(A))
XX dB(A)
Level of vibration(K=1.5m/s2)
Impact drill into concrete:
ah,ID=XXXXXm/s2
Drill into metal:
ah,D=XXXXXm/s2
Note:
-that the declared vibration total value has been measured in accordance with a
standard test method and may be used for comparing one tool with another;
-that the declared vibration total value may also be used in a preliminary assessment
of exposure.
Warning:
-that the vibration emission during actual use of the power tool can differ from the
declared total value depending on the ways in which the tool is used.
-avoid vibration risk
suggestion: 1) wear glove during operation
2) limit operating time and shorten trigger time.
Contents of packing
1 Impact drill
1 Auxiliary handle
1 Depth gauge
1 Key
1 Instruction manual
After unpacking, check the tool and accessories for damages and do not use the tool in
case something is defective.
Features

Original Instructions
Fig. 1
1. Chuck
2. Plastic Depth gauge
3. Function switch
4. Auxiliary handle
5. Lock-on button
6. ON/OFF switch
7. Forward/Reverse switch
8. Variable speed dial
9. Key
2. SAFETY SYMBOLS
Explanation of symbols
In this manual and/or on the machine the following symbols are may used:
Read instructions carefully
In accordance with essential applicable safety standards of European directives
Class II machine –Double insulation –You don’t need any earthed plug.
Denotes risk of personal injury, loss of life or damage to the tool in case of non-
observance of the instructions in this manual
Faulty and/or discarded electrical or electronic apparatus have to be collected
at theappropriate recycling locations
Immediately unplug the plug from the mains electricity in the case that the cord
getsdamaged and during maintenance.

Original Instructions
3. ASSEMBLY
Install drills
Fig. 2
When selecting a drill, use the right type for your job. For best performance, always use
sharp drills.
WARNING: Failure to unplug the drill could result in accidental starting causing
possible serious personal injury.
To insert a drill bit, proceed as follows:
Hold the chuck collar with one hand.
With the other hand, insert the chuck key and rotate the chuck key in an anticlockwise
direction until the chuck jaws are open sufficiently to accept the drill bit.
Place the drill bit in the jaws as far as it will go.
Rotate the chuck collar in a clockwise direction until it bites.
Tighten the chuck by using the chuck key. The drill bit is now held securely.
To remove the bit from the chuck, proceed as follows:
Loosen the chuck, using the chuck key.
Remove the bit from the chuck.
NOTE: The chucks of reversible drills are always fixed by a screw with a left hand thread.
The screw must be loosed before the chuck can be removed if necessary. To loosen the
screw, turn it in a clockwise direction.
Install auxiliary handle and depth gauge
Fig. 3
Turn the auxiliary handle anticlockwise to loosen the collar and slip it over the chuck onto
the drill.
Adjust the position of the auxiliary handle to suit the application, add the plastic depth
gauge if required and tighten the handle to secure it in place.
Forward/reverse adjustment

Original Instructions
Fig. 4
1. For forward (clockwise) rotation, push the forward / reverse switch to the position of
diagram.
2. For reverse (counterclockwise) rotation, push the forward / reverse switch to the
position of diagram.
WARNING: Although an interlock prevents reversing the tool while the motor is running,
allow it to come to a full stop before reversing.
Drilling speed adjustment
Fig. 5
You can vary the drilling speed by press different pressure on the trigger switch while
drilling if necessary.
To vary the drilling speed, you also can rotate the variable speed knob to get the desired
drilling speed.
Select the impact/drill mode
Fig.6
The impact/drill switch should be set according to the type of action required. The tool has
two settings:
Drill mode : For drilling into wood and metal. Use standard drill bits.
Impact mode : For drilling into stone and masonry. Use masonry drill bits.
4. USE
Operating the drill
Start the tool by squeezing the variable speed trigger switch.
Release the trigger to stop the tool.
If you press the lock on button while the trigger switch is depressed, the switch is kept in
the operating position. This is convenient when continuous operating for extended periods
of time is required.
To release the lock on button, press and release the trigger switch.

Original Instructions
Hole drilling
When attempting to drill a large diameter hole, it is sometimes best to start with a smaller
drill bit then work up to the required size.
This prevents overloading the drill.
WARNING! Many accidents occur because of unforeseeable situations. Please
pay attention that drilling-out a small hole may cause the drill bit to jam in the hole,
especially when drilling metal.
Remember to use a “wood-pecker” action on deep holes to allow the swarf to be ejected
from the hole.
If the drill bit snags, switch off immediately to prevent permanent damage to the drill.
Try running the drill in reverse to remove the bit.
Keep the drill in line with the hole. Ideally, the drill bit should enter at right angles to the
work. If the angle is changed during drilling, this could cause the bit to snap off, blocking
the hole and perhaps causing injury.
Reduce pressure as the drill is about to break through the item being drilled.
Don’t force the drill, let it work at its own pace.
Keep the drill bit sharp.
Drilling wood
For maximum performance when drilling larger holes, use auger bits or spade bits for
wood drilling.
Set the tool to the drill mode.
Begin drilling at a very low speed to prevent the bit from slipping off the starting point.
Increase the speed as it bites into the wood.
When drilling through holes, place a block of wood behind the work piece to prevent
ragged or splintered edges on the back of the hole.
Drilling steel
For maximum performance, use HSS drill bits for metal drilling.
Set the tool to the drill mode.

Original Instructions
Mark off the centre of the hole using a centre punch.
Use a suitable lubricant for the material you are working on.
Begin drilling at a very low speed to prevent the bit from slipping off the starting point.
Always clamp sheet metal. Support thin metal with a block of wood to avoid distorting it.
Drilling masonry
For maximum performance, use high quality carbide-tipped masonry drill bits when drilling
holes in brick, tile, concrete etc.
Use the drilling setting initially then revert to the hammer action once the holes are
established.
Apply light pressure and medium speed for best results in brick.
Apply additional pressure and high speed for hard materials such as concrete.
When drilling holes in tile, practice on a scrap piece to determine the best speed and
pressure.
NOTE: Reverse rotation during impact drilling may damage the drill and drill bit.
5. SERVICE & MAINTENANCE
Always disconnect the device before performing any adjustment or
maintenance operation. If the supply cord is damaged, it must be replaced by the
manufacturer or its service agent in order to avoid a hazard.
Disconnect from the power supply immediately if the supply cord is damaged.
Take care not to expose this tool to the rain.
Cleaning
Avoid using solvents when cleaning plastic parts. Most plastic parts are susceptible to
damage from various types of commercial solvents and may be damaged by their use.
Use clean cloths to remove dirt, carbon dust, etc.
Lubrication

Original Instructions
All the bearings in this tool are lubricated with a sufficient amount of high grade lubricant
for the life of the unit under normal operating conditions, therefore no further lubrication
is required.
Environment
This symbol indicates that TESCO participate in the environment protection in applying
the directive WEEE 2012/19/EU. It’s forbidden that throwing out the apparatus electric
and electronic used with the mixed debris or in nature. Recycle them at the special
disposal centres provided for the purpose. Contact your local authorities or stockist for
advice on recycling.” You can dispose your tool to your distributor if you buy a same
model there. Respecting this measure indicates you contribute yourself to the
preservation of natural resources and the protection of human health.
Table of contents
Other Reikel Drill manuals
Popular Drill manuals by other brands

Bosch
Bosch GDB 350 WE Professional Original instructions

Milwaukee
Milwaukee 1001-1 Operator's manual

Villager
Villager VLN 250 Original operating manual

Cleco
Cleco 5 Series Operation & service manual

Narex
Narex EVP 13 G-2A Original operating manual

EINHELL
EINHELL TE-ID 750/1 E Original operating instructions