Reina Optima User manual

ELECTRIC CONVECTOR
OPTIMA
OPERATION INSTRUCTIONS

2

3
Warning! Before operating the heater, please read these instructions thoroughly to avoid damage and
hazardous situations. Keep these instructions even once you have installed your heater.
1 GENERAL INSTUCTIONS
This appliance with electronic room temperature control plus week timer is intended for normal
household use and not for use in commercial/industrial environment, in vehicles or on board ships or
aircrafts.
The product is equipped with an electronic device that allows the product to automatically vary its heat
output over a certain time period, in relation to a certain required level of indoor heating comfort, and
allows the setting of timing and temperature levels for a full week. During the 7-day period the settings
must allow a variation on a day-to-day basis.
The product is equipped with an electronic device that reduces the heat output when a window or door
has been opened.
Before any operation remove the packaging and check product integrity. In case of defects or
damages do not try to repair it yourself but contact your dealer.
Do not let children play with the packaging and protect the environment by disposing of the packaging
in accordance with the national regulations for waste processing.
Disconnect the power before carrying out any work on the heater.
The convectors are designed for twenty-four-hour operation without constant supervision.
2 TECHNICAL DATA
- Rated supply voltage 230 V ± 10 V
- Current frequency 50 Hz ± 1 Hz
- Protected against water projections IP24
- Class of protection from electric current shock II
Other specifications are resulted in table 1
Table 1
Model EOPT050 EOPT100 EOPT150 EOPT200
Rated power, kW 0,5 1,0 1,5 2,0
Rated current, А2,1 4,3 6,5 8,7
Sizes, mm, no more
(width×depth×heigth) 450×120×450 530×120×450 660×120×450 785×120×450
3 COMPLETENESS
- Electric convector - 1 pc
- Fixing brackets for wall mounting - 1 set
- User instruction - 1 copy
- Package - 1 set

4
4 SAFETY REQUIREMENTS
The appliance is not to be used by persons (including children) with reduced physical, sensory or
mental capabilities, or lack of experience and knowledge, unless they have been given supervision or
instruction, children being supervised not to play with the appliance.
This appliance can be used by children aged from 8 years and above and persons with reduced
physical, sensory or mental capabilities or lack of experience and knowledge if they have been given
supervision or instruction concerning use of the appliance in a safe way and understand the hazards
involved.
Children shall not play with the appliance.
Cleaning and user maintenance shall not be made by children without supervision.
Children of less than 3 years should be kept away unless continuously supervised.
Children aged from 3 years and less than 8 years shall only switch on/off the appliance provided that it
has been placed or installed in its intended normal operating position and they have been given
supervision or instruction concerning use of the appliance in a safe way and understand the hazards
involved. Children aged from 3 years and less than 8 years shall not plug in, regulate and clean the
appliance or perform user maintenance.
CAUTION — Some parts of this product can become very hot and cause burns. Particular
attention has to be given where children and vulnerable people are present.
WARNING: Children must not lean on the appliance. Under certain circumstances, there is a risk that
its surface may cause burns to the skin of young children. If there is any risk of this at all, install a
protection grill.
WARNING: To reduce the risk of fire, keep textiles, curtains, or any other flammable material a
minimum distance of 1m from the air outlet.
WARNING: Do not use this heater in small rooms when they are occupied by persons not capable of
leaving the room on their own, unless constant supervision is provided.
Do not introduce objects or paper into the device.
The heater must be installed by a qualified electrician in accordance with the local regulations.
If the power cable is damaged, it must be replaced by the manufacturer or its service agent or similarly
qualified person to avoid any risk.
All work on the interior of the appliance must be carried out by a licensed electrician.
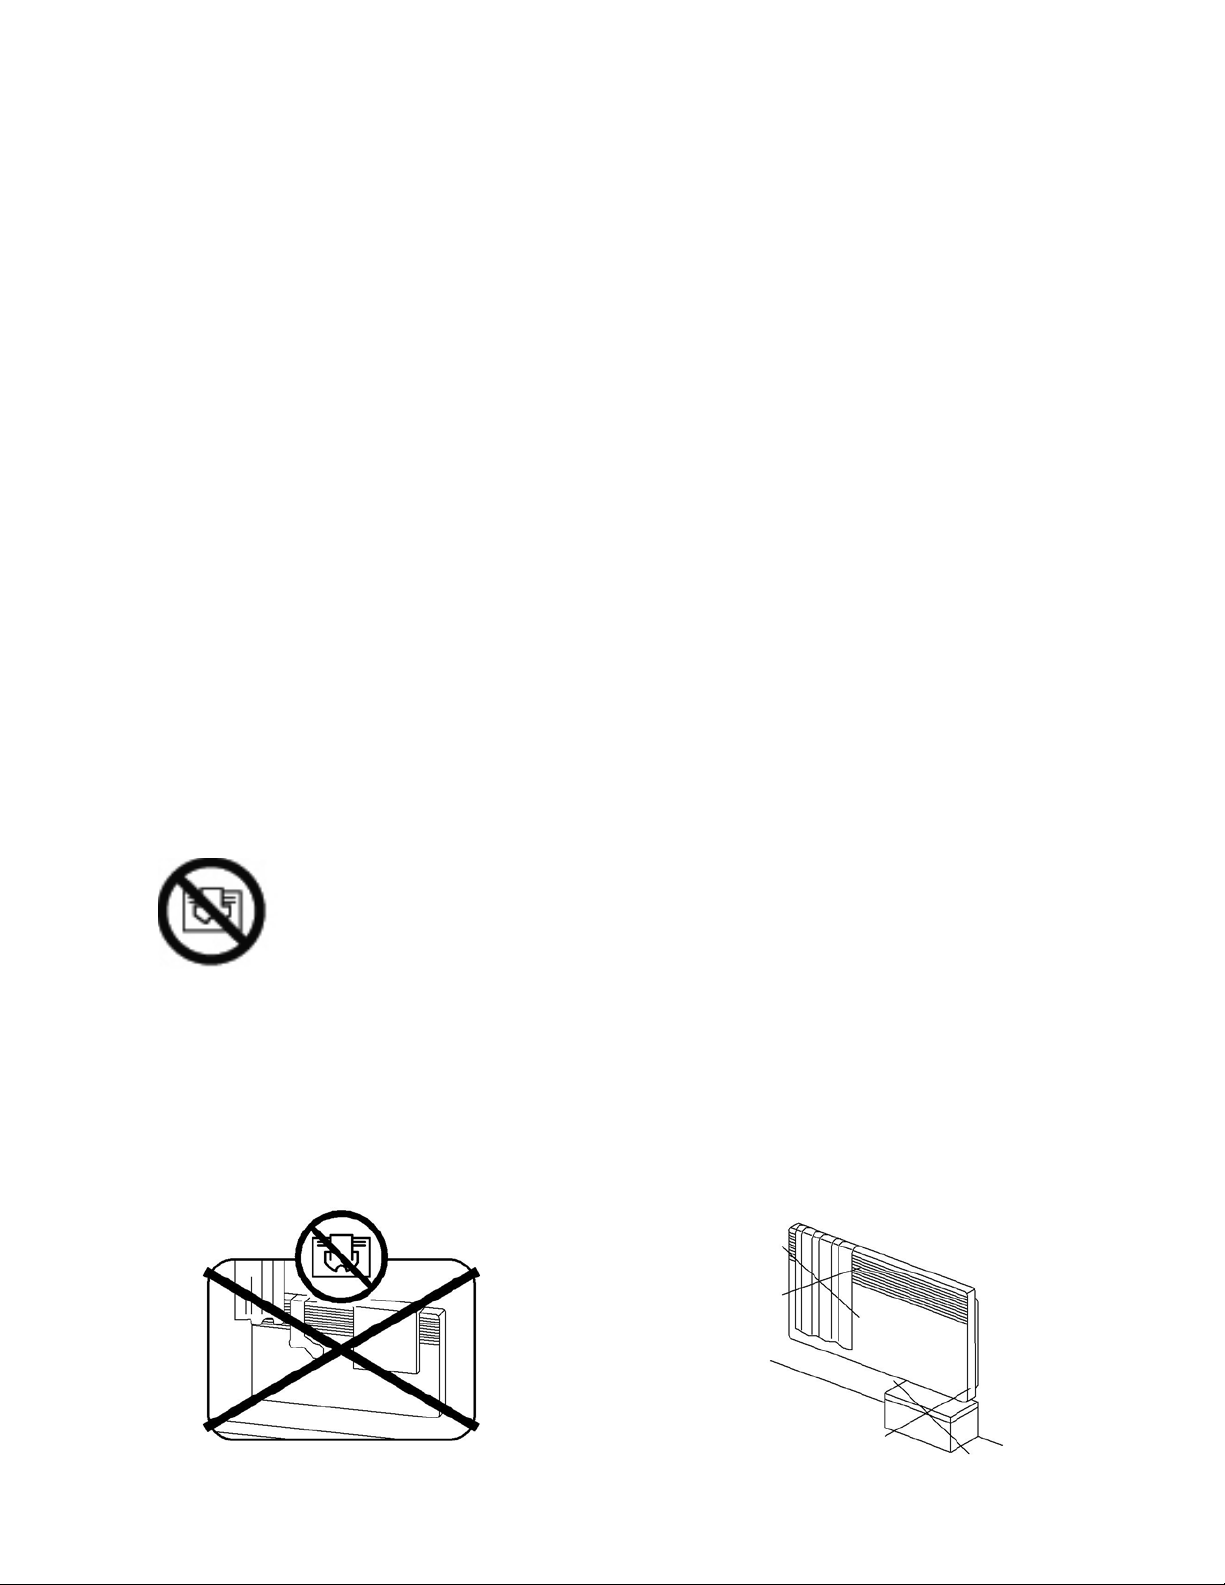
WARNING: In order to avoid overheating, do not cover the heater.
The heater carries the warning symbol indicating that the heater may not be covered.
IT IS PROHIBITED!
- Do not obstruct the grills, even partially (either on the front of the appliance or underneath it)
otherwise the appliance may overheat.
- To place easily inflammable materials and objects close to the convector.
- The heater should not be installed directly under a fixed mains power socket.
- The heater should not be installed where the controls may be touched by a person using a bath or
shower.
- To use convectors in immediate proximity to a bath, shower bath or a swimming-pool.
- To touch a plug of a power cord and to convector with wet hands.

5
5 PREPARATIONS FOR OPERATION
5.1 Unpack the convector. Keep the convector at room temperature not less than one hour after
placing the convector in a warm room from cold in case of the dew fall-out.
5.2 This equipment was designed to be installed in a residence. Please ask your distributor before
using it for any other purpose.
Do not install the convector in a draught that might affect adjustment (for example, under a central
mechanical ventilation unit etc...)
5.3 The convector should be installed according to normal trade practice and in compliance with
legislation in the relevant country (the IEE Wiring Regulations). Check the correspondence of the mains
to the data on the firm label which is on the convector rear wall; check also the mains and the protection
devices ability to with stand the consumption current.
5.4 To stationary installation of convector:
- It is necessary to hold minimum distances from the objects when mounting the convector as shown in
Figure 2, Figure 3 (dimension in cm);
- Execute on a wall a marking for fixing (see fig. 1, table 3);
- Fix the bracket in any accessible way, having provided reliable fastening of convector in all term of
operation;
- Mount the convector on the hook-on brackets.
Table 3
Figure 1 Figure 2
Figure 3Figure 4
Model
EOPT050
EOPT100
EOPT150
EOPT200
L, mm
96
144
276
396

6
5.5 Convector with protected against splashed water IP24 can be installed in bathroom (see fig. 4).
Do not install the convector:
- In zone 1 of bathrooms;
- In zone 2,if the person being in a bath or shower can touch to switches and other controls.
In humid areas such as bathrooms and kitchens the power socket must be installed at least 25 cm
above the floor.

7
6ORDER OF OPERATION
Warning:
It is strictly forbidden to switch on and operate the convector without fixing it to the brackets on the wall
or on supports on the floor.
The convector can only be switched on and operated in a vertical position with the air intake grate
down. When the convector is switched on for the first time, the smell from evaporation of the conservation
materials is possible. It is recommended to ventilate the room.
6.1 Description of controls
Fig. 6
6.2 Operating
Connect the convector cord plug to the power socket. The indicators on the control panel will light up
and will to show the time (Fig. 6). The convector is ready for operation.
6.2.1 Switch ON/OFF your appliance.
To switch on your convector press the button ON-OFF/MENU. The last mode used will be displayed.
To switch off your convector press and hold the button ON-OFF/MENU. The time will be displayed.
6.2.2 Selecting the operating mode of the convector and setting the mode parameters.
6.2.2.1 Heating Modes
Pictogram
Description
When used
Comfort
When at home. The convector works to maintain the comfort
temperature set. Used t
o select the preferred. The default
temperature is 21˚C, you can adjust it from Economy
temperature +1˚C to 28˚C.
Economy
When you are away from home for short periods (from 2 to 48
hours) or you are sleeping. The convector works to maintain
the Economy
temperature set and save energy. The default
temperature is 17˚C, you can adjust it from 7˚C to Comfort
temperature - 1˚C.
Frost-free
When you are away from home for long periods (more than 48
hours). The temperature is automatically set to around 7°C and
cannot be changed.
Programming
When you want preset programmed operation. You can choose
one of five pre-record programs.

8
6.2.2.2 Comfort mode.
● Press the button ►several time until the cursor is below the pictogram . You can adjust Comfort
temperature by press the top ▲ or bottom ▼ button.
After 10 seconds of inactivity the temperature is recorded, the display will show the setting
temperature.
If the adjusted control temperature is higher than the room temperature, the heating indicator lights up
and the convector starts heating the room.
Note. If the screen is not switched on, push any key to make it light up. The screen lights up and stays on for 30
seconds after the last time any key is pushed.
When the screen is switched off, the first time any key is pushed the screen lights up without activating the function
controlled by the key pushed.
6.2.2.3 Economy mode.
● Press the button ►several time until the cursor is below the pictogram . You can adjust Economy
temperature by press the top ▲ or bottom ▼ button.
After 10 seconds of inactivity the temperature is recorded.
●If you set the control temperature setting in COMFORT mode lower than the ECONOMY mode
setting, the ECONOMY adjustment temperature setting will automatically decrease by 1° C lower relative
to the new COMFORT setting.
6.2.2.4 Frost- free mode.
This mode keeps the temperature of about 7 ° C to prevent freezing rooms.
● Press the button ►several time until the cursor is below the pictogram .
6.2.2.5 Programming mode
Before setting the program, make sure the time and date are set in the convector. If not, please refer
to point 6.2.2.7.
You can chose periods of Comfort and Economy temperature using one of the five present pre-record
programs:
Pr1 is recommended for a constant presence
Pr2 is recommended for absence in the day
Pr3 is recommended for absence in the day and if you return to home for lunch time
Pr4 permanent Comfort
Pr5 permanent Economy
Hours
Prog.
0.00
1.00
2.00
3.00
4.00
5.00
6.00
7.00
8.00
9.00
10.00
11.00
12.00
13.00
14.00
15.00
16.00
17.00
18.00
19.00
20.00
21.00
22.00
23.00
24.00
Рr1
Рr2
Рr3
Рr4
Рr5
- Comfort mode, - Economy mode

9
● Press the button ►several time until the cursor is below the pictogram .
On each day of the week the default program is Pr1.
If you want the modify the program press the button ON-OFF/MENU several times until the selection
of the wrench icon .
● Press the button ► to choose the day, press the top ▲ or bottom ▼ button to choose your desired
program from Pr1 to Pr5.
After 10 seconds of inactive the program is recorded.
● Repeat this operation for each day of the week.
You can modify the active temperature by press the top ▲ or bottom ▼ button. After 10 seconds of
inactive the temperature is recorded.
6.2.2.6 Open window detection.
This function makes it possible to detect an open window and automatically to switch off heating for 15
minutes.
● Press the button ON-OFF/MENU several times until the selection of the wrench icon .
You can chose to activate (ON) or deactivate (OFF) function by press the top ▲ or bottom ▼ button.
After 10 seconds of inactivity the selection is recorded.
Если фун
6.2.2.7 Adjust time and date.
To adjust date and time push the button ON-OFF/MENU several times until the selection of the wrench
icon
● Press the button ►, when the hour icon blinks you can adjust the hours by press the top▲ or bottom
▼button.
● Press the button ►, when the minute icon blinks you can adjust the minutes by press the top ▲ or
bottom ▼button.
● Press the button ►, when the day icon blinks you can adjust the day by press the top ▲ or bottom
▼button. Monday is 01, Tuesday is 02 … Sunday is 07.
After 10 seconds of inactivity day and time are recorded.
6.2.2.8 Calibrate the temperature.
To calibrate the temperature push the button ON-OFF/MENU several times until the selection of the
wrench icon , t OFFSET appears. You can calibrate the difference of temperature by press the top
▲ or bottom ▼ button. After 10 seconds of inactivity the convector switches on the standard display.
6.2.2.9 Locking controls.
You can lock the controls with a long pressure simultaneously on the ▲ and ▼ buttons to prevent
unauthorized people from altering them, the padlock icon will appear.
Made the same operation to unlock the controls.
Note: If the appliance is disconnected the last setting are saved.
6.3 Dismounting the convector.
Press and hold the button ON-OFF/MENU until the convector turns off, the indication goes out and will to
show the time. Disconnect the convector cord plug from the power socket.
Lift up the convector until the bottom hooks of the brackets come out of the holes of the air intake
grate of the convector. Then lower the convector and remove it from the top hooks of the brackets.
Note: Electronic appliances with a microprocessor could be affected by some serious mains disturbances (not
compliant with CE regulations defining interference protection levels). If there are any problems (thermostat
jammed, etc.) cut the appliance power supply (fuse, circuit-breaker, etc.) then restart the appliance after 5 minutes.

10
7 MAINTENANCE
To maintain performances of your unit, you should clean the upper and lower grilles of the unit about
twice a year using a vacuum cleaner or a brush.
Dirt may collect on the grille of the unit if the atmosphere is polluted. This phenomenon is due to the
poor quality of the ambient air. In this case, it is recommended to check that the room is well ventilated
(ventilation, air inlet, etc.), and that the air is clean. The unit will not be replaced under the guarantee
because of this type of dirt.
The unit casing should be cleaned with a damp cloth, never use abrasive products.
8 WARRANTY CONDITIONS
This guarantee is applicable for 2 years from the date of original purchase and shall be valid for no
more than 30 months from the date of manufacture.
The warranty covers exchange or supply of parts found to be faulty, excluding any damages and
interest payments.
This guarantee excludes damage by neglect, shipping or accident and any damage due to incorrect
installation, use for purposes other than those intended or failure to observe the instructions given.
Products with this symbol should not be placed with garbage but must be collected
separately and recycled.
Collect and recycling of end life products should be done according to the provisions of
local ordinances (DEE 2002/96/CE).
Atay Global Ltd.
Unit 6, Weybridge Fam,
Stambourne Road
Great Yeldham
C09 4RB

11
Information with regard to ecodesign requirements according to Regulation (EU) 2015/1188
EN – Information requirements for electric fixed local space heaters
Model identifiers EOPT050 EOPT100 EOPT150 EOPT200
Heat output
Nominal heat output Pnom, kW 0,5 1,0 1,5 2,0
Minimum heat output Pmin, kW 0,1 0,2 0,3 0,4
Maximum continuous heat output
Pmax,c, kW
0,5 1,0 1,5 2,0
Auxiliary electricity consumption
At nominal heat output (elmax), kW 0,00035 0,00035 0,00035 0,00035
At minimum heat output (elmin), kW 0,00035 0,00035 0,00035 0,00035
In standby mode (elSB), kW 0,00035 0,00035 0,00035 0,00035
Type of heat output/room temperature
control With electronic room temperature control plus week timer
Other control options Room temperature options with open window detection
Contact details
Atay Global Ltd., Unit 6, Weybridge Fam, Stambourne Road,
Great Yeldham, C09 4RB

12
Table of contents
Other Reina Heater manuals
Popular Heater manuals by other brands

Sentiotec
Sentiotec 145 Instructions for installation and use

GE
GE ADTK15 owner's manual

Mandik
Mandik HELIOS Installation, Operation Instructions and Maintenance Manual

Mi
Mi Smart Space Heater S user manual

Webasto
Webasto Air Top Evo 40 Installation & operation manual

Rotel
Rotel U702CH1 Instructions for use

Coopers of Stortford
Coopers of Stortford 8837 Instructions for use

American Comfort Worldwide
American Comfort Worldwide ACW0035 owner's manual

Easy Radiant Works
Easy Radiant Works ED-40U Installation and operating instructions

Val6
Val6 FIR-X5 Maintenance manual

EQUATION
EQUATION IFH04-33E Assembly, Use, Maintenance Manual

MILL
MILL JA200 Assembly and instruction manual