REINOS RF-173 WH User manual

תוער םיבכמ ןיעידומ 11 רהה עלצ
08-9980501 .סקפ 08-9980500 .לט
11 Tzela H’aar Modiin Macabim Reut ISRAEL
Tel. 972-8-9980500 Fax. 972-8-9980501
FREEZER
User manual
RF-173 WH

EN - 1
Thank you for choosing this product.
This user manual contains important information on safety and instructions intended to
assist you in the operation and maintenance of your appliance.
Please take the time to read this user manual before using your appliance and keep this
book for future reference.
Icon Type Meaning
WARNING Serious injury or death risk
RISK OF ELECTRIC SHOCK Dangerous voltage risk
FIRE Warning; Risk of re / ammable materials
CAUTION Injury or property damage risk
IMPORTANT Operating the system correctly

EN - 2
CONTENTS
1 SAFETY INSTRUCTIONS ............................................................................... 3
1.1 General Safety Warnings ...............................................................................................3
1.2 Installation warnings.......................................................................................................7
1.3 During Usage..................................................................................................................7
2 DESCRIPTION OF THE APPLIANCE............................................................ 9
3 USING THE APPLIANCE ................................................................................ 9
3.1 Information on No-Frost technology ...............................................................................9
3.2 Display and Control Panel............................................................................................10
3.3 Operating your Freezer ................................................................................................10
3.3.1 Alarm light..................................................................................................................10
3.3.2 Freezer Temperature Set Button ...............................................................................10
3.3.3 Super Freezer Mode..................................................................................................10
3.3.4 Freezer Temperature Settings ...................................................................................10
3.3.5 Door Open Alarm Function........................................................................................10
3.4 Temperature Settings Warnings ...................................................................................11
3.5 Accessories ..................................................................................................................11
3.5.1 Ice Tray (In some models) .......................................................................................11
3.5.2 The Icematic (In some models) ...............................................................................12
4 FOOD STORAGE........................................................................................... 12
5 CLEANING AND MAINTENANCE................................................................ 15
5.1 Defrosting .....................................................................................................................16
6 SHIPMENT AND REPOSITIONING.............................................................. 16
6.1 Transportation and Changing Positioning ....................................................................16
6.2 Repositioning the Door.................................................................................................16
7 BEFORE CALLING AFTER-SALES SERVICE ........................................... 17
8 TIPS FOR SAVING ENERGY........................................................................ 18

EN - 3
1 SAFETY INSTRUCTIONS
1.1 General Safety Warnings
Read this user manual carefully.
WARNING: Keep ventilation openings, in the
appliance enclosure or in the built-in structure, clear of
obstruction.
WARNING: Do not use mechanical devices or
other means to accelerate the defrosting process,
other than those recommended by the manufacturer.
WARNING: Do not use electrical appliances inside
the food storage compartments of the appliance,
unless they are of the type recommended by the
manufacturer.
WARNING: Do not damage the refrigerant circuit.
WARNING: When positioning the appliance,
ensure the supply cord is not trapped or damaged.
WARNING: Do not locate multiple portable socket-
outlets or portable power supplies at the rear of the
appliance.
WARNING: In order to avoid any hazards resulting
from the instability of the appliance, it must be xed in
accordance with the instructions.
If your appliance uses R600a as a refrigerant (this
information will be provided on the label of the cooler)
you should take care during transportation and
installation to prevent the cooler elements from being
damaged. R600a is an environmentally friendly and

EN - 4
natural gas, but it is explosive. In the event of a leak
due to damage of the cooler elements, move your
fridge away from open ames or heat sources and
ventilate the room where the appliance is located for a
few minutes.
• While carrying and positioning the fridge, do not
damage the cooler gas circuit.
• Do not store explosive substances such as aerosol
cans with a ammable propellant in this appliance.
• This appliance is intended to be used in household
and domestic applications such as:
–staff kitchen areas in shops, ofces and other
working environments.
–farm houses and by clients in hotels, motels and
other residential type environments.
–bed and breakfast type environments;
–catering and similar non-retail applications.
• If the socket does not match the refrigerator plug,
it must be replaced by the manufacturer, a service
agent or similarly qualied persons in order to avoid
a hazard.
• A specially grounded plug has been connected
to the power cable of your refrigerator. This plug
should be used with a specially grounded socket of
10 - 16 amperes. If there is no such socket in your
house, please have one installed by an authorised
electrician.

EN - 5
• This appliance can be used by children aged from
8 years and above and persons with reduced
physical, sensory or mental capabilities or lack of
experience and knowledge if they have been given
supervision or instruction concerning use of the
appliance in a safe way and understand the hazards
involved. Children shall not play with the appliance.
Cleaning and user maintenance shall not be made
by children without supervision.
• Children aged from 3 to 8 years are allowed to load
and unload refrigerating appliances. Children are not
expected to perform cleaning or user maintenance
of the appliance, very young children (0-3 years old)
are not expected to use appliances, young children
(3-8 years old) are not expected to use appliances
safely unless continuous supervision is given, older
children (8-14 years old) and vulnerable people can
use appliances safely after they have been given
appropriate supervision or instruction concerning
use of the appliance. Very vulnerable people are
not expected to use appliances safely unless
continuous supervision is given.
• If the supply cord is damaged, it must be replaced
by the manufacturer, an authorised service agent or
similar qualied persons, in order to avoid a hazard.
• This appliance is not intended for use at altitudes
exceeding 2000 m.

EN - 6
To avoid contamination of food, please respect the
following instructions:
• Opening the door for long periods can cause
a signicant increase of the temperature in the
compartments of the appliance.
• Clean regularly surfaces that can come in contact
with food and accessible drainage systems
• Store raw meat and sh in suitable containers in the
refrigerator, so that it is not in contact with or drip
onto other food.
• Two-star frozen-food compartments are suitable for
storing pre-frozen food, storing or making ice cream
and making ice cubes.
• One-, two- and three-star compartments are not
suitable for the freezing of fresh food.
• If the refrigerating appliance is left empty for long
periods, switch off, defrost, clean, dry, and leave the
door open to prevent mould developing within the
appliance.

EN - 7
1.2 Installation warnings
Before using your freezer for the rst time,
please pay attention to the following points:
• The operating voltage for your freezer is
220-240 V at 50Hz.
• The plug must be accessible after
installation.
• Your freezer may have an odour when
it is operated for the rst time. This is
normal and the odour will fade when your
freezer starts to cool.
• Before connecting your freezer, ensure
that the information on the data plate
(voltage and connected load) matches
that of the mains electricity supply. If in
doubt, consult a qualied electrician.
• Insert the plug into a socket with an
efcient ground connection. If the socket
has no ground contact or the plug does
not match, we recommend you consult a
qualied electrician for assistance.
• The appliance must be connected
with a properly installed fused socket.
The power supply (AC) and voltage at
the operating point must match with
the details on the name plate of the
appliance (the name plate is located on
the inside left of the appliance).
• We do not accept responsibility for any
damages that occur due to ungrounded
usage.
• Place your freezer where it will not be
exposed to direct sunlight.
• Your freezer must never be used
outdoors or exposed to rain.
• Your appliance must be at least 50 cm
away from stoves, gas ovens and heater
cores, and at least 5 cm away from
electrical ovens.
• If your freezer is placed next to a deep
freezer, there must be at least 2 cm
between them to prevent humidity
forming on the outer surface.
• Do not cover the body or top of freezer
with lace. This will affect the performance
of your freezer.
• Clearance of at least 150 mm is required
at the top of your appliance. Do not place
anything on top of your appliance.
• Do not place heavy items on the
appliance.
• Clean the appliance thoroughly before
use (see Cleaning and Maintenance).
• Before using your freezer, wipe all parts
with a solution of warm water and a
teaspoon of sodium bicarbonate. Then,
rinse with clean water and dry. Return all
parts to the freezer after cleaning.
• Use the adjustable front legs to make
sure your appliance is level and stable.
You can adjust the legs by turning them
in either direction. This must be done
before placing food in the appliance.
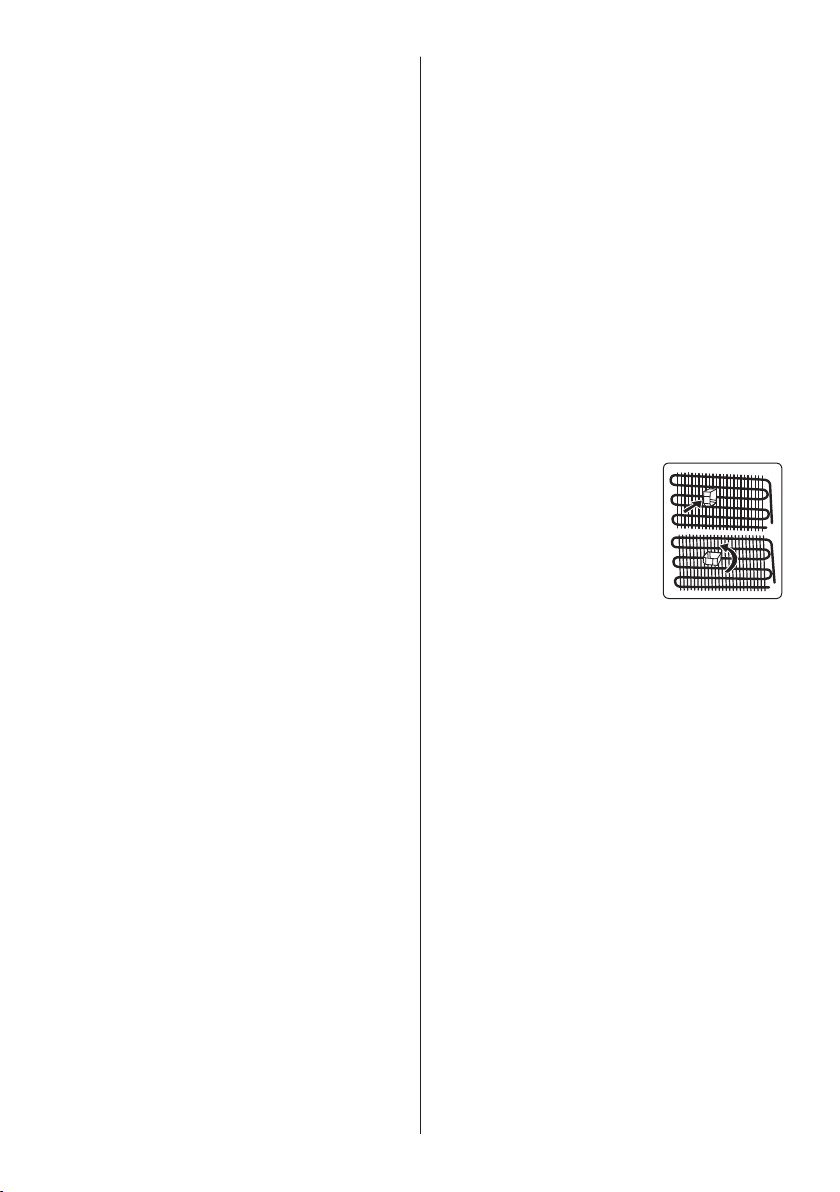
• Install the two plastic distance guides (the
parts on the black vanes
-condenser- at the rear)
by turning it 90° (as
shown in the gure) to
prevent the condenser
from touching the wall.
• The distance between
the appliance and back wall must be a
maximum of 75 mm.
1.3 During Usage
• Do not connect your freezer to the mains
electricity supply using an extension lead.
• Do not use damaged, torn or old plugs.
• Do not pull, bend or damage the cord.
• Do not use plug adapter.
• This appliance is designed for use by
adults. Do not allow children to play with
the appliance or hang off the door.
• Never touch the power cord/plug with wet
hands. This may cause a short circuit or
electric shock.
• Do not place glass bottles or cans in
your freezer as they will burst when the
contents freeze.
• Do not place explosive or ammable
material in your freezer.
• When removing ice from the ice-making
compartment, do not touch it. Ice may
cause frost burns and/or cuts.

EN - 8
• Do not touch frozen goods with wet
hands. Do not eat ice-cream or ice cubes
immediately after they are removed from
the ice-making compartment.
• Do not re-freeze thawed frozen food. This
may cause health issues such as food
poisoning.
When the door of the freezer is closed, a
vacuum seal will form. Wait for 1 minute
before reopening it.
This application is optional for easy opening
of the door. With this application, a little
condensation may occur around this area
and you may remove it.
Old and Out-of-order Fridges
• If your old fridge or freezer has a
lock, break or remove the lock before
discarding it, because children may
get trapped inside it and may cause an
accident.
• Old fridges and freezers contain
isolation material and refrigerant with
CFC. Therefore, take care not to harm
environment when you are discarding
your old fridges.
CE Declaration of conformity
We declare that our products meet the
applicable European Directives, Decisions
and Regulations and the requirements
listed in the standards referenced.
Disposal of your old appliance
The symbol on the product or on
its packaging indicates that this
product may not be treated as
household waste. Instead it shall
be handed over to the applicable
collection point for the recycling of electrical
and electronic equipment. By ensuring
this product is disposed of correctly,
you will help prevent potential negative
consequences for the environment and
human health, which could otherwise be
caused by inappropriate waste handling
of this product. For more detailed
information about recycling of this product,
please contact your local city ofce, your
household waste disposal service or the
shop where you purchased the product.
Packaging and the Environment
Packaging materials protect
your machine from damage that
may occur during transportation.
The packaging materials are
environmentally friendly as they are
recyclable. The use of recycled material
reduces raw material consumption and
therefore decreases waste production.
Notes:
• Please read the instruction manual
carefully before installing and using your
appliance. We are not responsible for the
damage occurred due to misuse.
• Follow all instructions on your appliance
and instruction manual, and keep this
manual in a safe place to resolve the
problems that may occur in the future.
• This appliance is produced to be used
in homes and it can only be used in
domestic environments and for the
specied purposes. It is not suitable for
commercial or common use. Such use
will cause the guarantee of the appliance
to be cancelled and our company will not
be responsible for any losses incurred.
• This appliance is produced to be used
in houses and it is only suitable for
cooling / storing foods. It is not suitable
for commercial or common use and/or
for storing substances except for food.
Our company is not responsible for any
losses incurred by inappropriate usage of
the appliance.

EN - 9
2 DESCRIPTION OF THE
APPLIANCE
1
2
3
4
5
6
This presentation is only for
information about the parts of the
appliance. Parts may vary according to the
appliance model.
1. Control panel
2. Freezer aps
3. Freezer drawers
4. Freezer bottom drawer
5. Freezer big drawer
6. Ice tray (In some models)
In some models there is a shelf with
icematic in the top basket
3 USING THE APPLIANCE
3.1 Information on No-Frost technology
No-frost freezers differ from other static
freezers in their operating principle.
In normal freezers, the humidity entering
the freezer due to opening the door and
the humidity inherent in the food causes
freezing in the freezer compartment. To
defrost the frost and ice in the freezer
compartment, you are periodically required
to turn off the freezer, place the food that
needs to be kept frozen in a separately
cooled container and remove the ice
gathered in the freezer compartment.
The situation is completely different in no-
frost freezers. Dry and cold air is blown into
the freezer compartment homogeneously
and evenly from several points via a blower
fan. Cold air dispersed homogeneously
and evenly between the shelves cools all
of your food equally and uniformly, thus
preventing humidity and freezing.
Therefore your no-frost freezer allows you
ease of use, in addition to its huge capacity
and stylish appearance.

EN - 10
3.2 Display and Control Panel
1 2 3 4
Using the Control Panel
1. Freezer temperature set button
2. Super freeze symbol (Super freeze LED)
3. Alarm symbol (Alarm LED)
4. Freezer adjusted temperature indicator
3.3 Operating your Freezer
Lighting (If available)
When the product is plugged in for the
rst time, the interior lights may turn on 1
minute late due to opening tests.
3.3.1 Alarm light
In case of a problem within the freezer, the
alarm led will release red light.
3.3.2 Freezer Temperature Set Button
This button allows setting temperature
of the freezer. In order to set values for
freezer partition, press this button. Use this
button also to activate super freeze mode.
3.3.3 Super Freezer Mode
When Would It Be Used?
• To freeze huge quantities of food.
• To freeze fast food.
• To freeze food quickly.
• To store seasonal food for a long time.
How To Use?
• Press temperature set button until super
freezing light comes on.
• Super freezing led will light during this
mode.
• Maximum amount of fresh food (in
kilograms) to be frozen within 24 hours is
shown on the appliance label.
• For optimal appliance performance
in maximum freezer capacity, set the
appliance to active super freeze mode 24
hours before you put the fresh food into
the freezer.
During This Mode:
If you press temperature set button, the
mode will be cancelled and the setting will
be restored from -16.
Super freeze mode will automatically
cancel after 54 hours, depending on
the environmental temperature or when the
freezer sensor reaches a sufciently low
temperature.
3.3.4 Freezer Temperature Settings
• The initial temperature of the setting
display is -18 °C.
• Press freezer setting button once.
• Every time you press the button, the
setting temperature will decrease.
(-16 °C, -18 °C, -20 °C,.. super freezing)
• If you press freezer setting button until
super freezer symbol is displayed on
freezer.
• Settings display and you do not press
any button within the following 3 seconds,
super freezing will blink.
• If you keep on pressing, it will restart from
last value.
Recommended Temperature Values for
Freezer
When to adjust Inner
Temperature
For minimum freezing capacity -16 oC, -18 oC
In normal usage -18 oC, -20 oC,
-22 oC
For maximum freezing capacity -24 oC
3.3.5 Door Open Alarm Function
If freezer door is opened more than 2

EN - 11
minutes, appliance sounds ‘beep beep’.
3.4 Temperature Settings Warnings
• Your appliance is designed to operate in
the ambient temperature ranges stated
in the standards, according to the climate
class stated in the information label. It
is not recommended that your fridge is
operated in the environments which are
outside of the stated temperature ranges.
This will reduce the cooling efciency of
the appliance.
• Temperature adjustments should be
made according to the frequency of
door openings, the quantity of food kept
inside the appliance and the ambient
temperature in the location of your
appliance.
• When the appliance is rst switched on,
allow it to run for 24 hours in order to
reach operating temperature. During this
time, do not open the door and do not
keep a large quantity of food inside.
• A 5 minute delay function is applied
to prevent damage to the compressor
of your appliance when connecting
or disconnecting to mains, or when
an energy breakdown occurs. Your
appliance will begin to operate normally
after 5 minutes.
Climate class and meaning:
T (tropical): This refrigerating appliance
is intended to be used at ambient
temperatures ranging from 16 °C to 43 °C.
ST (subtropical): This refrigerating
appliance is intended to be used at ambient
temperatures ranging from 16 °C to 38 °C.
N (temperate): This refrigerating appliance
is intended to be used at ambient
temperatures ranging from 16 °C to 32 °C.
SN (extended temperate): This
refrigerating appliance is intended to be
used at ambient temperatures ranging from
10 °C to 32 °C.
Important installation instructions
This appliance is designed to work in
difcult climate conditions and is powered
with ‘Freezer Shield’ technology which
ensures that the frozen food in the
freezer will not defrost even if the ambient
temperature falls as low as -15 °C. So
you may then install your appliance in an
unheated room without having to worry
about frozen food in the freezer being
spoilt. When the ambient temperature
returns to normal, you may continue using
the appliance as usual.
3.5 Accessories
Visual and text descriptions in the
accessories section may vary according
to the model of your appliance.
3.5.1 Ice Tray (In some models)
• Fill the ice tray with water and place in
the freezer compartment.
• After the water has completely frozen,
you can twist the tray as shown below to
remove the ice cubes.

EN - 12
3.5.2 The Icematic (In some models)
(The images are representative)
• Pull the lever towards you and remove
the ice maker tray
• Fill with water to the marked level
• Hold the left end of the lever and set the
ice-tray on the icebox
• When ice cubes have formed, twist
the lever to drop the ice cubes into the
icebox.
Do not ll the icebox with water in
order to make ice. It will break.
Visual and text descriptions in
the accessories section may vary
according to the model of your
appliance.
4 FOOD STORAGE
For normal operating conditions, set the
temperature of the freezer compartment to
-18 or -20 oC.
• The freezer is used for storing frozen
food, freezing fresh food, and making ice
cubes.
• Food in liquid form should be frozen
in plastic cups and other food should
be frozen in plastic folios or bags.For
freezing fresh food; wrap and seal fresh
food properly, that is the packaging
should be air tight and shouldn’t leak.
Special freezer bags, aluminum foil
polythene bags and plastic containers
are ideal.
• Do not store fresh food next to frozen
food as it can thaw the frozen food.
• Before freezing fresh food, divide it into
portions that can be consumed in one
sitting.
• Consume thawed frozen food within a
short period of time after defrosting
• Always follow the manufacturer's
instructions on food packaging when
storing frozen food. If no information is
provided food, should not be stored for
more than 3 months from the date of
purchase.
• When purchasing frozen food, make sure
that it has been stored under appropriate
conditions and that the packaging is not
damaged.
• Frozen food should be transported in
appropriate containers and placed in the
freezer as soon as possible.
• Do not purchase frozen food if the
packaging shows signs of humidity
and abnormal swelling. It is probable
that it has been stored at an unsuitable
temperature and that the contents have
deteriorated.
• The storage life of frozen food depends
on the room temperature, the thermostat
setting, how often the door is opened,
the type of food, and the length of time

EN - 13
required to transport the product from
the shop to your home. Always follow the
instructions printed on the packaging and
never exceed the maximum storage life
indicated.
• If the freezer door has been left open for
a long time or not closed properly, frost
will form and can prevent efcient air
circulation. To resolve this, unplug the
freezer and wait for it to defrost. Clean
the freezer once it has fully defrosted.
• The freezer volume stated on the label is
the volume without baskets, covers, and
so on.
• Do not refreeze thawed food. It may
pose a danger to your health and cause
problems such as food poisoning.
NOTE: If you attempt to open the freezer
door immediately after closing it, you
will nd that it will not open easily. This
is normal. Once equilibrium has been
reached, the door will open easily.
If you would use maximum freezing
capacity of your freezer:
• While freezing fresh foods, the maximum
amount of fresh food (in kg) that can be
frozen in 24 hours is indicated on the
appliance label.
• For optimum appliance performance
to reach maximum freezing capacity,
activate Super Freeze (SF) mode 24
hours before placing fresh food into the
freezer.
• After placing fresh food into the freezer,
24 hours is generally sufcient for
freezing. ”Super Freeze” mode will be
deactivated automatically in 2-3 days to
save energy.
If you would freeze a small amount (up
to 3 kg) in your freezer:
• Place your food without touching already
frozen food and activate “Fast Freezing”
mode. You can put your food next to
other frozen food after it is completely
frozen (after minimum 24 hours).
• Do not re-freeze frozen food after it has
thawed. This may cause health issues,
such as food poisoning.
• Allow hot food to completely cool down
before placing it in the freezer.
• When buying frozen food ensure that
these have been frozen at suitable
temperatures and that the packing is
intact.
• Use the fast freezing shelf to freeze
home cooking (and any other food
which needs to be frozen quickly) more
quickly because of the freezing shelf’s
greater freezing power. Fast freezing
shelf is the bottom drawer of the freezer
compartment.
• To use the maximum capacity of the
freezer compartment, use the glass
shelves for the upper and middle section,
and use the lower basket for the bottom
section.

EN - 14
The table below is a quick guide to show you the most efcient way to store the major
food groups in your freezer compartment.
Meat and sh Preparation Maximum storage time
(months)
Steak Wrap in foil 6 - 8
Lamb meat Wrap in foil 6 - 8
Veal roast Wrap in foil 6 - 8
Veal cubes In small pieces 6 - 8
Lamb cubes In pieces 4 - 8
Minced meat In packaging without using spices 1 - 3
Giblets (pieces) In pieces 1 - 3
Bologna sausage/salami Should be kept packaged even if it has a membrane 1 - 3
Chicken and turkey Wrap in foil 4 - 6
Goose and duck Wrap in foil 4 - 6
Deer, rabbit, wild boar In 2.5 kg portions or as llets 6 - 8
Freshwater sh
(Salmon, Carp, Crane,
Catsh)
After cleaning the bowels and scales of the sh,
wash and dry it. If necessary, remove the tail and
head.
2
Lean sh (Bass, Turbot,
Flounder) 4
Fatty shes (Tuna,
Mackerel, Bluesh,
Anchovy)
2 - 4
Shellsh Clean and in a bag 4 - 6
Caviar In its packaging, or in an aluminium or plastic
container 2 - 3
Snails In salty water, or in an aluminium or plastic container 3
NOTE: Thawed frozen meat should be cooked as fresh meat. If the meat is not cooked after defrosting, it
must not be re-frozen.
Vegetables and Fruits Preparation Maximum storage time
(months)
String beans and beans Wash, cut into small pieces and boil in water 10 - 13
Beans Hull, wash and boil in water 12
Cabbage Clean and boil in water 6 - 8
Carrot Clean, cut into slices and boil in water 12
Pepper Cut the stem, cut into two pieces, remove the core
and boil in water 8 - 10
Spinach Wash and boil in water 6 - 9
Cauliower Remove the leaves, cut the heart into pieces and
leave it in water with a little lemon juice for a while 10 - 12
Eggplant Cut into pieces of 2cm after washing 10 - 12
Corn Clean and pack with its stem or as sweet corn 12
Apple and pear Peel and slice 8 - 10
Apricot and Peach Cut into two pieces and remove the stone 4 - 6

EN - 15
Vegetables and Fruits Preparation Maximum storage time
(months)
Strawberry and
Blackberry Wash and hull 8 - 12
Cooked fruits Add 10 % of sugar to the container 12
Plum, cherry, sourberry Wash and hull the stems 8 - 12
Maximum storage time
(months)
Thawing time at room
temperature (hours)
Thawing time in oven
(minutes)
Bread 4 - 6 2 - 3 4-5 (220-225 °C)
Biscuits 3 - 6 1 - 1,5 5-8 (190-200 °C)
Pastry 1 - 3 2 - 3 5-10 (200-225 °C)
Pie 1 - 1,5 3 - 4 5-8 (190-200 °C)
Phyllo dough 2 - 3 1 - 1,5 5-8 (190-200 °C)
Pizza 2 - 3 2 - 4 15-20 (200 °C)
Dairy products Preparation Maximum storage time
(months) Storage conditions
Packet (Homogenized)
Milk In its own packet 2 - 3 Pure Milk – in its own packet
Cheese - excluding
white cheese In slices 6 - 8
Original packaging may be
used for short-term storage.
Keep wrapped in foil for
longer periods.
Butter, margarine In its packaging 6
5 CLEANING AND
MAINTENANCE
Disconnect the unit from the power
supply before cleaning.
Do not wash your appliance by
pouring water on it.
Do not use abrasive products,
detergents or soaps for cleaning the
appliance. After washing, rinse with clean
water and dry carefully. When you have
nished cleaning, reconnect the plug to the
mains supply with dry hands.
• Make sure that no water enters the lamp
housing and other electrical components.
• The appliance should be cleaned
regularly using a solution of bicarbonate
of soda and lukewarm water.
• Clean the accessories separately by
hand with soap and water. Do not wash
accessories in a dish washer.
• Clean the condenser with a brush at least
twice a year. This will help you to save on
energy costs and increase productivity.
The power supply must be
disconnected during cleaning.

EN - 16
5.1 Defrosting
water tray
• Your appliance performs automatic
defrosting. The water formed as a result
of defrosting passes through the water
collection spout, ows into the water tray
behind your appliance and evaporates
there.
• Make sure you have disconnected the
plug of your appliance before cleaning
the water tray.
• Remove the water tray from its position
by removing the screws (if it has screws).
Clean it with soapy water at specic time
intervals. This will prevent odours from
forming.
Replacing LED Lighting
To replace any of the LEDs, please contact
the nearest Authorised Service Centre.
Note: The numbers and location of the
LED strips may change according to
the model.
6 SHIPMENT AND
REPOSITIONING
6.1 Transportation and Changing
Positioning
• The original packaging and foam may be
kept for re-transportation (optional).
• Fasten your appliance with thick
packaging, bands or strong cords and
follow the instructions for transportation
on the packaging.
• Remove all movable parts or x them
into the appliance against shocks
using bands when re-positioning or
transporting.
Always carry your appliance in the
upright position.
6.2 Repositioning the Door
• It is not possible to change the opening
direction of your appliance door if door
handles are installed on the front surface
of the appliance door.
• It is possible to change the opening
direction of the door on models with
handle on the side of the door or without
handles.
• If the door-opening direction of your
appliance can be changed, contact the
nearest Authorised Service Centre to
change the opening direction.

EN - 17
7 BEFORE CALLING AFTER-SALES SERVICE
Errors
Your appliance will warn you if the temperature(s) is/are at improper levels or if a problem
occurs with the appliance. In case of a problem within the appliance, the alarm led will
release red light.
Alarm
indicator LED
is turning on
MEANING WHY WHAT TO DO
"Failure" Warning
There is/are some
part(s) out of order or
there is a failure in the
cooling process.
The product is plugged
for the rst time or
a long-time power
interruption for 1 hour.
Check the door is open or not and check
if the product working 1 hour. If the door
is not open and the product had worked
1 hour, call service for assistance as
soon as possible.
If you are experiencing a problem with
your appliance, please check the following
before contacting the after-sales service.
Your appliance is not operating
Check if:
• There is power
• The plug is correctly placed in the socket
• The plug fuse or the mains fuse has
blown
• The socket is defective. To check this,
plug another working appliance into the
same socket.
The appliance performs poorly
Check if:
• The appliance is overloaded
• The appliance door is closed properly
• There is any dust on the condenser
• There is enough space near the rear and
side walls.
Your appliance is operating noisily
Normal noises
Cracking noise occurs:
• During automatic defrosting
• When the appliance is cooled
or warmed (due to expansion of
appliance material).
Short cracking noise occurs: When
the thermostat switches the compressor
on/off.
Motor noise: Indicates the compressor
is operating normally. The compressor
may cause more noise for a short time
when it is rst activated.
Bubbling noise and splash occurs:
Due to the ow of the refrigerant in the
tubes of the system.
Water owing noise occurs: Due
to water owing to the evaporation
container. This noise is normal during
defrosting.
Air blowing noise occurs: In some
models during normal operation of the
system due to the circulation of air.
The edges of the appliance in contact
with the door joint are warm
Especially during summer (warm seasons),
the surfaces in contact with the door joint
may become warmer during the operation
of the compressor, this is normal.
There is a build-up of humidity inside
the appliance
Check if:
• All food is packed properly. Containers
must be dry before being placed in the
appliance.
• The appliance door is opened frequently.
Humidity of the room enters the
appliance when the doors are opened.
Humidity increases faster when the doors
are opened more frequently, especially if
the humidity of the room is high.

EN - 18
The door does not open or close
properly
Check if:
• There is food or packaging preventing the
door from closing
• The door joints are broken or torn
• Your appliance is on a level surface.
Recommendations
• If the appliance is switched off or
unplugged, wait at least 5 minutes before
plugging the appliance in or restarting
it in order to prevent damage to the
compressor.
• If you will not use your appliance for
a long time (e.g. in summer holidays)
unplug it. Clean your appliance according
to chapter cleaning and leave the door
open to prevent humidity and smell.
• If a problem persists after you have
followed all the above instructions,
please consult the nearest authorised
service centre.
• The appliance you have purchased is
designed for domestic use only. It is not
suitable for commercial or common use.
If the consumer uses the appliance in a
way that does not comply with this, we
emphasise that the manufacturer and
the dealer will not be responsible for any
repair and failure within the guarantee
period.
8 TIPS FOR SAVING ENERGY
1. Install the appliance in a cool, well-
ventilated room, but not in direct sunlight
and not near a heat source (such as a
radiator or oven) otherwise an insulating
plate should be used.
2. Allow warm food and drinks to cool
before placing them inside the appliance.
3. Place thawing food in the refrigerator
compartment if available. The low
temperature of the frozen food will
help cool the refrigerator compartment
while the food is thawing. This will save
energy. Frozen food left to thaw outside
of the appliance will result in a waste of
energy.
4. Drinks or other liquids should be
covered when inside the appliance. If
left uncovered, the humidity inside the
appliance will increase, therefore the
appliance uses more energy. Keeping
drinks and other liquids covered helps
preserve their smell and taste.
5. Avoid keeping the doors open for long
periods and opening the doors too
frequently as warm air will enter the
appliance and cause the compressor to
switch on unnecessarily often.
6. Keep the covers of the different
temperature compartments (such as the
crisper and chiller if available) closed.
7. The door gasket must be clean and
pliable. In case of wear, replace the
gasket.

16 - HE
8היגרנאב ןוכסיחל תוצע
1. ,בטיה ררוואמה רירק רדחב רישכמה תא ןקתה
ומכ( םוח רוקמ דיל אלו הרישי שמש אלל ךא
חולב שמתשה ,ןתינ אל םא ,)רונת וא רוטאידר
.דדובמ
2
. ינפל ררקתהל םימח תואקשמלו ןוזמל חנה
.רישכמל תסנכה
3
. .םייק םא ,רוריקה אתב רישפמ ןוזמ חנה
רוזעת אופקה ןוזמה לש הכומנה הרוטרפמטה
הז רבד .הרשפהה תעב רוריקה את תא ררקל
רישפהל ראשויש אופק ןוזמ .היגרנאב ךוסחי
.היגרנא זובזבל םורגי רישכמל ץוחמ
4
. הסכמב תוסכל שי םירחא םילזונ וא תואקשמ
,הסכמב וסוכי אל םה םא .רישכמה ךותב םהשכ
ךורצי רישכמהו הלעת רישכמה ךותב תוחלה
םירחא םילזונו תואקשמ יוסיכ .רתוי הבר היגרנא
.םעטהו חירה רומישב עייסמ הסכמב
5
. ןמז ךרואל תוחותפ תותלדה תראשהמ ענמיה
תאז ,ידמ תובורק םיתעל תותלדה תחיתפמ וא
םורגלו רישכמל סנכיהל םח ריוואמ עונמל ידכ
.ךרוצל אלש תובורק םיתעל לועפל סחדמל
6
. ילעב םיאתה לש םיסכמה תא ראשה
תוקריה תריגמ ומכ( תונושה תורוטרפמטה
)תומייק םא תולעמ ספאב רוריקה תריגמו
.םירוגס
7
. לש הרקמב .שימגו יקנ תויהל בייח תלדה םטא
.םטאה תא ףלחה ,יאלב
Table of contents
Languages:
Other REINOS Freezer manuals