Rekluse Motor Sports EXP Operation manual

©2015 RekluseMotorSports,Inc.
12000W FranklinRd
Boise,Idaho83709
208-426-0659
support@rekluse.com
REKLUSE MOTOR SPORTS
TheRekluseEXPKit forKTM690 &Husqvarna701-LC4
INSTALLATION &
USER’S GUIDE
Doc ID: 191-6380A
Doc Rev: 070716
OVERVIEW
For MY2016 bike owners only: Refer to the Slave Cylinder Appendix document before installing the
Rekluse-provided slave cylinder on your bike. It may be necessary to change the fluid seals.
This kit replaces the OEM clutch pack with a Rekluse-designed clutch pack designed for optimal
operation specific to your bike.
INSIDE THIS DOCUMENT
oDISASSEMBLY
oINSTALLATION
oSETTING THE INSTALLED GAP & BREAK-IN
oTROUBLESHOOTING
oEXP TUNING OPTIONS & ENGAGEMENT SETTINGS
oMAINTENANCE
INSTALLATION TIPS
Watch the “EXP Auto-Clutch Installation Video”by following this QR code or visiting
rekluse.com/support/videos.
Read this entire document before performing any steps, so you will know what to expect.
Be sure to wear proper eye protection.
It is recommended to replace the clutch cover gasket any time the clutch cover is removed.
Laying the bike on its side allows for easy clutch access and eliminates the need to drain oil
Use clean, quality JASO MA certified oil for motorcycle transmissions for best performance.
When reinstalling components, use the torque specifications found in your OEM service manual
TOOLS NEEDED
Metric socket set
4mm Allen key Torque wrench (in-lb & ft-lb, or N-m)
Metric open-end wrench set

Rekluse Adventure-Bike EXP Page 2
INCLUDED PARTS
Item
Item Type
Qty
13
EXP Base *
2
47
Assembly Screws (temporary, to aid assembly only)
2
51
Fastener - 1/4-Turn Pin *
6
60.1
EXP Adjustment Spring * ( see EXP tuning options)
6
60.2
Pressure Plate Spring (stiffer than stock)
4
63
Drive Plate (.040” [1.0mm] thick)
4
65
Drive Plate (.048” [1.2mm] thick)
3
69
™ Friction Disk
7
70
Basket Lining Sleeve
12
85
Wedge Assembly *
6
86
Slave Cylinder Assembly
1
* Denotes parts assembled as part of EXP disk assembly.
Visit Rekluse.com/support for a full parts fiche illustration
and a listing of all part numbers specific to your product.
ASSEMBLY OVERVIEW

Rekluse Adventure-Bike EXP Page 3
PREP & DISASSEMBLY
1. Soak the EXP disk and Rekluse friction disks in
engine oil for at least 5 minutes.
2. To avoid draining the oil, lay the motorcycle on
its left side. Alternatively, you can stand the bike
vertically on a center stand and drain the oil.
3. Remove the right side swingarm bolt, and move
the foot peg assembly out of the way of the
clutch cover bolts and clutch cover.
4. Remove the oil filter cover from the engine and
move it up out of the way.
5. Remove the clutch cover bolts and clutch cover,
taking care to not damage the cover gasket.
Replace this gasket if it is torn or damaged.
6. Remove the OEM screws and springs, followed
by the pressure plate and throwout.
7. Remove the outer hub and the entire OEM
clutch pack (all clutch plates).
None of the OEM clutch plates will be reused
with this kit.

Rekluse Adventure-Bike EXP Page 4
8. Remove the judder spring and the spring seat
washer from the outer hub and set them aside.
These two parts will not be reused with the EXP
clutch pack.
WARNING: It is critical that both the judder
spring (cupped ring) and its seat washer (flat ring)
are removed from the outer hub! Often, the
spring seat washer will be stuck via an oil film to
the outer hub flange.
These two parts will not be reused with the EXP
clutch pack.
Failure to remove both of these parts before
installing the Rekluse clutch plates will result in
poor performance or clutch malfunction.
9. Remove the inner hub from the engine by
loosening the center nut and washer.
HUB REASSEMBLY
NOTE: Because this bike has a slipper clutch with
a “backwards” design, you will assemble the
clutch pack between the two hubs before placing
this assembly into the bike.
1. Place the outer hub on a clean workbench,
then install the oil-soaked clutch pack starting
with a Rekluse friction disk [#69], followed by a
Rekluse drive plate [#63]. Follow this
alternating pattern until all the supplied clutch
plates are installed.
Be sure to align the tabs on the friction disks
with each other. This will make placement into
the basket much easier later.
Last in will be the EXP disk. The EXP disk is
unidirectional and can be installed in any
orientation.

Rekluse Adventure-Bike EXP Page 5
2. Place the 4x OEM hub springs in their pockets
in the outer hub, then install the inner hub,
taking care to align the arrows of the two hubs.
3. With your hands, compress this assembly
together and flip it over so that none of the
plates become unindexed from the outer hub.
4. Using a 4mm Allen key, thread the 2x provided
assembly screws [#47] through opposing spring
pockets. Tighten just until the springs are
compressed enough to contain the clutch pack,
but not fully clamping the clutch pack.
Do not over-tighten!
This step is designed to make it easier to drop
the assembly into the bike as one unit.
INSTALLATION
1. Install the 12x Basket Sleeves [#70] into the
tang slots of the basket, pushing them down in
until they contact the bottom of the basket.
When properly installed, they will be nearly
flush with the top of the basket.
2. Check to ensure that the 3-piece thrust washer
assembly is correctly in place on the mainshaft.
These may have moved when the hubs were
removed from the bike.
CROSS-SECTION VIEW

Rekluse Adventure-Bike EXP Page 6
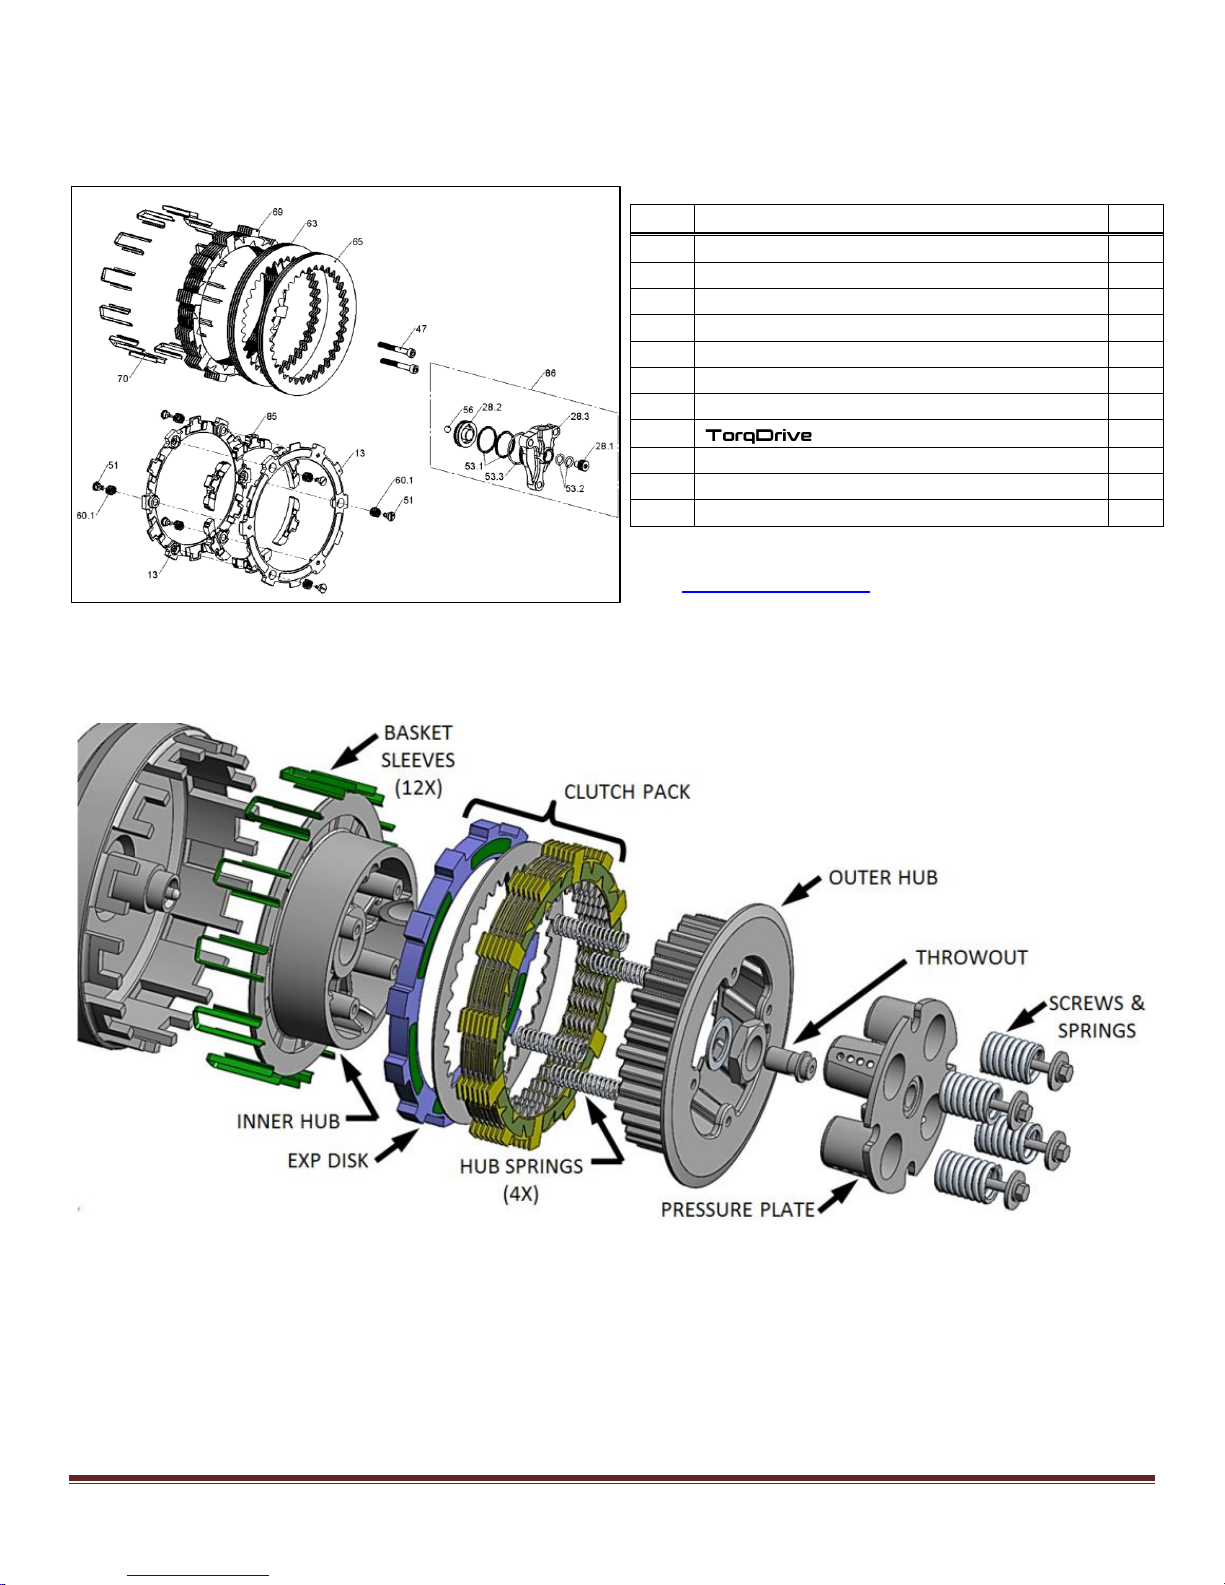
3. Install the hub assembly into the clutch basket,
making sure that all of the friction disk tabs
index into the steel basket sleeves and the
inner hub spline indexes correctly to the
mainshaft.
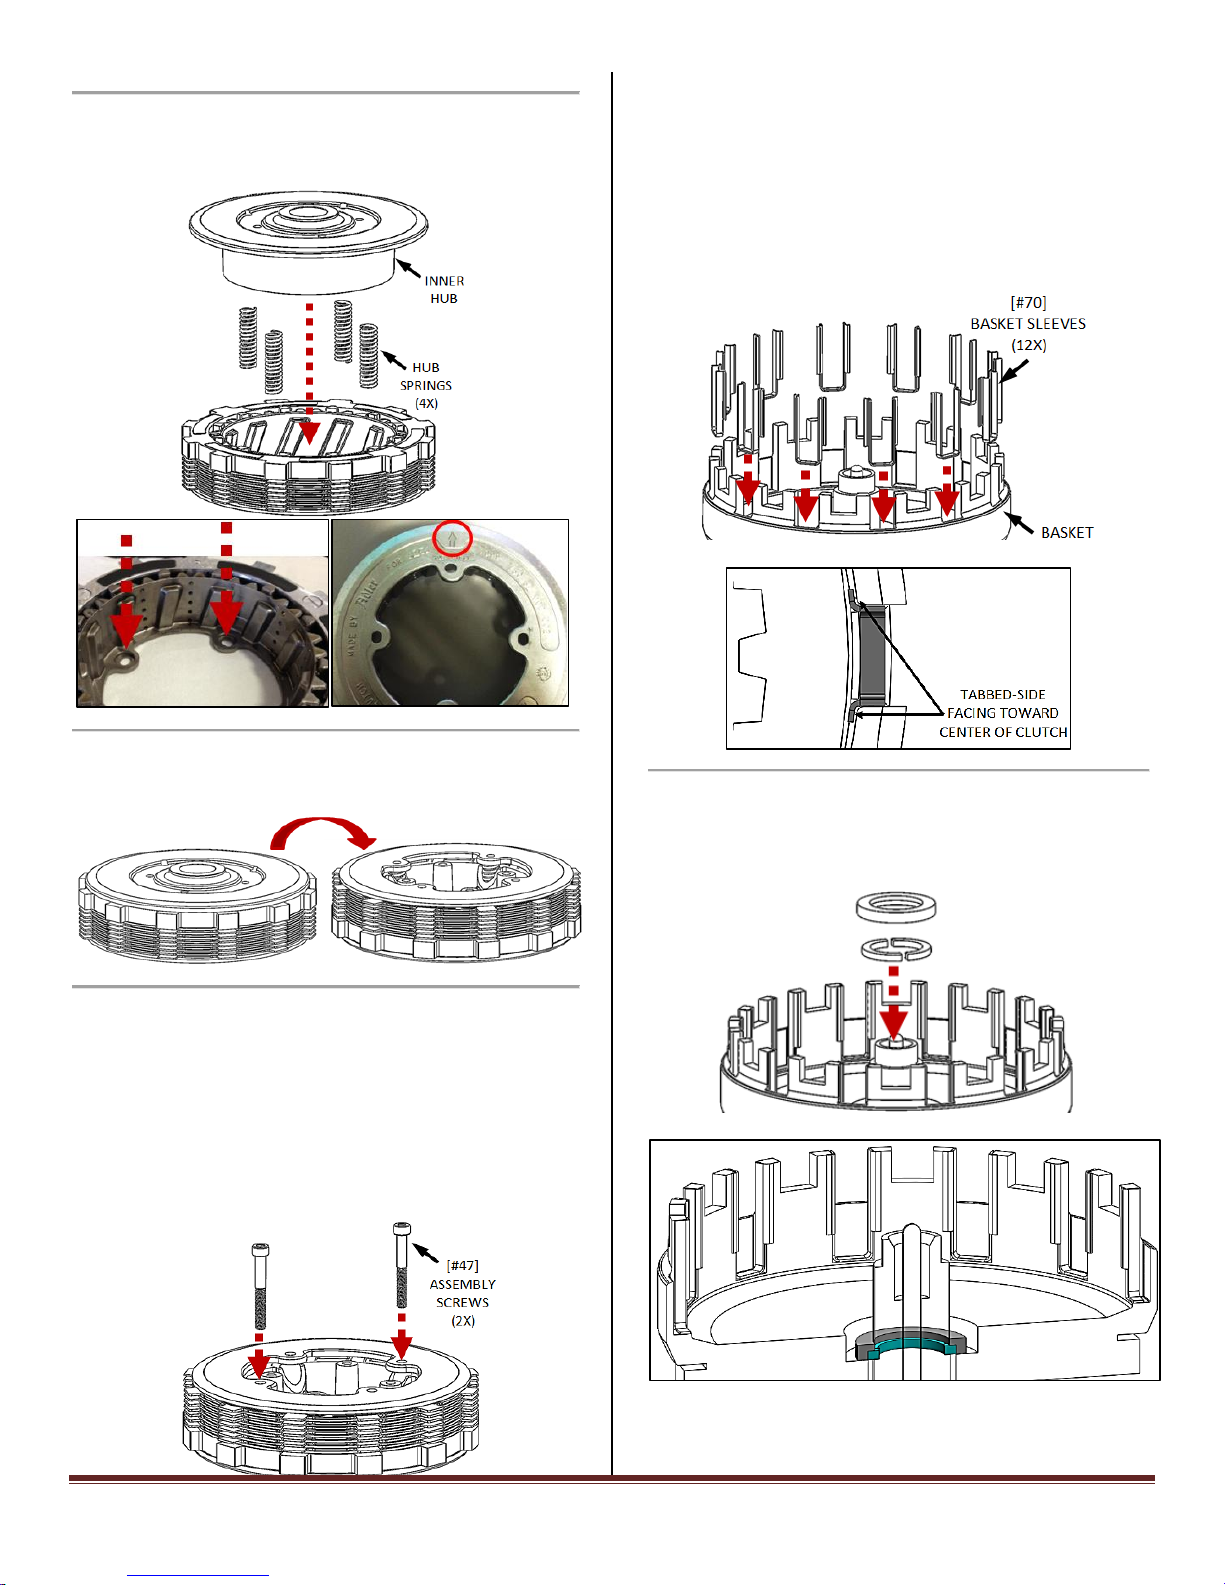
NOTE: Use only the full tang slots.
Never install any disks into the half-slots.
4. Reinstall the OEM washer and center nut,
applying Loctite© 243 or equivalent thread-
locking compound to the threads.
Use a torque wrench to tighten the center nut to
74 ft-lb (100 N-m), but do not over-torque!
This may require placing the transmission in the
highest gear and having a friend hold the brake
pedal to keep the clutch from spinning.
WARNING: Do not over-torque the center nut!
Over-torqueing will cause drag and can damage
your engine’s bearings or transmission
components.
5. Reinstall the OEM throwout and pressure plate,
followed by the springs [#60.2] and OEM bolts.
NOTE: The Rekluse-provided pressure plate
springs (white) are stiffer than the OEM springs,
and they have been found to significantly help
improve overall clutch performance in the form
of positive engagement and hookup. It is
recommended to install them at this time.
Due to the light nature of the clutch lever with
the stock springs, the stiffer springs should not
adversely affect the clutch lever effort or feel.
Torque the spring bolts to 4.4 ft-lb (6 N-m).
6. With the clutch installed, you can now remove
the screws that were used to hold the assembly
together during installation.
7. Reinstall the clutch cover and oil filter cover,
torqueing the bolts to the OEM spec:
Clutch Cover Bolts: 7.4 ft-lb (10 N-m)
Oil Filter Cover Bolts: 4.4 ft-lb (6 N-m)
8. Reinstall the foot peg assembly and swingarm
bolt, applying thread-locking compound to the
swingarm bolt and torqueing to 59ft-lb (80N-m).

Rekluse Adventure-Bike EXP Page 7
SLAVE CYLINDER
INSTALLATION
Handle with care! During assembly there is a small
ball bearing [#56] installed in the slave piston
[#28.3] with a small amount of grease. When
installing the Rekluse slave cylinder, make sure the
ball does not come loose.
1. Stand the bike up and lean it on its kickstand or
place it on a suitable bike stand.
2. Remove the plastic chain guard that covers the
slave cylinder.
IMPORTANT CLUTCH FLUID NOTE:
For MY2016 bike owners only:
Refer to the Slave Cylinder Appendix
document before installing the Rekluse-
provided slave cylinder on your bike. It may be
necessary to change the fluid seals in the
cylinder housing and piston.
For all other model-years:
Read the fluid information located on the
reservoir cap of your bike’s clutch master
cylinder. This will inform you of which clutch
fluid to use in the following steps, either mineral
oil or DOT brake fluid.
Generally:
- MY2015 and older: uses mineral oil
- MY2016 and newer: uses brake fluid
Adjustable Slave Cylinder Access:
To ensure access to the adjuster screw on the new
Rekluse slave cylinder, there are 3 options:
1. Modify the OEM plastic chain guard by
drilling a small hole.
2. Purchase an aftermarket chain guard which
allows access to the adjuster screw.
3. Remove the OEM chain guard when making
adjustments (however, the guard must be
securely in place to start the engine or it will
leak oil).

Rekluse Adventure-Bike EXP Page 8
3. To modify the OEM plastic guard, follow these
steps. If performed correctly, this modification
will not affect or compromise the safety or
integrity of the part.
a. Measure 1.20” (30.5mm) from the center of
the bolt sleeve and make a mark in the
center of the valley between embossments
as shown below.
b. Drill a ~5/16” (~8mm) hole at this location.
4. Starting at the slave cylinder, remove the OEM
parts named in the following diagram beginning
with the input line fitting. Your slave cylinder
will have a separate bleeder bolt that will be
reused.
5. On a workbench (away from the engine), bleed
the Rekluse slave cylinder by this procedure:
c. Use a 4mm Allen key to make the top O-
Ring [#53.1] visible on the adjuster screw
[#28.2].
d. Compress the piston [#28.3] until it bottoms.

Rekluse Adventure-Bike EXP Page 9
e. Pour clutch fluid into the slave cylinder port.
WARNING
Be sure to use the correct clutch fluid! Check the
cap of the clutch master cylinder to determine
which clutch fluid to use. Failure to use the correct
fluid will result in seal damage and/or failure.
f. Turn the adjuster screw clockwise until it
bottoms, keeping the fluid topped off.
g. Turn the adjuster screw back to the initial
position with the top O-ring visible.
h. Compress the piston until it bottoms out.
Repeat the process until there is no longer
air escaping from the top port when the
piston is compressed.
NOTE: When compressing the piston, fluid
can shoot out from the slave cylinder port. Be
sure to wear eye protection.
6. Check that the ball bearing [#56] is still in place.
7. Install the Rekluse slave cylinder on the bike
using OEM bleeder bolt and input line fitting,
and the provided case O-ring [#53.3].
NOTE: Some models employ a paper gasket as
well as the O-ring to seal the slave cylinder to
the engine. Reuse it if OEM-equipped.

Rekluse Adventure-Bike EXP Page 10
8. Reinstall the modified chain guard.
9. Remove the cap and bladder from the clutch
master cylinder and top off the clutch fluid.
10. Attach the supplied bleed tube to the bleeder
bolt port and loop it into a suitable catch bottle.
11. Pump the clutch lever 3-5 times then hold it
against the bar/grip.
12. Using an 8mm wrench, open the bleed port. Air
and fluid should come out of the bleed tube.
Tighten the bleed port.
13. Slowly release the clutch lever and check the
fluid level in the clutch master cylinder.
14. Repeat the previous 3 bleeding steps until air
no longer comes out of the bleed port. Then,
check that the clutch lever functions properly.
Repeat the bleeding procedure if necessary.
15. Finally, tighten the bleed port and remove the
bleed tube.

Rekluse Adventure-Bike EXP Page 11
INSTALLED GAP SETTING
DEFINITION: “Installed Gap” is the separation in
the clutch pack created by the adjustment of the
Adjuster Screw in the Slave Cylinder. This gap is
what allows the clutch to spin freely until the
desired RPM is reached for engagement; it must be
set correctly for optimal performance.
NOTICE
Failure to check and verify Free Play Gain can
cause failure or damage to this product.
Setting the correct gap is critical for clutch
performance.
1. Using the long end of a 4mm Allen key, turn the
adjuster screw clockwise until it stops under
moderate pressure. You are trying to feel for
the point at which the throwout will start to lift
the pressure plate. This is the “starting point”.
NOTE: It may take a few tries to find the point
at which the system is bottomed out. You
should feel a distinguishable change in turning
effort at this point.
2. Once you have found the starting point, turn the
adjuster clockwise 1 full turn plus 5 marks
(or “1+5”). This is NOT your final setting, but
it is a good reference point for using free play
gain to find the correct setting.
3. Top off the master cylinder with clutch fluid and
reinstall the OEM cap and bladder.
CLUTCH LEVER STICKER
1. Install the provided warning label on the clutch
lever so that the writing is visible to the rider as
shown.

Rekluse Adventure-Bike EXP Page 12
CHECKING
FREE PLAY GAIN
WARNING
Always make sure that the bike is in NEUTRAL before
checking Free Play Gain. Failure to do so may result in
the bike lurching forward, and loss of control and/or
injury may result.
NOTE: Before performing this step,
please visit our website at
rekluse.com/support to view the
TECH VIDEO entitled “How to Check
Free Play Gain”.
“Lever Free Play” is essentially the “slack” in the
clutch lever before it starts actuating the clutch.
Applying a light finger pressure will take up this
slack.
“Free Play Gain” is the increase of lever free play
as the auto-clutch engages. This happens when
the RPM increase from idle through around 5000
RPM. Free Play Gain is caused by the expansion of
the EXP disk which lifts the pressure plate away
from the throwout assembly.
Optimal Free Play Gain yields 1/8” (3mm) of clutch
lever movement, measured at the end of the lever.
This measurement at the lever correlates to
achieving the ideal installed gap.
The following steps explain two ways to check Free
Play Gain. One will use the rubber band that has
been included in the clutch kit and one explains
using your hand, which you will perform before
every ride.
Place the bike in neutral, start the engine and let it
warm up for 2-3 minutes.
NOTICE
Failure to check and verify Free Play Gain can cause
failure or damage to this product.Setting the correct
gap is critical for clutch performance.
Verify that the bike is in NEUTRAL before checking
Free Play Gain. Failure to do so may result in the
bike lurching forward, and loss of control and/or
injury may result.
A Rekluse auto-clutch can make your motorcycle
appear to be in neutral when in gear, even when the
engine is running and clutch lever released.
Motorcycles equipped with a Rekluse auto-clutch
can move suddenly and unexpectedly and cause
riders to lose control.
To avoid death, serious injury, and/or property
damage, always sit on the motorcycle to start it.
Rubber Band Method:
It is recommended that you use this method first
to find your Free Play Gain so you can see what
it is. Then, check it by hand as well so that you
can effectively and comfortably check free play
gain every time you ride.
Wrap the included rubber band around the outer
end of the handlebar grip and attach it to the ball
end of the clutch lever.

Rekluse Adventure-Bike EXP Page 13
With the bike at idle in neutral, quickly blip (rev)
the engine to at least 5,000 RPM and let it
return to idle. The clutch lever should move
in about 1/8” (3mm) toward the handlebar as
you rev the engine.
Note: If you are not getting the correct lever
movement, see the “Free Play Gain
Troubleshooting Guide” on the next page.
Hand Method:
Free play gain should also be checked using
your hand, as you will check it by hand before
every ride. With the bike at idle, apply enough
pressure to the lever to take up the initial
freeplay (slack) shown in the photos on the
previous page. While continuing to apply light
pressure, rev the engine to at least 5,000 RPM.
The clutch lever should move in 1/8” (3mm)
under your finger pressure as you rev the
engine and the auto-clutch engages.
FREE PLAY GAIN
TROUBLESHOOTING
Each adjustment should be done in small
increments - one tick mark at a time. After each
adjustment, repeat the rev-cycle until optimal free
play gain is achieved.
Symptom:
- Clutch lever moves in too far (too much free
play gain)
- Clutch has excessive drag
- It is difficult to fully override the clutch with
the lever
Answer: Installed Gap is too small
Solution: Turn the Adjuster Screw inwardly
(clockwise) to increase the Installed Gap.
Symptom:
- Clutch lever does not move enough or does
not move at all (too little free play gain)
- Clutch is slipping
Answer: Installed Gap is too large
Solution: Turn the Adjuster Screw outwardly
(counter-clockwise) to reduce the Installed Gap. It
may be helpful to re-find the starting point.

Rekluse Adventure-Bike EXP Page 14
BREAK –IN
Follow these procedures for a new installation and
any time new friction disks or EXP bases or wedges
are installed.
1. Rev cycles: Warm up the bike for 2-3 minutes.
With the bike in neutral and your hand off of the
clutch lever, rev the engine 10 times, being sure
to let it return to idle between each rev cycle.
2. With the engine running, pull in the clutch lever
and click the bike into gear. Slowly release the
clutch lever. The bike should stay in place,
perhaps with a slight amount of forward creep.
3. Now that the bike is idling in first gear, slowly
apply throttle to begin moving. To break in the
clutch components, perform the following roll-on
starts in 1st and 2nd gear without using the
clutch lever: In 1st gear, accelerate moderately
to approximately 5,000 RPMs and come to a
stop—repeat this 5 times. Next, starting in 2nd
gear, accelerate moderately to approximately
5,000 RPMs then come to a stop—repeat this 5
times.
4. Now that the EXP is broken-in and the clutch is
warm, re-check free play gain at your clutch
lever and adjust if necessary. Your clutch pack
will expand with heat, so final adjustments
should be made when the bike is warm. Now
you are ready to ride!
WARNING: DO NOT RIDE WITHOUT
SUFFICIENT FREE PLAY GAIN!
Checking free play gain is easy and takes less than
a minute to perform. For optimum performance
and longevity, check free play gain when the bike is
warm at the start of every ride.
CLUTCH NOISE & DRAG
Although it is harmless, some bike models may
have “squeal” or “chatter” coming from the clutch at
low RPM as it engages. Clutch squeal is caused by
the clutch components vibrating as the clutch
engages and can become more audible as the
clutch gets hot. For bike models that tend to have
clutch squeal or chatter here are some
recommendations to reduce or eliminate it:
- Oil:
Rekluse recommends that you have fresh,
clean JASO-MA rated oil for best clutch
performance. Dirty or old oil can make the
clutch more likely to squeal or chatter. Some
heavy-duty oil stabilizers or other additives
have been known to reduce noise and make
shifting smoother. Be sure that any additives
you might use are approved for use in wet-
clutch motorcycles.
- Installed Gap:
Adjusting the Installed Gap will NOT affect
clutch squeal or chatter
- Drag:
Now that your clutch has more friction surfaces,
the clutch may drag more than stock and
possibly may drag more noticeably when cold.
If this occurs, warm the bike up by allowing it to
idle for a few minutes before riding. If drag
persists and your installed gap is correct,
inspect your clutch plates.
- EXP Spring Setting:
If your oil is warm and the clutch plates
configuration is in spec, yet your bike wants to
drag, pulse, or chatter during idle or takeoff, it
may be necessary to tune the EXP springs for a
higher-RPM clutch engagement. See the “EXP
Tuning Options” section on the following pages
for instructions.

Rekluse Adventure-Bike EXP Page 15
LEVER SAFETY STRAPS
This kit includes 2 Velcro-type straps to be used to secure both the clutch and front brake levers when the bike is parked.
These are intended to reduce the risk of injury or damage that may occur from the bike rolling or launching unexpectedly
with or without a rider on it. Use the straps to pull both levers as tight to the bar as possible as shown in the photos every
time you park or leave the motorcycle. Refer to the Safety Information document for more information.
Brake Lever Strap: for use as a parking brake.
Clutch Lever Strap: to prevent unwanted launching.
Rekluse auto-clutch-equipped motorcycles may roll back or move suddenly and unexpectedly and cause riders
to lose control.
An auto-clutch-equipped motorcycle will move in gear with the engine off because the clutch is only engaged
when engine RPM is greater than the engagement threshold of the auto-clutch. Engine compression will not
prevent motorcycles from moving while in gear.
A Rekluse auto-clutch can make your motorcycle appear to be in neutral when in gear, even when the engine is
running and clutch lever released.
To avoid death, serious injury, and/or property damage:
Use the included brake lever strap to secure the front brake lever to the handlebar as a parking brake.
Use the included clutch lever strap when the motorcycle is parked to secure the clutch lever to the handle bar,
thereby completely disengaging the clutch.

Rekluse Adventure-Bike EXP Page 16
EXP TUNING OPTIONS
Included are spring options to tune the engagement RPM of the EXP friction disk. The EXP friction disk comes
set with the recommended “Medium” setting from Rekluse. See the following chart for settings.
KTM 690
ENGAGEMENT SETTING
SPRING CONFIGURATION
Low
6 3 Red & 3 Blue Springs
Medium
3 6 Blue Springs
High
6 3 Blue & 3 Gold Springs
Adjusting the engine idle speed to match your engagement setting is important and greatly affects the overall
feel of how the EXP disk engages. To prevent freewheeling and maximize engine braking, set the idle so there
is a slight amount of drag while the bike is idling in gear and warmed up. The idle should not be so high as to
move the bike forward in gear with the throttle closed. However, with a small opening of the throttle the bike
should move forward.
It is NOT necessary to disassemble the EXP halves to change springs! To change springs, remove 3 of the
¼-turn pins from one side of the EXP, replace springs, and re-install ¼-turn pins. Next, flip the EXP disk over
and repeat on the other side if necessary. To maintain even pressure when using two different color spring
sets, install one color set of 3 on one side of the EXP and the remaining color set of 3 on the other side.
CAUTION: If you disassemble the EXP, bearing pads may fall out or be stuck to the ramp surfaces of the EXP
bases. Take care to ensure all pads are correctly placed into wedge pockets using gentle pressure to avoid
damage to the pad surfaces before reassembling the EXP. Properly seated pads will be secured in place once
the EXP is reassembled. Operating the clutch without the pads in place will cause part damage or failure.

Rekluse Adventure-Bike EXP Page 17
MAINTENANCE
- Maintain adequate free play gain, checking before every ride and adjusting if necessary.
- Keep up with regular oil changes as per the bike manufacturer’s recommendations. Clutch function and
longevity depends on oil quality.
- Inspect all of your clutch parts every 40 hours for signs of wear or excessive heat, and replace
components as necessary.
oRekluse TorqDrive friction disk minimum allowable thickness at friction pads = 0.068” (1.73mm)
- Excessive heat or clutch slip can cause premature clutch failure. Once extreme temperatures are reached,
irreversible damage will occur. Insect your clutch plates; if the friction disks look burnt or glazed, or the
drive plates are warped, it is best to replace the entire clutch pack.
- Repeat the break-in procedure anytime the friction disks or EXP bases or wedges are replaced. Always
soak friction disks or EXP bases in oil for at least 5 minutes before installing.
BUMP-STARTING INSTRUCTIONS
If your bike needs to be bump-started due to a dead battery or any other reason, follow the steps below to
quickly bump-start your bike.
1. Use a 4mm Allen key to turn the slave cylinder adjustment screw counter-clockwise until the O-ring is
just starting to show, thus collapsing the installed gap in the clutch pack.
2. Bump-start the bike. The clutch will function like a manual clutch at this point.
3. Once the bike is started, reset the Installed Gap by readjusting the slave cylinder adjuster for optimal
free play gain as per the prior instructions.
Other manuals for EXP
2
Table of contents
Popular Engine manuals by other brands

Nice
Nice ERA XL Instructions and warnings for installation and use

Yanmar
Yanmar 3JH4E Operation manual

UNITED POWER EQUIPMENT
UNITED POWER EQUIPMENT UP152 Operation manual

Siemens
Siemens SIMOTICS 1LA operating instructions

Marc Motor
Marc Motor ROS Series Technical handbook

Briggs & Stratton
Briggs & Stratton 405777 Series manual

Mitsubishi
Mitsubishi SL-Series Operation manual

O.S. engine
O.S. engine MAX-21TM instruction manual

Ebmpapst
Ebmpapst M4Q045-DA13-04 operating instructions

Zenoah
Zenoah G4K-D Operation and maintenance guide

Torqeedo
Torqeedo Deep Blue Translation of the original operating instructions

ULPOWER
ULPOWER UL390i installation manual