Transportation and Storage
transportation.
the original packaging for storage.
6. Store the outboard in a dry, well ventilated place without direct sun exposure.
Emergency Situations
1. Stop the outboard immediately.
2. Check the propeller and other components before you start the motor again.
before re-operation.
could damage the RemigoOne. Remigo will not be responsible for any damages caused by using
unlicenced charging devices.
1 agree to these notes and instructions;
2 agree not to use this product for purposes that infringe upon or contravene laws and
regulations;
3 agree to be responsible for your own conduct while operating this product.
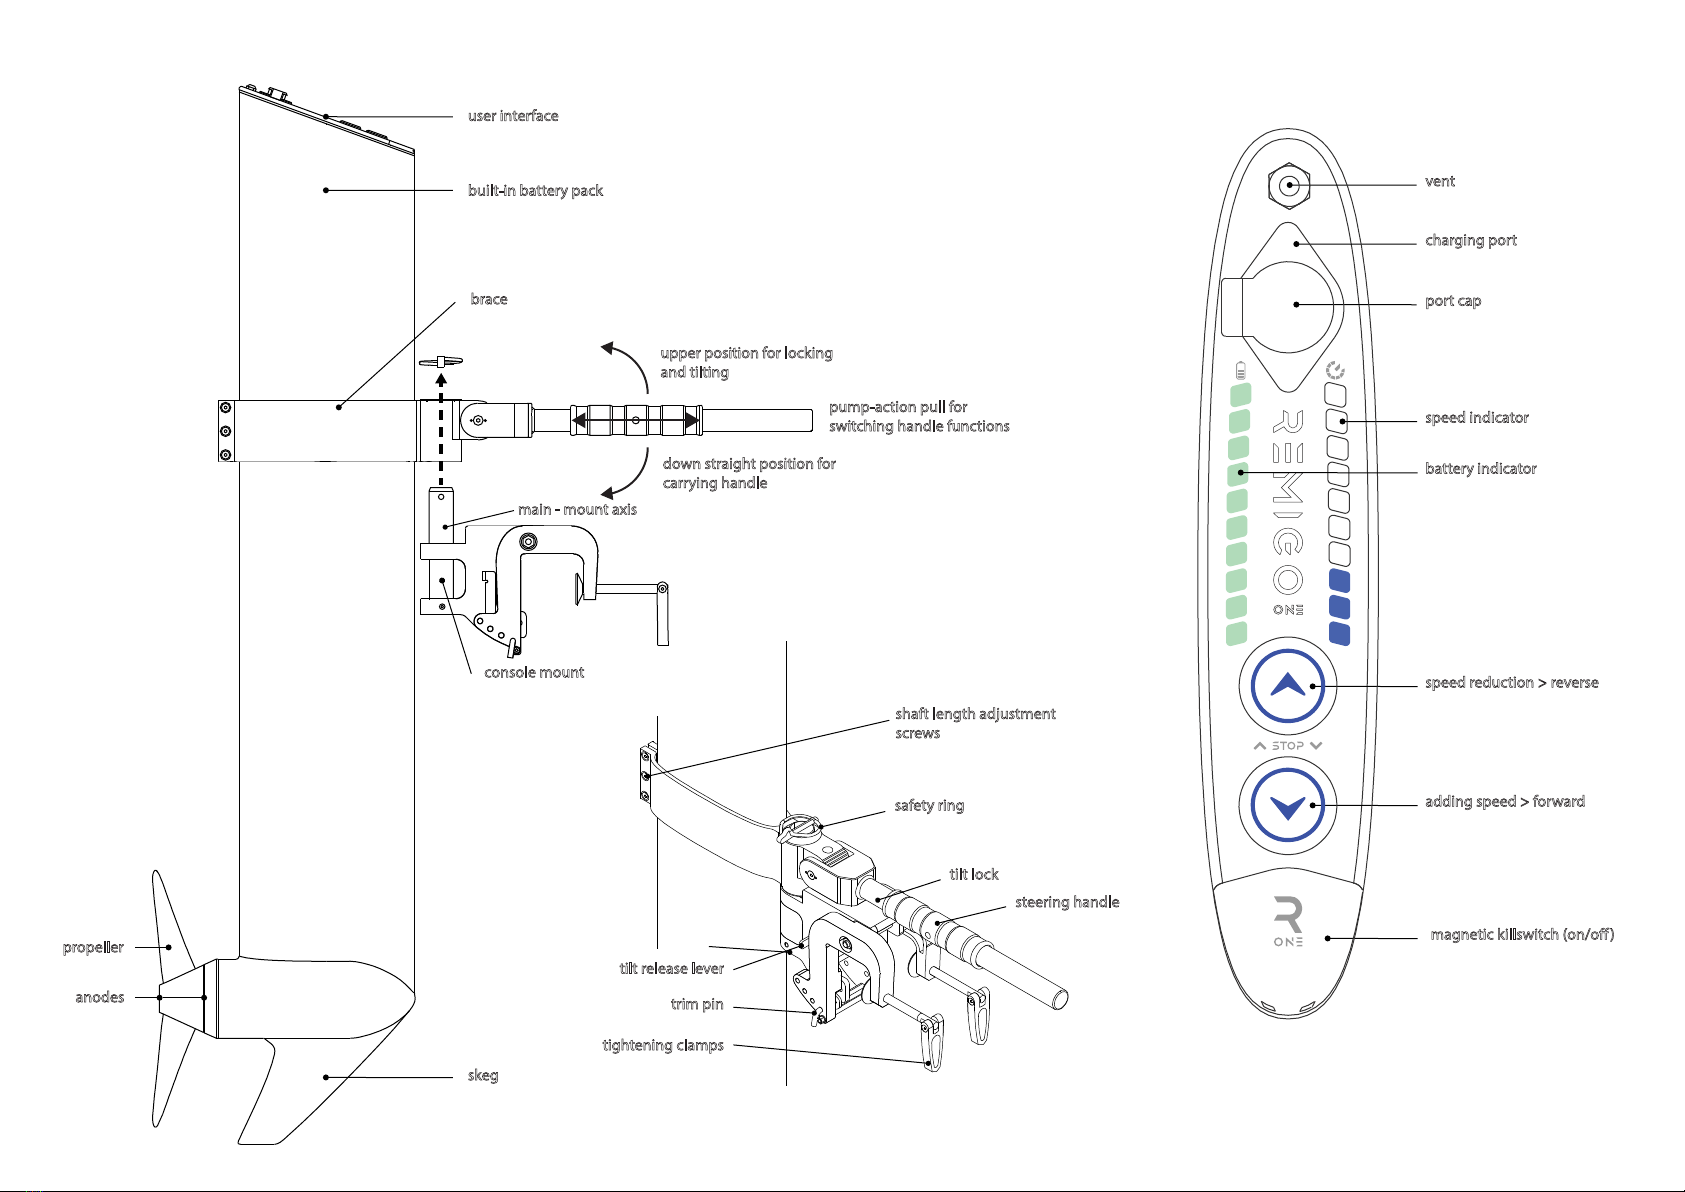
• Only allow adults who have thorough understanding of this manual to operate this
product.
• Always have paddles on board for additional safety.
and tilting.
of your boat, do not overload the boat or the outboard.
• Only run the outboard while the propeller is under water.
• Stop the outboard immediately if someone falls overboard.
• Tilt up the outboard above water for a longer period of not using it.
• Wash the outboard with fresh water before storing it for a longer period.
• Do not start the outboard in shallow or unknown water conditions. Only use the
outboard in deep water area.
• If an error occurs and the outboard malfunctions, please remove killswitch and wait
automatically.
used in low power.
• To keep electric connector in good condition, please spray the connector once a year
with contact spray.
other medical implants.
instruments, keep it away from these instruments.
other magnetic media.
7
EU-Izjava o skladnos�
EU-Konformitätserklärung/EU declaraon of conformity
Tip:/Typ:/Type:
Seite:/Page:/Seiten:/Pages:
Produkt:/Product:
Elektrischer Außenbordmotor/Electric outboard motor
yy* Letnica names�tve CE oznake na aparat (zadnja dva znaka)./Jahr der Anbringung der CE Kennzeichnung am Apparat (letzte zwei
Zeichen)./The year of axing of CE mark on the appliance (last two digits).
in standardi:
Mit voller Verantwortung erklären wir, dass die angeführten Produkte mit folgenden Vorschrien und Standards konform sind:
We declare with our full responsibility that the abovemenned appliances are in conformity with the following regulans and standards:
1. Nacionalna zakonodaja:
Naonale Gesetzgebung:/Naonal legislaton: mej (Uradni list RS, št. 75/08, 66/10, 17/11 – ZTZPUS-1 in 74/11)
Oznaka evropske direk�ve:
Nummer der Europäischen Richtlinie:
European direcve number:
Standard:
Direk�va 2006/42/ES Evropskega parlamenta in Sveta
RL 2006/42/EC
Direcve 2006/42/EC
EN ISO 12100:2010
2. Nacionalna zakonodaja:
Naonale Gesetzgebung:/Naonal legislaton: Uradni list RS št 132/2006)
Oznaka evropske direk�ve:
Nummer der Europäischen Richtlinie:
European direcve number:
Standard:
Direk�va 2014/30/EU Evropskega parlamenta in Sveta
RL 2014/30/EU
Direcve 2014/30/EU
EN 61000-6-2:2019
EN 61000-6-3:2007 + A1:2011
3. Nacionalna zakonodaja:
Naonale Gesetzgebung:/Naonal legislaton:
Oznaka evropske direk�ve:
Nummer der Europäischen Richtlinie:
European direcve number:
Standard:
opremi (Uradni list RS št 102/2012)
Direk�va 2011/65/EU Evropskega parlamenta in Sveta
RL 2011/65/EU
Direcve 2011/65/EU
Aussteller: /Issuer:
SI-1210 Šentvid Ljubljana
Slovenia, EU
Mesto, datum:/Ort, Datum:/Place, Date:
Pravno odgovorni:/Rechtsverbindliche:/Legally binding person:
Programmdirektor/Plant director:
Ime:/Name:/name:
Marko Vrtovec
Podpis:/Unterschri:/signature:
Ta izjava o skladnosje izdana na lastno odgovornost proizvajalca. Izjava potrjuje skladnost z navedenimi predpisi, vendar ne zagotavlja
.
Die alleinige Verantwortung für dieAusstellung dieser Konformitätserklärung trägt der Hersteller. Diese Erklärung bestägt
Konformität mit den angeführten Vorschrien, garant jedoch keine Zusicherung von Eigenschaen des Produkts. Die
Sicherheitshinweise der mitgelieferten Produktdokumentan sind zu beachten.
This declaraon of conformity is issued under the sole responsibility of the manufacturer. This declaran conms the conformity
with the menned regulans, yet it doesnot guarantee other characteriscs of the product. The safety direcons which are delivered
with the enclosed product documentaon should be observed.